1. Introduction
Thank you for purchasing the VEVOR MD-092P Emergency Weather Radio. This device is designed to provide essential information and power in emergency situations, featuring multiple power sources, NOAA weather alerts, an SOS alarm, and a built-in flashlight. Please read this manual thoroughly before use to ensure proper operation and to maximize the product's lifespan.
2. Product Overview
2.1 Package Contents
- 1 x VEVOR MD-092P Emergency Weather Radio
- 1 x USB Charging Cable
- 1 x User Manual
2.2 Device Components
Familiarize yourself with the various parts of your emergency radio:

Image: Overview of the VEVOR MD-092P Emergency Weather Radio, highlighting its various ports and features such as the Micro USB input, USB output for power bank function, headphone jack, LED flashlight, SOS alarm button, LCD display, key lock, radio tuner, and integrated bottle opener.
- Antenna: Extendable for improved radio reception.
- LED Flashlight: Provides illumination.
- LCD Display: Shows frequency, battery level, and other indicators.
- Control Buttons: Power, Mode, Tuning, Volume, SOS.
- Hand Crank: For manual power generation.
- Solar Panel: For solar charging.
- USB Output (DC 5V OUT): For charging external devices.
- Micro USB Input (DC 5V IN): For charging the radio via USB cable.
- 3.5mm Headphone Jack: For private listening.
- SOS Button: Activates emergency alarm and flashlight.
- Bottle Opener: Integrated utility feature.
- AAA Battery Compartment: For optional AAA battery power (batteries not included).
3. Setup
3.1 Initial Charge
Before first use, fully charge the internal 2000mAh lithium battery. Connect the supplied USB cable to the radio's Micro USB Input and to a USB power adapter (not included) or a computer USB port. The charging indicator on the LCD display will show charging status. A full charge typically takes several hours.
3.2 Optional AAA Batteries
For an additional power source, you can insert 3 AAA batteries (not included) into the battery compartment. Ensure correct polarity. The radio will prioritize the internal lithium battery if charged, but AAA batteries provide a backup.
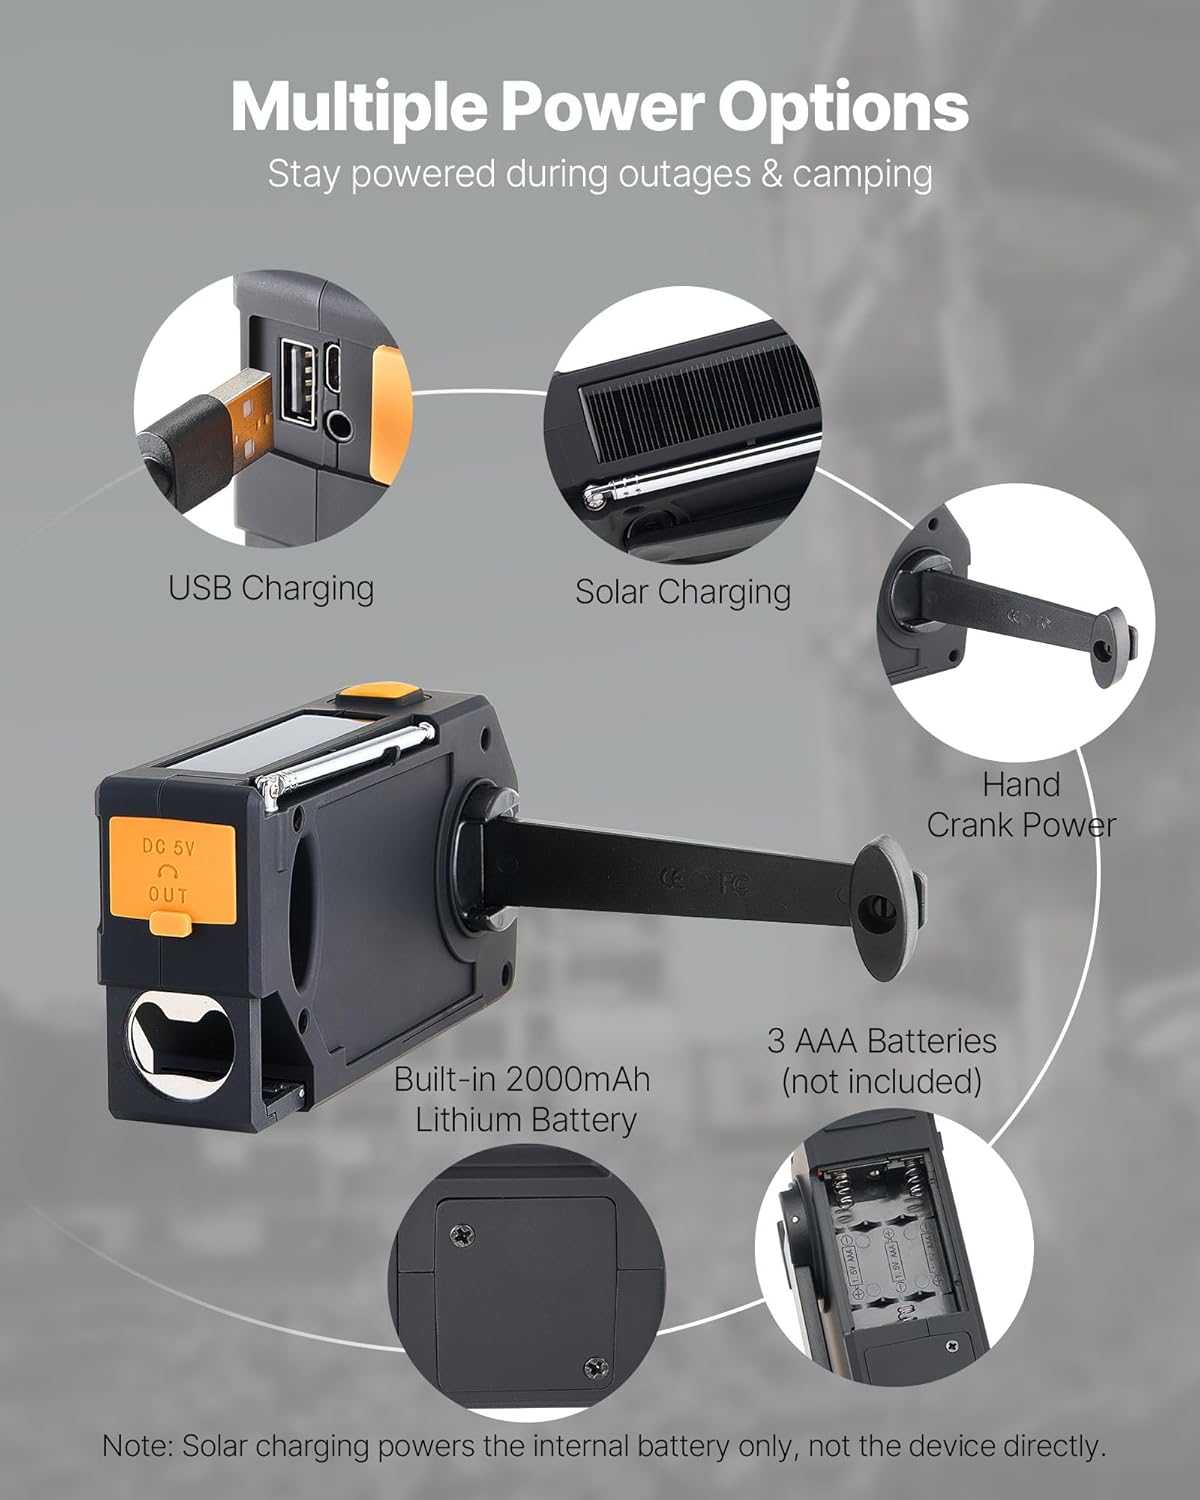
Image: Illustration of the various power input methods for the radio, including USB charging, solar panel, hand crank, the internal 2000mAh battery, and the compartment for 3 AAA batteries. Note that solar charging primarily charges the internal battery.
4. Operating Instructions
4.1 Power On/Off
Press and hold the Power button to turn the radio on or off.
4.2 Radio Tuning (FM/AM/WB)
- Press the BAND button to cycle through FM, AM, and WB (Weather Band) modes.
- Extend the antenna for optimal reception, especially for FM and WB.
- Use the Tuning Up (+) or Tuning Down (-) buttons to manually tune to a station.
- For automatic scanning, press and hold the Tuning Up or Tuning Down button. The radio will stop at the next strong signal.
4.3 Volume Control
Press the Volume Up (+) or Volume Down (-) buttons to adjust the audio level.
4.4 NOAA Weather Alerts
The radio supports 7 NOAA Weather Band (WB) channels. In WB mode, the radio can automatically tune to the strongest NOAA channel and provide alerts.
- When a weather alert is received, the radio will display "ALERT", flash a yellow light, and sound an alarm.
- The radio automatically locks onto the strongest NOAA channel for continuous monitoring.

Image: Visual representation of the 7 NOAA weather alert channels and the radio's ability to automatically detect and tune to the strongest signal for timely weather warnings.
4.5 SOS Alarm and Flashlight
In an emergency, the SOS function can be activated:
- Press and hold the SOS button to activate a loud alarm (≥78dB) and a flashing LED light.
- This function can last up to 3 hours on a full charge.
- The SOS alarm works even when headphones are connected, ensuring visibility and audibility for rescue.

Image: Depiction of the SOS alarm feature, showing the dedicated SOS button and its function to trigger a loud alarm and flashing light for emergency signaling.
To use the flashlight independently:
- Press the Flashlight button (usually indicated by a light bulb icon) to turn the LED flashlight on or off.
- The 1W LED light can operate for up to 8 hours on a full charge.
4.6 Power Bank Function
The radio can act as a power bank to charge small electronic devices:
- Connect your device's USB charging cable to the radio's USB Output (DC 5V OUT) port.
- Ensure the radio has sufficient battery charge to power your external device.
5. Charging Methods
The VEVOR MD-092P offers multiple ways to charge its internal 2000mAh battery:
- USB Charging: Connect the radio to a USB power source using the provided USB cable. This is the primary and fastest charging method.
- Solar Charging: Place the radio with the solar panel facing direct sunlight. This method is ideal for maintaining charge or slow charging in outdoor environments. Note: Solar charging primarily charges the internal battery and is not intended for rapid charging or powering the device directly for extended periods.
- Hand Crank Power: Rotate the hand crank clockwise or counter-clockwise at a steady pace (approximately 130-150 RPM) to generate power. Cranking for 1 minute can provide several minutes of radio operation or flashlight use.
- AAA Batteries: While not charging the internal battery, 3 AAA batteries (not included) can power the radio as an alternative source.
6. Maintenance
- Keep the radio clean by wiping it with a soft, damp cloth. Do not use harsh chemicals or abrasive cleaners.
- Store the radio in a cool, dry place when not in use. Avoid extreme temperatures and direct sunlight for prolonged periods.
- If storing for an extended time, ensure the internal battery is partially charged (around 50%) and recharge it every 3-6 months to maintain battery health.
- The radio has an IPX3 waterproof rating, meaning it is protected against spraying water. Do not immerse the radio in water.
7. Troubleshooting
| Problem | Possible Cause | Solution |
|---|---|---|
| Radio does not turn on. | Low battery or no power. | Charge the internal battery via USB, solar, or hand crank. Check AAA batteries if installed. |
| Poor radio reception. | Antenna not extended, weak signal, or interference. | Fully extend the antenna. Try repositioning the radio. Scan for stronger signals. |
| Flashlight not working. | Low battery. | Charge the internal battery. |
| Cannot charge external devices. | Radio battery is too low or device is incompatible. | Ensure the radio's internal battery is sufficiently charged. Some high-power devices may not be fully supported. |
| SOS alarm not loud enough. | Obstruction or environmental noise. | Ensure the speaker is not covered. The alarm is designed to be loud (≥78dB) but may be affected by surroundings. |
8. Specifications
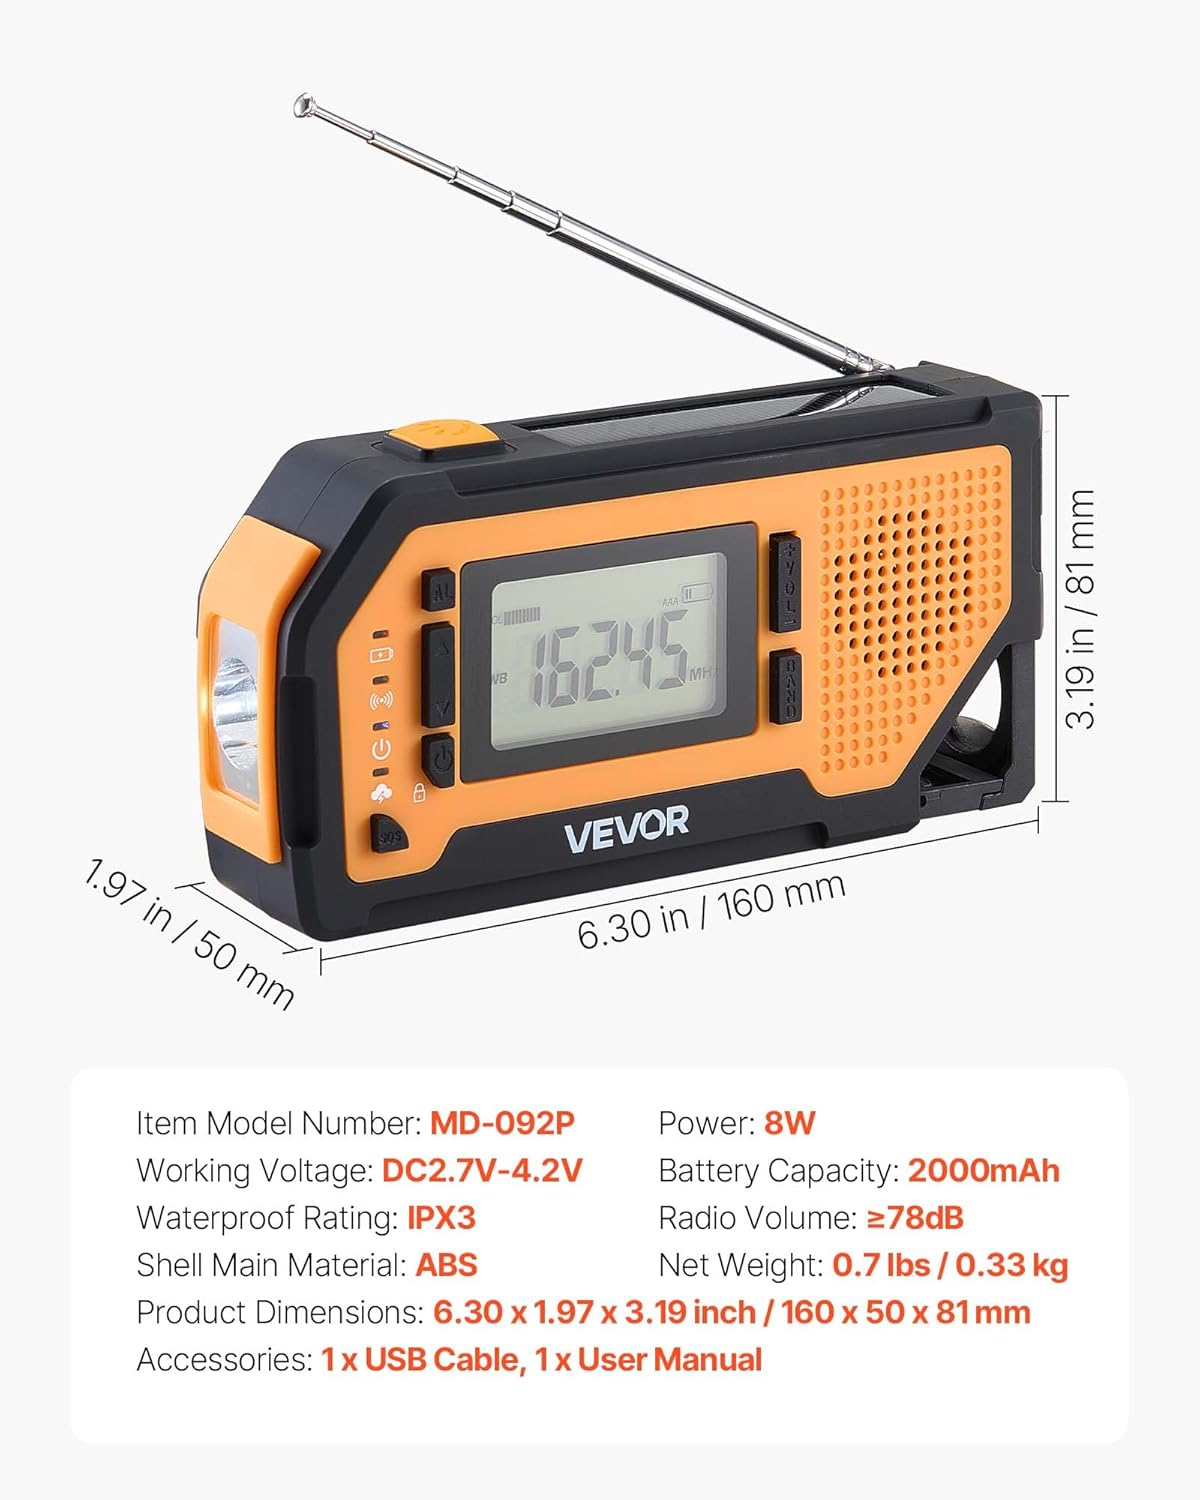
Image: Detailed view of the VEVOR MD-092P radio with its physical dimensions and key technical specifications, including model number, working voltage, power, battery capacity, waterproof rating, radio volume, shell material, net weight, and included accessories.
| Model Number | MD-092P |
| Product Dimensions | 6.3 x 1.97 x 3.19 inches (160 x 50 x 81 mm) |
| Item Weight | 11.7 ounces (0.33 kg) |
| Battery Capacity | 2000mAh (Built-in Nonstandard Battery) |
| Power Source | Battery Powered (USB, Solar, Hand Crank, AAA) |
| Working Voltage | DC2.7V-4.2V |
| Power Output | 8W |
| Radio Bands Supported | FM, AM, WB (7-Band NOAA) |
| Waterproof Rating | IPX3 |
| Shell Main Material | ABS |
| Radio Volume | ≥78dB (SOS Alarm) |
| Connectivity Technology | USB |
| Included Components | Emergency Weather Radio, USB Cable, Owner's Manual |
9. Warranty and Support
VEVOR products are designed for durability and performance. For warranty information or technical support, please refer to the official VEVOR website or contact their customer service directly. Keep your purchase receipt as proof of purchase for warranty claims.
Note: Specific warranty terms may vary by region and product. Please consult the VEVOR official channels for the most accurate and up-to-date information.


