
Jonsbo D32 PRO
JONSBO D32 PRO Micro-ATX PC Case Instruction Manual
Model: D32 PRO | Brand: Jonsbo
1. Product Overview
The JONSBO D32 PRO is a compact Micro-ATX PC case designed for high compatibility and optimized performance. It features a 24-liter volume and offers flexible A/B modes to support both standard and back-connect BTF motherboards, providing versatile solutions for PC builders.
Key features include extensive hardware compatibility, an optimized visual design with tempered side glass, and an installation-friendly structure with a detachable PCI-E position for large graphics cards.

Figure 1.1: JONSBO D32 PRO Micro-ATX PC Case with internal components.
Video 1.1: Overview of the JONSBO D32 PRO Micro-ATX PC Case, highlighting its features and design flexibility.
2. Key Features and Design
2.1 A/B Mode Motherboard Compatibility
The D32 PRO offers a unique A/B mode switching mechanism for motherboard installation, allowing compatibility with both standard Micro-ATX and back-connect Micro-ATX (BTF) motherboards. This design optimizes space and cable management based on your motherboard choice.
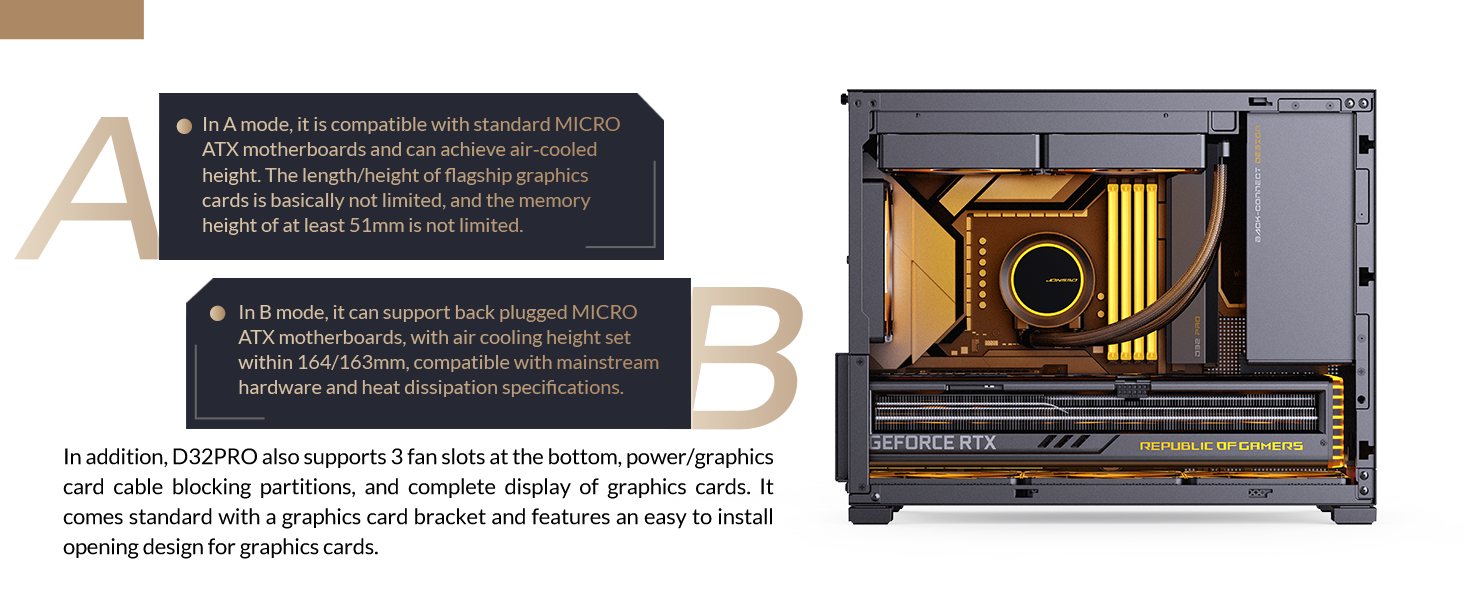
Figure 2.1: A/B Mode explanation for motherboard compatibility.
- A Mode (Factory Default): Compatible with ordinary Micro-ATX motherboards, offering larger motherboard compartment space for better airflow and cable management. Supports CPU air coolers up to 170mm (Intel) or 169mm (AMD).
- B Mode: Designed for back-connect Micro-ATX motherboards, providing increased back cable compartment space. This mode requires manual switching before hardware assembly. Supports CPU air coolers up to 164mm (Intel) or 163mm (AMD).
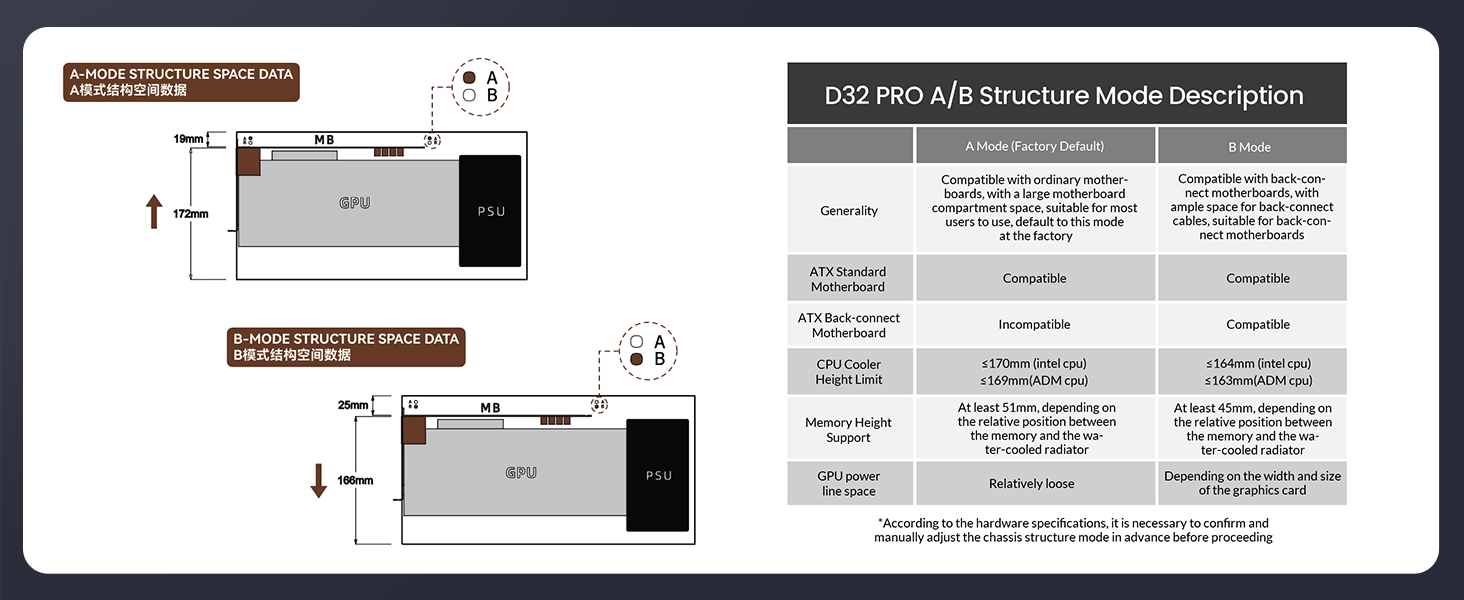
Figure 2.2: A/B Structure Mode Description with technical specifications.
2.2 Optimized Visual Design
The case features tempered side glass to showcase internal components. An adjustable motherboard cable management cover helps conceal complex wiring, contributing to a clean and neat internal appearance.
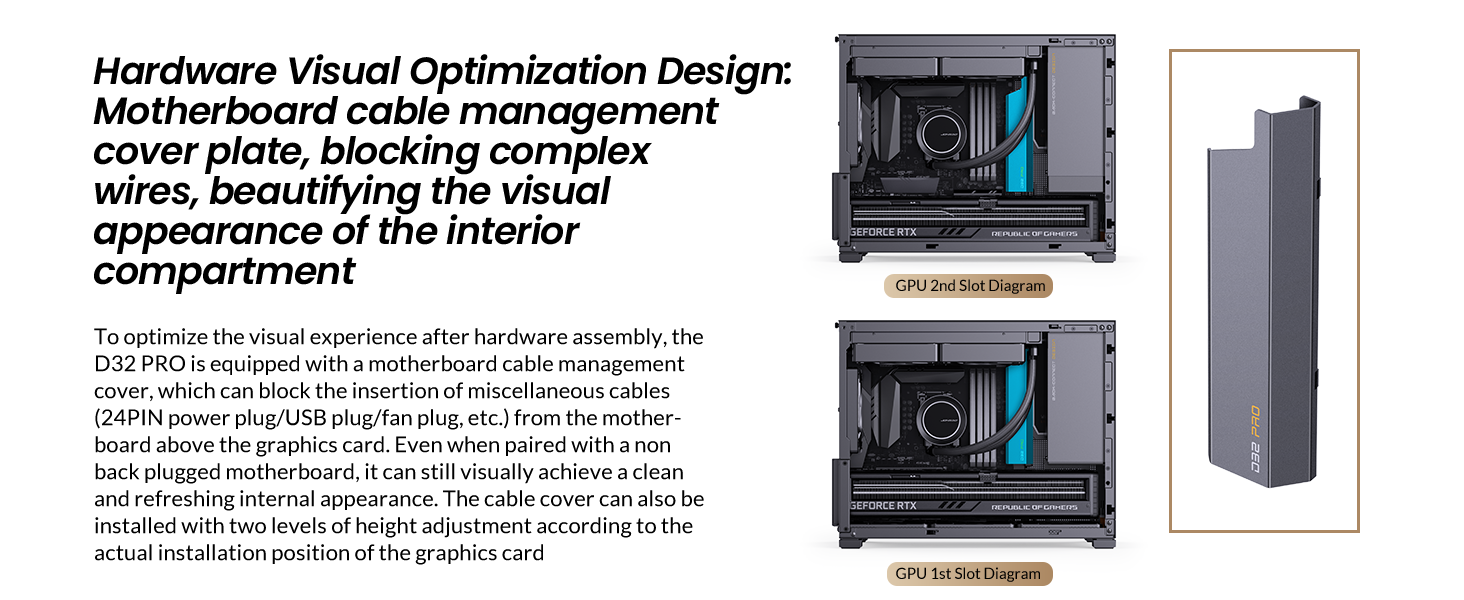
Figure 2.3: Motherboard cable management cover plate for visual optimization.
2.3 Installation Experience
A detachable PCI-E position with an unobstructed opening design facilitates easy insertion of large graphics cards, simplifying the build process. The standard configuration includes a simple and adjustable graphics card support bracket to prevent sagging of long GPUs.
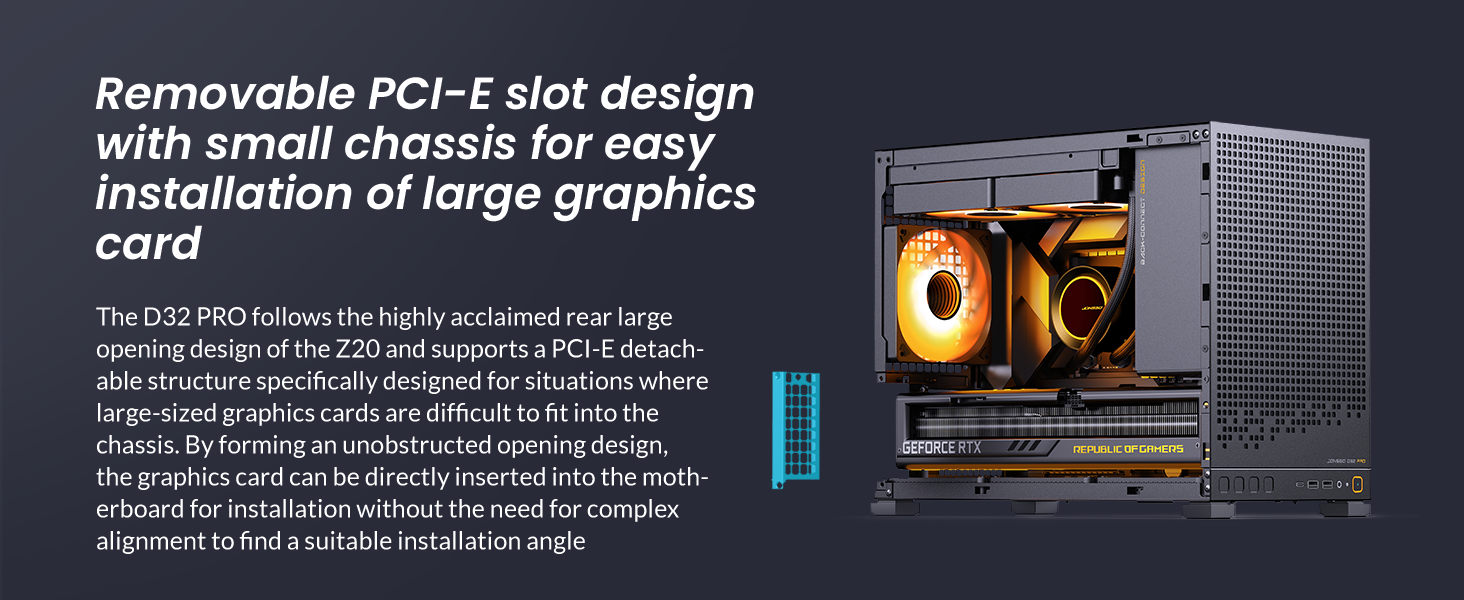
Figure 2.4: Removable PCI-E slot design for large graphics cards.
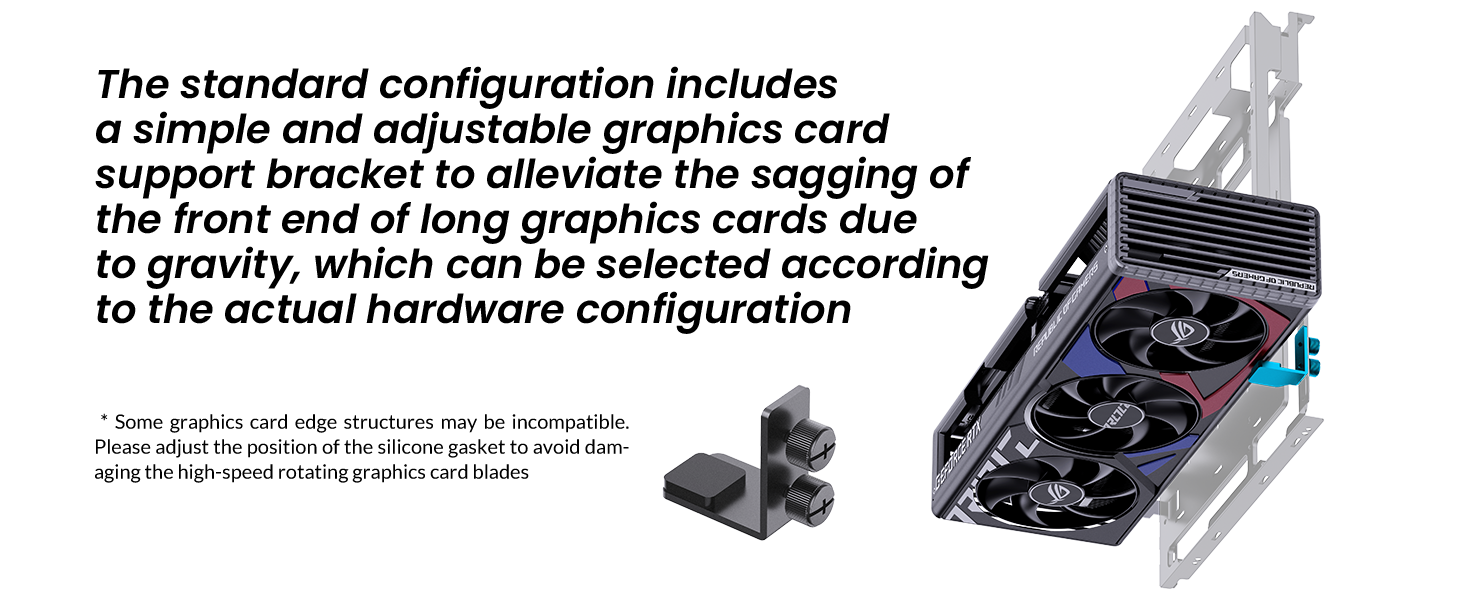
Figure 2.5: Adjustable graphics card support bracket.
2.4 Cooling and Storage
The D32 PRO supports various cooling configurations, including top-mounted radiators up to 240mm and multiple fans for optimal heat dissipation. It also offers flexible storage options for 2.5" SSDs and 3.5" HDDs.

Figure 2.6: Fan installation options for the JONSBO D32 PRO.
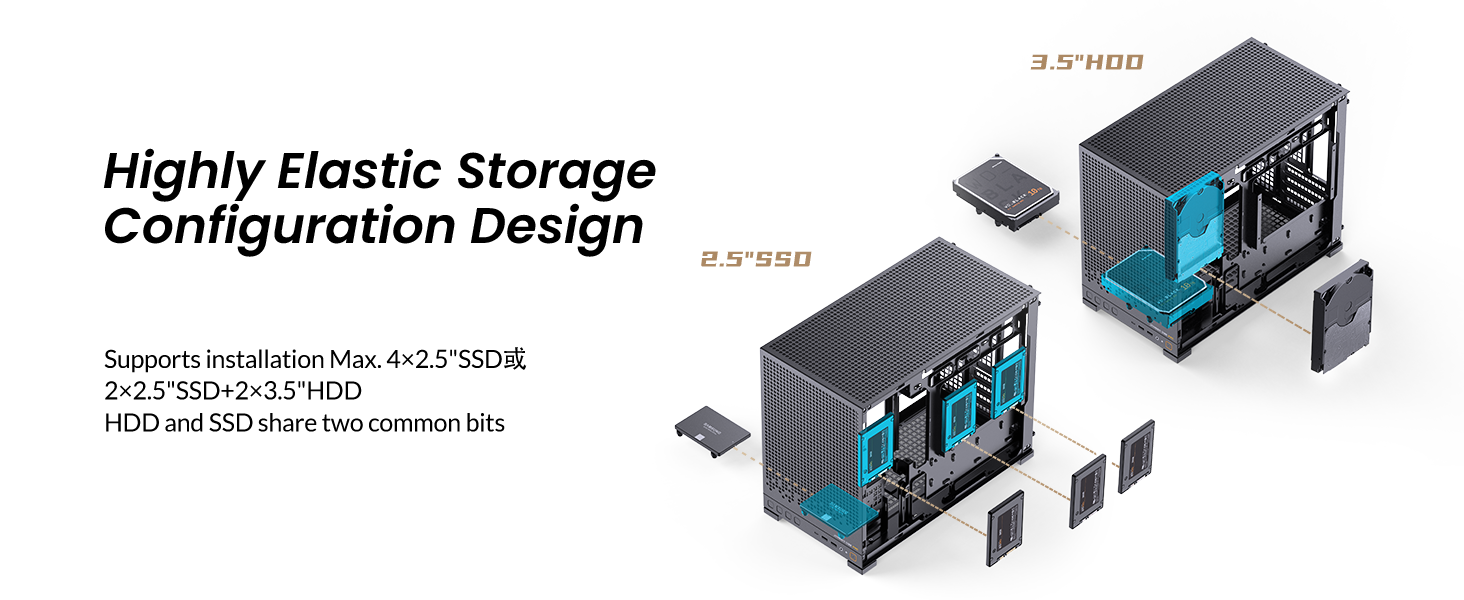
Figure 2.7: Highly elastic storage configuration design.
3. Setup and Installation
This section provides general guidance for installing components into your JONSBO D32 PRO PC case. Always refer to the specific manuals for your individual components (motherboard, CPU, GPU, PSU, etc.) for detailed instructions.
3.1 Pre-Installation
- Unpack the case and accessories.
- Remove the side panels by unscrewing the thumb screws.
- If using a back-connect motherboard, switch the case to B mode as per the instructions in the accessory kit.
3.2 Motherboard Installation
- Install the necessary motherboard standoffs into the case according to your motherboard's form factor (Micro-ATX or Mini-ITX).
- Carefully place your motherboard into the case, aligning it with the standoffs and I/O shield opening.
- Secure the motherboard with the provided screws.
3.3 Power Supply Unit (PSU) Installation
The D32 PRO supports ATX/SFX-L/SFX PSUs up to 200mm in length (excluding 16A plugs). The power supply is mounted at the front of the case.
- Attach the SFX power adapter bracket to your SFX PSU if applicable.
- Route the PSU extension cable through the designated channel.
- Secure the PSU to the front mounting bracket.
- Connect the necessary modular cables to your PSU before securing it fully into the case.
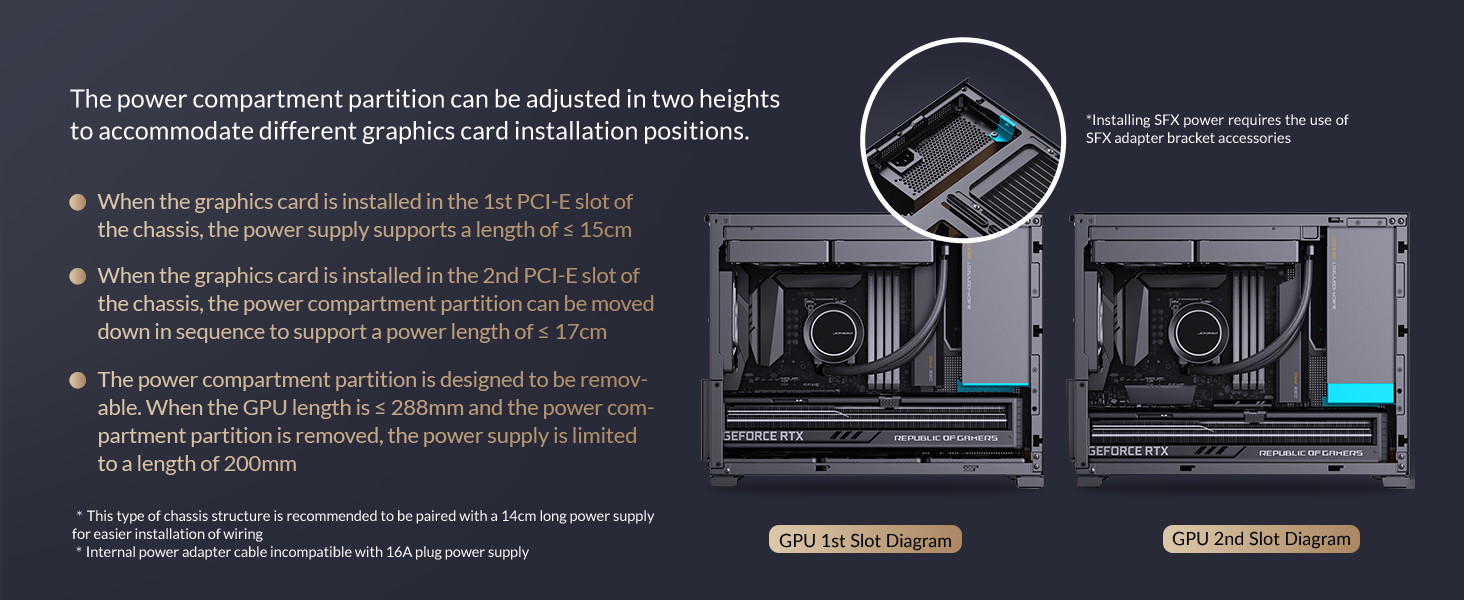
Figure 3.1: Power compartment partition adjustment for PSU and GPU.
3.4 Graphics Card (GPU) Installation
The case supports graphics cards up to 365mm in length.
- Remove the detachable PCI-E slot cover for easier installation.
- Insert your graphics card into the appropriate PCI-E slot on the motherboard.
- Secure the graphics card with screws and reattach the PCI-E slot cover.
- Install the adjustable graphics card support bracket if needed to prevent sagging.
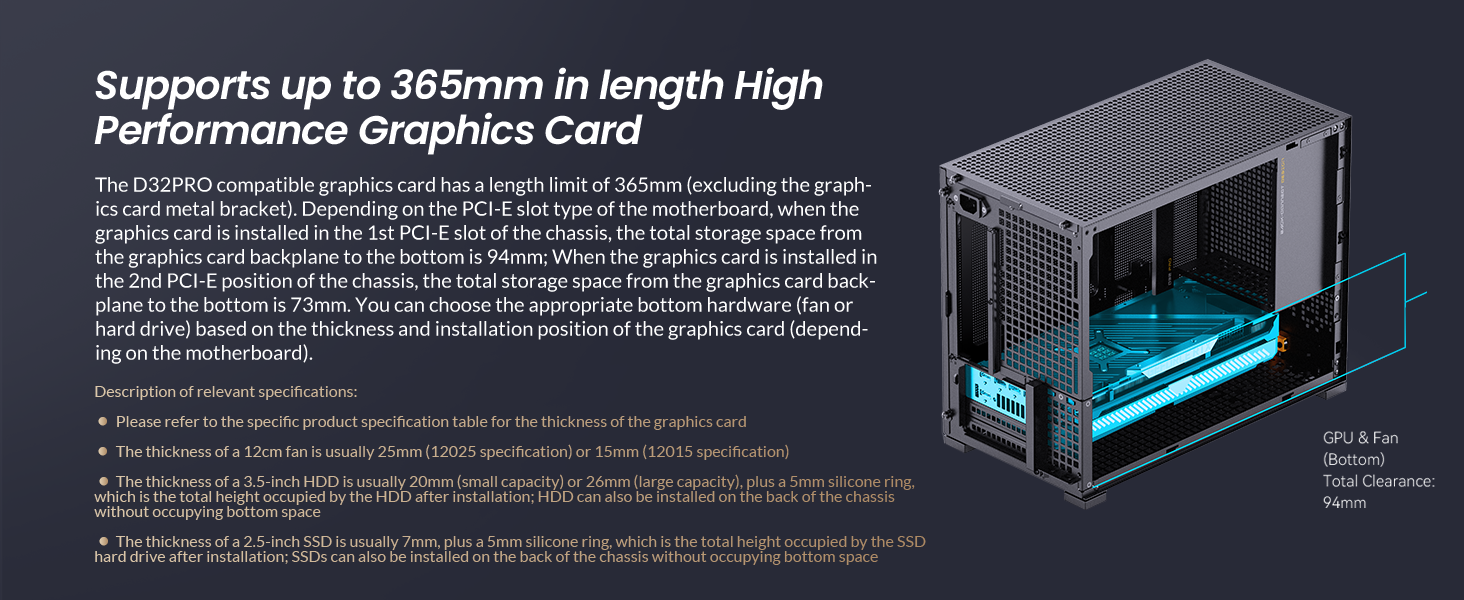
Figure 3.2: Graphics card length compatibility.
3.5 Storage Drive Installation
The D32 PRO supports up to four 2.5" drives or two 3.5" drives (shared with 2.5" mounts), depending on other hardware configurations.
- Locate the designated mounting points for 2.5" SSDs or 3.5" HDDs.
- Secure your drives using the provided screws.
3.6 Fan and Radiator Installation
The case supports various fan and radiator configurations for optimal cooling.
- Top: 2 x 120mm / 2 x 140mm fans or a 240mm radiator.
- Rear: 1 x 120mm fan.
- Bottom: 3 x 120mm / 2 x 140mm fans.
Video 3.1: Installation guide for water-cooling mode, demonstrating radiator and pump setup.
3.7 Cable Management
Utilize the adjustable motherboard cable management cover and integrated cable ties to organize internal wiring, ensuring optimal airflow and a clean aesthetic.
4. Operating Modes
The JONSBO D32 PRO offers two distinct operating modes for motherboard installation, allowing users to optimize the internal layout based on their chosen components.
- A Mode: This is the factory default mode, providing maximum space for traditional Micro-ATX motherboards and larger air coolers.
- B Mode: This mode is specifically designed for back-connect (BTF) Micro-ATX motherboards, which route power and data cables to the rear of the motherboard tray. Switching to B mode involves adjusting the internal chassis structure to create more space behind the motherboard for cable routing. Refer to the accessory kit instructions for details on switching modes.
5. Maintenance
Regular maintenance helps ensure the longevity and optimal performance of your PC case.
- Dust Filters: The case features mesh panels that act as dust filters. Periodically remove and clean these filters to maintain good airflow and prevent dust buildup inside the system.
- Exterior Cleaning: Use a soft, damp cloth to wipe down the exterior surfaces of the case. Avoid abrasive cleaners or solvents that could damage the finish.
- Interior Cleaning: With the system powered off and unplugged, use compressed air to remove dust from internal components and hard-to-reach areas.
6. Troubleshooting
If you encounter issues during or after building your PC, consider the following general troubleshooting steps:
- No Power: Ensure all power cables (PSU to wall, PSU to motherboard, CPU, GPU) are securely connected. Check the PSU switch is in the 'ON' position.
- No Display: Verify that your monitor is connected to the graphics card (not the motherboard's integrated graphics ports, unless you are not using a dedicated GPU). Reseat the graphics card and RAM modules.
- Overheating: Check fan connections and orientation. Ensure dust filters are clean and not obstructing airflow. Verify CPU cooler is properly seated.
- Component Not Detected: Reseat the component (RAM, GPU, storage drive). Check all power and data cables.
- Consult Component Manuals: For specific issues related to your motherboard, CPU, GPU, or other components, always refer to their respective instruction manuals.
7. Specifications

Figure 7.1: Main Specifications of the JONSBO D32 PRO.
| Feature | Specification |
|---|---|
| Model | D32 PRO Mesh |
| Dimensions (L×W×H) | 396mm × 207mm × 314mm (Foot included) |
| Motherboard Support | MINI-ITX / MICRO-ATX Standard / MICRO-ATX (Back-connect, B mode required) |
| GPU Clearance | Max. 365mm |
| PSU Clearance | Max. L200mm (not compatible with 16A plugs) |
| CPU Air Cooler Height Limit (A Mode) | H170mm (Intel CPU) / 169mm (AMD CPU) |
| CPU Air Cooler Height Limit (B Mode) | H164mm (Intel CPU) / 163mm (AMD CPU) |
| Radiator Support (Top) | Up to 240mm |
| Fan Support (Top) | 2 x 120mm / 2 x 140mm |
| Fan Support (Rear) | 1 x 120mm |
| Fan Support (Bottom) | 3 x 120mm / 2 x 140mm |
| Drive Bays (2.5") | Up to 4 (depends on other hardware) |
| Drive Bays (3.5") | Up to 2 (shared with 2.5" mounts, depends on other hardware) |
| Front I/O Ports | USB3.2 Gen1 Type-A*2 / USB3.2 Gen 2 Type-C*1 / AUDIO*1 / MIC*1 |
| Material | Metal |
| Item Weight | 11.62 pounds |
8. Warranty and Support
Jonsbo products are manufactured to the highest quality standards. For warranty information, technical support, or service inquiries, please refer to the official Jonsbo website or contact your local retailer. Keep your proof of purchase for warranty claims.
Related documentsD32 PRO


Ask a question about this manual
Ask about setup, troubleshooting, compatibility, parts, safety, or missing instructions. Manuals+ will review the question and use this page’s manual context to help answer it.