Introduction
Thank you for choosing the Wattive BHT-006GCLW WiFi Smart Thermostat. This device is designed to provide intelligent temperature control for your boiler heating system, offering convenience through remote access, programmable schedules, and voice control. Please read this manual carefully before installation and operation to ensure proper use and safety.

The Wattive BHT-006GCLW Smart Thermostat features Wi-Fi smart control, shared management, and an LED display. It is compatible with Smart Life, Google Home, and Alexa for convenient home automation.
Safety Information
- Installation must be performed by a qualified electrician in accordance with local electrical codes.
- Always disconnect power at the circuit breaker before installing or servicing the thermostat.
- This thermostat operates on 220V AC. Ensure your power supply matches this requirement.
- Do not expose the thermostat to water or excessive humidity.
- Keep out of reach of children.
Product Overview
The Wattive BHT-006GCLW thermostat offers a clear LED display and intuitive touch controls for easy operation. It integrates seamlessly with smart home ecosystems for enhanced control.

The thermostat's LED display shows current room temperature, heating status, time, and day. Touch controls allow for manual/programmable mode selection, temperature adjustment (Up/Down), Wi-Fi status, and power on/off.
Key Features:
- WiFi Connectivity: Control your heating system remotely via the "Smart Life" app.
- Voice Control: Compatible with Amazon Alexa and Google Assistant for hands-free operation.
- Programmable Schedules: Set weekly schedules (e.g., 5+1+1 days) with up to six daily periods for energy efficiency.
- Precise Temperature Control: Maintains desired temperature with an accuracy of ±1°C.
- Shared Management: Allow family members to control the thermostat via the app.
- LED Display: Clear, color LCD display with touch-sensitive buttons.
Installation
This thermostat is suitable for installation in standard 86mm flush-mounted boxes or European 60mm flush-mounted boxes. Ensure compatibility with your boiler system before proceeding.

This thermostat is designed for use with 3A boiler systems. It is not compatible with electric floor heating systems.
Installation Steps:
- Step 1: Switch off the power supply to your heating system at the main circuit breaker.
- Step 2: Gently push the LCD screen assembly upwards and downwards to detach it from the mounting plate.
- Step 3: Connect the power cables to the corresponding terminals on the thermostat. Refer to the 'Wiring Diagram' section for detailed connections.
- Step 4: Secure the mounting plate to the wall using the screws provided in the package.
- Step 5: Rotate the thermostat body onto the mounting plate until it locks securely into place.
- Step 6: Installation is complete. Restore power to the heating system.
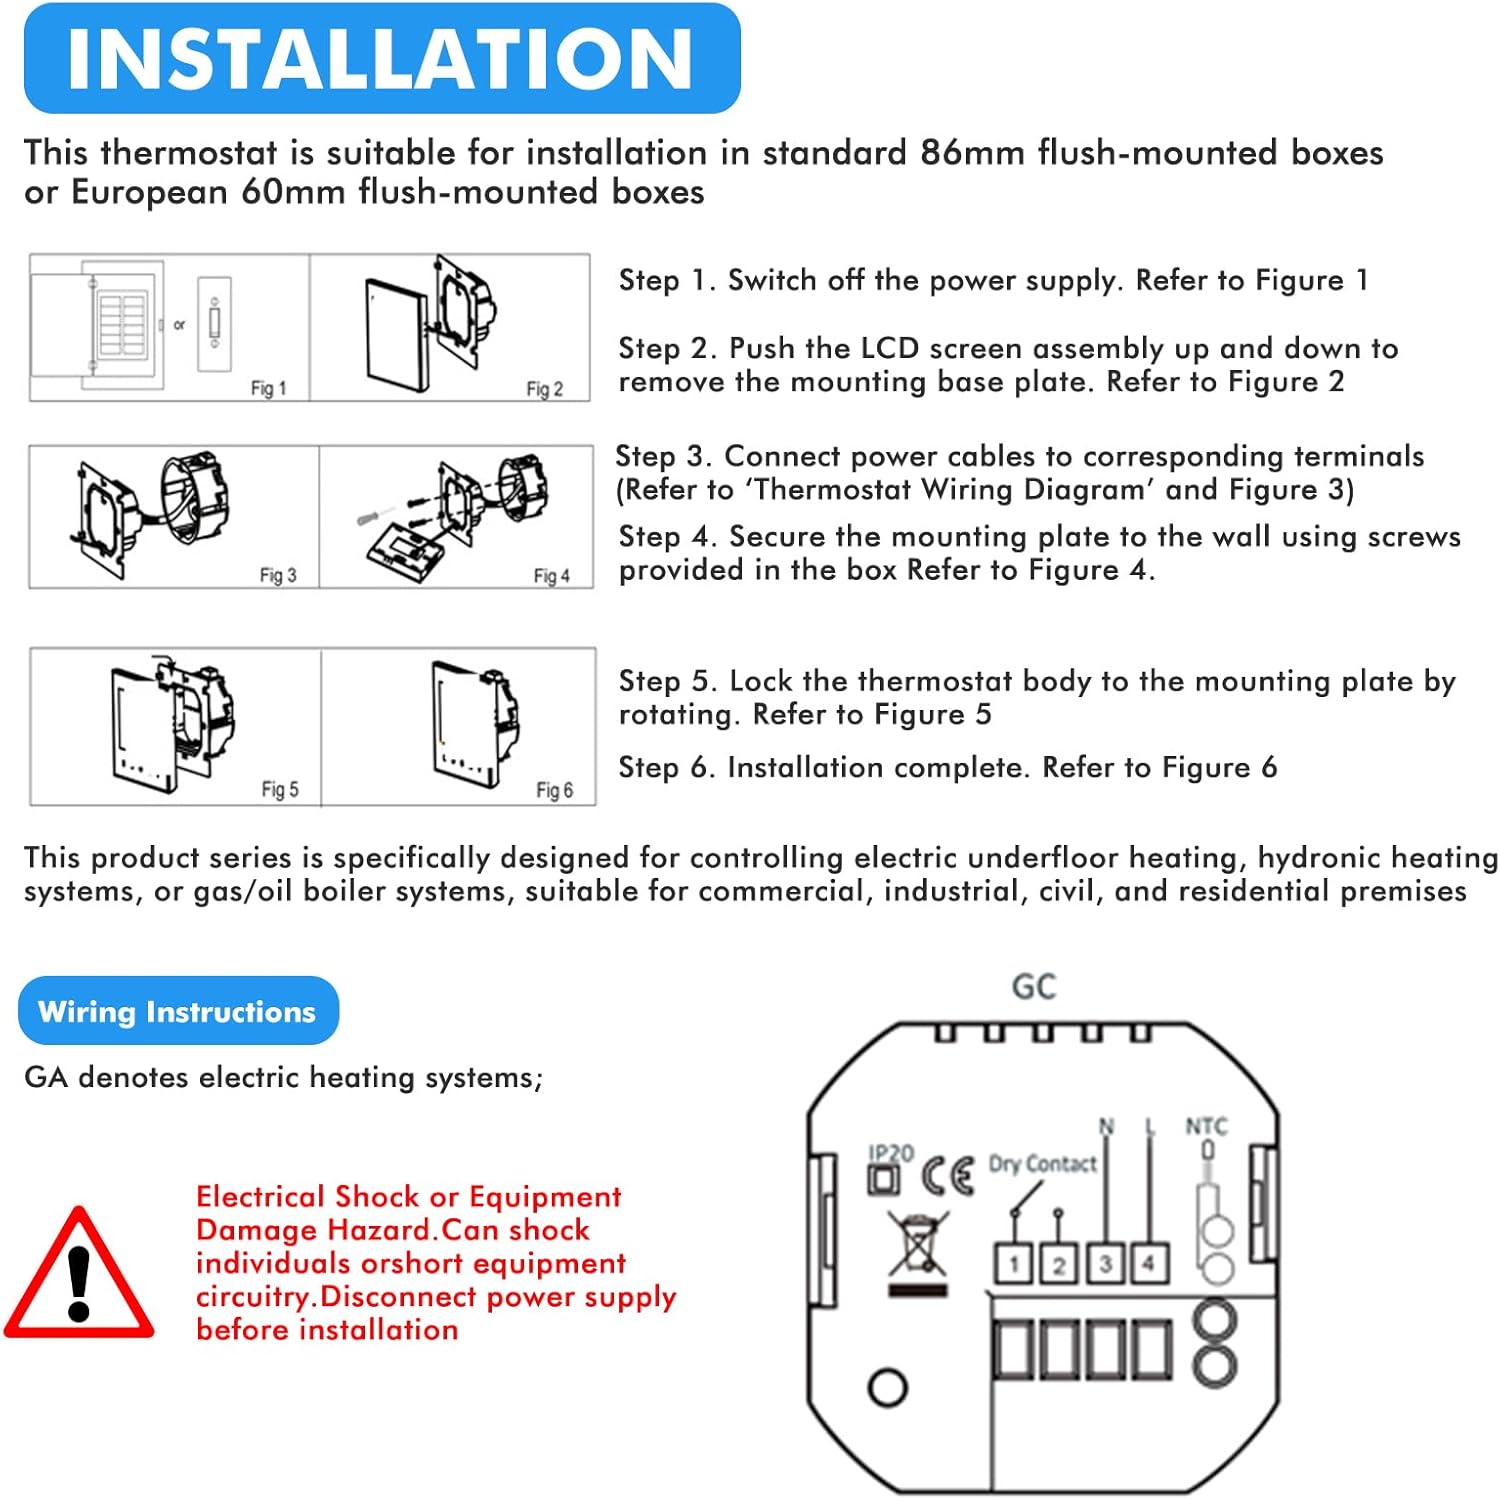
Installation involves switching off power, removing the LCD screen, connecting power cables, securing the mounting plate, and locking the thermostat body. Refer to the wiring diagram for electrical connections.
Wiring Diagram
The Wattive BHT-006GCLW (GC model) is designed for boiler/wall-mounted boiler heating systems. It uses potential-free contacts to control the boiler.

The wiring diagram illustrates connections for live wire, neutral wire, and dry contacts to the boiler. Terminals 1 and 2 are for dry contacts, 3 and 4 for 95-240V AC power. Ensure proper electrical safety during installation.
Wiring Instructions:
- Terminals 1 & 2: Used for connecting the dry contacts of the boiler. These contacts are potential-free and provide an ON/OFF signal to the boiler.
- Terminals 3 & 4: For 95-240V AC power supply. Connect the live wire to one and the neutral wire to the other.
- Terminals 5 & 6: For connecting external sensors (if applicable). If no external sensor is used, no connections are required for these terminals.
Warning: Electrical Shock or Equipment Damage Hazard. Disconnect power supply before installation. Improper wiring can cause damage to the thermostat or boiler.
Operating Instructions
Manual Mode:
In manual mode, the thermostat maintains a constant temperature set by the user. Use the Up/Down arrows on the display to adjust the desired temperature. The thermostat will heat until this temperature is reached and then maintain it.
Programmable Mode:
The programmable mode allows you to set a weekly schedule with different temperatures for various times of the day. The thermostat supports a "5+1+1" schedule (weekdays, Saturday, Sunday) with six programmable periods per day. Refer to the app or the thermostat's advanced settings for detailed schedule configuration.
App Control (Smart Life):
- Download the "Smart Life" app from your smartphone's app store.
- Register or log in to your account.
- Add the thermostat as a new device (ensure your phone is connected to a 2.4 GHz Wi-Fi network).
- Follow the in-app instructions to connect the thermostat to your Wi-Fi network.
- Once connected, you can remotely control the temperature, set schedules, and manage other settings from anywhere.
Voice Control (Alexa/Google Assistant):
After connecting your thermostat to the Smart Life app, you can link your Smart Life account to Amazon Alexa or Google Home. This enables voice commands for temperature adjustment.
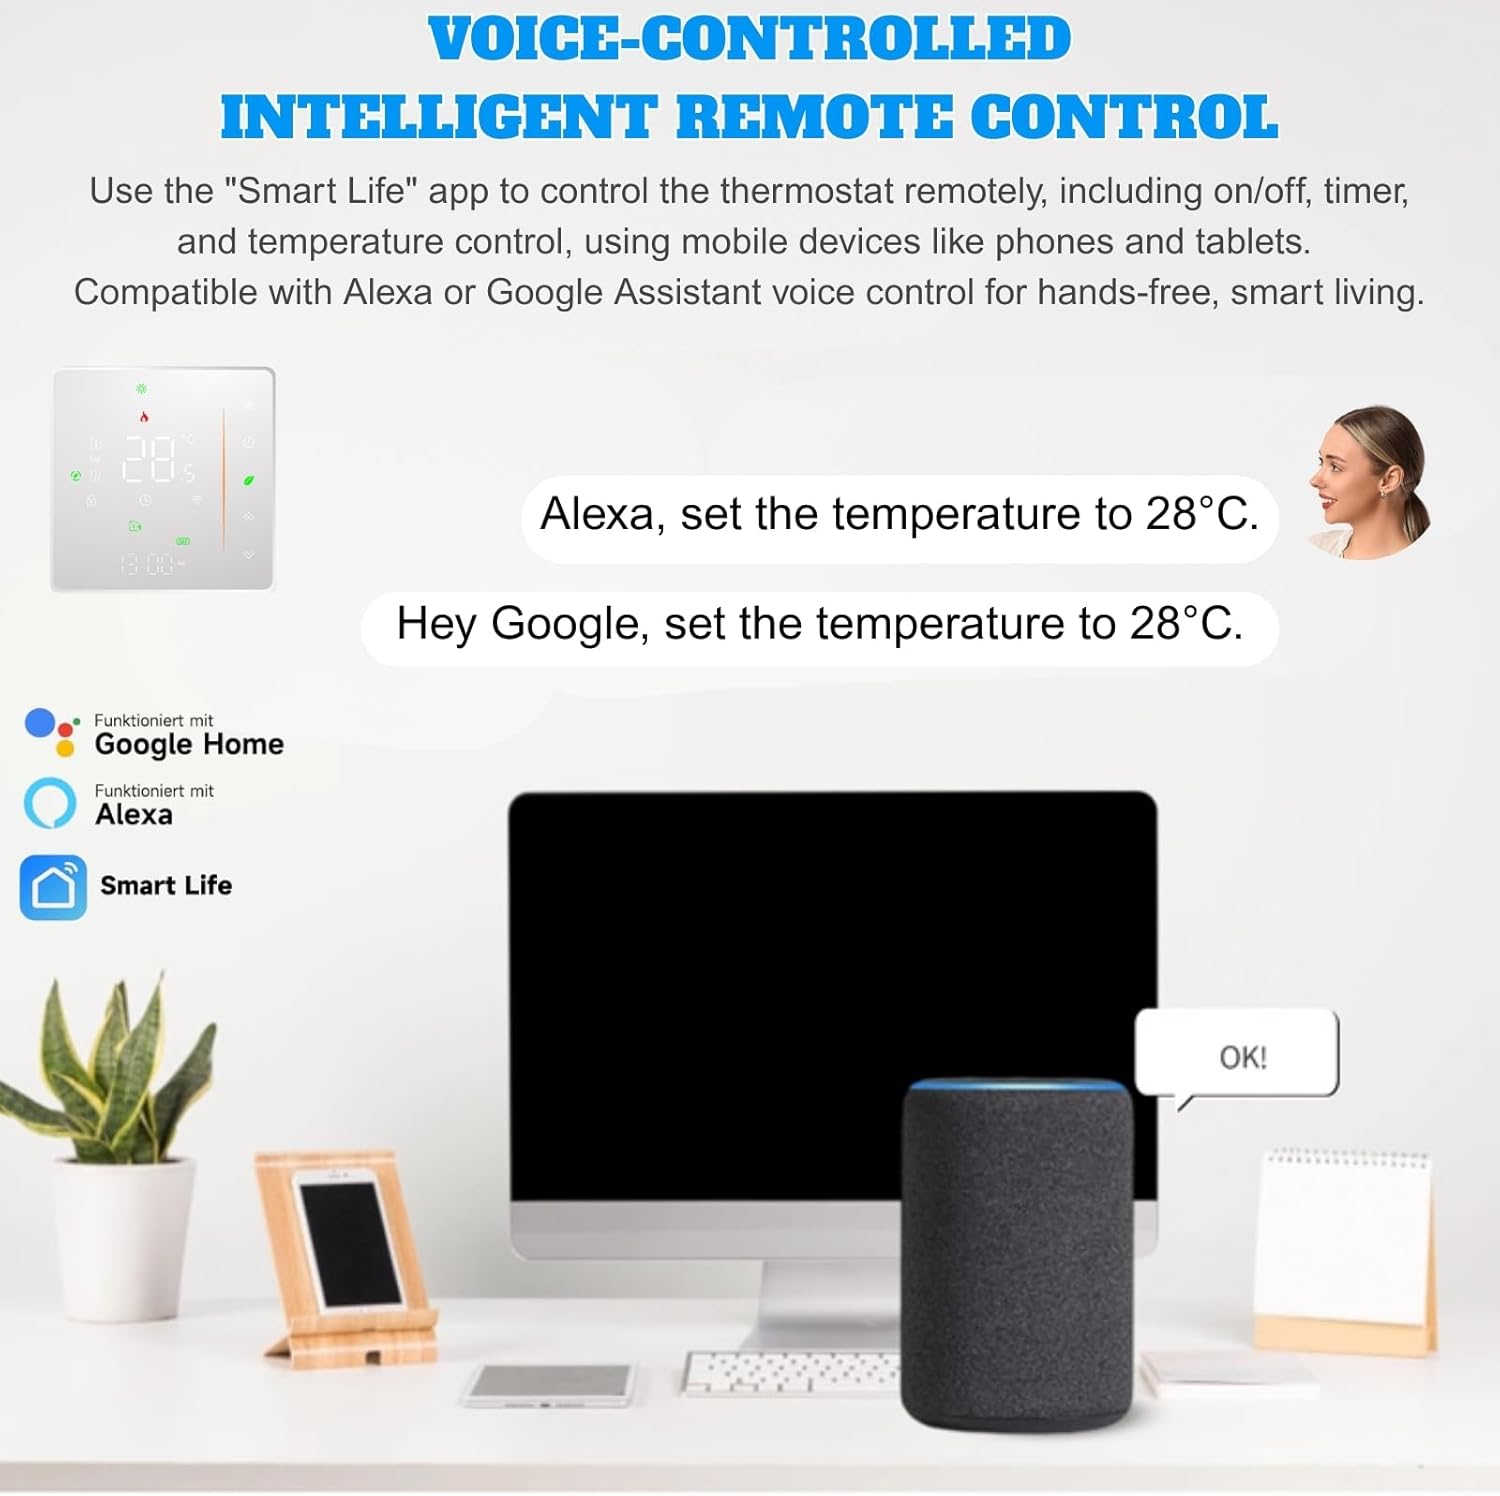
Control your thermostat hands-free using voice commands with Amazon Alexa or Google Assistant. Simply say 'Alexa, set the temperature to 28°C' or 'Hey Google, set the temperature to 28°C'.
- Example Commands:
- "Alexa, set [Thermostat Name] to 22 degrees."
- "Hey Google, what is the temperature of [Thermostat Name]?"
- "Alexa, turn on [Thermostat Name]."
Specifications
Below are the technical specifications for the Wattive BHT-006GCLW Smart Thermostat:
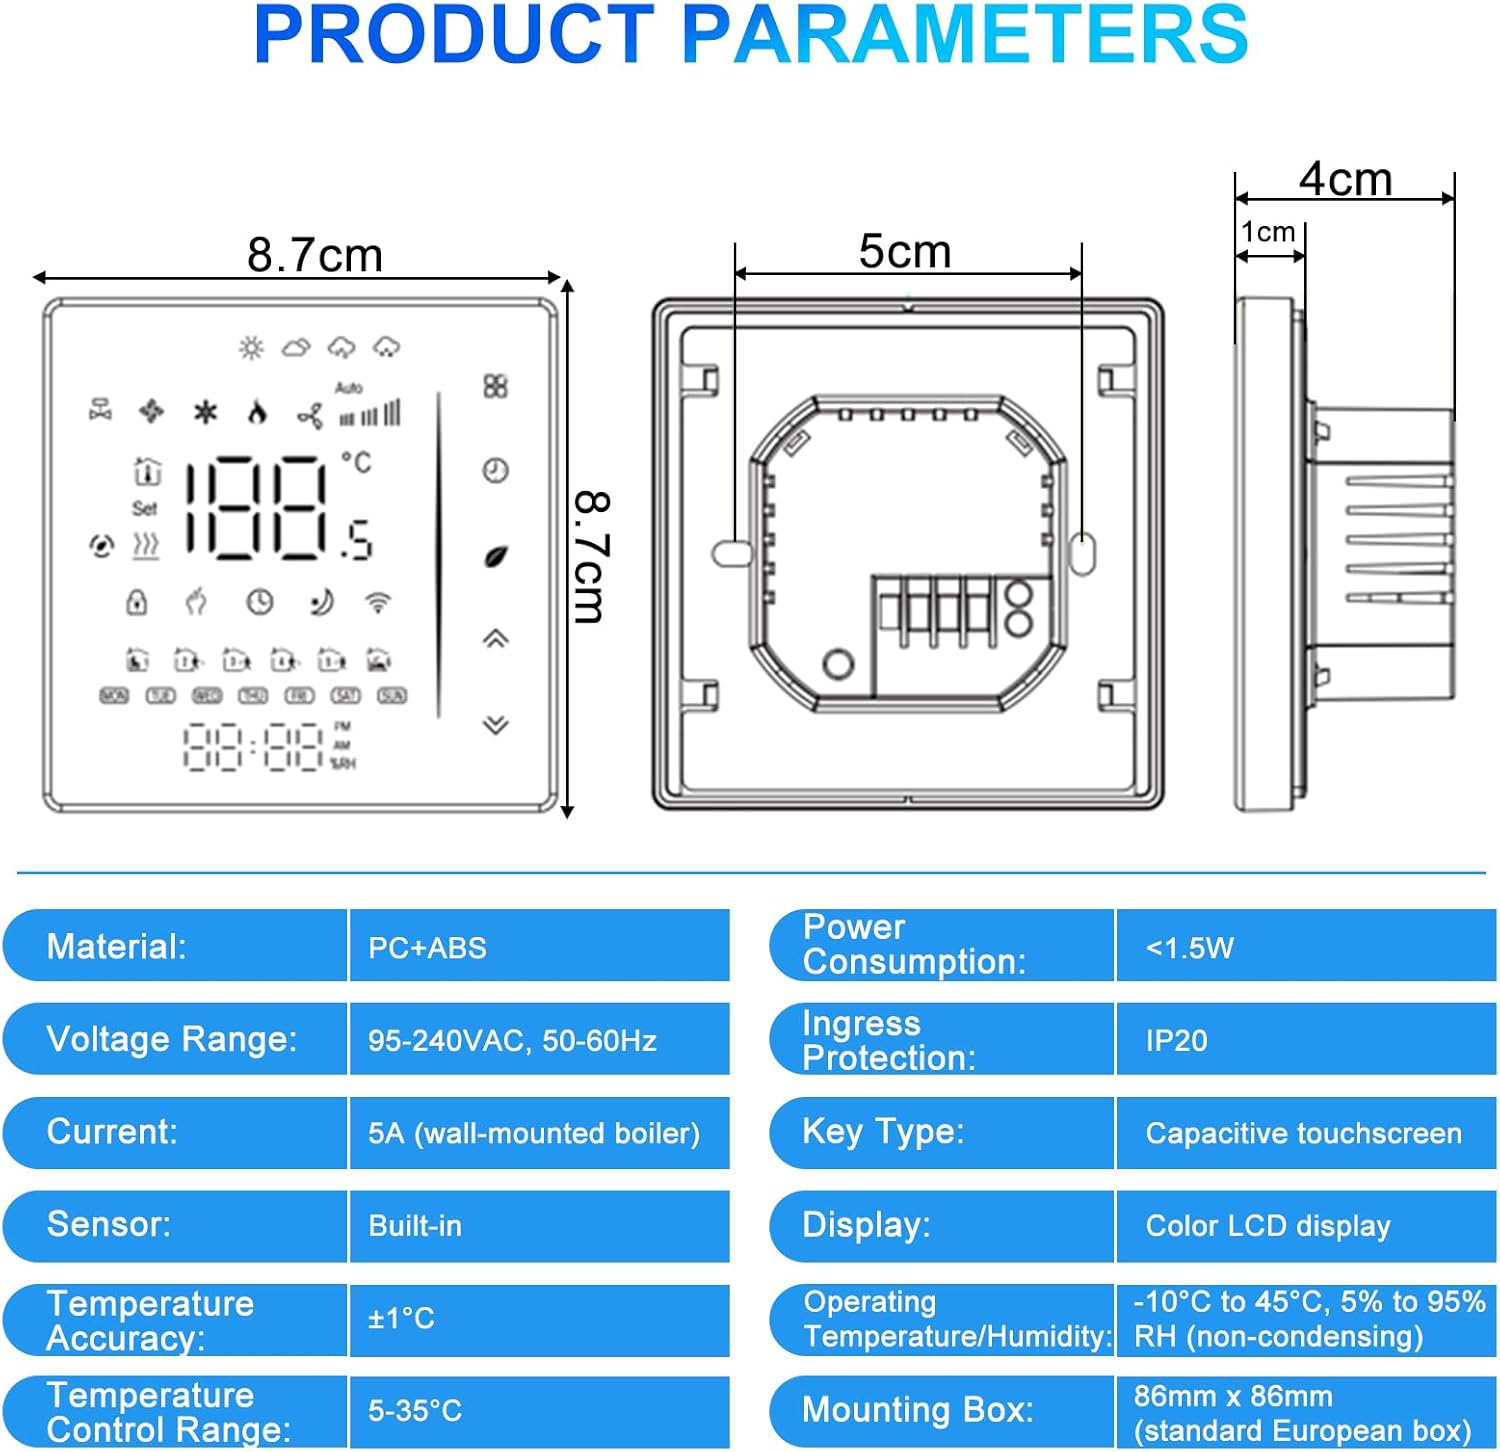
Key specifications include PC+ABS material, 95-240VAC voltage range, 5A current, built-in sensor, ±1°C temperature accuracy, 5-35°C control range, <1.5W power consumption, IP20 ingress protection, capacitive touchscreen, color LCD display, and compatibility with 86mm x 86mm mounting boxes.
| Parameter | Value |
|---|---|
| Material | PC + ABS |
| Voltage Range | 95-240VAC, 50-60Hz |
| Current | 5A (wall-mounted boiler) |
| Sensor | Built-in |
| Temperature Accuracy | ±1°C |
| Temperature Control Range | 5-35°C |
| Power Consumption | <1.5W |
| Ingress Protection | IP20 |
| Key Type | Capacitive touchscreen |
| Display | Color LCD display |
| Operating Temperature/Humidity | -10°C to 45°C, 5% to 95% RH (non-condensing) |
| Mounting Box | 86mm x 86mm (standard European box) |
Troubleshooting
- Thermostat not powering on: Check the main power supply and wiring connections (Terminals 3 & 4). Ensure the circuit breaker is ON.
- Boiler not heating: Verify the thermostat is in heating mode and the set temperature is above the current room temperature. Check boiler connections (Terminals 1 & 2).
- Wi-Fi connection issues: Ensure your router is broadcasting a 2.4 GHz Wi-Fi signal. Restart your router and the thermostat. Re-attempt the pairing process in the Smart Life app.
- Inaccurate temperature reading: Ensure the thermostat is not exposed to direct sunlight, drafts, or heat sources that could affect its internal sensor.
- Voice control not working: Confirm that your Smart Life account is correctly linked to Alexa or Google Home. Check your internet connection.
Maintenance
- Clean the thermostat's display and casing with a soft, dry cloth. Do not use abrasive cleaners or solvents.
- Ensure the area around the thermostat is free from obstructions to allow for accurate temperature sensing.
- Periodically check for firmware updates through the Smart Life app to ensure optimal performance and security.
Warranty and Support
This Wattive product comes with a standard manufacturer's warranty. For detailed warranty information, please refer to the documentation included with your purchase or contact your retailer. For technical support, troubleshooting assistance, or further inquiries, please contact Wattive customer service through the contact information provided on our official website or your purchase platform.

The Wattive Smart Thermostat is suitable for various applications, including residential homes, hotels, restaurants, and offices, providing intelligent temperature control.


