1. Setup
1.1 Package Contents
Verify that all items are included in your package:
- Magnetic Mini Selfie Stick x1
- LED Fill Light x2
- Phone Clip x1
- USB-C Cable x1
- Magnetic Ring x2
- User Manual x1

1.2 Charging the Remote Control and Fill Lights
The detachable remote control and LED fill lights are rechargeable via the included USB-C cable. Connect the cable to the charging port on each device and a suitable power source. A blue indicator light on the remote signifies charging, turning off when fully charged. The fill lights will also indicate their charging status.
1.3 Bluetooth Pairing
- Turn on the remote control by pressing and holding the button until the indicator light flashes.
- On your smartphone, navigate to Bluetooth settings.
- Search for "VIP" in the list of available devices and select it to pair.
- The indicator light on the remote will stop flashing, indicating a successful connection.
1.4 Attaching Your Smartphone
1.4.1 For MagSafe Compatible Phones (iPhone 12 Pro Max and above, or MagSafe cases)
Align your MagSafe-compatible phone or case directly with the magnetic ring on the selfie stick's phone holder. The strong magnets will securely attach your phone.
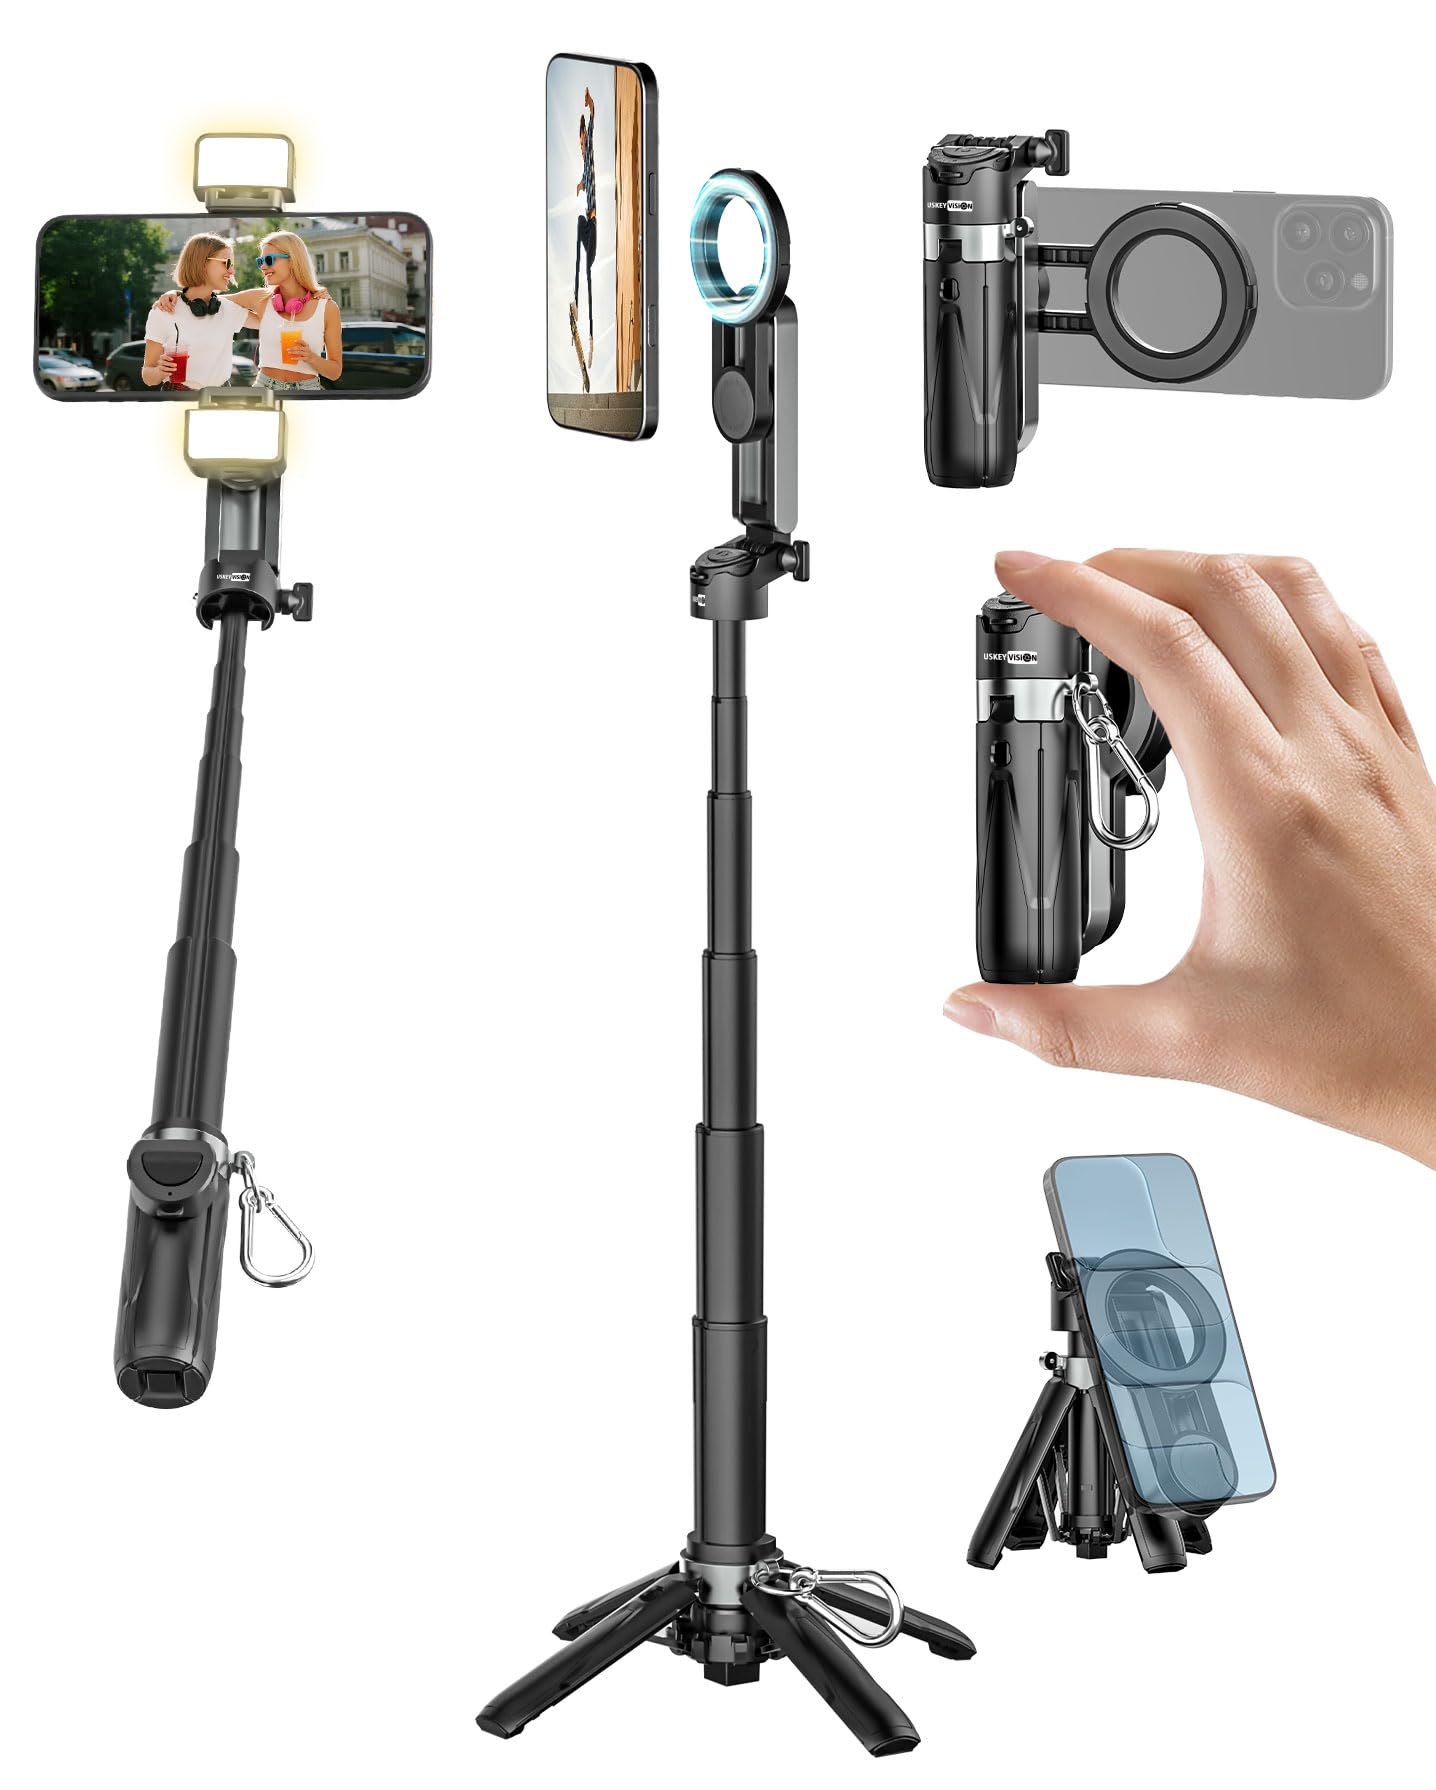
1.4.2 For Non-MagSafe Phones
For phones without MagSafe or non-MagSafe cases, use the included adhesive magnetic ring. Peel off the protective film and carefully center the magnetic ring on the back of your phone or case. Press firmly for complete adhesion. It is recommended to wait at least 2 hours after applying before use for optimal bond strength. Once the ring is attached, your phone can be magnetically mounted to the selfie stick.

1.5 Attaching the Phone Clip (Optional)
The selfie stick includes a removable phone clip for additional security or for phones that may not be suitable for magnetic rings. Attach the phone clip to the top of the selfie stick's phone holder. Ensure your smartphone fits within the width range of 2.56-3.54 inches. Foldable phones are not recommended for use with the clip.
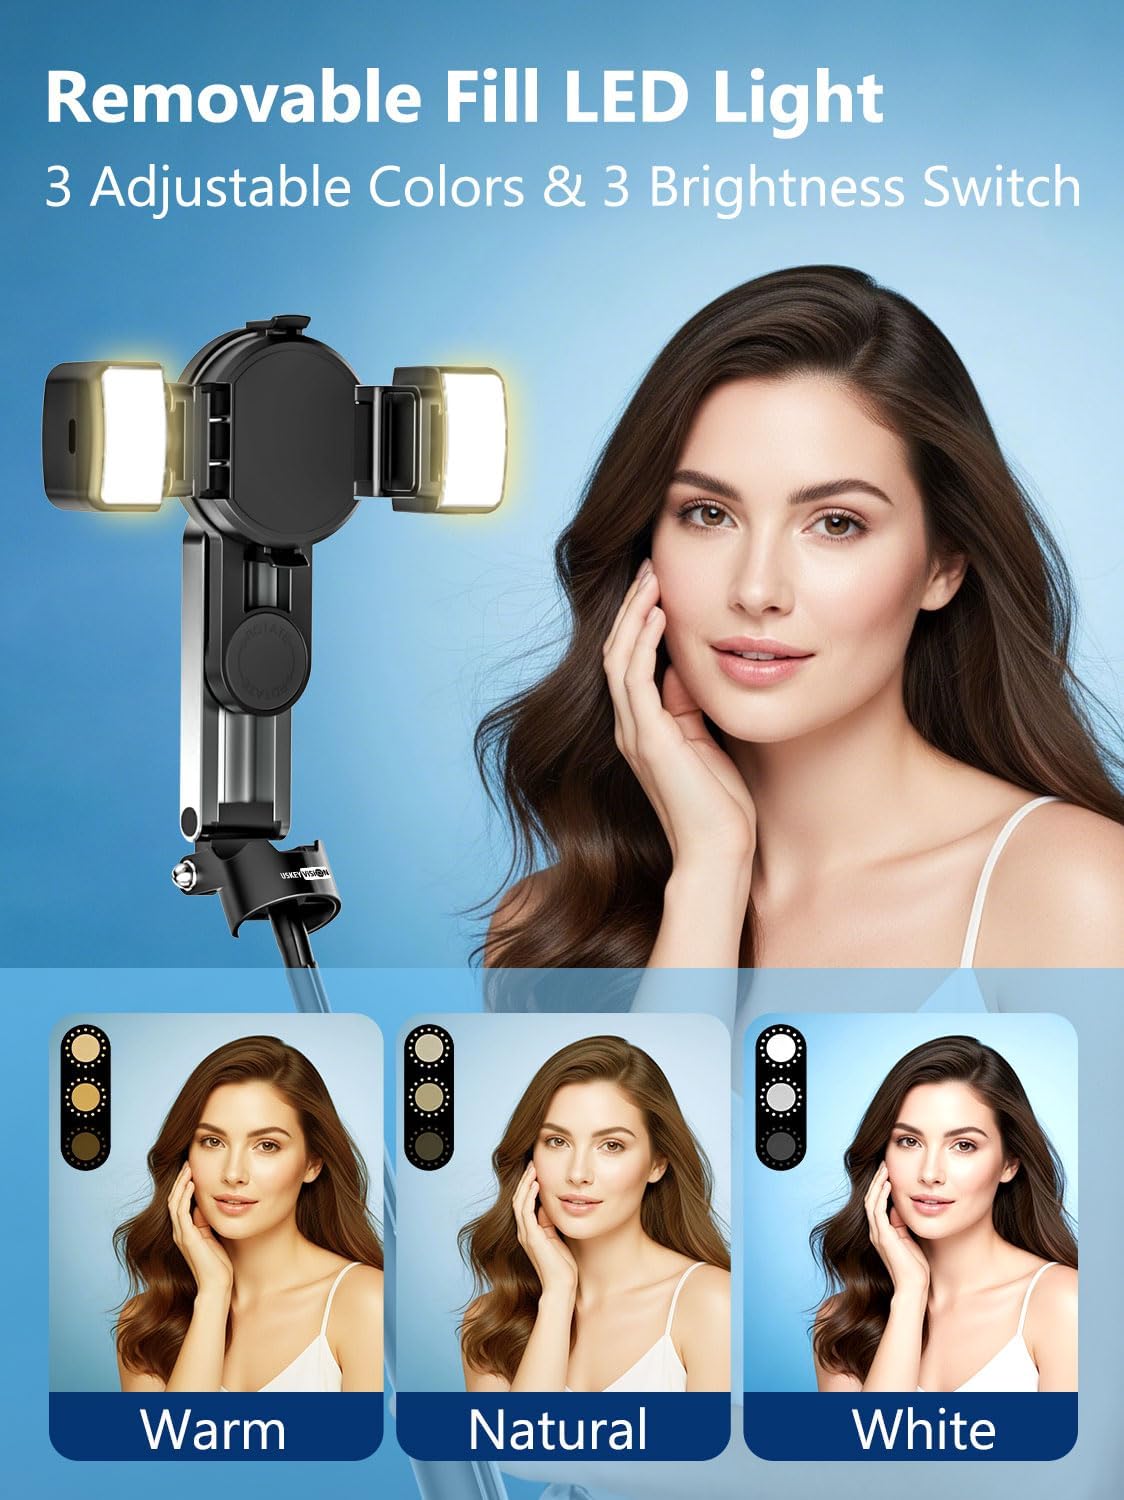
1.6 Attaching Fill Lights
The two LED fill lights can be attached to the sides of the phone holder. They snap into place securely, providing additional illumination for your photos and videos.
2. Operating Instructions
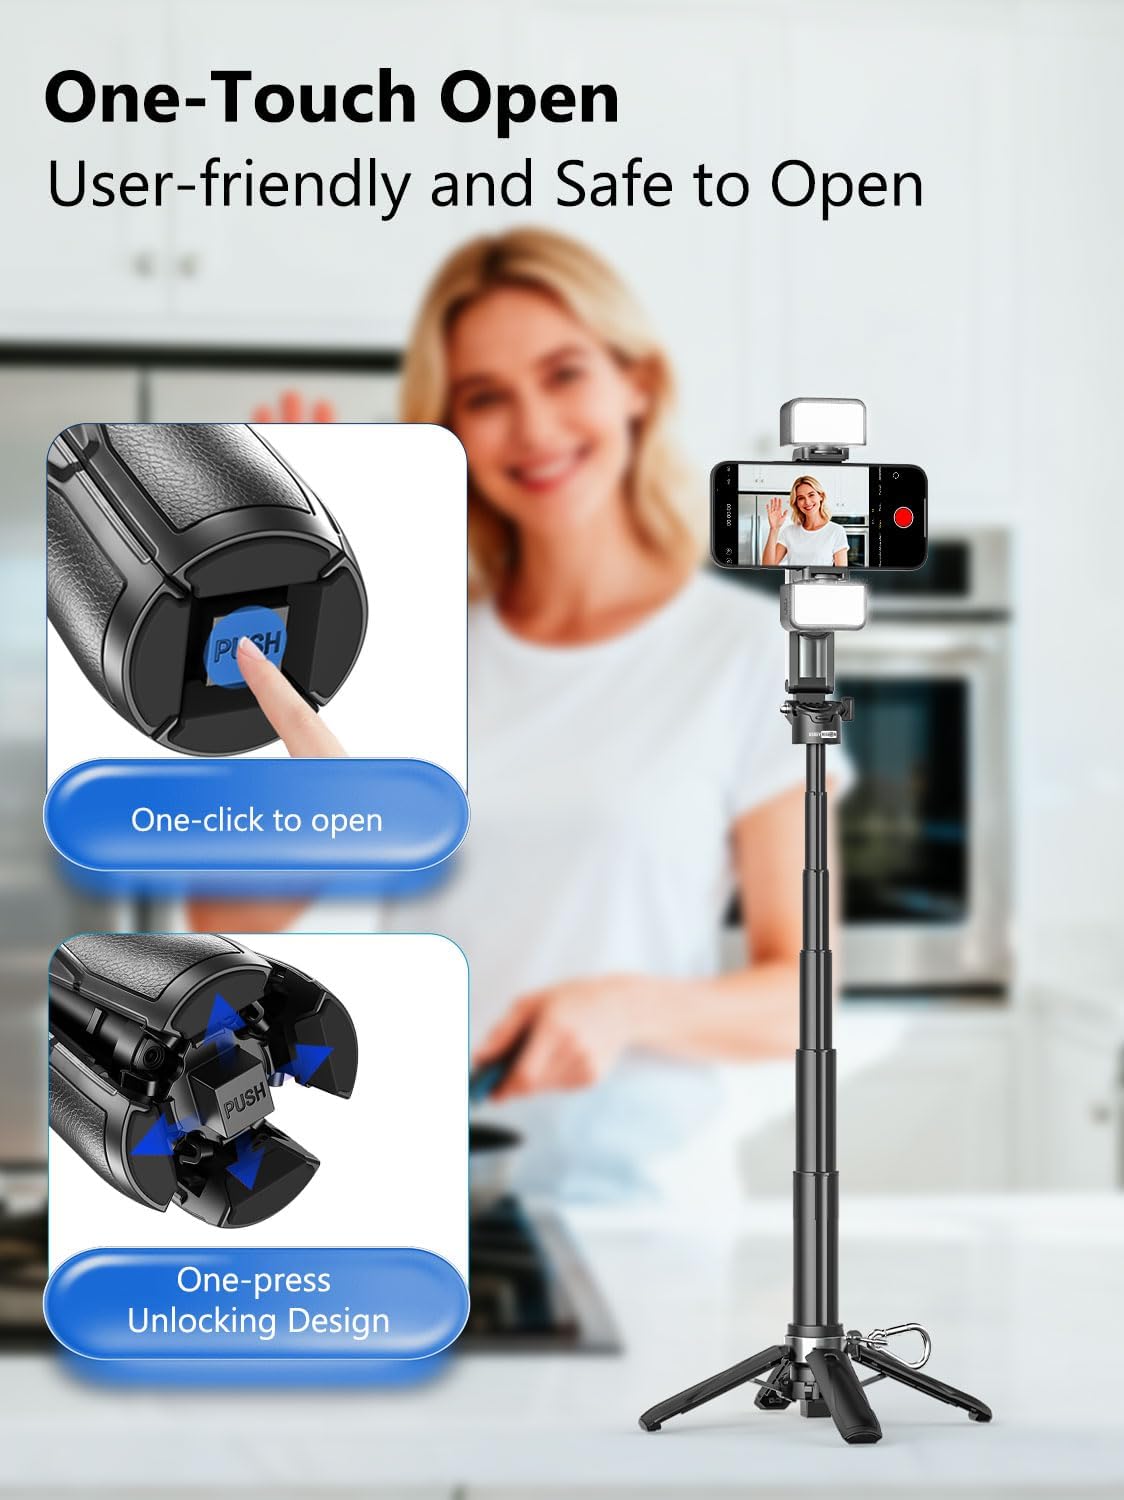
2.1 Opening the Tripod Legs
To deploy the tripod legs, press the one-touch open button located at the base of the selfie stick. The legs will automatically extend and lock into position, providing a stable base for hands-free use.
2.2 Selfie Stick Mode
Hold the handle firmly. Extend the telescopic pole to your desired length for wider shots or group photos. The pole extends smoothly and locks at various lengths for flexible framing.
2.3 Tripod Mode
With the tripod legs extended, place the selfie stick on a flat, stable surface. Adjust the telescopic pole to achieve your desired height for hands-free recording, live streaming, or video calls.
2.4 Phone Hand Grip Mode
Collapse the telescopic pole and fold the tripod legs. The device can then be used as a comfortable hand grip for more stable handheld shooting, similar to a camera grip.
2.5 Adjusting Angles and Orientation
The phone holder offers flexible adjustments:
- 225° Rotation: Tilt the phone holder up or down to capture high-angle or low-angle shots.
- 360° Rotation: Rotate your phone horizontally or vertically without removing it from the holder.
- Sliding Rail: Fine-tune your composition quickly with the integrated sliding rail.

2.6 Using the Fill Lights
Each LED fill light offers three color modes (white, warm, natural) and three brightness levels. Press the power button on each light to cycle through the modes and brightness settings to adapt to different lighting environments.
3. Maintenance
- Clean the device with a soft, dry cloth. Avoid using harsh chemicals or abrasive materials.
- Ensure the magnetic surfaces are clean and free of debris for optimal adhesion.
- Store the selfie stick in a cool, dry place away from direct sunlight and extreme temperatures.
- Regularly charge the remote control and fill lights to maintain battery health.
4. Troubleshooting
4.1 Remote Control Not Connecting
- Ensure the remote control is charged.
- Verify Bluetooth is enabled on your smartphone.
- Try re-pairing the remote control by following the Bluetooth Pairing instructions in Section 1.3.
4.2 Phone Not Securely Attached
- For MagSafe phones, ensure the phone or case is MagSafe compatible and properly aligned.
- For non-MagSafe phones, confirm the adhesive magnetic ring is securely attached to your phone or case and has had sufficient time to bond (at least 2 hours).
- Check for any obstructions or debris between the phone and the magnetic holder.
4.3 Tripod Instability
- Ensure the tripod legs are fully extended and locked into place.
- Place the tripod on a flat, stable surface.
- Avoid placing heavy objects on the extended pole, especially when fully extended.
5. Specifications
| Feature | Detail |
|---|---|
| Model Name | MPT-02 |
| Brand | USKEYVISION |
| Material | Metal |
| Color | Black |
| Special Features | Foldable, Lightweight, Remote Control, Telescopic |
| Compatible Devices | Smartphones (Width of 2.56-3.54", Foldable phones are not recommended) |
| Batteries | 1 Lithium Ion battery required (included) |
| Product Dimensions (Folded) | 12.8 x 8 x 6.9 cm |
| Product Weight | 360 g |
6. Warranty & Support
For warranty information or technical support, please refer to the contact details provided with your purchase or visit the official USKEYVISION website. Keep your proof of purchase for any warranty claims.


