1. Introduction
The RockSeed S2 Digital Laser Distance Meter is a precision measuring instrument designed for accurate distance, area, and volume calculations. It features two bubble levels for enhanced precision, multiple measurement modes, and unit switching capabilities. This manual provides detailed instructions for the safe and effective use of your device.

Image: The RockSeed S2 Digital Laser Distance Meter, highlighting its accuracy of ±2mm/±0.08inch and a measurement range of 50m/165ft.
2. Safety Information
2.1 Laser Safety
This device emits a Class 2 laser. Observe the following safety precautions:
- Do not stare directly into the laser beam.
- Do not aim the laser beam at people or animals.
- Avoid direct eye exposure to the laser beam.
- Do not disassemble the device; laser radiation exposure may result.
2.2 General Safety
- Keep the device out of reach of children.
- Do not use the device in explosive environments.
- Protect the device from impact, vibration, and extreme temperatures.
- Clean the device with a soft, damp cloth. Do not use harsh chemicals.
3. Package Contents
Verify that all items are present in the package:
- RockSeed S2 Red Laser Distance Meter (165Ft)
- Instruction Manual
- Packaging Box
- Cloth Bag
- AAA 1.5V Batteries (2 included)
- Lanyard / Hand Strap

Image: The complete package contents for the RockSeed S2 Laser Distance Meter, laid out for inspection.
4. Product Features & Controls
The RockSeed S2 Laser Distance Meter is equipped with features designed for efficient and accurate measurements:
- High Accuracy: Measures distances up to 165 feet (50 meters) with an accuracy of ±1/16 inch (±2mm).
- Dual Bubble Levels: Integrated horizontal and vertical bubble levels for precise alignment.
- Backlit LCD Display: Large display with backlight for visibility in various lighting conditions.
- Multiple Measurement Modes: Includes single distance, continuous, area, volume, and Pythagorean (three points) measurements.
- Unit Switching: Easily switch between meters (M), inches (In), and feet (Ft).
- Data Storage: Stores up to 20 groups of measurement data.
- Mute Function: Option to turn off the measurement beep for quiet environments.
- Durable Design: IP54 rated for splash and dust resistance, with a hard rubber body for grip and protection.
- Auto Shut-off: Automatically powers off after 150 seconds of inactivity to conserve battery.
4.1 Device Layout and Buttons
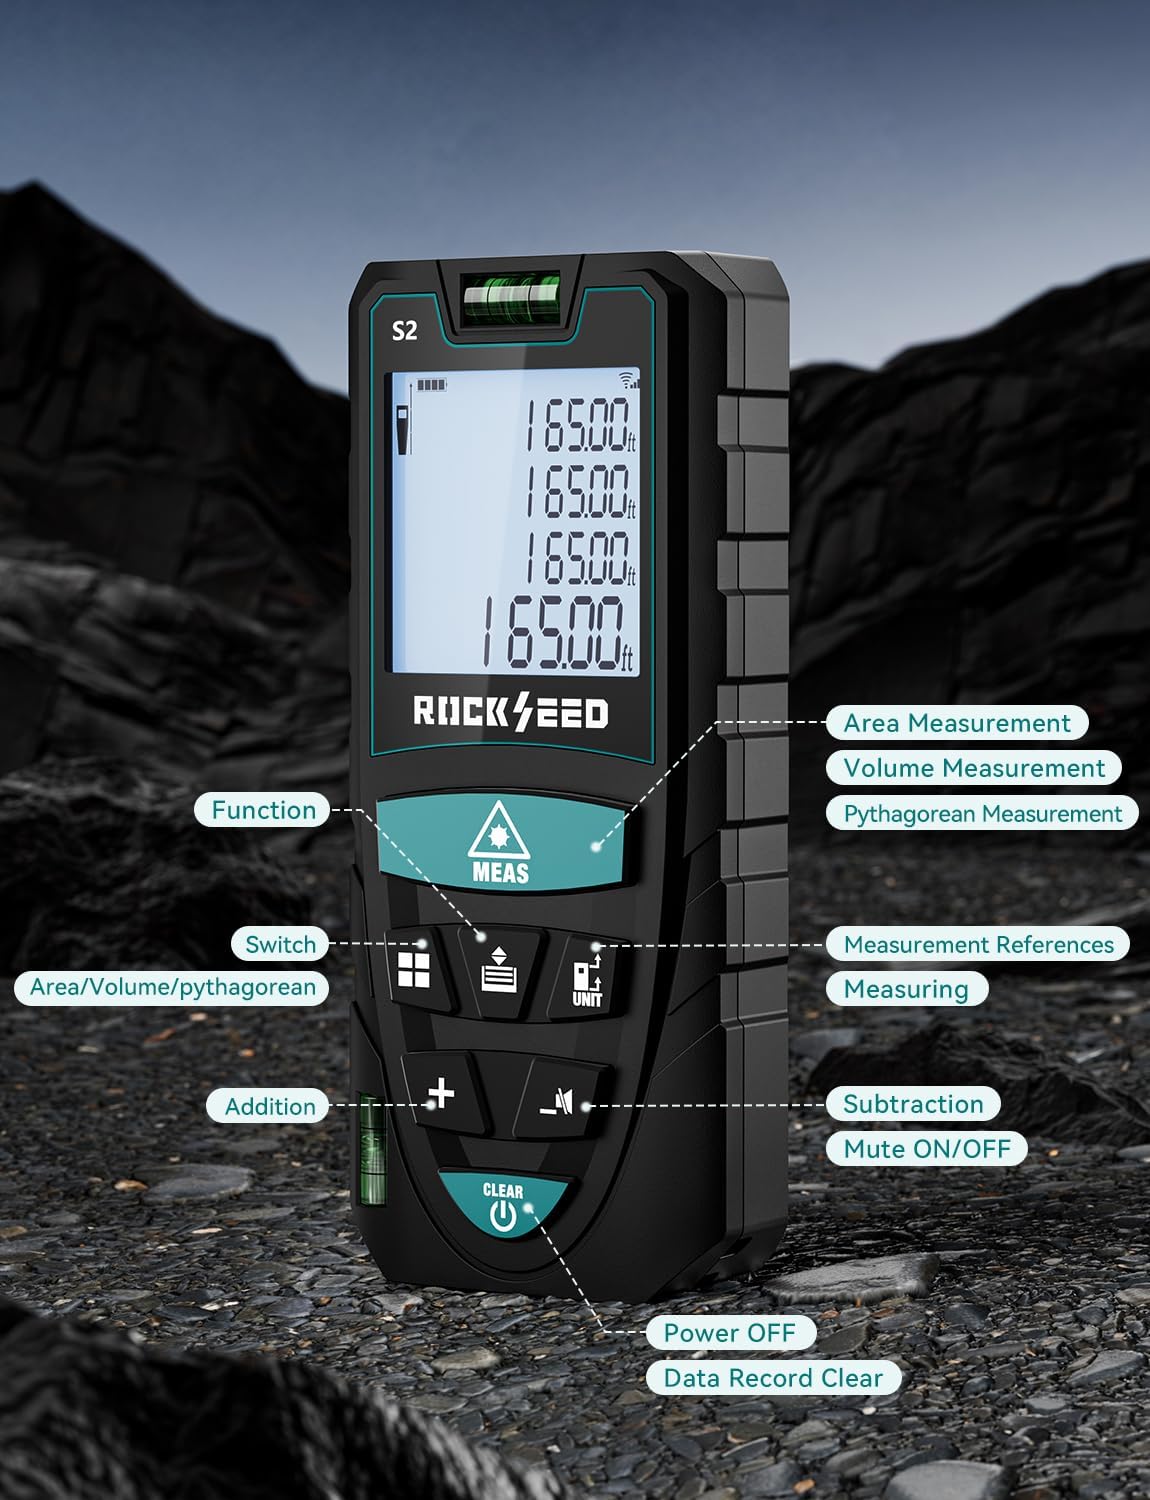
Image: A detailed view of the RockSeed S2 Laser Distance Meter, indicating the location and function of each button, including Function, Switch, Addition, Subtraction, Mute ON/OFF, Measurement References, Measuring, Power Off, and Data Record Clear.
Refer to the image above for the location of each control button:
- MEAS Button: Initiates single or continuous measurement.
- Function Button: Cycles through measurement modes (Area, Volume, Pythagorean).
- UNIT Button: Changes measurement units (M/In/Ft).
- Reference Button: Switches between front and back measurement reference points.
- + / - Buttons: Used for addition and subtraction of measurements.
- Mute Button: Toggles the measurement beep sound on or off.
- CLEAR / OFF Button: Clears current measurement, deletes data, or powers off the device (long press).
5. Setup
5.1 Battery Installation
The RockSeed S2 requires two AAA 1.5V batteries (included). To install or replace batteries:
- Locate the battery compartment cover on the back of the device.
- Slide the cover downwards to open the compartment.
- Insert two AAA batteries, ensuring correct polarity (+/-).
- Close the battery compartment cover by sliding it upwards until it clicks into place.
6. Operating Instructions
6.1 Power On/Off
- Power On: Press the MEAS button once to turn on the device.
- Power Off: Long press the CLEAR / OFF button to turn off the device. The device will also automatically power off after 150 seconds of inactivity.
6.2 Unit Switching
To change the measurement unit (meters, inches, feet):
- Long press the UNIT button to cycle through M (meters), In (inches), Ft (feet), and Ft+In (feet and fractional inches).

Image: The device display illustrating the four available unit conversions: feet + inches, inches, meters, and feet.
6.3 Reference Point Selection
The device can measure from its front or back edge. The default is typically the back edge.
- Press the Reference button to switch between the front and back reference points. An icon on the display will indicate the active reference point.

Image: Illustration demonstrating how to measure from both the front and back reference points of the device.
6.4 Single Distance Measurement
- Point the laser at the target surface.
- Press the MEAS button once. The measured distance will appear on the display.
6.5 Continuous Measurement (Tracking)
- Press the MEAS button and hold it for approximately 2 seconds. The device will enter continuous measurement mode.
- Move the device to track distances. The display will update in real-time, showing current, minimum, and maximum values.
- Press the MEAS button again to exit continuous measurement mode.
6.6 Area Measurement
- Press the Function button until the area icon (rectangle) appears on the display.
- Measure the first side (length) by pressing MEAS.
- Measure the second side (width) by pressing MEAS again.
- The calculated area will be displayed.
6.7 Volume Measurement
- Press the Function button until the volume icon (cube) appears on the display.
- Measure the length by pressing MEAS.
- Measure the width by pressing MEAS.
- Measure the height by pressing MEAS.
- The calculated volume will be displayed.
6.8 Pythagorean Measurement
This mode allows indirect measurement of height or distance using the Pythagorean theorem.
- Press the Function button until a Pythagorean icon appears (there are typically 3 types: 2-point height, 3-point height, 3-point partial height). Select the desired mode.
- Follow the on-screen prompts to measure the required sides (hypotenuse, base, etc.) by pressing MEAS for each segment.
- The calculated indirect measurement will be displayed.

Image: Visual examples of the various measurement functions: Continuous Measurement, Area Measurement, Volume Measurement, and Pythagorean Measurement.
6.9 Addition and Subtraction
To add or subtract measurements:
- Perform a measurement.
- Press the + button for addition or - button for subtraction.
- Perform the next measurement. The result will be automatically added or subtracted.
- Repeat as needed.
6.10 Data Memory
The device stores up to 20 sets of measurement data.
- To view stored data, press the Memory button (often integrated with another function button, refer to device layout).
- To manually delete the current data, press the CLEAR button.
6.11 Mute Function
To enable or disable the measurement beep sound:
- Press the Mute button (speaker icon) to toggle the sound on or off.

Image: A visual comparison of the device's display in daylight and with its LCD backlight activated in a dark environment, demonstrating improved visibility.
7. Maintenance
7.1 Cleaning
- Wipe the device with a soft, damp cloth. Do not use abrasive cleaners or solvents.
- Clean the laser lens carefully with a soft cloth, similar to cleaning camera lenses.
7.2 Storage
- Store the device in its protective cloth bag when not in use.
- Keep the device in a dry, cool place, away from direct sunlight and extreme temperatures.
- Remove batteries if the device will not be used for an extended period to prevent leakage.
8. Troubleshooting
If you encounter issues with your device, refer to the following common problems and solutions:
| Problem | Possible Cause | Solution |
|---|---|---|
| Device does not power on | Low or dead batteries; Incorrect battery installation | Replace batteries; Check battery polarity. |
| Inaccurate measurements | Unstable device; Obstruction in laser path; Target surface too reflective/non-reflective; Environmental factors (strong light) | Ensure device is stable; Clear laser path; Use a target plate for difficult surfaces; Measure in dimmer conditions. |
| Laser beam not visible | Bright ambient light; Long distance measurement | Use in dimmer conditions; Use a target plate. |
| Error message on display | Measurement out of range; Signal interference | Ensure target is within range; Re-measure, ensuring clear path. |
9. Specifications
| Feature | Specification |
|---|---|
| Model Number | S2-50M |
| Measurement Range | 165 feet (50 meters) |
| Accuracy | ±1/16 inch (±2mm) |
| Measurement Units | Meters (M), Inches (In), Feet (Ft), Feet + Fractional Inches (Ft+In) |
| Laser Class | Class 2 |
| Battery Type | 2 x AAA 1.5V Alkaline Batteries |
| Auto Laser Off | 30 seconds |
| Auto Device Off | 150 seconds |
| Data Storage | 20 groups |
| Dust & Splash Protection | IP54 |
| Material | Acrylonitrile Butadiene Styrene |
| Item Weight | 120 Grams (4.2 ounces) |
| Certifications | CE, FCC, FDA, ROHS |
10. Warranty & Support
10.1 Warranty Information
RockSeed products in the United States come with a two-year free repair service. This warranty covers defects in materials and workmanship under normal use.
10.2 Technical Support
For technical assistance or after-sales service, please contact RockSeed support:
- Phone: 904-900-2136 (Monday to Friday, 9:00 a.m. to 6:00 p.m. Eastern Time)
- Email: Replies typically within 24 hours on weekdays.
RockSeed is committed to continuous improvement and customer satisfaction.