
1. Introduction
The RUIZHI ESP32 V3 LoRa Development Board is a versatile and powerful solution for Internet of Things (IoT) and long-range wireless communication projects. Powered by the SX1262 LoRa transceiver and the ESP32-S3 microcontroller, this board offers integrated WiFi, Bluetooth, and a 0.96-inch OLED display. It is fully compatible with Meshtastic and Arduino ecosystems, making it suitable for a wide range of applications from remote monitoring to smart agriculture.
2. Product Overview and Components
This section provides a visual guide to the RUIZHI ESP32 V3 LoRa Development Board, detailing its physical layout and key components.

Figure 2.1: The RUIZHI ESP32 V3 LoRa Development Board, showcasing its compact design, integrated 0.96 inch OLED display, and the connected 868MHz LoRa antenna.
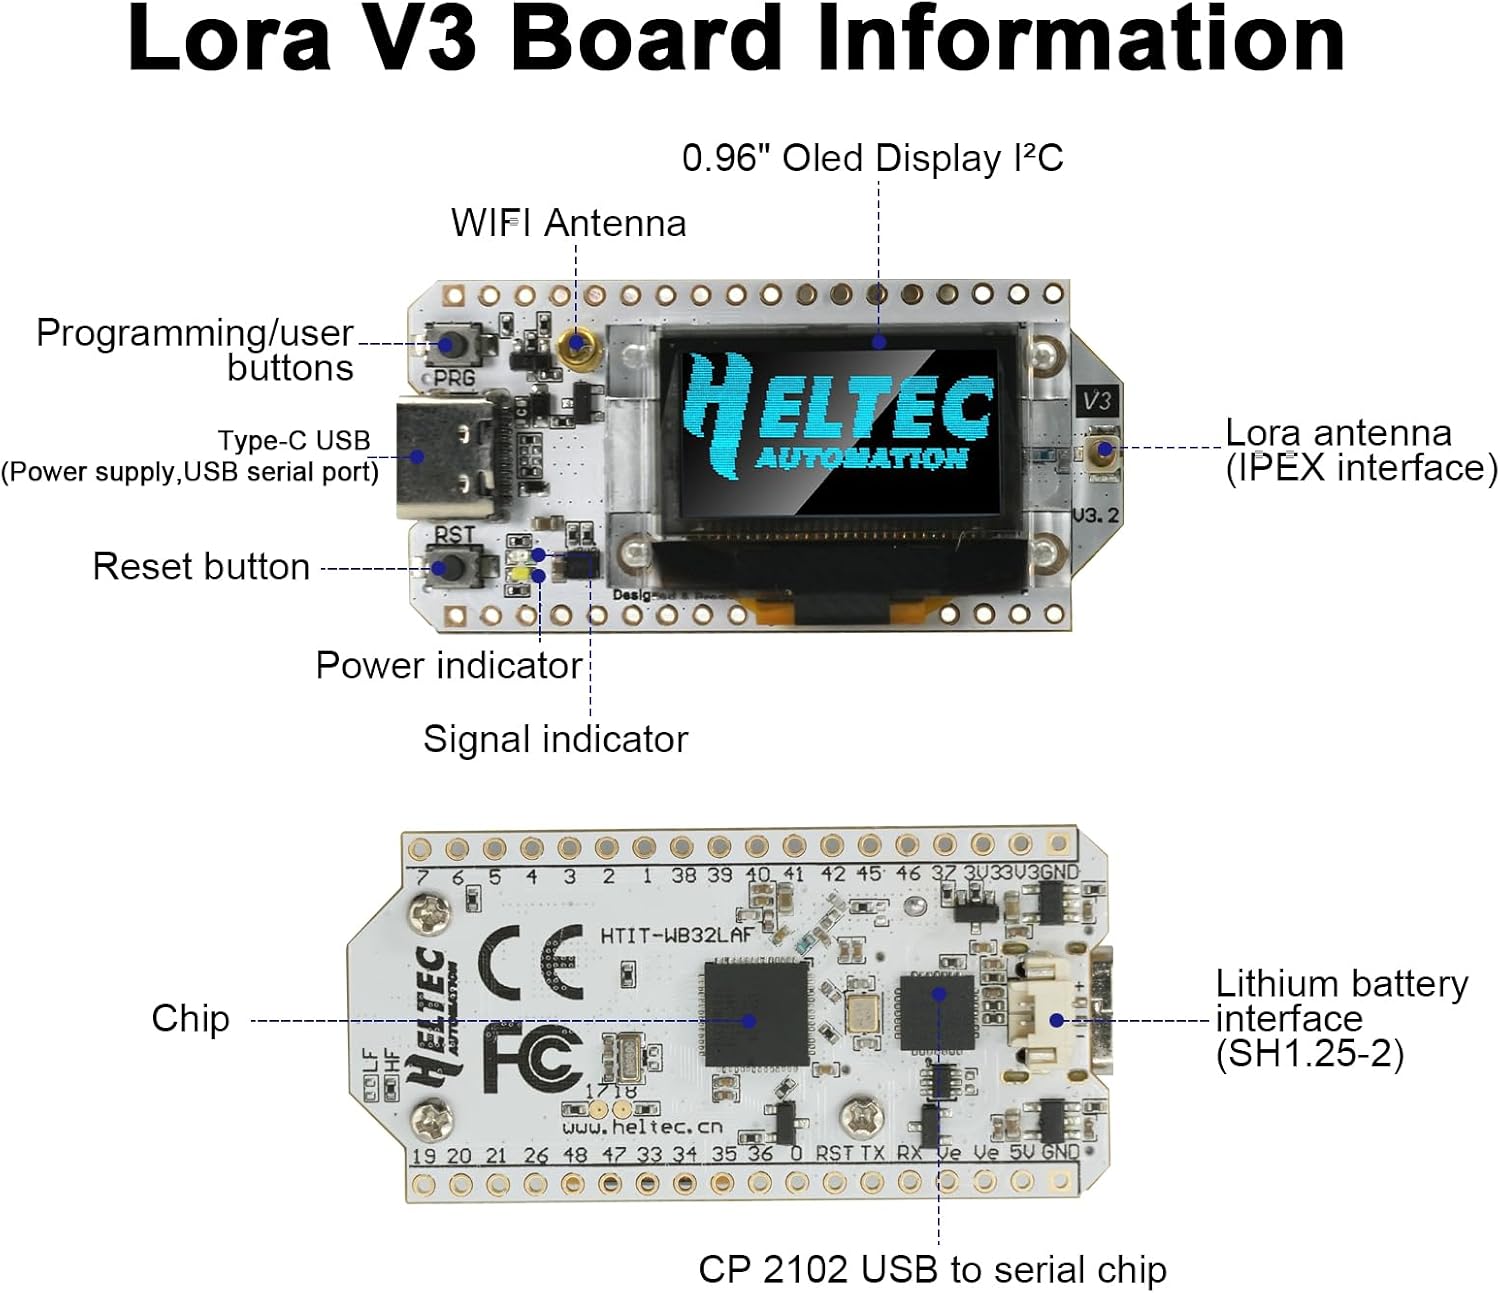
Figure 2.2: A detailed diagram of the RUIZHI ESP32 V3 LoRa Development Board, indicating key components such as the Type-C USB port, programming/user buttons, reset button, power indicator, signal indicator, WiFi antenna, LoRa antenna (IPEX interface), 0.96 inch OLED display I2C, main chip, and lithium battery interface (SH1.25-2).

Figure 2.3: This diagram illustrates the pin assignments for the RUIZHI ESP32 V3 LoRa Development Board, detailing Header J2 and Header J3 connections, including power, ground, GPIO, ADC/DAC, serial, and other functional pins.
3. Specifications
The following table outlines the technical specifications of the RUIZHI ESP32 V3 LoRa Development Board.

Figure 3.1: A table outlining the technical specifications of the LoRa V3 Board, including frequency, flash memory, processor, main control chip, LoRa chip support frequency band, open communication distance, computing power, WiFi support mode, development environment, working voltage, operating range temperature, UDP continuous throughput, USB interface chip, and dual-mode Bluetooth capabilities.
| Feature | Specification |
|---|---|
| Model Name | ESP32 V3.2 |
| Brand | RUIZHI |
| Main Control Chipset | SX1262 + ESP32-S3FN8 |
| Processor | Xtensa LX7 Dual-Core, 240 MHz |
| Flash Memory | 8 MB |
| LoRa Frequency Band | 868-915 MHz |
| Communication Distance | Up to 3.6 km (open areas) |
| Receiver Sensitivity | -139 dBm |
| Output Power | +22 dBm |
| Display | 0.96 inch OLED |
| Wireless Connectivity | WiFi (Sniffer, Station, SoftAP, WiFi Direct), Bluetooth (Classic & BLE) |
| Development Environment | Arduino, Meshtastic, IoT, LoRaWAN |
| USB Interface Chip | CP2102 |
| Working Voltage | 3.3V - 7V |
| Operating Temperature | -40°C to 90°C |
| Compatible Devices | PC, Laptop |
| Country of Origin | China |

Figure 3.2: This image provides the physical dimensions of the RUIZHI ESP32 V3 LoRa Development Board, measuring approximately 47.92mm x 25mm, along with the dimensions of the 868MHz antenna and pin headers.
4. Setup Guide
Follow these steps for initial setup of your RUIZHI ESP32 V3 LoRa Development Board.
- Connect Antenna: Carefully screw the provided 868MHz LoRa antenna onto the IPEX connector on the board. Ensure it is securely fastened but do not overtighten.
- Connect to PC: Use a USB Type-C cable to connect the board to your computer. The board should power on, and the OLED display may show initial boot information.
- Install USB Driver: The board uses a CP2102 USB-to-serial chip. If your operating system does not automatically install the driver, download and install the appropriate CP2102 driver from Silicon Labs' official website.
- Prepare Development Environment:
- Arduino IDE: Install the Arduino IDE. Add ESP32 board support by navigating to File > Preferences > Additional Board Manager URLs and adding
https://raw.githubusercontent.com/espressif/arduino-esp32/gh-pages/package_esp32_index.json. Then, go to Tools > Board > Boards Manager, search for 'esp32', and install the ESP32 by Espressif Systems package. Select the correct board (e.g., 'ESP32 Dev Module' or specific Heltec LoRa 32 V3 if available) and COM port. - PlatformIO: Install VS Code and the PlatformIO extension. Create a new PlatformIO project and select the appropriate board configuration for ESP32-S3 with LoRa.
- Arduino IDE: Install the Arduino IDE. Add ESP32 board support by navigating to File > Preferences > Additional Board Manager URLs and adding
- Flash Firmware: For Meshtastic compatibility, download the latest Meshtastic firmware for ESP32-S3 LoRa boards from the official Meshtastic website. Use the Meshtastic Flasher tool or PlatformIO to upload the firmware to your board.
5. Operating Instructions
Once the firmware is successfully installed, you can begin operating your RUIZHI ESP32 V3 LoRa Development Board.
- Power On: Connect the board via USB-C or a compatible lithium battery (SH1.25-2 interface). The OLED display will illuminate, showing the boot sequence and current status as defined by your loaded firmware (e.g., Meshtastic node information).
- OLED Display: The 0.96-inch OLED display provides real-time information such as signal strength, battery level, network status, and received messages, depending on the firmware.
- Buttons: The board includes programming/user buttons and a reset button. Their functionality is determined by the loaded firmware. For Meshtastic, these buttons might be used for menu navigation or specific actions.
- LoRa Communication: Ensure the 868MHz antenna is connected for optimal LoRa performance. The board will automatically attempt to join or form a LoRa mesh network based on the Meshtastic firmware configuration.
- WiFi and Bluetooth: The ESP32-S3 chip supports WiFi and Bluetooth. These can be configured via firmware for various purposes, such as connecting to a local network for internet access or pairing with a mobile device for configuration and monitoring.
6. Maintenance
Proper care and maintenance will ensure the longevity and reliable operation of your development board.
- Handling: Always handle the board by its edges to avoid touching sensitive components. Electrostatic discharge (ESD) can damage electronic components, so use appropriate precautions.
- Cleaning: If necessary, gently clean the board with a soft, dry brush or compressed air to remove dust. Avoid using liquids or abrasive materials.
- Storage: Store the board in a dry, cool environment, away from direct sunlight and extreme temperatures. Use anti-static bags if storing for extended periods.
- Firmware Updates: Regularly check for firmware updates for Meshtastic or your chosen development platform to benefit from new features, bug fixes, and performance improvements.
7. Troubleshooting
This section addresses common issues you might encounter and provides potential solutions.
- Board Not Powering On / Black Screen:
- Ensure the USB-C cable is fully inserted and connected to a working USB port.
- If using a battery, verify it is charged and correctly connected to the SH1.25-2 interface.
- Check if the power indicator LED on the board is lit.
- Firmware Upload Failure:
- Verify that the correct CP2102 USB driver is installed and the board is recognized by your computer (check Device Manager on Windows or
ls /dev/tty*on Linux/macOS). - Ensure the correct COM port is selected in your IDE or flashing tool.
- Try holding down the 'BOOT' or 'PRG' button (if available) while initiating the upload, then releasing it once the upload starts.
- Confirm that you have selected the correct board type (e.g., ESP32-S3 Dev Module or specific Heltec LoRa 32 V3) in your development environment.
- Verify that the correct CP2102 USB driver is installed and the board is recognized by your computer (check Device Manager on Windows or
- No LoRa Communication:
- Ensure the 868MHz antenna is securely connected to the IPEX connector.
- Verify that the firmware is correctly configured for the 868MHz frequency band.
- Check if other LoRa devices are within range and operating on the same frequency and network settings.
- OLED Display Not Working:
- Confirm that the firmware includes support for the 0.96-inch OLED display and that it is correctly initialized.
- Ensure there are no physical damages to the display or its connection.
8. Warranty and Support
Warranty information for this product is not explicitly provided. For product support, technical assistance, or inquiries regarding potential defects, please contact the seller directly through your purchase platform. Refer to the manufacturer's (RUIZHI) official resources for general documentation and community support related to ESP32 and LoRa development.