Introduction
This manual provides essential information for the safe and efficient operation of your Giantex Portable Twin Tub Washing Machine. Designed for compact living spaces such as apartments, RVs, and dorms, this appliance offers a convenient solution for your laundry needs. Please read all instructions carefully before initial use and retain this manual for future reference.

Image: Front view of the Giantex Portable Twin Tub Washing Machine.
Safety Information
To reduce the risk of fire, electric shock, or injury, always follow basic safety precautions when operating this appliance.
- Ensure the appliance is connected to a properly grounded outlet.
- Do not operate the machine with a damaged power cord or plug.
- Keep the machine away from heat sources and direct sunlight.
- Do not immerse the electrical parts in water.
- Supervise children when the appliance is in use.
- Do not wash items that are soiled with flammable substances.
- Always ensure the spin lid and safety cover are properly closed during operation.
Package Contents
Verify that all items are present in the package:
- 1 x Twin Tub Washing Machine
- 1 x Inlet Hose Kit
- 1 x User Guide
Product Overview
The Giantex Portable Twin Tub Washing Machine features a dual-tub design for separate washing and spinning functions. The control panel is located on the top of the unit for easy access.

Image: Detailed view of the control panel, showing the wash timer, wash selector, and spin timer dials.

Image: Close-up of the built-in filter, safety cover for the spinner, cable organizer, and integrated carrying handles.
Setup
Before operating the washing machine, ensure it is placed on a stable, level surface. Connect the water inlet hose and position the drain hose correctly.
Water Connection
- Attach the provided 48-inch inlet hose to a suitable water source (e.g., faucet).
- Insert the other end of the inlet hose into the 'WATER INLET' port on the washing machine.
- Ensure all connections are secure to prevent leaks.
Drainage Setup
- The machine utilizes a gravity drainage system. The 20-inch outlet hose must be positioned lower than the machine's base for effective draining.
- Direct the drain hose into a sink, bathtub, or floor drain. Ensure it is secured to prevent accidental displacement during draining.
- The drain hose can be hung up using the integrated bracket when not in use.

Image: Illustration of the water inlet and outlet hose connections for proper setup.
Power Connection
- Plug the power cord into a standard 110-120V, 60Hz grounded electrical outlet.
- Use the cable organizer on the back of the machine to manage the power cord.
Operating Instructions
Follow these steps for washing and spinning your laundry.
Washing Cycle
- Load Laundry: Open the lid of the washing tub (left side). Place up to 12 lbs of dry laundry into the tub. Do not overload.
- Add Water: Fill the washing tub with water using the inlet hose or manually. Ensure water level covers the clothes.
- Add Detergent: Add a small amount of laundry detergent directly into the washing tub. Use sparingly to avoid excessive suds.
- Select Wash Setting: Turn the 'WASH SELECTOR' dial to 'SOFT' for delicate items or 'NORMAL' for regular loads.
- Set Wash Timer: Turn the 'WASH TIMER' dial to the desired wash time (0-15 minutes). The machine will start automatically.
- Drain Water: Once the wash cycle is complete, turn the 'WASH SELECTOR' dial to 'DRAIN' to empty the water from the tub.
Spinning Cycle
- Transfer Laundry: Carefully transfer the washed laundry from the washing tub to the spinning tub (right side). Ensure clothes are evenly distributed and do not exceed 8 lbs.
- Secure Safety Cover: Place the safety cover over the clothes in the spinning tub and close the spin lid.
- Set Spin Timer: Turn the 'SPIN TIMER' dial to the desired spin time (0-5 minutes). The machine will start spinning.
- Remove Laundry: Once the spin cycle is complete, the machine will stop. Open the lid and carefully remove the spun laundry. Clothes will be damp, not completely dry.
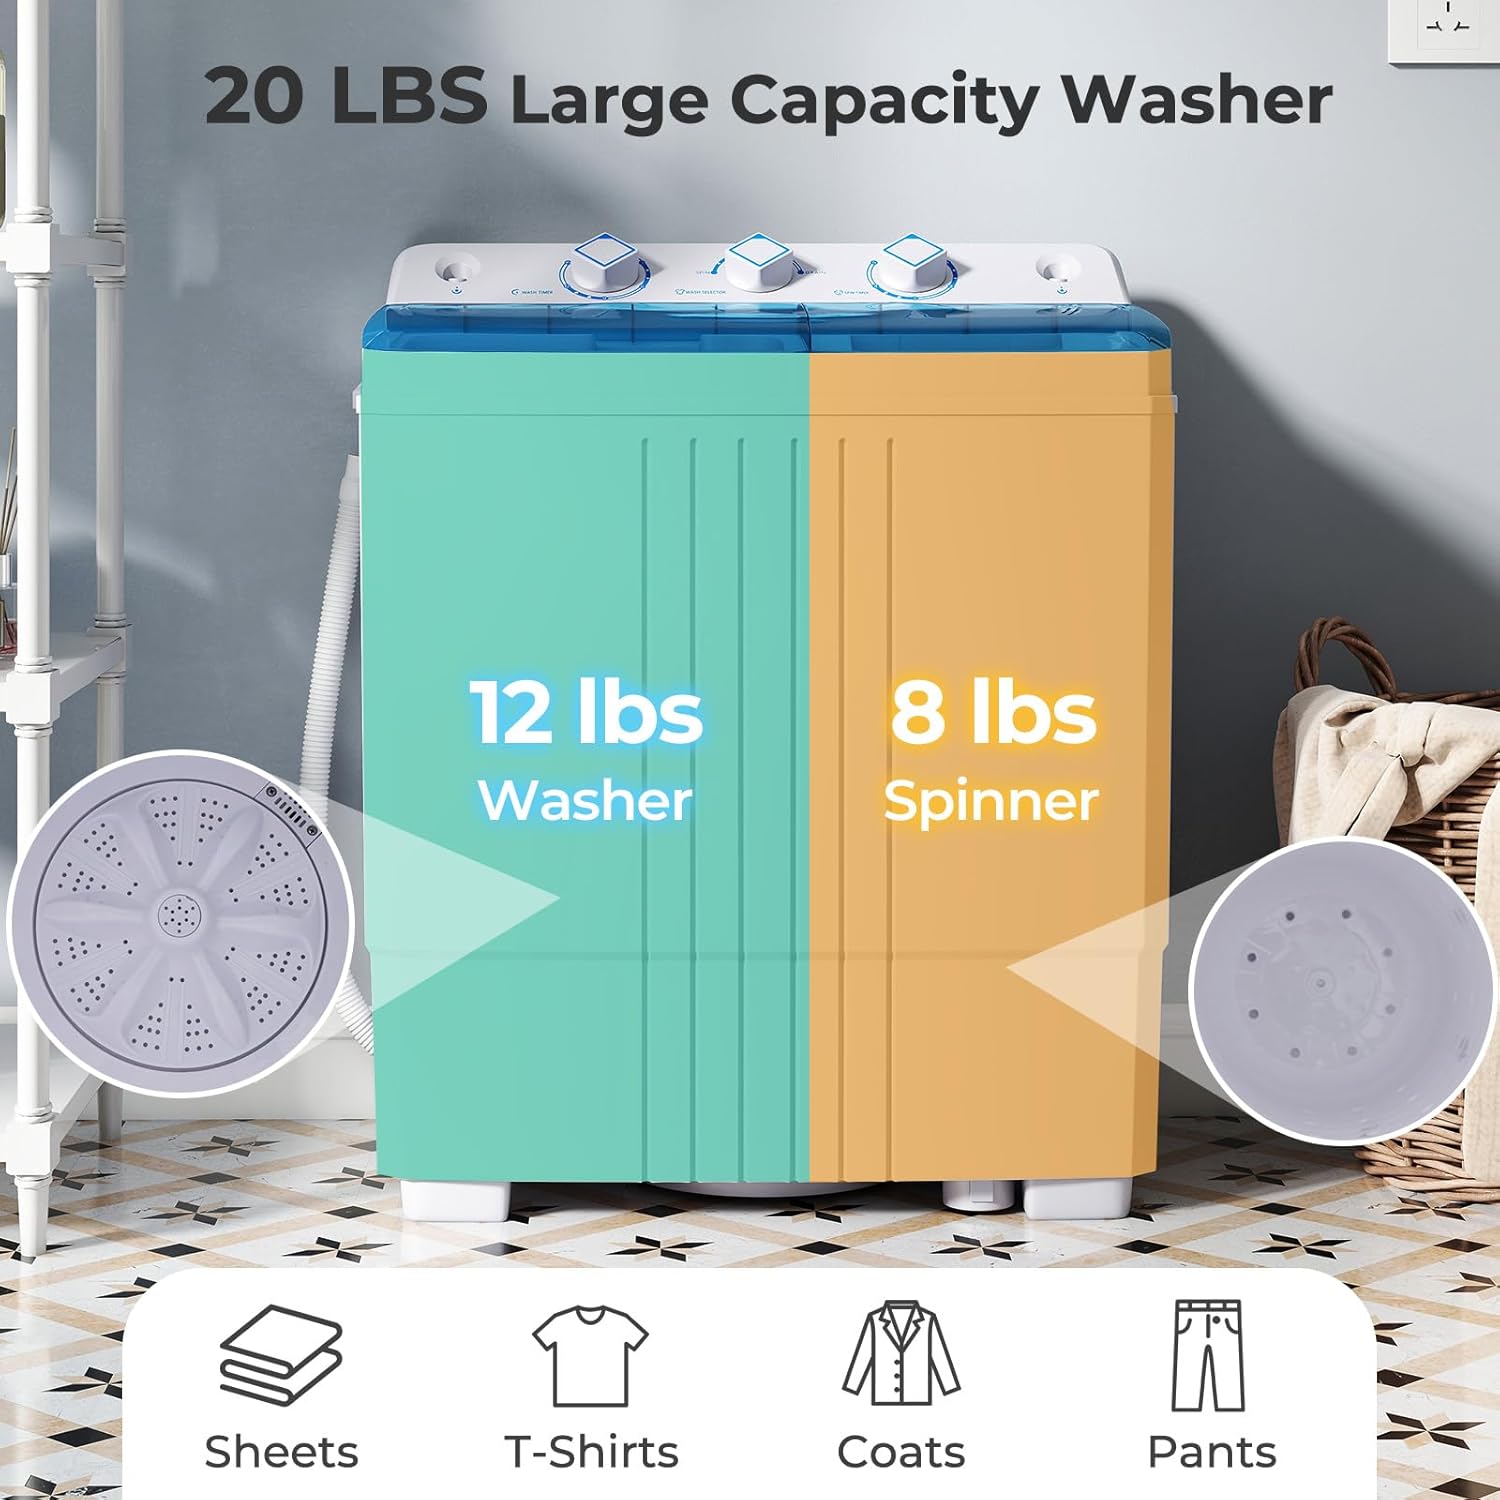
Image: Visual representation of the washing and spinning capacities.
Maintenance
Regular maintenance ensures the longevity and optimal performance of your washing machine.
Cleaning the Lint Filter
- The built-in filter in the washing tub collects lint and impurities.
- To clean, gently pull out the filter component.
- Remove any accumulated lint and rinse the filter under running water.
- Reinsert the clean filter back into its slot.
General Cleaning
- Wipe the exterior of the machine with a soft, damp cloth.
- Do not use abrasive cleaners or solvents.
- Ensure the machine is dry before storing or next use.
Troubleshooting
If you encounter any issues, refer to the following common problems and solutions:
| Problem | Possible Cause | Solution |
|---|---|---|
| Machine does not start | Power cord not plugged in; Timer not set; Lid not closed. | Check power connection; Set timer; Ensure lids are securely closed. |
| Water does not drain | Drain hose not positioned correctly (too high); Drain hose clogged. | Ensure drain hose is lower than the machine; Check for kinks or blockages in the hose. |
| Excessive suds | Too much detergent used. | Reduce the amount of detergent for future washes. |
| Clothes not clean enough | Overloading; Insufficient detergent; Short wash time. | Reduce load size; Adjust detergent amount; Increase wash time. |
| Clothes still very wet after spin | Overloading spin tub; Short spin time. | Reduce load size in spinner; Increase spin time (up to 5 minutes). |
Specifications
| Feature | Detail |
|---|---|
| Brand | Giantex |
| Model Name | GX11048US-DK-PF |
| Material | ABS, PP |
| Overall Dimensions (L x W x H) | 25” x 15.5” x 29.5” |
| Height of Open Status | 36.5” |
| Inlet Hose Length | 48” |
| Outlet Hose Length | 20” |
| Washer Capacity | 12 lbs |
| Spinner Capacity | 8 lbs |
| Washing Power | 260W |
| Spinning Power | 140W |
| Voltage | 110-120V |
| Frequency | 60 Hz |
| Net Weight | 28.5 lbs |
Warranty and Support
For warranty information or technical support, please refer to the contact details provided in your purchase documentation or visit the official Giantex website. Keep your proof of purchase for any warranty claims.


