1. Introduction and Overview
The KOHO Multi-Function Media Recorder is designed to convert and preserve your analog video and audio memories into digital formats. This device supports recording from various sources such as VCRs, DVD players, camcorders, and vintage digital cameras to DVDs, USB storage devices, or SD cards. It also facilitates file copying between different storage media and offers smartphone integration via a dedicated app for wireless transfers. The recorder features a 4.3-inch LCD preview screen and supports HD output up to 1080p for viewing on external displays.

Image: The KOHO Multi-Function Media Recorder, showing its compact design, integrated screen, control buttons, RCA cables, and a stack of blank DVDs.
Video: An overview of the KOHO Multi-Function Media Recorder, demonstrating its unboxing, various components, and initial setup steps, including connecting a USB drive and playing back a video. It highlights the device's ability to convert old media to digital formats.
2. Setup
Before operating your KOHO Media Recorder, ensure proper connections and media preparation.
2.1 Power Connection
- Connect the provided power adapter to the DC 5V input port on the recorder.
- Plug the power adapter into a standard electrical outlet.
2.2 Connecting Analog Sources
Use the supplied RCA (red, white, yellow) cables to connect your analog source device (e.g., VCR, camcorder, DVD player) to the recorder's AV IN ports. The yellow cable is for video, and the red and white cables are for audio (right and left channels, respectively).
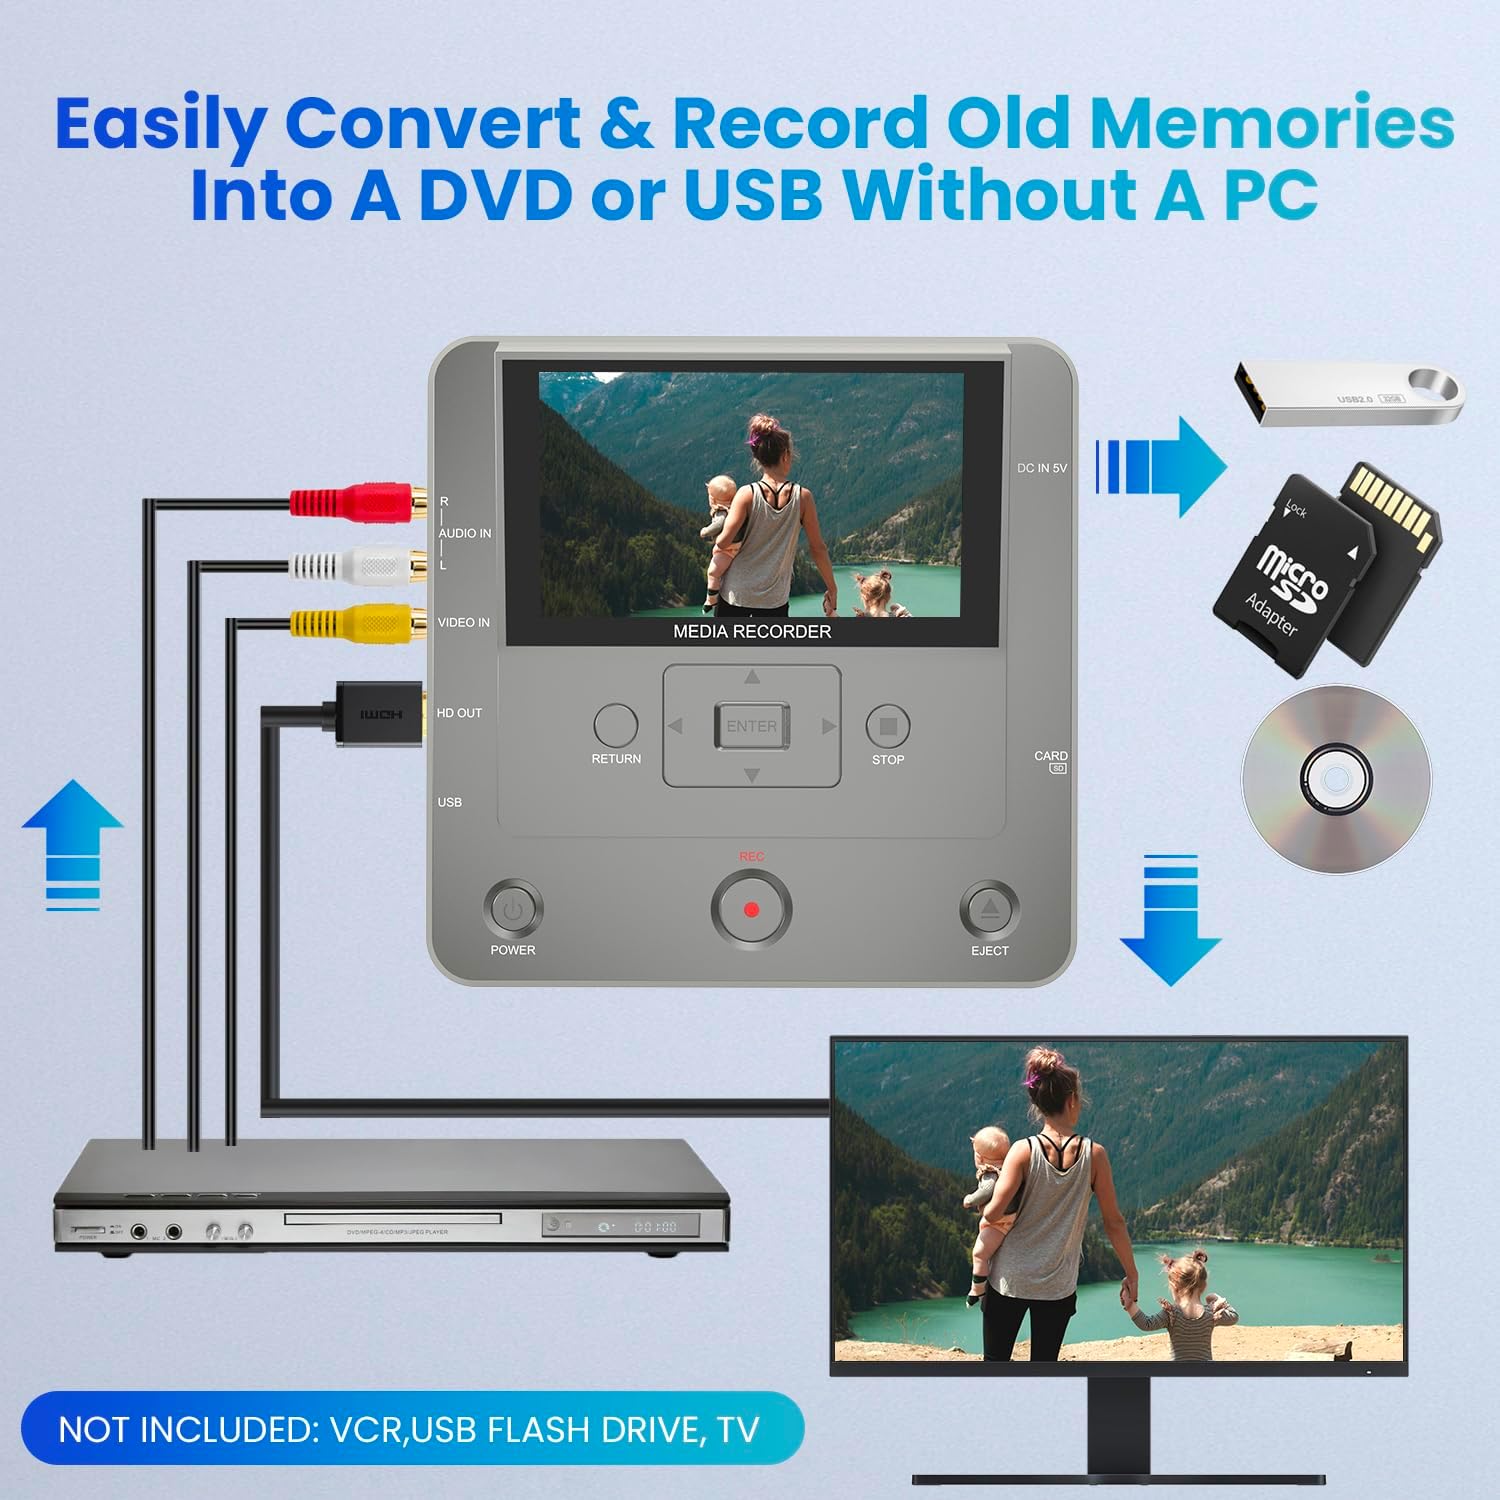
Image: A diagram illustrating how to connect various devices to the media recorder. It shows RCA input from a source device, HDMI output to a TV, and connections for USB, SD card, and DVD for recording and playback.
2.3 Preparing Digital Storage Media
- USB Device: Insert a USB flash drive or external HDD into the USB port. For optimal compatibility, ensure the USB device is formatted to FAT32.
- SD Card: Insert an SD card into the SD card slot.
- DVD/CD: Open the disc tray by pressing the EJECT button and place a blank recordable DVD (DVD+RW/R, DVD-RW/R) or CD (CD+RW/R, CD-RW/R) onto the tray. Close the tray.

Image: An illustration of various analog video sources compatible with the recorder, including VCR, DVR, DVD, VHS, Hi8, Film, Camcorders, and Portable Players. It emphasizes the need for an AV video output interface on the source device.
3. Operating Instructions
3.1 Recording from Analog Sources
To convert your analog content to digital:
- Connect your analog source (e.g., VCR, camcorder) to the recorder's AV IN ports using RCA cables.
- Power on the recorder and the analog source device.
- Select the desired recording destination (DVD, USB, or SD card) from the on-screen menu.
- Start playback on your analog source device.
- Press the REC button on the recorder to begin recording. You can monitor the recording on the built-in 4.3-inch LCD screen.
- Press the STOP button to end the recording.

Image: A visual guide demonstrating the process of recording from a VHS player to the media recorder, with output options including DVD/CD, Portable HDD, USB Drive, and SD Card.
3.2 DVD Burning Options
When burning to DVD, consider the format and burn mode for compatibility and capacity:

Image: A chart detailing the 'Solution Guide for Successful DVD Burning', outlining recommended formats (MP4, MPG), burn modes (DATA Burn, Video Burn), supported devices, and best use cases to avoid playback errors and capacity issues.

Image: A table titled 'Maximum Recording Capacity Chart', showing estimated recording times in minutes for different recording qualities (High, Medium, Low) across various formats and burn modes (MPG/MP4 with DATA Burn or VIDEO Burn), along with supported playing platforms.
3.3 File Copying
The recorder allows seamless transfer of files between USB, SD card, and CD/DVD:
- From USB or memory card to CD.
- From CD to USB or memory card.
- From mobile phone to DVD, USB, or memory card (via WiFi).

Image: A diagram illustrating the various file transfer options, showing how recordings from AV input can be saved to DVD Disc, SD Card, or USB HDD, and how files can be copied seamlessly between CD/DVD Disc, SD Card, and USB HDD.
3.4 Smartphone WiFi Transmission
Utilize the
Related Documents - B0FP1HPC1C
 |
KOHO HD4K Pico Projector User Manual User manual for the KOHO HD4K Pico Projector, providing detailed instructions on setup, operation, safety precautions, specifications, and troubleshooting. |
 |
Frameo Digital Photo Frame User Manual - Setup, Features, and Support Comprehensive user manual for the Frameo digital photo frame, covering setup, connecting friends and family, managing photos, settings, Wi-Fi, backup, and support information. |
 |
TroposAir Koho 3VT52+LED175 Ceiling Fan Owner's Manual and Installation Guide Comprehensive guide for the TroposAir Koho 3VT52+LED175 ceiling fan, detailing safety, parts, installation, operation, troubleshooting, and remote pairing. |
 |
Harbour Chandler Inventory Clearance Sale - October 23-31, 2025 Shop the Harbour Chandler Inventory Clearance Sale from October 23rd to October 31st, 2025. Find huge deals on marine electronics, boating accessories, fishing gear, and more. In-store and online. |