1. Introduction and Overview
The LILYGO T-Deck ESP32-S3 is a versatile development board integrating an ESP32-S3 microcontroller with LoRa, Bluetooth Low Energy (BLE), and Wi-Fi connectivity. It features a 2.8-inch ST7789 IPS LCD, a full QWERTY keyboard, and a trackball for user interaction. This specific variant comes pre-loaded with Meshtastic firmware, enabling long-range, off-grid communication capabilities. It is designed for developers and enthusiasts interested in IoT, wireless communication, and custom embedded projects.
Key features include:
- MCU: ESP32-S3FN16R8 Dual-core LX7 microprocessor
- Wireless Connectivity: 2.4 GHz Wi-Fi & Bluetooth 5 (LE), LoRaWAN
- Display: 2.8 inch ST7789 SPI Interface IPS LCD (320 x 240 resolution)
- Onboard Functions: Trackball, Microphone, Speaker, QWERTY Keyboard
- Storage: 16MB PSRAM, 8MB Flash

Figure 1.1: Front view of the LILYGO T-Deck, showing the display and keyboard.
2. Setup Instructions
This section outlines the initial steps to get your LILYGO T-Deck operational. For detailed technical information and advanced configurations, please refer to the official LILYGO Wiki and GitHub repository.
2.1 Package Contents
Verify that all components are present in your package:
- 1 x LILYGO T-Deck ESP32-S3 Module
- 1 x 6-pin Header
- 1 x Power Cable
- 1 x 433MHz FPC Antenna (frequency may vary based on model)

Figure 2.1: Contents of the LILYGO T-Deck package, including the main board, pin header, power cable, and antenna.
2.2 Connecting the Antenna
- Locate the U.FL connector on the LILYGO T-Deck board for the LoRa antenna.
- Carefully snap the FPC antenna connector onto the U.FL connector. Ensure a secure connection.

Figure 2.2: Back view of the LILYGO T-Deck board, highlighting the LoRa antenna connector and other components.
2.3 Powering the Device
The LILYGO T-Deck can be powered via its USB-C port or an external battery connected to the battery connector.
- USB-C Power: Connect a standard USB-C cable to the device and a 5V power source (e.g., computer USB port, USB wall adapter).
- Battery Power: Connect a compatible LiPo battery to the designated battery connector on the board. Ensure correct polarity.
2.4 Initial Firmware (Meshtastic)
This LILYGO T-Deck variant comes pre-loaded with Meshtastic firmware. For updates or custom firmware installation, refer to the official Meshtastic documentation and the LILYGO GitHub repository.
Important: When flashing new firmware, it is often necessary to set the device to bootloader mode. This typically involves holding down the trackball button while powering on the device, or using a specific switch combination. Consult the LILYGO GitHub for precise instructions for your model.
Useful Resources:
3. Operating Instructions
The LILYGO T-Deck provides multiple interfaces for interaction, including a display, keyboard, and trackball.
3.1 Basic Navigation
- Display: The 2.8-inch IPS LCD shows information and menu options.
- Trackball: Use the trackball for menu navigation (up, down, left, right) and selection (press down).
- Keyboard: The integrated QWERTY keyboard allows for text input, such as sending messages in Meshtastic.

Figure 3.1: Angled view of the LILYGO T-Deck, illustrating the interactive display and keyboard.
3.2 Meshtastic Firmware Operation
With Meshtastic firmware, the T-Deck functions as a long-range communication device. Specific operations will depend on the Meshtastic UI version installed.
- Sending Messages: Use the keyboard to type messages and the trackball to navigate and send.
- Channel Configuration: Access radio configuration settings through the device's menu to adjust channels, power, and other network parameters.
- GPS Integration: If a GPS module is connected (not included), the device can display location information and share it over the mesh network.
For detailed instructions on using Meshtastic features, refer to the official Meshtastic documentation and community resources.
4. Maintenance
Proper care and maintenance will ensure the longevity and optimal performance of your LILYGO T-Deck.
- Cleaning: Use a soft, dry cloth to clean the device. Avoid abrasive materials or harsh chemicals. For the screen, use a microfiber cloth.
- Storage: Store the device in a cool, dry place away from direct sunlight and extreme temperatures.
- Battery Care: If using an external LiPo battery, follow the manufacturer's guidelines for charging and storage. Avoid over-discharging or over-charging.
- Physical Protection: Consider using a protective case to prevent damage from drops or impacts.

Figure 4.1: The LILYGO T-Deck shown within a protective case, illustrating recommended storage.
5. Troubleshooting
This section addresses common issues you might encounter with your LILYGO T-Deck.
5.1 Device Not Powering On
- Check Power Source: Ensure the USB-C cable is securely connected to a functional power source, or that the external battery is charged and correctly connected.
- Power Switch: Verify that the power switch on the side of the board is in the 'ON' position.
5.2 Screen Remains Blank After Power On
- Firmware Issue: A blank screen can indicate a firmware issue or that the device is in bootloader mode. Try re-flashing the firmware following instructions on the LILYGO GitHub.
- Connection: Ensure the display's flexible flat cable (FFC) is properly seated in its connector.
5.3 LoRa Communication Issues
- Antenna Connection: Confirm the LoRa antenna is securely connected to the U.FL port.
- Antenna Type: Ensure you are using the correct frequency antenna for your region (e.g., 433MHz, 868MHz, 915MHz).
- Firmware Configuration: Verify that the LoRa settings in your Meshtastic firmware (e.g., frequency, power) match your requirements and local regulations.
5.4 General Connectivity Problems (Wi-Fi/BLE)
- Firmware Support: Ensure your installed firmware supports and enables Wi-Fi and BLE functionalities.
- Interference: Minimize potential interference from other 2.4 GHz devices.
For more complex issues, consult the LILYGO GitHub repository's issues section or the Meshtastic community forums for assistance.
6. Specifications
Detailed technical specifications for the LILYGO T-Deck ESP32-S3 module:
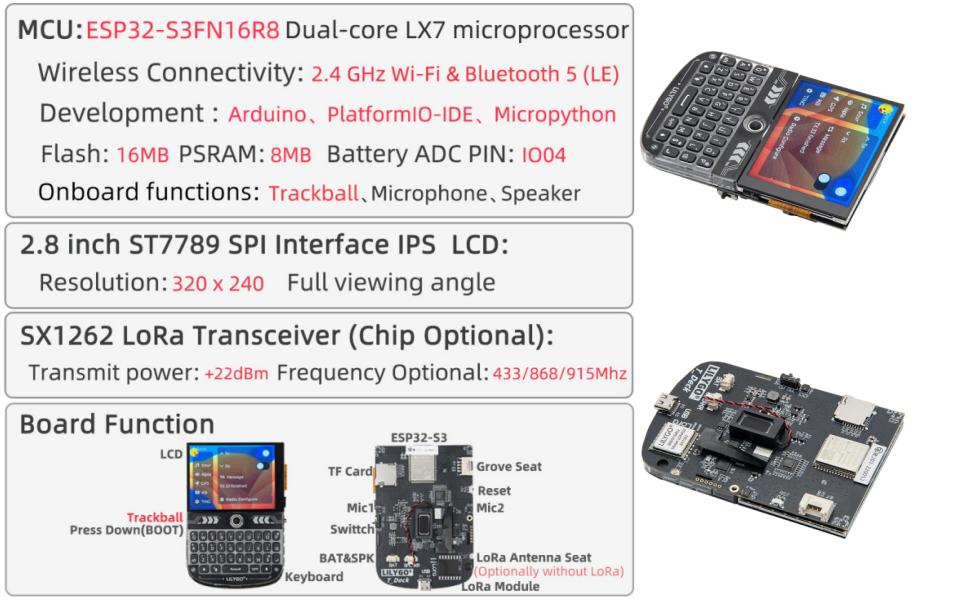
Figure 6.1: Visual representation of LILYGO T-Deck specifications and features.
| Feature | Description |
|---|---|
| MCU | ESP32-S3FN16R8 Dual-core LX7 microprocessor |
| Wireless Connectivity | 2.4 GHz Wi-Fi & Bluetooth 5 (LE) |
| LoRa Transceiver | SX1262 (Chip Optional), Transmit power: +22dBm, Frequency Optional: 433/868/915MHz |
| Display | 2.8 inch ST7789 SPI Interface IPS LCD, Resolution: 320 x 240, Full viewing angle |
| Flash Memory | 16MB PSRAM, 8MB Flash |
| Onboard Functions | Trackball, Microphone, Speaker, QWERTY Keyboard |
| Development Environment | Arduino, PlatformIO-IDE, Micropython |
| Dimensions (Approx.) | Length: 100mm, Width: 67mm, Height: 14mm |
| Item Weight | 3.2 ounces |
| ASIN | B0FP14ZCR3 |
| UPC | 717382831527 |
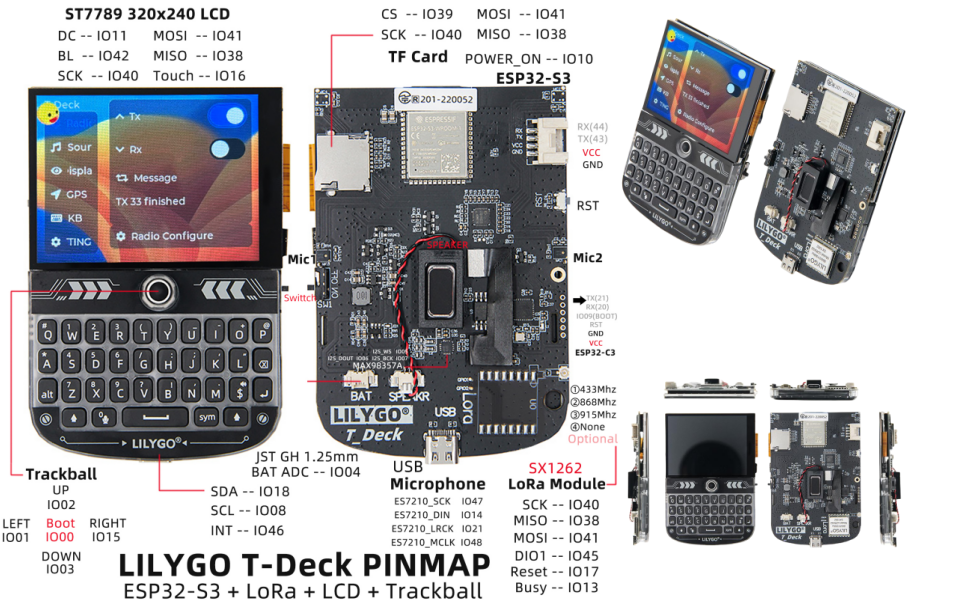
Figure 6.2: Pinmap diagram for the LILYGO T-Deck, detailing GPIO assignments and connectors.

Figure 6.3: Physical dimensions of the LILYGO T-Deck module.
7. Warranty and Support
LILYGO is committed to providing quality products and customer satisfaction.
7.1 Product Service
If you have any questions or suggestions regarding the LILYGO T-Deck, please feel free to contact LILYGO customer service. They aim to answer your questions as soon as possible.
7.2 Technical Resources
For comprehensive technical documentation, community support, and the latest firmware updates, please refer to the following official resources:
Specific warranty details are not provided in this manual. Please refer to your purchase documentation or contact LILYGO directly for warranty information.


