
Introduction
Thank you for choosing the PRUNUS J-165 Portable Radio. This compact and versatile radio offers AM, FM, and Shortwave (SW) reception, along with convenient features like preset station buttons, a sleep timer, and a lock function. Designed for ease of use and portability, the J-165 provides reliable audio entertainment wherever you go. This manual will guide you through the setup, operation, and maintenance of your new radio.
Product Overview
The PRUNUS J-165 is a lightweight, battery-operated radio featuring a clear speaker and a 3.5mm headphone jack for private listening. Its compact design includes a back clip and hand strap for enhanced portability.
Key Features:
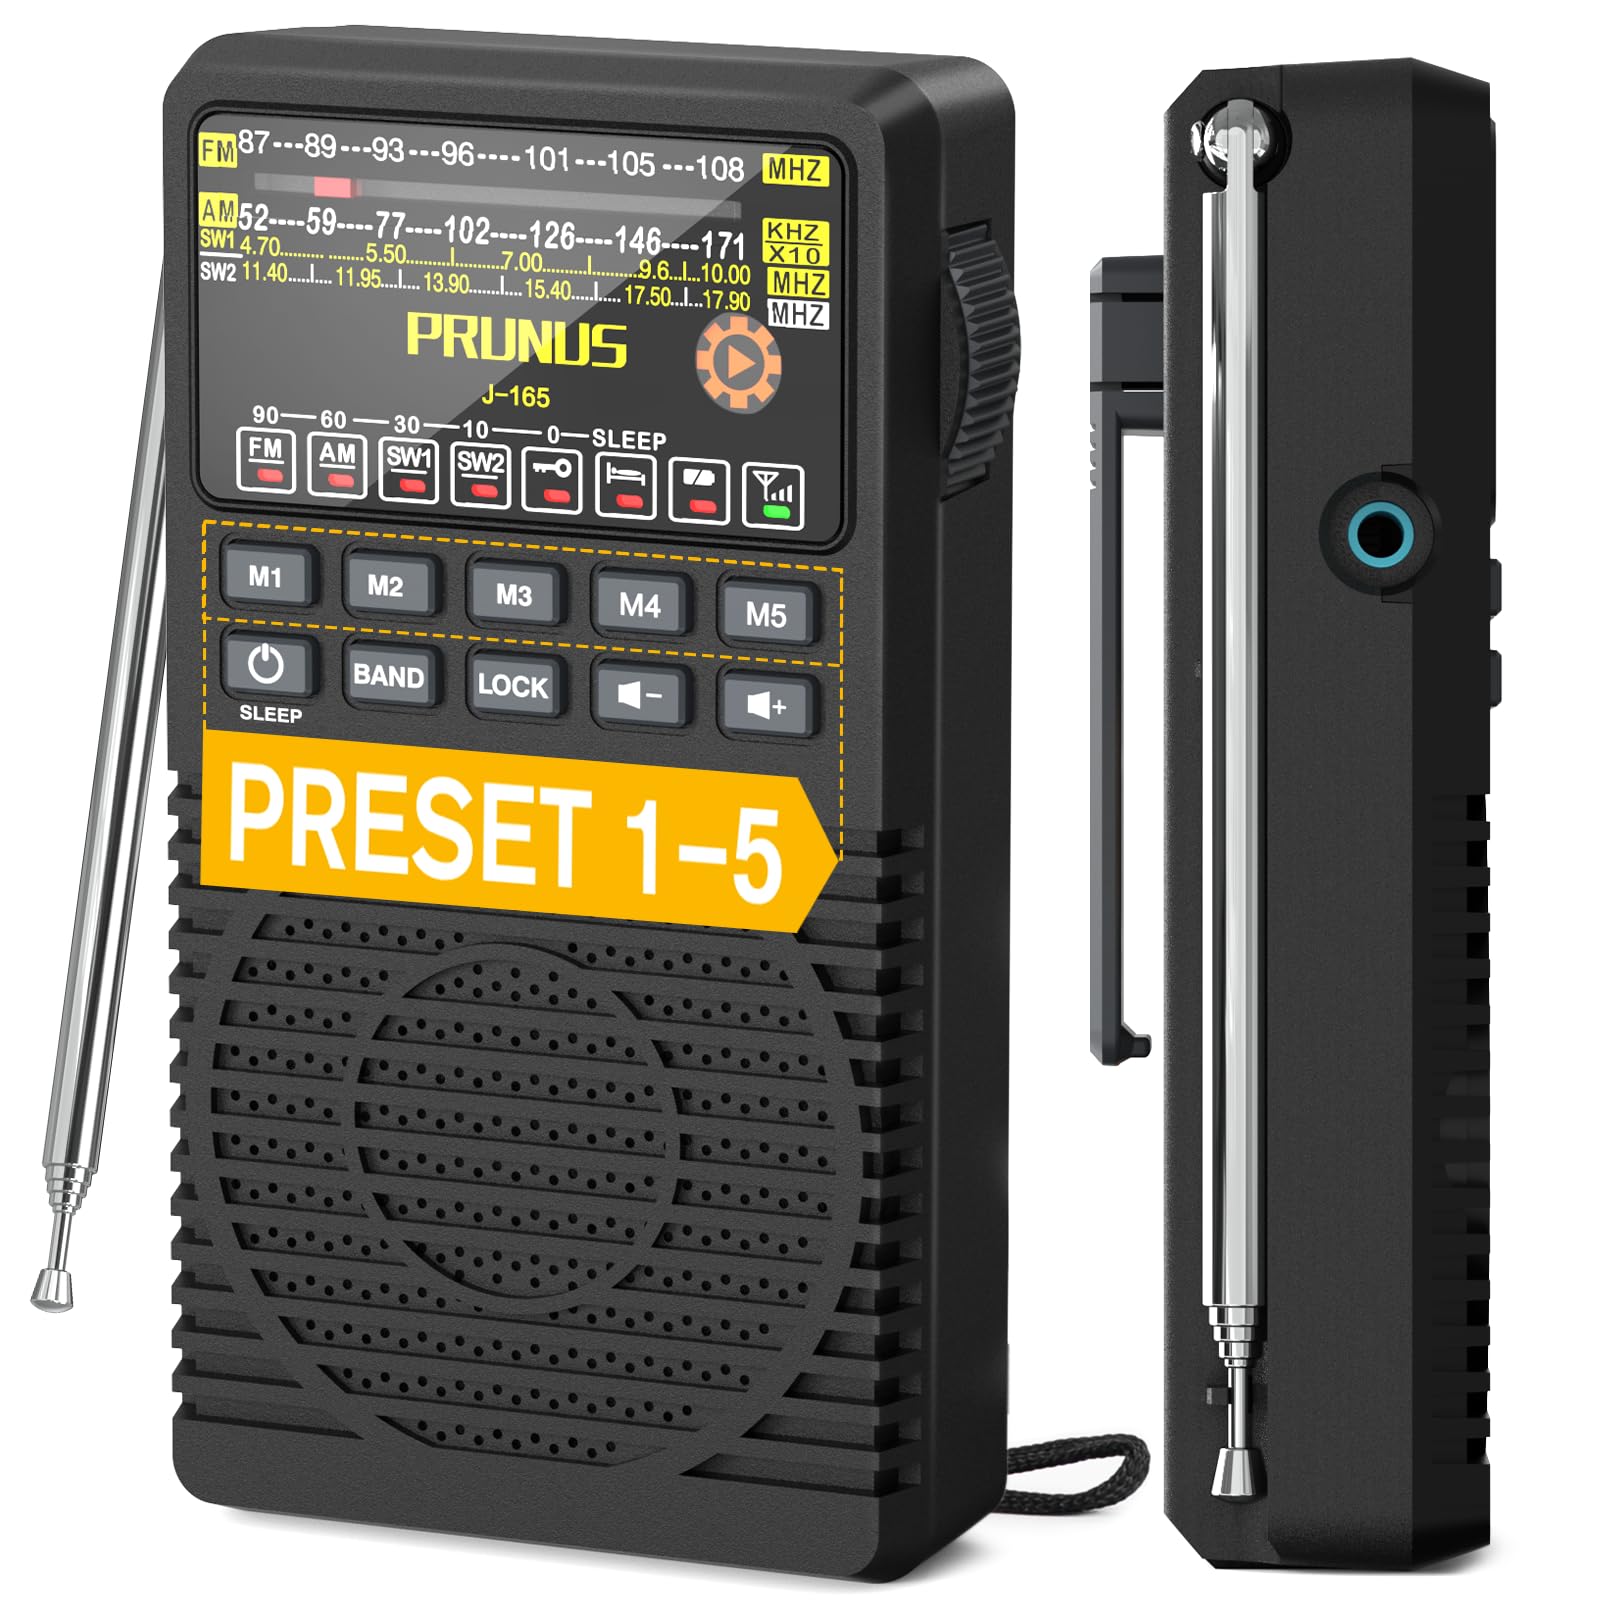
- Multi-Band Reception: Access FM (87-108 MHz), AM (520-1710 KHz), and two Shortwave bands (SW1: 4.70-10.00 MHz, SW2: 11.40-17.9 MHz).
- 5 Preset Station Buttons: Quickly save and recall your favorite radio stations.
- Sleep Timer: Set the radio to automatically turn off after 0-90 minutes.
- Portable Design: Compact size (approximately 4.6 x 2.6 x 1.2 inches, weighing 3.6 oz) with a back clip and hand strap.
- Lock Function: Prevents accidental button presses during transport or use.
- Excellent Reception: Equipped with an advanced DSP chip and a 16-inch telescopic antenna for stable signal reception.
- Clear Sound: Built-in magnetic speaker and 3.5mm headphone jack.
- Battery Operated: Powered by AA batteries (not included) for use at home or outdoors.
Radio Components and Controls:
Familiarize yourself with the various parts of your PRUNUS J-165 radio.

Setup
1. Battery Installation:
- Locate the battery compartment on the back of the radio.
- Carefully open the battery compartment cover. Some models may require turning a small dial or using a pry tool to release the latch, especially the first time. The belt clip may need to be lifted or moved slightly to access the cover.
- Insert two (2) AA batteries (not included) into the compartment, ensuring correct polarity (+ and -) as indicated inside the compartment.
- Close the battery compartment cover securely.

2. Initial Power On:
Press and hold the POWER button to turn on the radio. The display will illuminate, and the radio will start playing from the last tuned station or a default frequency.
Operating Instructions
1. Power On/Off:
- Press and hold the POWER button to turn the radio ON or OFF.
2. Band Selection:
- Press the BAND button repeatedly to cycle through FM, AM, SW1, and SW2 bands. The selected band will be indicated on the display.
3. Tuning to a Station:
- Use the large side tuning knob to manually scan for stations. Turn the knob slowly for precise tuning.
- A signal indicator light will illuminate when a strong station is found, aiding in tuning accuracy.
4. Preset Stations (M1-M5):
The radio allows you to save up to 5 favorite stations for each band (FM, AM, SW1, SW2).
- To Save a Station:
- Tune to your desired station using the tuning knob.
- Press and hold one of the preset buttons (M1 to M5) until the display confirms the station has been saved.
- To Recall a Station:
- Ensure you are on the correct band (FM, AM, SW1, or SW2).
- Press the corresponding preset button (M1 to M5) once to instantly tune to the saved station.

5. Volume Control:
- Use the Volume Up (+) and Volume Down (-) buttons to adjust the sound level.
6. Sleep Timer:
The sleep timer allows the radio to automatically turn off after a set period.
- Press the SLEEP button repeatedly to cycle through available sleep timer durations (e.g., 10, 30, 60, 90 minutes, or OFF). The selected duration will be shown on the display.
- The radio will automatically power off once the set time has elapsed.

7. Lock Function:
The lock function prevents accidental button presses.
- Press the LOCK button to activate or deactivate the lock function. When activated, a lock icon will appear on the display, and most buttons will be unresponsive.
8. Headphone Use:
- Plug any standard 3.5mm headphones (not included) into the headphone jack located on the side of the radio for private listening. The internal speaker will automatically mute when headphones are connected.

Maintenance
Cleaning:
- Wipe the radio with a soft, dry cloth. Do not use liquid cleaners or abrasive materials.
- Keep the radio away from dust, dirt, and moisture.
Battery Care:
- Remove batteries if the radio will not be used for an extended period to prevent leakage.
- Replace batteries when the low battery indicator light appears or when audio quality degrades.
Troubleshooting
| Problem | Possible Cause / Solution |
|---|---|
| Radio does not power on. |
|
| Poor reception or static. |
|
| Difficulty tuning to a specific station. |
|
| Buttons are unresponsive. |
|
| No sound from speaker when headphones are unplugged. |
|
Specifications
| Feature | Detail |
|---|---|
| Brand | PRUNUS |
| Model | J-165 |
| Tuner Technology | DSP (Digital Signal Processing) |
| Radio Bands | FM, AM, SW1, SW2 |
| Frequency Range FM | 87-108 MHz |
| Frequency Range AM | 520-1710 KHz |
| Frequency Range SW1 | 4.70-10.00 MHz |
| Frequency Range SW2 | 11.40-17.9 MHz |
| Power Source | 2 x AA Batteries (not included) |
| Headphone Jack | 3.5mm standard |
| Material | Plastic |
| Dimensions (approx.) | 4.6 x 2.6 x 1.2 inches (11.7 x 6.6 x 3.0 cm) |
| Weight (approx.) | 3.6 oz (102 g) without batteries |

Warranty Information
PRUNUS products are manufactured to high-quality standards. For specific warranty details, please refer to the warranty card included with your purchase or visit the official PRUNUS website. Keep your purchase receipt as proof of purchase for any warranty claims.
Customer Support
If you encounter any issues or have questions regarding your PRUNUS J-165 radio that are not covered in this manual, please contact PRUNUS customer support. Contact information can typically be found on the product packaging, the official PRUNUS website, or through your retailer.


