
1. Introduction
The GODOX X3 Pro N is a versatile 2.4G wireless flash trigger designed for Nikon cameras, offering advanced control over your lighting setup. It features a 2.4-inch LCD full-color touchscreen for intuitive operation and supports Bluetooth connectivity for remote configuration via the Godox Flash APP. Equipped with the Godox 2.4G wireless X system, it ensures stable and efficient wireless control in various shooting environments, from outdoor locations to complex multi-light studio setups.
2. What's in the Box
Upon opening the package, verify that all the following items are included:
- X3Pro Trigger for Nikon
- Charging cable (USB Type-C)
- Storage bag
- Cleaning cloth

Image: Contents of the GODOX X3 Pro N package.
Video: An unboxing and initial overview of the GODOX X3 Pro N flash trigger, demonstrating its components and basic physical features.
3. Setup and Physical Features
3.1 Physical Layout
The X3 Pro N features a compact design with clearly labeled controls and ports:
- 2.4-inch LCD Touchscreen: Full-color display for settings and monitoring.
- Select Dial: For navigation and parameter adjustment.
- Menu/Power Button: To access menus and power the device on/off.
- Test/Shutter Button: To test flash or trigger the camera shutter.
- Indicator: Green for focus (camera), Red for trigger (flash) + shutter (camera).
- Detaching Button: For mounting/dismounting from the hot shoe.
- 2.5mm Sync Port: For wired camera connection.
- USB-C Port: For charging and firmware upgrades.
- Focus Assist Beam: Integrated for low-light focusing.
- Hot Shoe: Standard mount for camera.
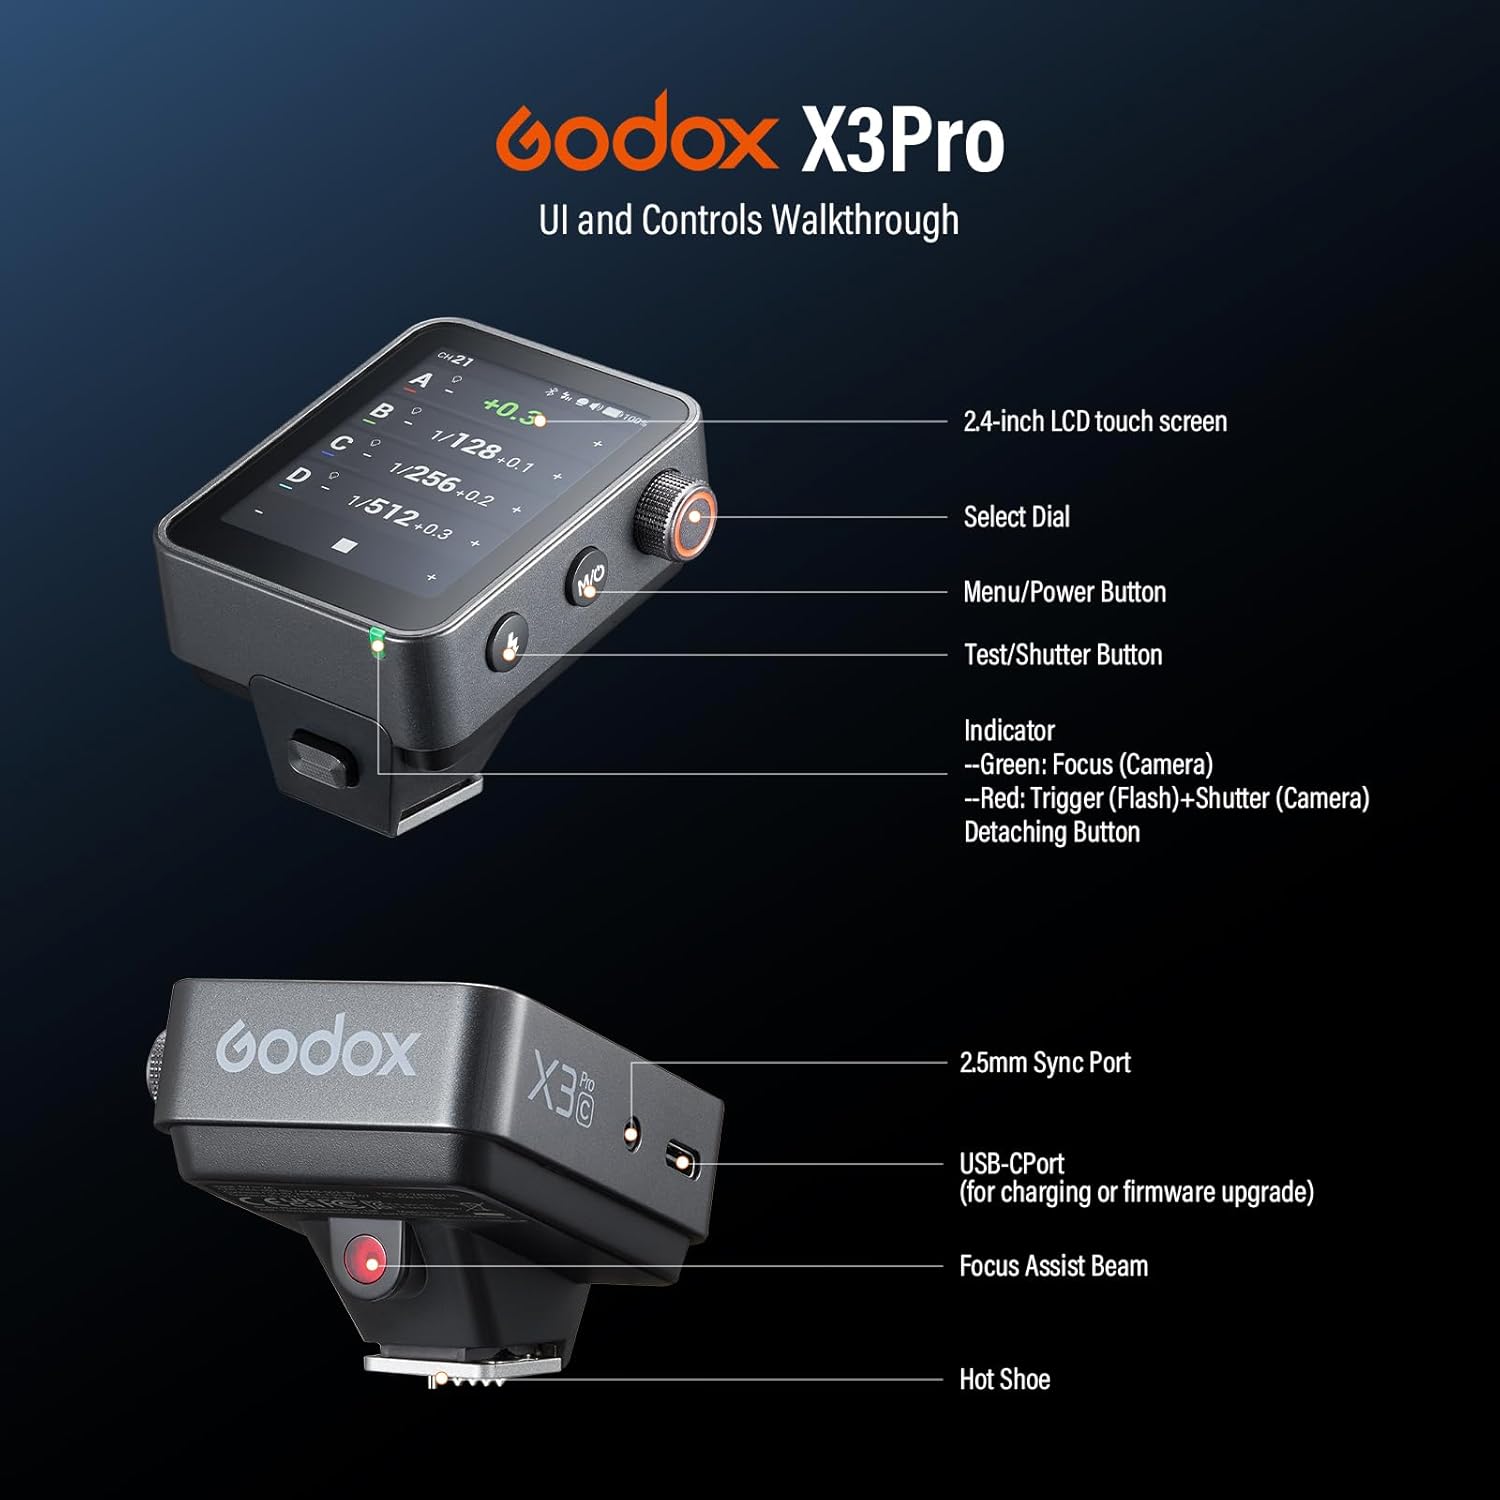
Image: UI and Controls Walkthrough of the GODOX X3 Pro N.
3.2 Initial Power On
To power on the device, long-press the Menu/Power button located on the side. The screen will illuminate, displaying the Godox logo before showing the main control interface.
3.3 Mounting to Camera
Slide the X3 Pro N onto your Nikon camera's hot shoe until it clicks into place. Ensure it is securely fastened. The trigger is compatible with Nikon cameras that have a standard hot shoe with the necessary pins for flash communication.
4. Operating Instructions
4.1 User Interface and Control
The X3 Pro N supports both touch operation via its 2.4-inch LCD full-color touchscreen and key operation using the physical buttons and select dial. This allows for flexible control adapted to different shooting scenarios and user preferences.

Image: GODOX X3 Pro N 2.4-inch LCD Full-Color Touchscreen interface.
4.2 Shooting Modes
The trigger offers three distinct shooting modes:
- Single Shooting Mode: Ideal for individual scenes, sending only the trigger signal.
- Group Shooting Mode: Suitable for multi-person or complex scenarios, delivering both settings and trigger signals for multiple groups.
- L-858 Mode: Connects to an L-858 light meter to synchronize parameters for precise exposure control.

Image: GODOX X3 Pro N Professional Shooting Modes.
4.3 Shutter Control Functions
The X3 Pro N provides powerful shutter control capabilities directly from its touchscreen. You can set parameters such as delay duration, exposure length, and interval settings for various operations:
- Single Shot
- Time-lapse Photography
- Long Exposure Operations
It also supports PC sync port or pairing with XR/TR-RX receivers to trigger cameras, enabling reverse shutter control via the transmitter.

Image: GODOX X3 Pro N Shutter Control interface.
4.4 Precise Light Shaping
The X3 Pro N allows for comprehensive independent adjustment per group, enabling precise control over power, zoom, and modeling lamp settings. Users can quickly switch between TTL (Through-The-Lens) and Manual (M) modes with a tap on the screen. A preset function is also available to save lighting configurations for enhanced shooting efficiency.

Image: GODOX X3 Pro N Precise Light Shaping in a studio setting.
4.5 Wireless System and App Control
The integrated Godox 2.4G wireless X system provides a wide transmission range and interference-resistant channel scanning, supporting up to 16 groups, 32 channels, and 99 wireless IDs. Additionally, the built-in Bluetooth module enables seamless connection to the Godox Flash APP for remote grouping, power adjustment, and flashing through smart devices.

Image: GODOX X3 Pro N Intelligent Control and App Connectivity.
4.6 Synchronization Settings
The X3 Pro N supports one-click synchronization settings, simplifying the pairing process with compatible flashes. This eliminates the need for manual, slow pairing procedures, allowing for quicker setup and operation.
5. Maintenance
5.1 Charging and Battery Life
The X3 Pro N is equipped with a high-efficiency lithium battery and supports a universal USB-C port for charging. It requires approximately 2 hours for a full charge and can deliver over 1 month of standby time on a single charge.

Image: GODOX X3 Pro N Rapid Charging and Extended Operation.
5.2 Cleaning
Use the provided cleaning cloth to gently wipe the touchscreen and body of the trigger. Avoid using harsh chemicals or abrasive materials that could damage the device.
6. Troubleshooting
If you encounter issues with your GODOX X3 Pro N, consider the following general troubleshooting steps:
- Device Not Powering On: Ensure the battery is charged. Connect the device to a USB-C power source and attempt to power on again.
- Flash Not Triggering: Verify that the trigger is securely mounted on the camera's hot shoe. Check that the flash unit is powered on and set to the correct channel and ID as the trigger. Ensure the camera's flash settings are enabled and in mechanical shutter mode.
- App Connectivity Issues: Ensure Bluetooth is enabled on your smart device and the X3 Pro N. Restart both the trigger and the Godox Flash APP.
- Inconsistent Performance: Check for potential interference in the 2.4G wireless X system. Try changing channels or IDs. Ensure the trigger's firmware is up to date via the USB-C port.
For persistent issues, refer to the official GODOX support resources or contact customer service.
7. Specifications
| Feature | Detail |
|---|---|
| Product Dimensions | 2.13 x 1.6 x 2.6 inches |
| Item Weight | 7 ounces |
| Item Model Number | X3ProN |
| Brand | GODOX |
| Special Feature | Rechargeable |
| Color | Black |
| Max Number of Supported Devices | 1 |
| Compatible Devices | Godox Flash for Nikon |
| Battery Type | High-efficiency lithium battery (approx. 2930mAh) |
| Charging Port | USB-C |
| Wireless System | Godox 2.4G Wireless X System |
| Bluetooth | Built-in for APP control |
8. Warranty and Support
For warranty information, product registration, or technical support, please visit the official GODOX website or contact your authorized GODOX dealer. Keep your purchase receipt as proof of purchase for warranty claims.