1. Introduction
This manual provides detailed instructions for the installation, operation, and maintenance of your Inexaccessories 10.1-inch QLED Car Stereo. This unit is specifically designed for Toyota RAV4 models from 2013 to 2018. It features an Android 13 operating system, 6GB RAM, 128GB ROM, and supports Wireless/Wired Apple CarPlay and Android Auto. Other features include WiFi connectivity, GPS navigation, Bluetooth 5.0, FM/AM radio, rear view camera input, and steering wheel control compatibility.
Important Note: If your vehicle's steering wheel has keys on both sides, this radio may not be compatible, and the included power cable might not fit. Please verify compatibility before installation.
2. Safety Information
- Read all instructions carefully before installation and operation.
- Professional installation is recommended. Incorrect installation can damage the unit or vehicle.
- Do not operate the unit in a way that distracts you from driving. Always prioritize road safety.
- Ensure all wiring is correctly connected to prevent short circuits or electrical hazards.
- Keep the unit away from water and excessive moisture.
- Do not attempt to repair the unit yourself. Refer to qualified service personnel.
3. Package Contents
Verify that all items are present in the package:
- 10.1-inch QLED Car Stereo Unit
- Power Cable (A)
- RCA Cable (B)
- 2 USB Cables (C)
- GPS Antenna (E)
- Reversing Input Cable (F)
- 4G Antenna (G)
- Backup Camera
- Camera Cable
- Microphone
- User Manual (this document)
- Ankle Buckle (Installation accessories)
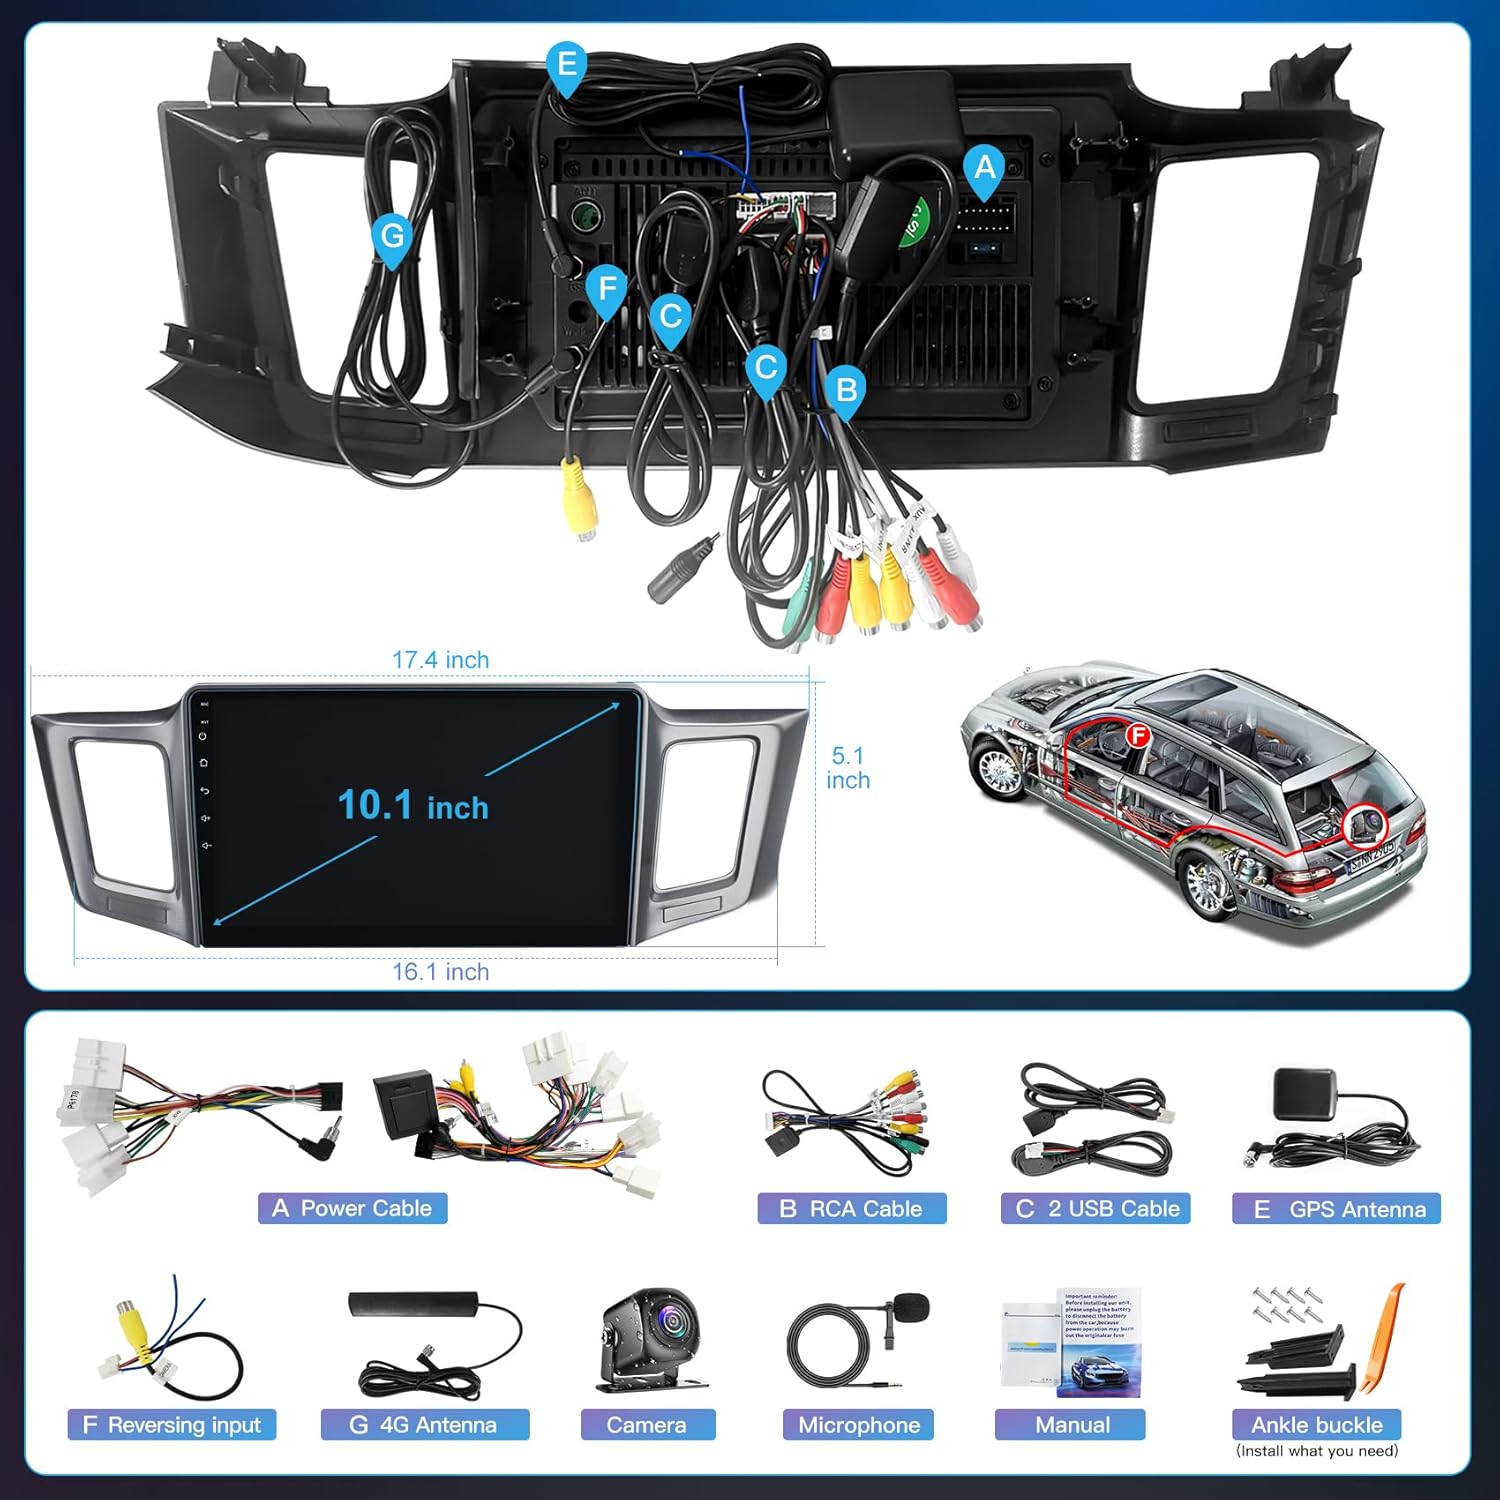
Figure 3.1: Included components and wiring harnesses. (A) Power Cable, (B) RCA Cable, (C) USB Cables, (E) GPS Antenna, (F) Reversing Input, (G) 4G Antenna, Backup Camera, Microphone, Manual, Ankle Buckle.
4. Installation (Setup)
This section outlines the general installation process. Due to variations in vehicle models, specific steps may differ. It is highly recommended to seek professional installation if you are not familiar with car audio systems.
4.1 Pre-Installation Check
- Disconnect the vehicle's battery to prevent electrical shorts.
- Remove the original car stereo unit and trim panels carefully.
- Inspect the vehicle's wiring harness for any damage.
4.2 Wiring Connections
- Connect the main Power Cable (A) to the vehicle's wiring harness. Ensure all wires match correctly (e.g., constant power, accessory power, ground).
- Connect the RCA Cable (B) for audio output to external amplifiers or subwoofers, if applicable.
- Plug in the two USB Cables (C) to the corresponding ports on the stereo unit. Route these cables to a convenient location for connecting USB devices or for wired CarPlay/Android Auto.
- Connect the GPS Antenna (E) and position it in a location with a clear view of the sky (e.g., on the dashboard).
- Connect the Reversing Input Cable (F) to the vehicle's reverse light signal wire and the backup camera input.
- Connect the 4G Antenna (G) if your unit supports 4G connectivity (check specifications).
- Connect the included Backup Camera and its cable to the designated input on the stereo.
- Connect the external Microphone for improved call quality.
4.3 Mounting the Unit
- Carefully insert the new stereo unit into the dashboard opening.
- Secure the unit using the provided ankle buckles or mounting brackets.
- Reinstall any removed trim panels.
- Reconnect the vehicle's battery.

Figure 4.1: Visual comparison of the dashboard before and after installing the new car stereo unit.
5. Operating Instructions
5.1 Initial Power On and System Overview
After installation, turn on your vehicle's ignition. The stereo unit will boot up, displaying the Android 13 operating system. The 10.1-inch QLED touch display offers a 1280x720 resolution and a 178-degree wide viewing angle for a clear and vibrant visual experience.

Figure 5.1: System specifications including 8-core processor, Android 13, 6GB RAM, 128GB ROM, and 10.2-inch QLED display with 1280x720 resolution and 178° wide view angle.
5.2 Wireless/Wired CarPlay & Android Auto
Connect your smartphone to the car stereo via Bluetooth for wireless CarPlay or Android Auto. Alternatively, use one of the USB cables for a wired connection. This feature allows you to access navigation, music, calls, and voice assistants directly from the stereo display.
- Wireless Connection: Pair your phone via Bluetooth. Once paired, select the CarPlay or Android Auto icon on the stereo.
- Wired Connection: Connect your phone to one of the USB ports using a compatible USB cable. The system should automatically prompt you to launch CarPlay or Android Auto.

Figure 5.2: CarPlay, Android Auto, and Mirror Link functionality displayed on the car stereo screen.
5.3 Bluetooth 5.0
The built-in Bluetooth 5.0 module enables hands-free calling and audio streaming. Pair your phone to make and receive calls safely while driving, and stream music directly to the car stereo.
- Go to the Bluetooth settings on the stereo.
- Enable Bluetooth on your smartphone and search for available devices.
- Select the stereo unit from the list on your phone and confirm the pairing code.

Figure 5.3: Bluetooth 5.0 interface for hands-free calls and voice commands, alongside the FM/AM radio display.
5.4 FM/AM Radio
The unit supports FM radio with frequencies from 87.5-108MHz (FM1/FM2/FM3). You can scan for stations and save your favorites for quick access.
- Tap the "Radio" icon on the home screen.
- Use the scan function to find available stations.
- Press and hold a preset button to save the current station.
5.5 WiFi Connection
With the built-in WiFi module, you can connect to a WiFi hotspot (e.g., from your smartphone) to access the internet, download apps, and stream online content.
- Go to "Settings" and then "Network & Internet".
- Turn on Wi-Fi and select your desired network.
- Enter the password if prompted.

Figure 5.4: WiFi connection for internet access and app usage, and GPS navigation displaying a map with route information.
5.6 GPS Navigation
The stereo includes a built-in GPS module and supports both online and offline navigation. You can use pre-installed maps or download your preferred navigation apps.
- Ensure the GPS antenna is properly connected and positioned.
- Open the navigation application from the home screen.
- For offline maps, download the necessary map data via WiFi beforehand.
5.7 Rear View Camera
The unit supports a rear view camera input. When the vehicle is shifted into reverse, the camera image will automatically display on the screen, assisting with safer parking and backing up.
- Ensure the rear view camera and its cable are correctly installed and connected to the "Reversing Input" (F).
- The camera features a 170° wide-angle view, night vision, and is waterproof.

Figure 5.5: Rear view camera display with 170° wide view and night vision, and the Steering Wheel Control learning interface.
5.8 Steering Wheel Control (SWC)
The unit supports steering wheel controls, allowing you to manage stereo functions (e.g., volume, track change) without taking your hands off the wheel. This enhances driving safety.
- Access the "Steering Learn" or "SWC Settings" menu in the system settings.
- Follow the on-screen instructions to program each steering wheel button to its corresponding function on the stereo.
5.9 Sound Settings (DSP & EQ)
Enhance your audio experience with the built-in Digital Sound Processor (DSP) and Equalizer (EQ). Adjust sound parameters to achieve your preferred audio profile.
- Navigate to the "Sound Settings" or "EQ" menu.
- Adjust frequency bands, balance, fader, and other audio effects.

Figure 5.6: Customizable UI views and advanced DSP/EQ settings for audio optimization.
5.10 Split Screen Function
The split-screen feature allows you to run two applications simultaneously on the display, such as navigation and music playback.
- Open the first application.
- Long-press the recent apps button or drag an app to one side of the screen (depending on the Android version) to activate split-screen mode.
- Select the second application to fill the other half of the screen.
5.11 UI Customization
Personalize your stereo's interface by customizing the home screen layout and setting your favorite images as background wallpapers.
- Access UI settings from the main menu.
- Choose from various themes or upload your own images.
6. Maintenance
- Cleaning: Use a soft, dry cloth to clean the screen and unit. Avoid abrasive cleaners or solvents.
- Software Updates: Periodically check for system software updates to ensure optimal performance and access to new features. Updates can usually be found in the system settings under "About device" or "System updates".
- Temperature: Avoid exposing the unit to extreme temperatures.
7. Troubleshooting
| Problem | Possible Cause | Solution |
|---|---|---|
| Unit does not power on. | Incorrect wiring; Blown fuse; Vehicle battery disconnected. | Check power cable connections. Inspect vehicle fuses. Ensure battery is connected. |
| No sound. | Volume too low; Mute activated; Incorrect audio output settings; Speaker wiring issue. | Increase volume. Check mute status. Verify audio settings. Inspect speaker connections. |
| GPS signal lost or inaccurate. | GPS antenna improperly placed or disconnected; Obstruction. | Ensure GPS antenna has a clear view of the sky and is securely connected. |
| Bluetooth not connecting. | Bluetooth off on phone/stereo; Incorrect pairing process; Interference. | Ensure Bluetooth is enabled on both devices. Re-attempt pairing. Clear previous pairings. |
| CarPlay/Android Auto not launching. | Incorrect USB cable; Phone not compatible; Software issue; Bluetooth not connected (for wireless). | Use original or certified USB cable. Ensure phone OS is updated. Check Bluetooth connection for wireless. |
| Rear view camera not displaying. | Camera not connected; Reverse trigger wire not connected; Faulty camera. | Check camera and reverse trigger wire connections. Test camera functionality. |
| Steering Wheel Controls not working. | SWC wiring incorrect; Not programmed; Vehicle incompatibility. | Verify SWC wiring. Re-program buttons in "Steering Learn" settings. Confirm vehicle compatibility. |
8. Specifications
| Feature | Detail |
|---|---|
| Brand | Inexaccessories |
| Model Number | Inex8C6G128GB |
| Operating System | Android 13 |
| Processor | 8-Core |
| RAM | 6GB |
| ROM (Internal Storage) | 128GB |
| Display Size | 10.1 inches |
| Display Type | QLED Touchscreen (2.5D) |
| Resolution | 1280x720 |
| Viewing Angle | 178° |
| CarPlay & Android Auto | Wireless & Wired Support |
| Bluetooth Version | 5.0 |
| WiFi | Built-in Module |
| GPS Navigation | Built-in Module, Online/Offline Maps |
| Radio Tuner | FM (87.5-108MHz) / AM |
| Audio Output Mode | Stereo, Surround |
| Surround Sound Channel Configuration | 5.1 |
| Video Encoding | H.264, H.265/HEVC |
| Connectivity | Bluetooth, RCA, USB |
| Control Type | Touch |
| Compatible Devices | Smartphone |
| Product Weight | 3.6 pounds |
9. Warranty and Support
For warranty information and technical support, please refer to the contact details provided at the point of purchase or visit the official Inexaccessories website. Keep your purchase receipt as proof of purchase for warranty claims.
- Warranty: Standard manufacturer's warranty applies. Details may vary by region.
- Technical Support: Contact customer service for assistance with installation, troubleshooting, or operational questions.