This instruction manual provides detailed guidance for assembling and operating your Karei 3-in-1 Remote Control Robot Building Kit, Model A1001. This versatile kit allows you to construct three distinct models: a Remote Control Robot, an Excavator, and a Garbage Truck. Each model offers unique features and interactive play experiences. Please read these instructions carefully before beginning assembly or operation to ensure proper use and safety.
2. What's in the Box
Your Karei 3-in-1 Robot Building Kit includes the following components:
Instruction Manual
Building block package (700+ pieces)
Remote control
Science and education motor (built-in 500mAh lithium battery)
Charging cable
Figure 2.1: Kit Contents Overview
3. Product Features
3-in-1 Building Options: Construct a Remote Control Robot, an Excavator, or a Garbage Truck from the same set of 700+ pieces. (Note: Only one model can be built at a time.)
Dual Control Modes: Operate your built model using either the included 2.4GHz handheld remote control or a smart app on your mobile device.
STEM Education Focus: Engage in Path Planning, Gyroscope Control, and STEM Programming modes via the app to enhance logical thinking, fine motor skills, spatial awareness, and coding abilities.
Rechargeable Battery: The built-in 500mAh environmentally friendly lithium battery provides approximately 30 minutes of play on a full charge. A USB charging cable is included.
Durable Construction: Made from high-quality, environmentally friendly, and non-toxic ABS plastic for sturdy connections and lasting play.
Detailed Instructions: Includes a crystal-clear, step-by-step printed manual for all three models, along with a QR code for app download.
Figure 3.1: Key Product Features
4. Assembly Instructions
Follow the detailed, color-coded, step-by-step instructions provided in the printed manual. Each model has its own dedicated section. Ensure all pieces are correctly connected for optimal functionality.
4.1. Robot Model Assembly
The Remote Control Robot features synchronized gears, a flexible manipulator, and cool stickers. Refer to the manual for specific steps.
Figure 4.1: Robot Model Details
4.2. Excavator Model Assembly
The Excavator model includes a rotating cab and synchronized gear arms for realistic operation. Follow the manual for construction.
Figure 4.2: Excavator Model Details
4.3. Garbage Truck Model Assembly
The Garbage Truck model features bright LED lights and a fully functional, openable trash bin. Consult the manual for assembly steps.
Figure 4.3: Garbage Truck Model Details
4.4. Assembly Notes
The instruction manual provides clear guidance on which material packages are needed for each model. For example, Robot 01 uses material packages 1+2+3, while Excavator 02 and Garbage Truck 03 require all material packages to be disassembled.
Figure 4.4: Robot 01 Assembly Notes
Figure 4.5: Excavator 02 and Garbage Truck 03 Assembly Notes
5. Setup
5.1. Battery Installation and Charging
The main motor unit has a built-in 500mAh lithium battery. Use the provided USB charging cable to charge the motor unit. The remote control requires 2 AAA batteries (not included).
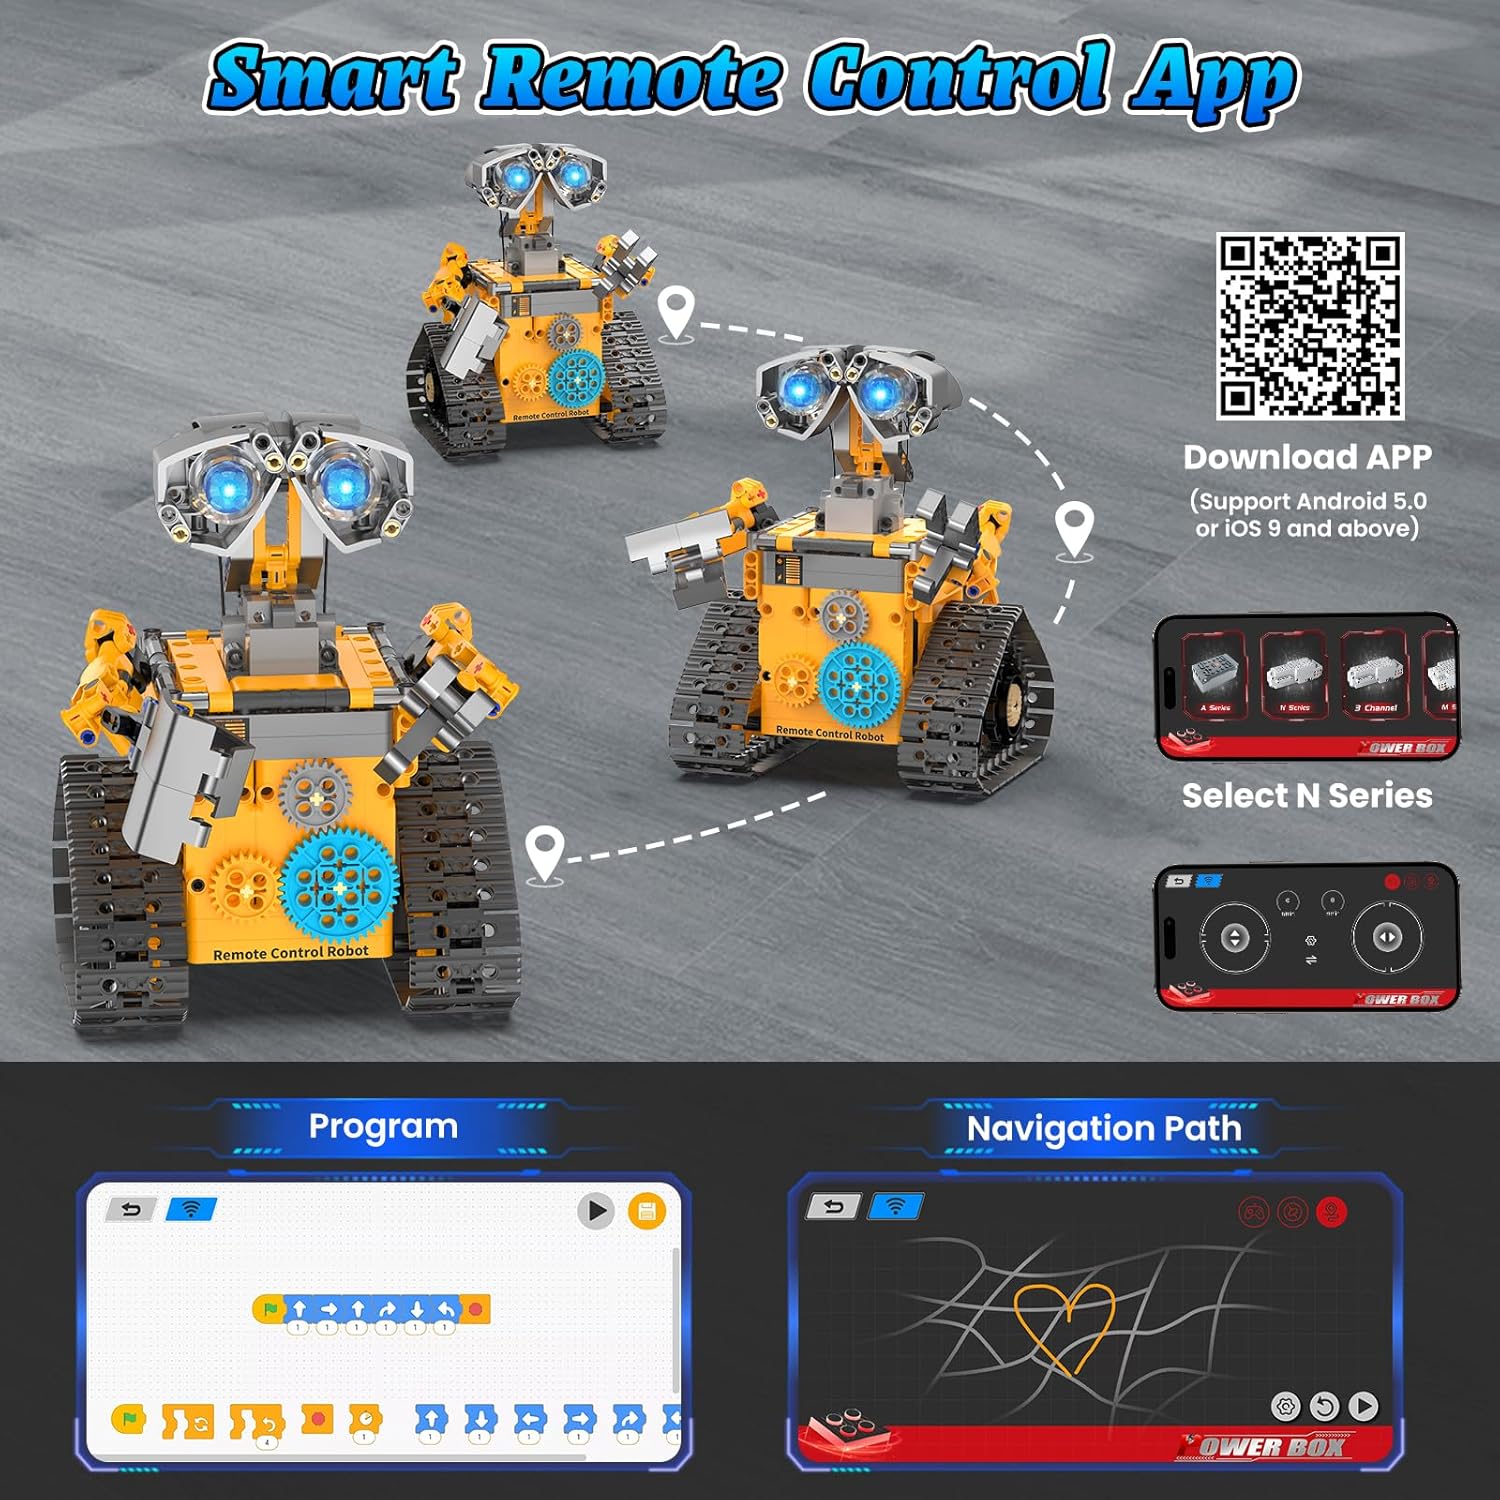
5.2. App Download
Scan the QR code in the instruction manual to download the smart app. After opening the app, select the 'N Series' option to connect to your toy.
Use the included 2.4GHz remote control to maneuver your robot. The remote allows for forward, backward, left, and right movements. Some models may have additional programmable buttons for specific actions.
Figure 6.1: Handheld Remote Control
6.2. Smart App Control
The smart app offers advanced control features:
Path Planning Mode: Design custom routes for your robot to follow.
Gyroscope Control Mode: Control the robot's movement by tilting your mobile device.
STEM Programming Mode: Engage in hands-on coding challenges to program your robot's actions.
Figure 6.2: Multi-function Remote Control App
Video 6.1: Demonstrates the building and play experience with the robot, highlighting its interactive features and educational value. This video is provided by the seller, Aukfa.
Video 6.2: Showcases the 3-in-1 STEM Robot Set for Kids, demonstrating its assembly and remote control functions. This video is provided by the seller, DOLIVE TOYS.
Video 6.3: Features the 3-in-1 STEM Remote Control Robot, demonstrating its movements and control capabilities. This video is provided by the seller, ANFEIYE.
7. Maintenance
Keep the building blocks clean and free from dust.
Store the kit in a dry place away from direct sunlight and extreme temperatures.
Ensure the battery is fully charged before each play session for optimal performance.
Avoid exposing the electronic components to water or moisture.
8. Troubleshooting
Robot not moving: Ensure the motor unit is charged and turned on. Check that the remote control batteries are installed correctly and have power. Verify the app is connected via Bluetooth if using app control.
Difficulty with assembly: Double-check the step-by-step instructions in the manual. Ensure all pieces are oriented correctly and firmly pressed together.
App connection issues: Make sure Bluetooth is enabled on your device and the robot's motor unit is powered on. Restart the app and try connecting again.
9. Specifications
Product Dimensions: 7 x 7 x 10 inches
Item Weight: 3.19 pounds
Item Model Number: A1001
Manufacturer Recommended Age: 8 years and up
Batteries: 1 D battery required (included for motor), 2 AAA batteries required (not included for remote)
Material: High-quality ABS plastic
10. Safety Information
WARNING: CHOKING HAZARD - Small parts. Not for children under 3 years.
Always supervise children during assembly and play. Ensure all small parts are kept out of reach of young children to prevent choking hazards. Do not modify the product or use it for purposes other than its intended use.
11. Warranty and Support
For any questions, concerns, or support needs regarding your Karei 3-in-1 Remote Control Robot Building Kit, please refer to the contact information provided in the product packaging or reach out to Karei customer service directly. Please retain your purchase receipt for warranty purposes.
AXIS A1001 Installation Guide for Access Control Systems Comprehensive installation and programming guide for the AXIS A1001 access control unit. Covers wiring diagrams, power options (PoE, external supply), and configuration for various lock types including electric strikes and magnetic locks.
Hello Spring Card Crafting Guide | Couture Creations Step-by-step instructions and materials list from Couture Creations to create a beautiful 'Hello Spring' handmade card using the A1005 kit and A1001 template.
AXIS A1001 Network Door Controller Installation and Wiring Guide This document provides detailed installation and configuration instructions for the AXIS A1001 Network Door Controller, including wiring diagrams for various lock types, power supplies, and dual-door setups.
AXIS A1001 & AXIS Entry Manager User Manual Comprehensive user manual for the AXIS A1001 and AXIS Entry Manager, detailing installation, configuration, system management, troubleshooting, and technical specifications for advanced access control solutions by Axis Communications.