
Ninja EG201C
Ninja Foodi 6-in-1 Indoor Grill & Air Fryer EG201C User Manual
Model: EG201C
Important Safeguards
Please read all instructions before using your Ninja Foodi 6-in-1 Indoor Grill & Air Fryer to ensure safe operation and prevent property damage. Keep this manual for future reference.
- Always ensure the appliance is properly assembled before use.
- Do not touch hot surfaces. Use handles or knobs.
- To protect against electrical shock, do not immerse cord, plugs, or main unit housing in water or other liquid.
- Close supervision is necessary when any appliance is used by or near children.
- Unplug from outlet when not in use and before cleaning. Allow to cool before putting on or taking off parts.
- Do not operate any appliance with a damaged cord or plug, or after the appliance malfunctions or has been damaged in any manner.
- The use of accessory attachments not recommended by the appliance manufacturer may cause injuries.
- Do not use outdoors.
- Do not let cord hang over edge of table or counter, or touch hot surfaces.
- Do not place on or near a hot gas or electric burner, or in a heated oven.
- Extreme caution must be used when moving an appliance containing hot oil or other hot liquids.
- Always attach plug to appliance first, then plug cord into the wall outlet. To disconnect, turn any control to "off", then remove plug from wall outlet.
- Do not use appliance for other than intended use.
Product Overview
The Ninja Foodi 6-in-1 Indoor Grill & Air Fryer (Model EG201C) is a versatile kitchen appliance designed for grilling, air crisping, roasting, baking, broiling, and dehydrating. It features Cyclonic Grilling Technology for even cooking and char-grilled results.
Components Included:
- Ninja Foodi Grill Main Unit
- 10" x 10" Grill Grate
- 4-quart Crisper Basket
- 6-quart Cooking Pot
- Splatter Shield
- Cleaning Brush
- Chef-Created 15-Recipe Book (not part of this manual)


Setup and First Use
- Unpacking: Carefully remove all packaging materials and promotional labels from the appliance.
- Cleaning Components: Wash the grill grate, crisper basket, cooking pot, and splatter shield in warm, soapy water. Rinse thoroughly and dry completely. The nonstick ceramic-coated components are also dishwasher safe.
- Main Unit Placement: Place the main unit on a clean, dry, level surface. Ensure there is adequate space around the unit for proper ventilation.
- Splatter Shield Installation: Insert the splatter shield into the underside of the lid. Ensure it is securely in place.
- Cooking Pot Installation: Place the 6-quart cooking pot into the main unit.
- Grill Grate or Crisper Basket Installation: Depending on your desired cooking function, place either the grill grate or the crisper basket into the cooking pot.
- Power Connection: Plug the power cord into a grounded electrical outlet. The unit will beep, and the power button will illuminate.
Operating Instructions
The Ninja Foodi Grill offers 6 versatile cooking functions. Always ensure the correct accessory is installed for the chosen function.
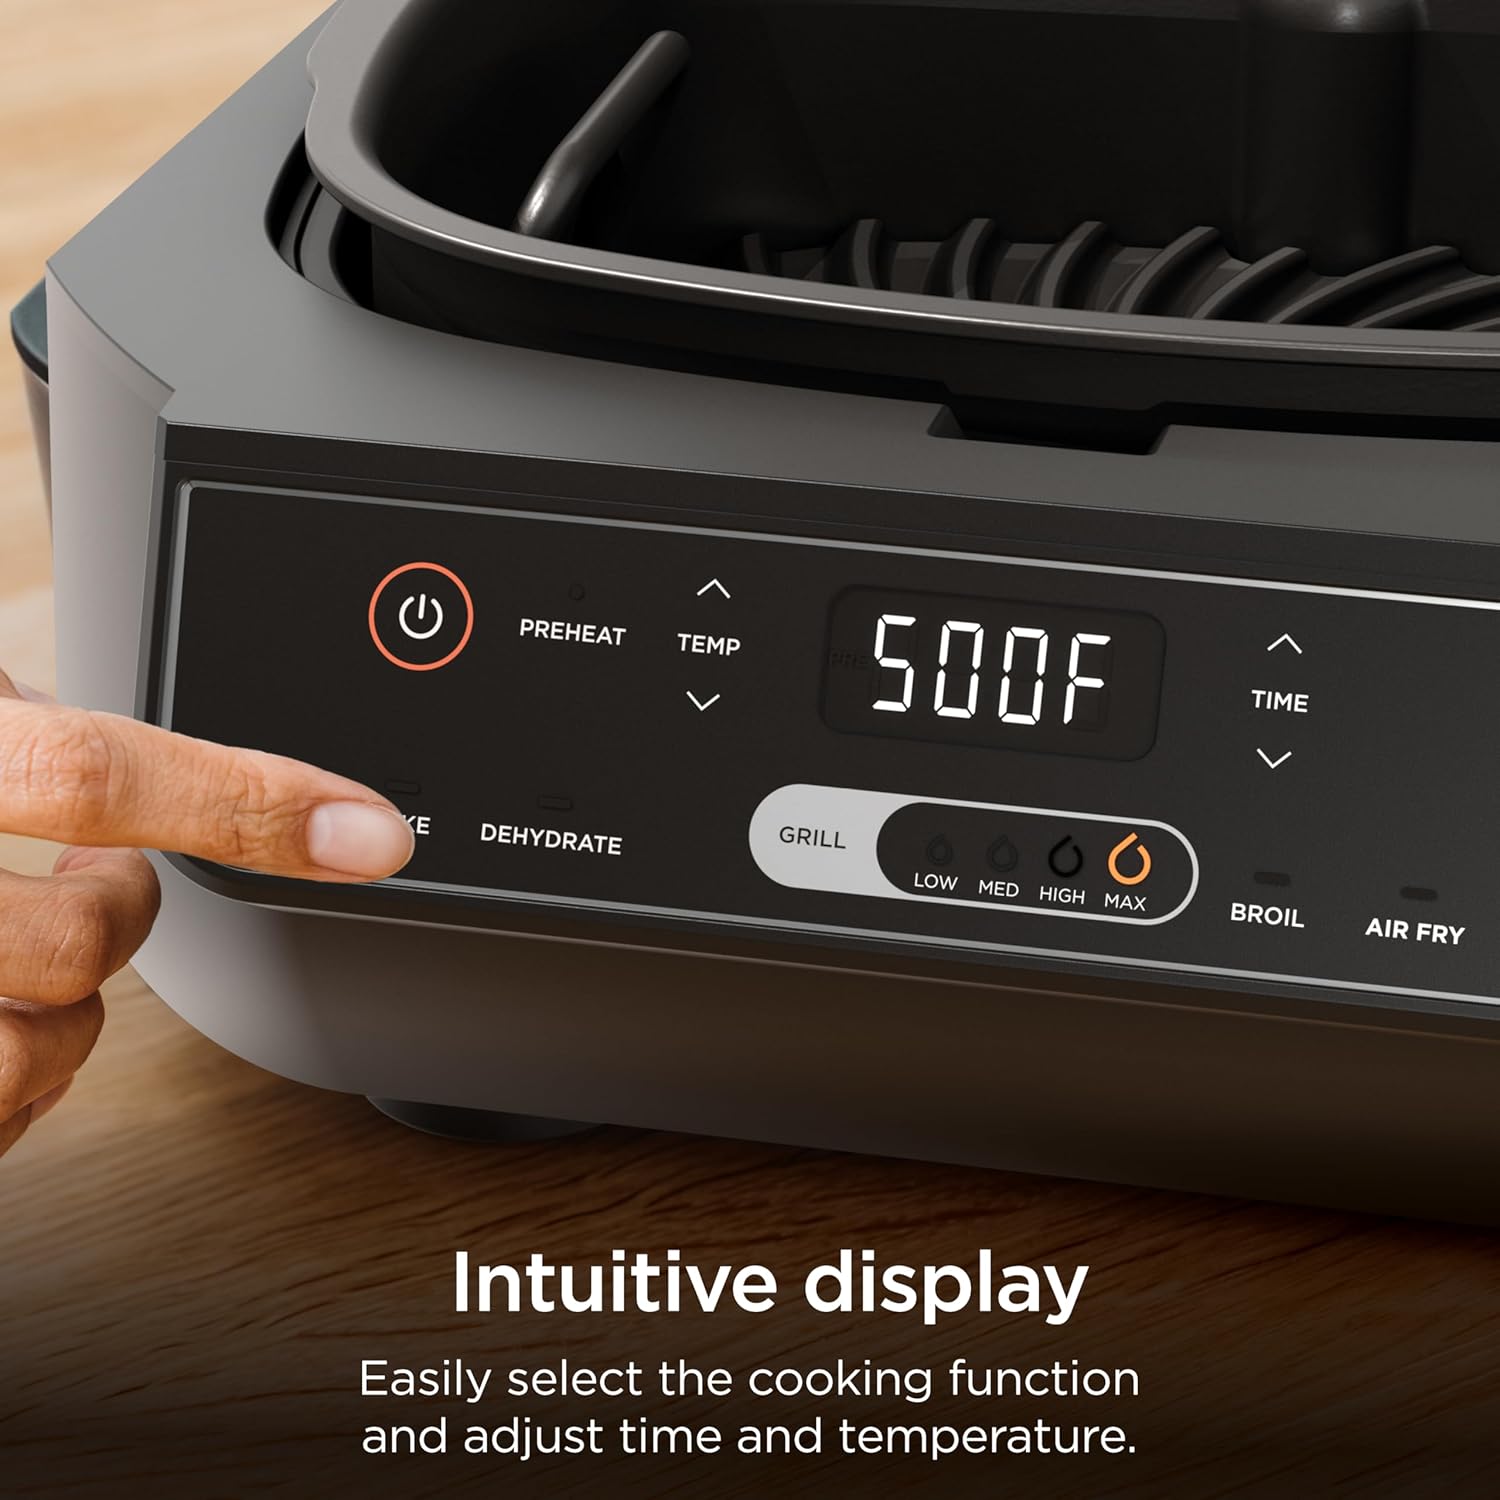
General Operation Steps:
- Power On: Press the Power button (⏻) to turn on the unit.
- Select Function: Use the function buttons (Grill, Air Crisp, Roast, Bake, Broil, Dehydrate) to choose your desired cooking method.
- Set Temperature/GrillControl: Use the TEMP arrows to adjust the temperature. For Grill function, select Low, Medium, High, or Max.
- Set Time: Use the TIME arrows to set the cooking duration.
- Start Cooking: Press the START/STOP button to begin preheating (if applicable) or cooking.
- Add Food: Once preheating is complete (the unit will beep and display "ADD FOOD"), carefully place your food onto the appropriate accessory.
- Monitor Progress: The display will show the remaining cooking time.
- Finish Cooking: The unit will beep when cooking is complete. Carefully remove food using heat-resistant utensils.
Specific Functions:
-
Grill: Ideal for char-grilled marks and flavors. Uses 500°F cyclonic air. Select GrillControl settings (Low, Medium, High, Max). Use the grill grate.

Figure 4: Cyclonic Grilling Technology. This diagram shows how 500°F cyclonic air circulates within the grill, ensuring even cooking and creating char-grilled marks on food. 
Figure 5: Family-Sized Capacity. The grill is shown with four steaks cooking simultaneously, illustrating its capacity to prepare meals for a family. It can accommodate up to 4 steaks, 4 burgers, 2 lbs of fries, or a 3-lb roast. 
Figure 6: Frozen to Char-Grilled. This image demonstrates the grill's ability to cook food directly from frozen, such as chicken breasts, achieving char-grilled results in approximately 25 minutes. - Air Crisp: For crispy results with up to 75% less fat than deep frying. Use the crisper basket.
- Roast: For tender meats and vegetables. Use the cooking pot.
- Bake: For baking various dishes. Use the cooking pot.
- Broil: For quick cooking and browning. Use the grill grate or cooking pot depending on food.
- Dehydrate: For drying fruits, vegetables, and making jerky. Use the crisper basket.
Note: The Smoke Control System, which includes a temperature-controlled grill grate, splatter shield, and cool-air zone, helps reduce smoke during grilling. Always follow chef-recommended grilling practices for best results.
Cleaning and Maintenance
Proper cleaning ensures the longevity and optimal performance of your Ninja Foodi Grill. Always unplug the unit and allow it to cool completely before cleaning.

Cleaning Steps:
- Main Unit: Wipe the main unit and control panel with a clean, damp cloth. Do not immerse the main unit in water or any other liquid.
- Removable Components: The grill grate, crisper basket, cooking pot, and splatter shield are PTFE/PFOA-free, nonstick ceramic-coated, and dishwasher safe. They can also be hand-washed with warm, soapy water and a non-abrasive sponge.
- Splatter Shield: For thorough cleaning, remove the splatter shield from the lid. Use the included cleaning brush to remove any food residue.
- Cleaning Brush: Use the provided cleaning brush to clean stubborn food residue from the grill grate.
- Drying: Ensure all components are completely dry before reassembling or storing.
Troubleshooting
If you encounter any issues with your Ninja Foodi Grill, refer to the following common problems and solutions:
| Problem | Possible Cause | Solution |
|---|---|---|
| Unit not turning on. | Power cord not securely plugged in. | Ensure the power cord is firmly plugged into a grounded outlet. |
| Excessive smoke during grilling. | Fatty foods, dirty splatter shield, or incorrect GrillControl setting. | Trim excess fat from food. Clean the splatter shield. Use a lower GrillControl setting for very fatty foods. Ensure the cooking pot is clean. |
| Food not cooking evenly. | Overcrowding the cooking area, uneven food placement. | Avoid overcrowding. Arrange food in a single layer. Flip or toss food halfway through cooking for even results. |
| "ADD FOOD" message not appearing. | Unit has not completed preheating. | Wait for the preheating cycle to complete. The unit will beep and display "ADD FOOD". |
Specifications
- Model: EG201C
- Brand: Ninja
- Functions: Grill, Air Crisp, Roast, Bake, Broil, Dehydrate
- Grilling Temperature: Up to 500°F / 260°C
- Technology: Cyclonic Grilling Technology
- Material: Stainless Steel (exterior), Nonstick Ceramic-Coated (internal components)
- Product Dimensions: 43.6D x 36W x 28H centimetres
- Included Components: 10" x 10" Grill Grate, 4-qt. Crisper Basket, 6-qt. Cooking Pot, Splatter Shield, Cleaning Brush
- Manufacturer: SharkNinja Operating LLC
- Country of Origin: China
- UPC: 622356701570
Warranty and Support
Ninja products are designed to provide reliable performance for years when used normally. For information regarding your product's warranty, please refer to the warranty card included with your purchase or visit the official Ninja website.
For customer support, replacement parts, or service, please contact Ninja Customer Service. Contact details can typically be found on the Ninja website or in the original packaging materials.
Online Resources: For additional recipes, tips, and product information, visit the official Ninja website: www.ninjakitchen.com
Related documentsEG201C


Ask a question about this manual
Ask about setup, troubleshooting, compatibility, parts, safety, or missing instructions. Manuals+ will review the question and use this page’s manual context to help answer it.