1. Introduction
This manual provides detailed instructions for the setup, operation, and maintenance of your artfone A400 4G VoLTE Big Button Cell Phone. Designed for ease of use, this device features large buttons, a clear display, and essential functions for reliable communication. Please read this manual thoroughly to ensure proper usage and to maximize the phone's capabilities.
2. What's in the Box
Verify that all items are present upon unboxing:
- 1x artfone A400 Mobile Phone (Battery not installed)
- 1x 1800mAh Battery
- 1x USB Charger Cable
- 1x Charging Base/Stand
- 1x User Manual

Figure 2.1: Package contents of the artfone A400, showing the phone, battery, USB-C cable, charging dock, and user manual.
3. Device Overview
Familiarize yourself with the physical components of your artfone A400.

Figure 3.1: Front view of the artfone A400 in its charging dock, highlighting the large buttons and 1800mAh battery indicator. The back view shows the camera, SOS button, and speaker.
3.1 Key Features and Components
- 2.4-inch Display: Clear screen for easy viewing.
- Large Buttons: Ergonomically designed for comfortable dialing and navigation.
- SOS Button: Located on the back for quick access to emergency contacts.
- Volume Buttons: Located on the side, also used for the time-telling function.
- Flashlight Switch: Dedicated side switch for easy activation.
- Keypad Lock Switch: Side switch to prevent accidental key presses.
- 2MP Camera: For basic photo capture.
- Loud Speaker: Enhanced audio for calls and multimedia.
- USB-C Port: For direct charging.
- Charging Dock Connectors: For convenient drop-in charging.

Figure 3.2: The artfone A400 showing its dimensions (145mm L x 68mm W x 13mm T) and various side views, including the volume buttons, power switch, and charging port.

Figure 3.3: A detailed view of the artfone A400's side buttons, including volume controls, the power switch, and the prominent SOS button on the back.

Figure 3.4: The artfone A400 keypad, emphasizing the large fonts and keys designed for easy visibility and use.
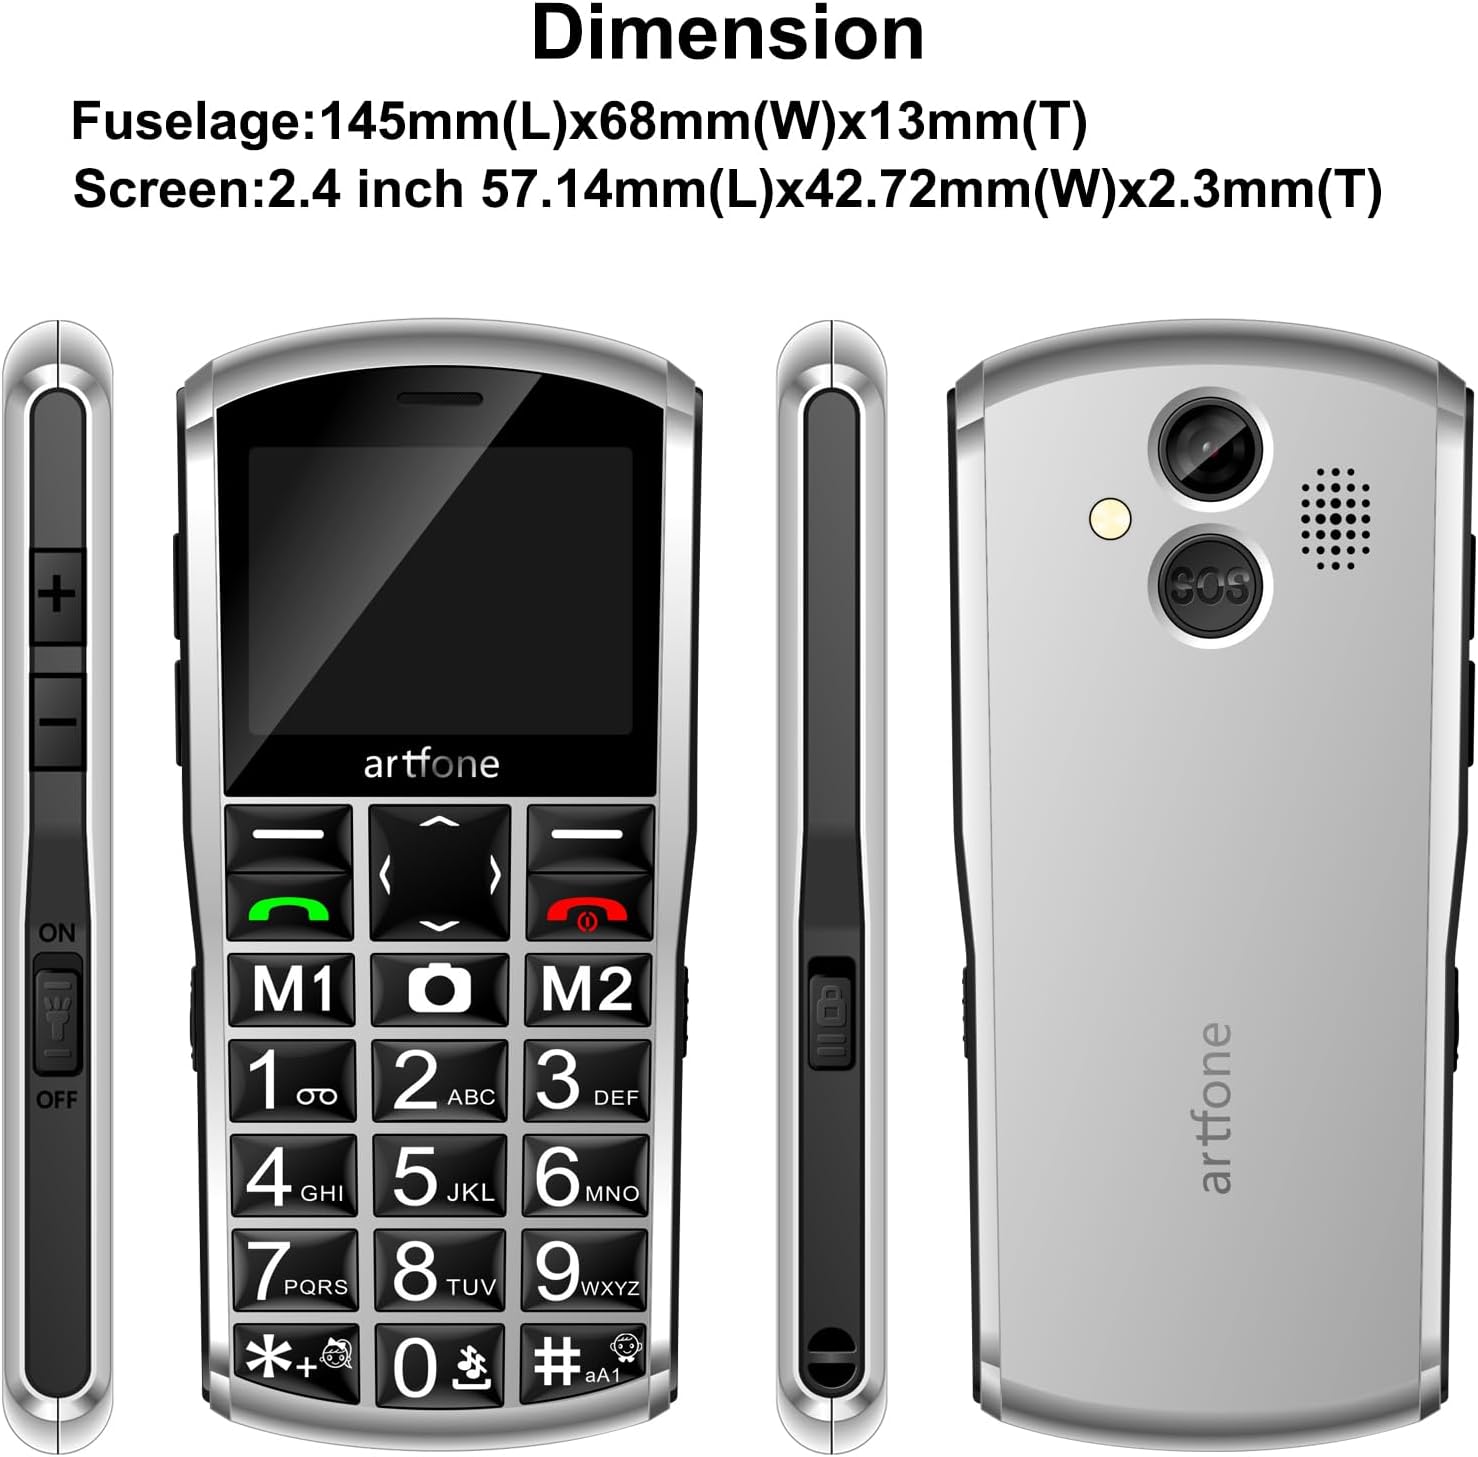
Figure 3.5: The artfone A400's front receiver and rear speaker, designed for clear audio during calls and multimedia playback.
4. Setup
4.1 Battery Installation
- Remove the back cover of the phone by gently prying it open from the notch.
- Insert the 1800mAh battery into the battery compartment, ensuring the gold contacts align with the phone's terminals.
- Replace the back cover, pressing firmly until it clicks into place.
4.2 SIM Card and Micro-SD Card Installation
The artfone A400 supports dual SIM cards (Nano-SIM) and a Micro-SD card for expanded storage.
- With the back cover and battery removed, locate the SIM card slots.
- Carefully insert your Nano-SIM card(s) into the designated slots. Ensure the metal contacts face downwards and the card is correctly oriented.
- If desired, insert a Micro-SD card (up to 64GB) into its dedicated slot for additional storage for photos, music, etc.
- Reinstall the battery and back cover.

Figure 4.1: Internal view of the artfone A400, illustrating the placement of Nano-SIM cards and a Micro-SD card.
4.3 Charging the Phone
Your phone can be charged using the included USB-C cable or the charging dock.
- Using the Charging Dock: Connect the USB charger cable to the charging dock, then place the phone into the dock. Ensure the phone is seated correctly and the charging indicator appears on the screen.
- Using the USB-C Cable: Connect the USB charger cable directly to the USB-C port on the bottom of the phone and to a power adapter.
A full charge typically takes approximately three hours. The battery indicator on the screen will show charging status.
5. Operating Instructions
5.1 Power On/Off
- To Power On: Press and hold the red End Call/Power button until the screen lights up.
- To Power Off: Press and hold the red End Call/Power button until the power-off options appear, then select 'Power off'.
5.2 Making and Receiving Calls
- To Make a Call: Enter the phone number using the keypad and press the green Call button.
- To Answer a Call: Press the green Call button when the phone rings.
- To End a Call: Press the red End Call button.
5.3 SOS Emergency Function
The SOS button allows you to quickly contact pre-set emergency numbers.
- Setting Up SOS Contacts: Navigate to the SOS settings in the phone's menu. You can add up to 5 emergency contacts.
- Using the SOS Button: In an emergency, press and hold the SOS button located on the back of the phone for 3 seconds. The phone will automatically call and send an emergency text message to your pre-set contacts until one answers.

Figure 5.1: A hand demonstrating how to press the SOS button on the back of the artfone A400 for emergency calls.

Figure 5.2: Visual representation of the SOS function, showing how pressing the SOS button can alert up to 5 pre-selected emergency contacts.
5.4 Time-Telling Function
The phone can announce the current time verbally.
- To Activate: Press and hold the Volume Up (+) button on the side of the phone. The phone will announce the current time.

Figure 5.3: A hand holding the artfone A400, with an inset showing the volume '+' button, indicating its use for the time reporting function.
5.5 Contacts and Speed Dial
Store up to 1000 contacts and assign speed dial numbers.
- Adding Contacts: Navigate to the 'Contacts' menu, select 'Add New', and enter the name and number. You can also associate contact photos.
- Speed Dial: Assign numbers to M1, M2, and keys 1-9, *, # for quick dialing. Refer to the phone's menu for specific instructions on setting up speed dial.
5.6 Messaging
The phone supports text messaging using T9 predictive text input.
- Composing Messages: Go to the 'Messages' menu, select 'New Message', and use the keypad to type your message.
- T9 Input: Press the number keys corresponding to the letters of your word. The phone will suggest words, which you can select.
5.7 Multimedia and Tools
The artfone A400 includes several useful features:
- Camera: Access the camera from the menu to take photos.
- FM Radio: Tune into local radio stations.
- Audio/Video Playback: Play media files stored on a Micro-SD card.
- Flashlight: Activate using the dedicated side switch.
- Calculator, Alarm, Calendar: Standard utility functions are available in the 'Tools' menu.
6. Features Overview
The artfone A400 is designed with specific user needs in mind, offering a range of practical features.
- 4G VoLTE Connectivity: Ensures clear call quality and reliable network performance on compatible 2G, 3G, and 4G LTE networks (T-Mobile and its MVNOs only).
- Enhanced Usability: Features a redesigned operating system with larger fonts and clearer menu icons, ideal for users with visual impairments. The automatic keyboard backlight improves visibility in low-light conditions.
- Long-lasting Battery: Equipped with an 1800mAh battery for extended usage and standby time.
- Dual Charging Options: Conveniently charge via the included USB-C cable or the desktop charging dock.
- Personalized Contacts: Supports associating contact photos with phone numbers for easy caller identification.
- Loud Speaker: Provides amplified audio for calls and alerts, ensuring important sounds are not missed.
Video 6.1: An official product video from Shenzhen Yujie Communication Co., Ltd, showcasing various features of the artfone A400, including its large buttons, SOS function, and charging methods. This video provides a visual demonstration of the phone's user-friendly design.
7. Maintenance
To ensure the longevity and optimal performance of your artfone A400, follow these maintenance guidelines:
- Cleaning: Use a soft, dry cloth to clean the phone's screen and body. Avoid using liquid cleaners or abrasive materials.
- Battery Care: Avoid extreme temperatures. Do not expose the battery to direct sunlight or very cold conditions. Charge the phone regularly, but avoid overcharging for extended periods.
- Storage: If storing the phone for an extended period, ensure it is partially charged (around 50%) and stored in a cool, dry place.
- Protection: While durable, the phone's plastic shell can scratch. Consider using a protective pouch if available.
8. Troubleshooting
If you encounter issues with your artfone A400, refer to the following common problems and solutions:
| Problem | Possible Cause | Solution |
|---|---|---|
| Phone does not power on | Low battery; Battery not installed correctly | Charge the phone for at least 30 minutes; Reinstall the battery, ensuring proper contact. |
| Cannot make/receive calls | No SIM card; SIM card not inserted correctly; Out of network coverage; Incorrect network settings | Ensure SIM card is inserted correctly; Check network signal; Verify phone is compatible with your carrier (T-Mobile and MVNOs only). |
| Poor call quality/Loud speaker not working | Volume too low; Obstruction of speaker/microphone | Adjust volume using side buttons; Ensure speaker and microphone are clear of debris. |
| SOS function not working | SOS contacts not set up; No network signal | Set up emergency contacts in the SOS settings; Ensure phone has network coverage. |
| Screen is dim or unresponsive | Low battery; Software glitch | Charge the phone; Restart the phone. |
9. Specifications
Key technical specifications for the artfone A400:
- Model Name: A400
- Operating System: artfone OS
- Cellular Technology: 4G (VoLTE), 3G, 2G
- Wireless Carrier Compatibility: T-Mobile and its MVNOs only (Not compatible with AT&T, Verizon, or locked SIM cards)
- Screen Size: 2.4 Inches
- Battery Capacity: 1800 Milliamp Hours (mAh)
- Phone Talk Time: Up to 8 Hours
- Memory Storage Capacity: 0.13 GB (Internal), expandable with Micro-SD card (up to 64GB)
- RAM Memory Installed Size: 48 MB
- Connectivity Technology: Bluetooth, USB (USB-C)
- Audio Jack: 3.5 mm
- Camera: Rear
- Special Features: VoLTE, SOS Button, Time-Telling Function, Loud Speaker, Charging Dock, Dual SIM, Speed Dial, Large Buttons, Keyboard Backlight
- Item Weight: 9.1 ounces
- Package Dimensions: 5.98 x 4.65 x 2.32 inches
10. Warranty and Support
For warranty information or technical support, please refer to the documentation included with your purchase or contact artfone customer service. Keep your purchase receipt as proof of purchase for warranty claims.


