
1. Introduction
This manual provides instructions for the installation, operation, and maintenance of the Sogledwow Elite ESP32 WLED LED Strip Controller with Ethernet. This device is designed to manage digital addressable RGB IC LED strips, offering advanced control features including Ethernet connectivity, music reactivity, and energy-saving functions.
2. Safety Information
- Ensure the power supply voltage matches the requirements of the LED strip and controller (DC 5-24V).
- Do not exceed the maximum output current of 15A for the controller or 10A per channel.
- Disconnect power before making any connections or performing maintenance.
- This device is designed for indoor use only and is not water-resistant. Avoid exposure to moisture or extreme temperatures.
- The controller includes a 20A pluggable fuse for overcurrent protection. If the fuse blows, replace it with a fuse of the same rating.
- Ensure proper wiring to prevent damage to the circuit. Incorrect polarity at the input terminal can cause damage.
3. Package Contents
- 1 x Sogledwow Elite ESP32 WLED LED Strip Controller with Ethernet (Model: LT-GL-C-616WL)
4. Product Overview
The Sogledwow Elite ESP32 WLED LED Strip Controller is a compact device designed for advanced LED strip management. It features multiple input and output options, an integrated fuse, and network connectivity.
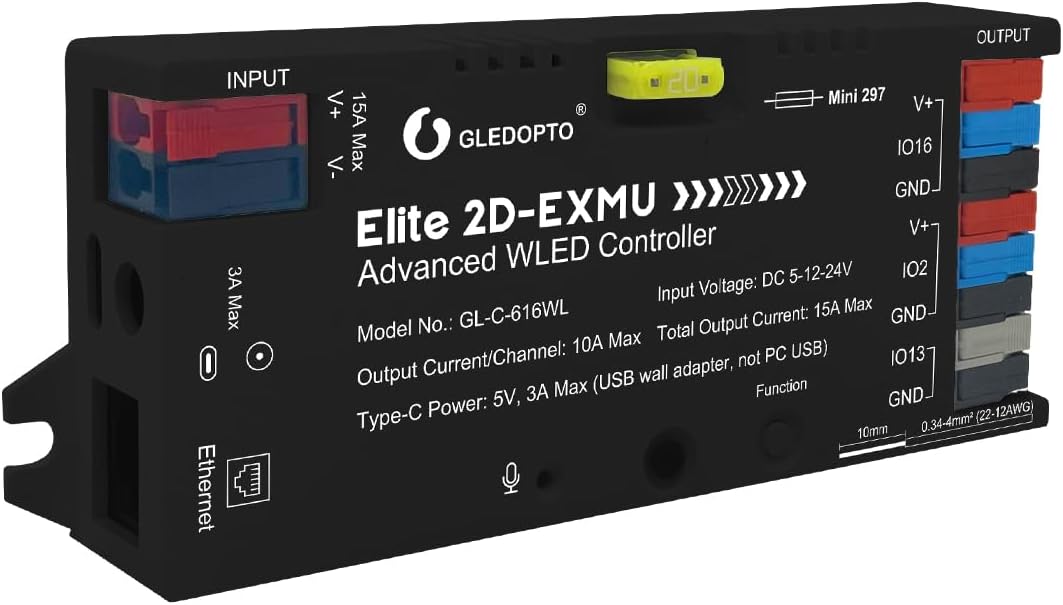
Figure 4.1: Front view of the Sogledwow Elite ESP32 WLED LED Strip Controller, showing input/output terminals, fuse, and Ethernet port.
4.1 Key Components
- Input Terminals: For connecting the power supply (DC 5-24V, 15A Max).
- Output Terminals: For connecting LED strips (V+, Data, GND). Supports multiple data lines (IO16, IO2, IO13).
- 20A Pluggable Fuse: Provides overcurrent protection for the output.
- Ethernet Port: For wired network connectivity.
- USB-C Port: For 5V power input (3A Max) and UART download.
- Barrel Connector: For 5-24V DC power input.
- Function Button: Multi-purpose button for power, color switching, and reset.
- Integrated Microphone: Enables music sound reactive lighting effects.

Figure 4.2: Internal circuit design highlighting key components such as the ESD chip, Ethernet chip, input reverse polarity protection, and pluggable fuse.
5. Setup Instructions
5.1 Power Connection
The controller supports three methods for power input:
- USB-C Port: Connect a 5V USB-C power adapter (3A maximum). Note: This is for power only, not for PC connection during normal operation.
- Barrel Connector: Connect a DC 5-24V power supply.
- Wire Terminal (Input): Connect a DC 5-24V power supply to the V+ and V- terminals. This method supports up to 15A.
Important: Ensure the input voltage matches the voltage requirements of your LED strip. The controller passes the input voltage directly to the output V+ terminals.
5.2 LED Strip Connection
The controller features tool-free lever-style terminals for easy wiring. It supports various addressable LED strip types including WS2811, WS2812, SK6812, WS2813, WS2815, and WS2805.
- Identify the V+, Data, and GND wires of your LED strip.
- For each output channel (IO16, IO2, IO13), lift the corresponding lever on the output terminal.
- Insert the stripped wire (recommended gauge printed on the controller) into the open entry.
- Lower the lever to secure the wire.
- Connect the LED strip's V+ wire to the controller's V+ output terminal.
- Connect the LED strip's GND wire to the controller's GND output terminal.
- Connect the LED strip's Data wire to one of the available data pins (IO16, IO2, or IO13) on the controller.

Figure 5.1: Illustration of the quick connect port wiring process: 1. Open the connector upwards. 2. Press down after inserting the wire. 3. Wiring is complete.
5.3 Network Connection
The controller supports both Wi-Fi and Ethernet connectivity.
5.3.1 Wi-Fi Setup
- Power on the controller. It will broadcast a temporary Wi-Fi network (SSID: WLED-APP, Password: wled1234).
- Connect your smartphone or computer to this temporary Wi-Fi network.
- Open the WLED app or navigate to the controller's IP address in a web browser.
- In the WLED interface, go to the 'Config' section, then 'Wi-Fi Setup'.
- Enter your home Wi-Fi network's SSID and password.
- Save the settings. The controller will reboot and connect to your home network.
5.3.2 Ethernet Setup
- Connect a standard Ethernet cable from your router or network switch to the Ethernet port on the controller.
- Power on the controller.
- The controller will automatically obtain an IP address from your network via DHCP.
- You can find the controller's IP address through your router's client list or by using network scanning tools.

Figure 5.2: Close-up of the Ethernet port on the controller, illustrating its plug-and-play functionality.
6. Operating Instructions
The Sogledwow Elite ESP32 WLED Controller is primarily operated via the WLED application or web interface.
6.1 WLED App Control
The WLED app provides comprehensive control over your LED strips.
- Color Selection: Choose from a wide spectrum of colors using a color wheel or predefined palettes.
- Dynamic Effects: Access over 100 pre-programmed dynamic lighting modes to create various visual effects.
- Segmented Control: Personalize individual segments of your LED strip to display different colors or effects simultaneously.
- Sync Lighting: Synchronize lighting effects across multiple LED strips connected to the same Wi-Fi network.

Figure 6.1: Screenshot of the WLED application interface for color selection and basic controls.

Figure 6.2: Screenshot of the WLED application displaying a list of over 100 dynamic lighting effects.
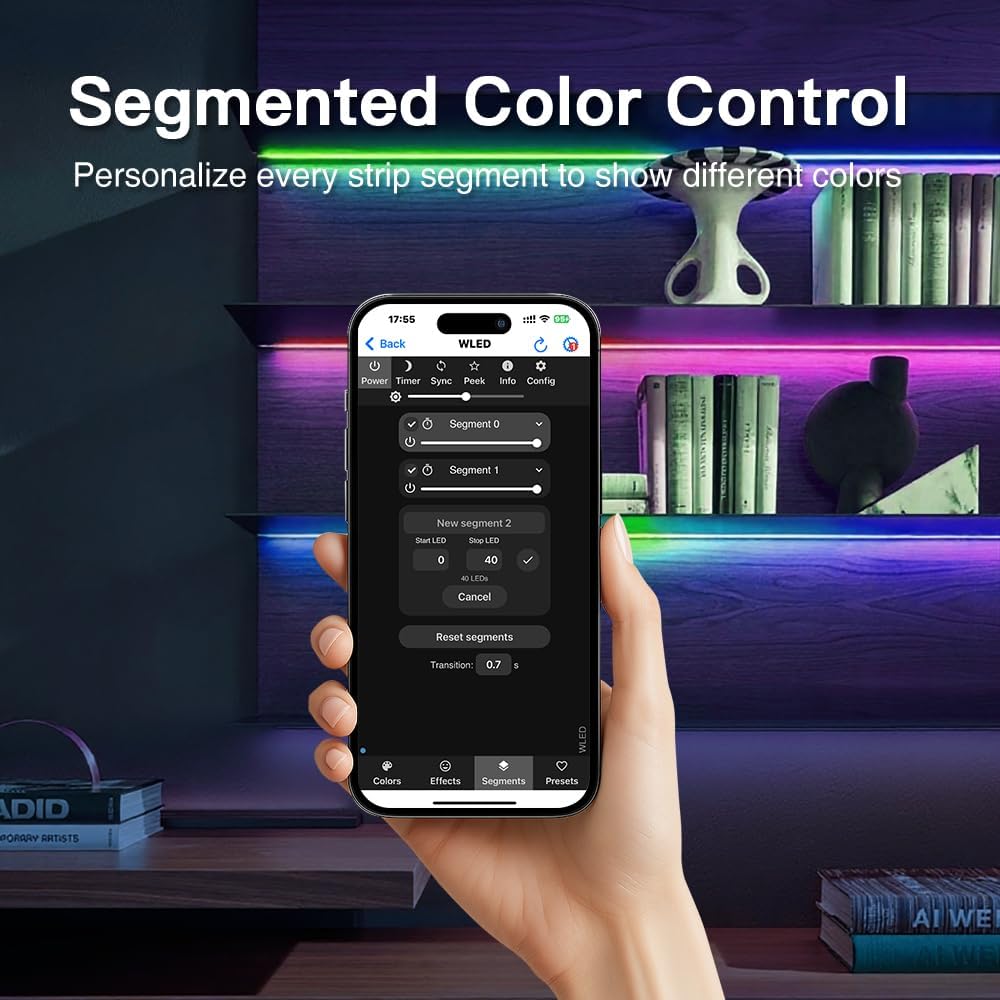
Figure 6.3: Screenshot of the WLED application demonstrating segmented color control, allowing customization of different strip sections.
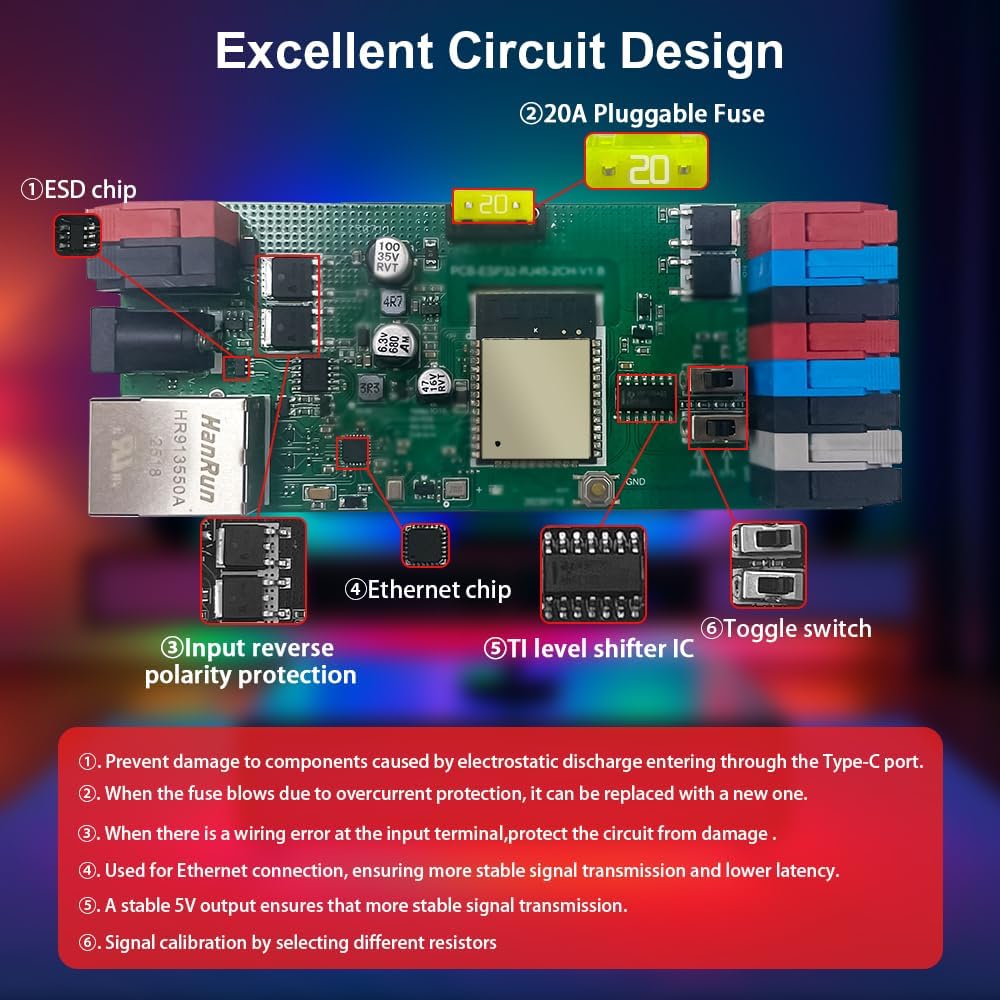
Figure 6.4: Comparison showing LED strips before and after synchronization via the WLED app on a Wi-Fi network.
6.2 Music Sound Reactivity
The integrated microphone allows the LED strips to react to ambient music or sounds, creating dynamic visual displays synchronized with audio.

Figure 6.5: Illustration of the microphone function, where LED lights react to the rhythm of music.
6.3 Energy Saving Relay
The controller includes an energy-saving relay that minimizes power consumption when the LED strips are idle or turned off, preventing standby power draw.
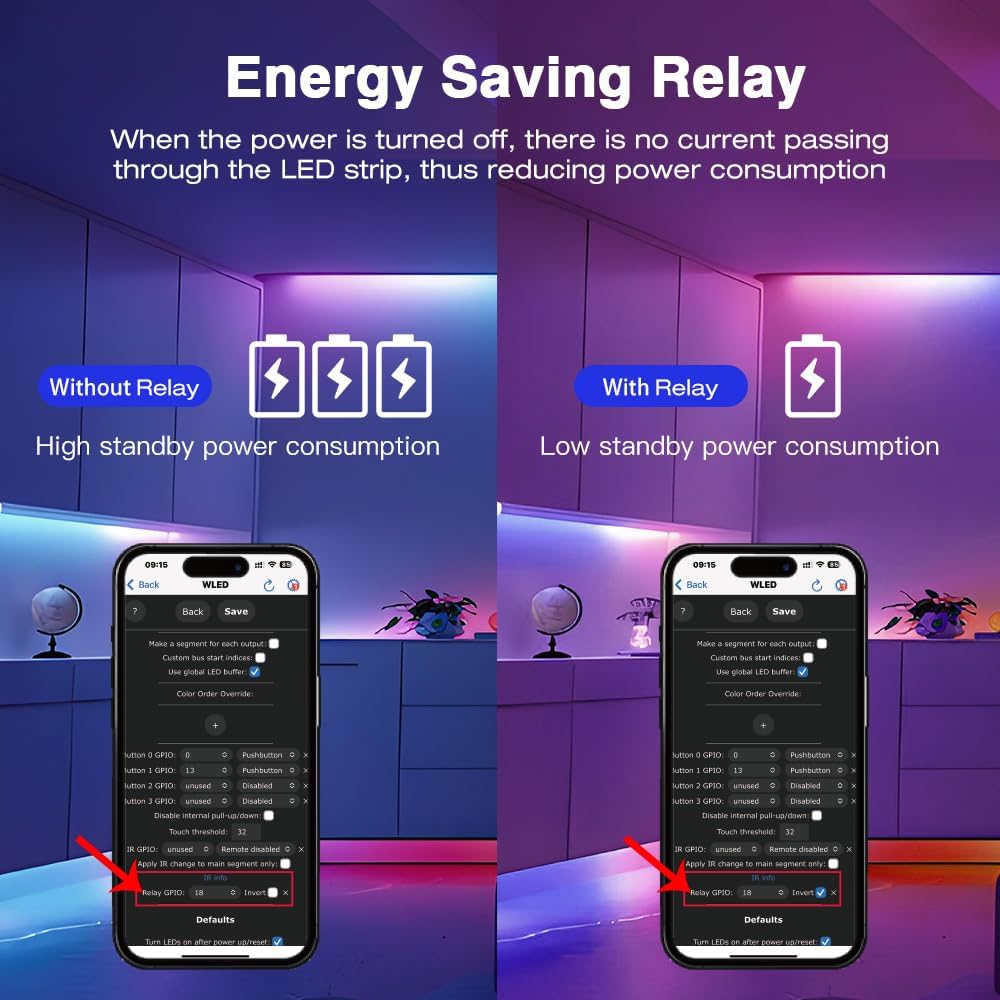
Figure 6.6: Diagram comparing high standby power consumption without a relay versus low standby power consumption with the integrated energy-saving relay.
6.4 Function Button Operation
The single function button on the controller provides quick access to basic controls:
- Short Press: Toggles power on/off.
- Long Press (1 second): Switches between different colors or effects.
- Long Press (10 seconds): Resets the WLED controller to factory settings and activates the WLED-AP hotspot for initial configuration.
7. Maintenance
7.1 Fuse Replacement
The controller is equipped with a 20A pluggable fuse for overcurrent protection. If the LED strip stops working due to an electrical fault, the fuse may have blown.
- Disconnect all power from the controller.
- Carefully remove the blown fuse from its holder.
- Replace it with a new 20A mini blade fuse.
- Reconnect power and test the system.
7.2 General Care
- Keep the controller clean and free from dust. Use a dry, soft cloth for cleaning.
- Avoid placing the controller in direct sunlight or near heat sources.
- Ensure adequate ventilation around the device to prevent overheating.
8. Troubleshooting
- Controller not powering on: Check all power connections. Ensure the power supply is functioning and providing the correct voltage. Verify the fuse is intact.
- LED strip not lighting up: Confirm the LED strip is correctly wired to the controller (V+, Data, GND). Check the WLED app settings to ensure the correct number of LEDs and GPIO pin are configured. Verify the LED strip itself is functional.
- No Wi-Fi connection: Ensure the controller is within range of your Wi-Fi router. Double-check the Wi-Fi SSID and password entered in the WLED app. If issues persist, try resetting the controller (long press 10 seconds) and reconfiguring Wi-Fi.
- No Ethernet connection: Verify the Ethernet cable is securely connected to both the controller and the router/switch. Check your router's status for connected devices.
- Lights not reacting to music: Ensure the microphone is not obstructed. Check WLED app settings for sound reactivity modes and sensitivity.
- Inconsistent lighting or flickering: This can be due to insufficient power supply for the length/density of the LED strip. Ensure your power supply can provide enough current (Amps) for all LEDs. Also, check for loose wiring connections.
9. Specifications
| Parameter | Value |
|---|---|
| Model No. | LT-GL-C-616WL |
| Input Voltage | DC 5-12-24V |
| Total Output Current | 15A Max |
| Output Current/Channel | 10A Max |
| Type-C Voltage | 5V |
| Type-C Current | 3A Max (USB wall adapter, not PC USB) |
| IP Rating | IP20 |
| Material | Flame Retardant PC |
| Net Weight (N.W.) | 78.1g |
| Gross Weight (G.W.) | 87.2g |
| Dimensions | 129 x 50 x 23mm |
| Operating Temperature | -20~45°C |
| Controller Type | App Control |
| Connectivity | Wi-Fi, Ethernet |
| Supported LED Types | WS2811, WS2812, SK6812, WS2813, WS2815, WS2805 |
10. Warranty and Support
For warranty information and technical support, please refer to the official Sogledwow website or contact your retailer. Keep your purchase receipt for warranty claims.