Introduction
This manual provides detailed instructions for the proper setup, operation, and maintenance of your FEELWORLD FW759 PRO 7-inch 1280x800 IPS Touch Screen Camera Field Video Monitor. Please read this manual thoroughly before using the product to ensure optimal performance and to prevent damage.
The FW759 PRO is designed to provide precise monitoring for professional video and photography applications. It features a 7-inch 1280x800 IPS display, 4K HDMI input, and a touch screen interface for intuitive control.
Package Contents
Verify that all items listed below are included in your package. If any items are missing or damaged, please contact your retailer.

Figure 1: Included Accessories
- FEELWORLD FW759 PRO Monitor (1x)
- HDMI Cable (1x)
- Micro HDMI Cable (1x)
- Mini Hot Shoe Mount + Hex Wrench (1x)
- USB-A to USB-C Adapter (1x)
- Sun Shade + Frame (1x)
- Cable Management Tie (1x)
- Quick Start Guide (1x)
Product Overview
The FW759 PRO monitor features a slim and lightweight design, making it suitable for mobile shooting environments. It incorporates multiple ports for connectivity and versatile power options.

Figure 2: Front and Side Views with Ports
Front and Side Features:
- 7-inch IPS Touch Screen: High-resolution display for clear monitoring and intuitive control.
- F1, F2, F3 Buttons: Customizable shortcut keys for quick access to frequently used functions.
- Power Button: For turning the monitor on and off.
- Type-C 5V Port: For power input.
- AV Port: For analog video input.
- HDMI Port: Supports 4K 30Hz signal input.
- DC IN 12V Port: For external power supply.
- 3.5mm Headphone Jack: For audio monitoring.

Figure 3: Rear View with Battery Plate
Rear Features:
- NP-F Battery Plate: Compatible with NP-F series batteries for portable power.
- 1/4" Mounting Points: Multiple mounting points for flexible attachment to cameras or rigs.
Setup
1. Mounting the Monitor
The FW759 PRO features multiple 1/4" mounting points on its sides and bottom, allowing for flexible attachment to various camera setups or rigs using the included Mini Hot Shoe Mount or other compatible accessories.

Figure 4: Monitor Mounting Options
- Attach the Mini Hot Shoe Mount to your camera's hot shoe or a compatible rig.
- Secure the monitor to the Mini Hot Shoe Mount using one of the 1/4" screw threads. Ensure it is tightened securely with the hex wrench.
2. Powering the Monitor
The FW759 PRO offers versatile power options:
- NP-F Series Battery: Insert a charged NP-F series battery into the battery plate on the back of the monitor.
- DC IN 12V: Connect an external 12V DC power adapter (not included) to the DC IN port.
- Type-C 5V: Connect a 5V Type-C power source (e.g., power bank, USB adapter) to the Type-C port.
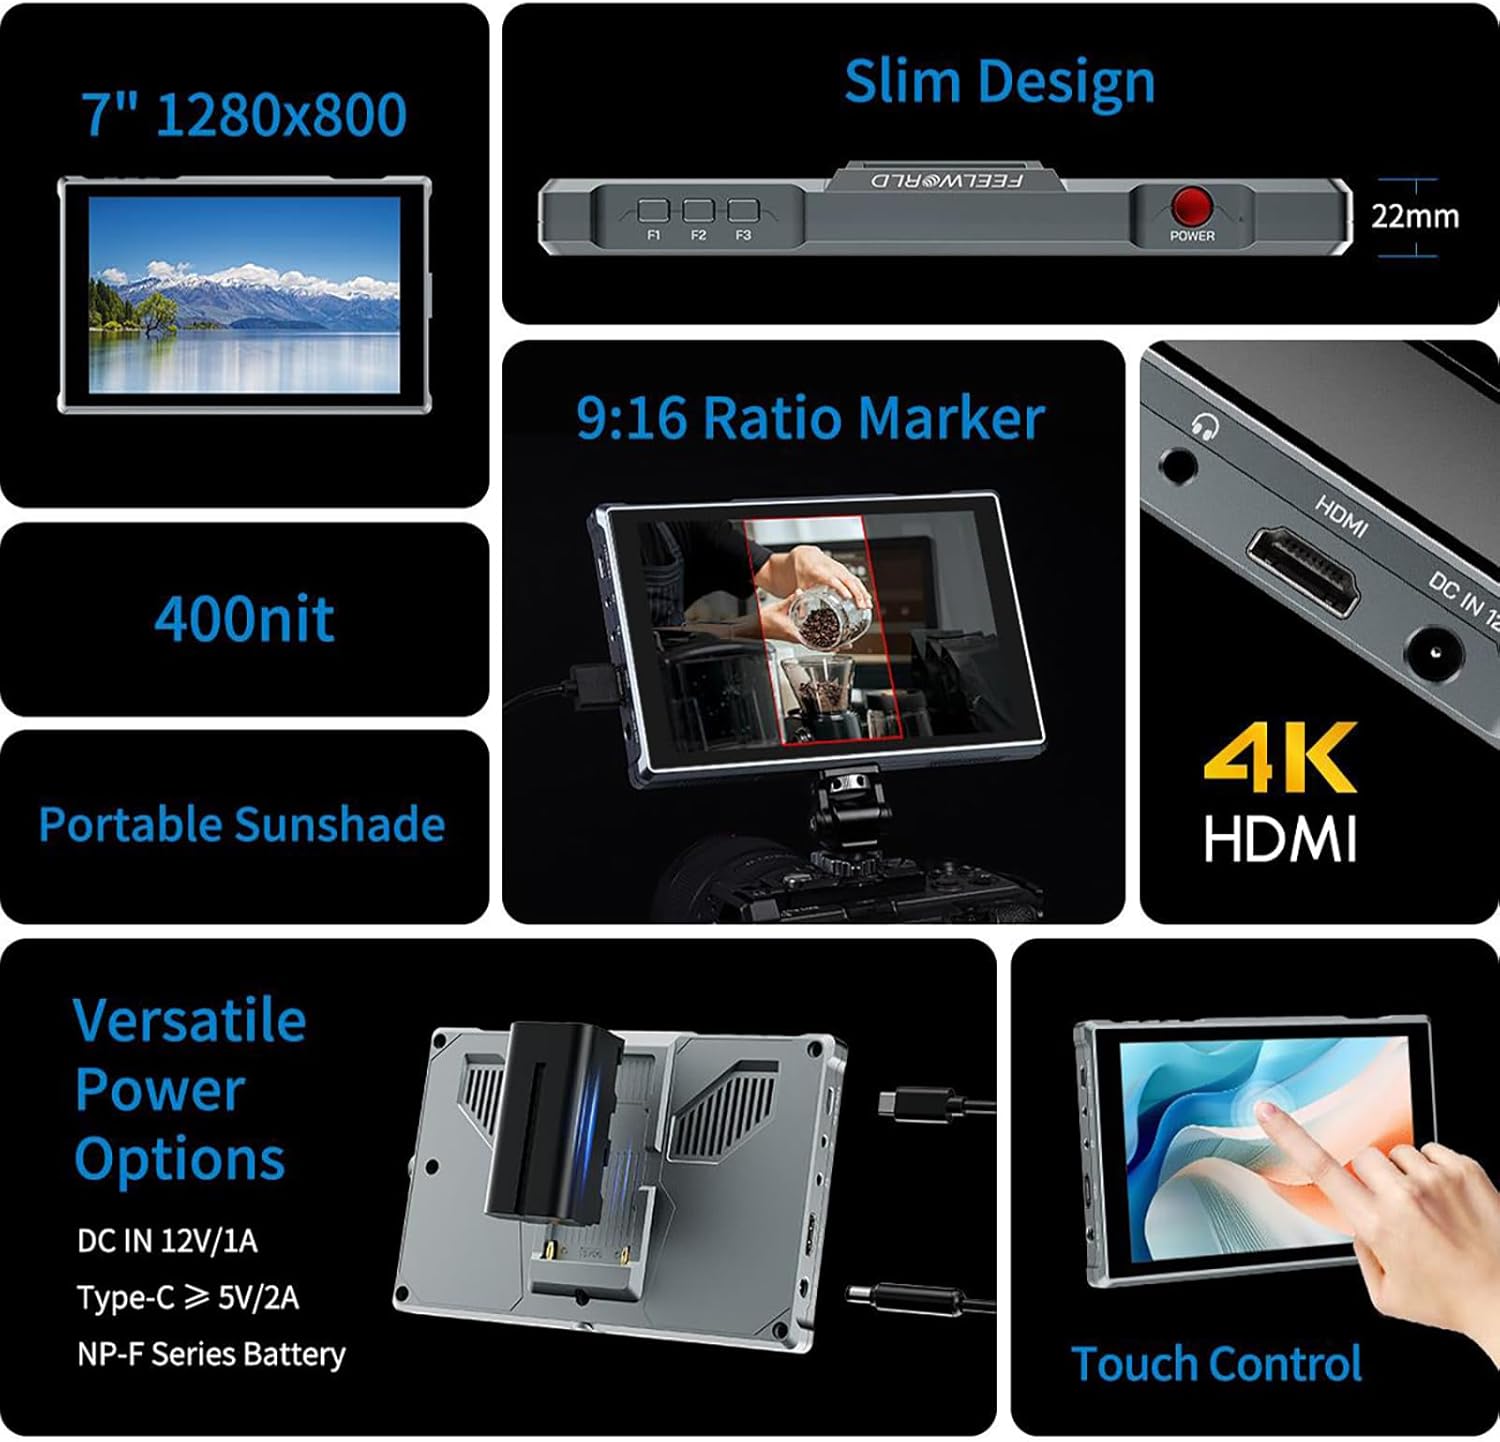
Figure 5: Power Options and Connectivity
3. Connecting Video Input
Connect your camera or video source to the monitor using the appropriate cable:
- HDMI Input: Use the provided HDMI or Micro HDMI cable to connect your camera's HDMI output to the monitor's HDMI input port. The monitor supports 4K 30Hz signals.
- AV Input: For devices with analog video output, connect to the AV port.
4. Attaching the Sun Shade
For improved visibility in bright outdoor conditions, attach the included sun shade:
- Assemble the sun shade frame.
- Slide the sun shade onto the monitor's frame until it clicks into place.
Operating Instructions
1. Power On/Off
Press and hold the Power Button located on the top right side of the monitor to turn it on or off.
2. Touch Screen Operation
The FW759 PRO features an intuitive touch screen for quick adjustments:

Figure 6: Touch Screen Gestures
- Swipe from the left edge: Adjust backlight brightness.
- Swipe from the right edge: Adjust volume.
- Swipe up from the bottom edge: Access the shortcut menu for quick settings.
- Tap: Select menu items or confirm settings.
3. Customizable Shortcut Keys (F1, F2, F3)
The three customizable function buttons (F1, F2, F3) allow you to assign frequently used features for quick access. To assign a function:
- Access the main menu (via touch screen or a long press on a function button).
- Navigate to the 'Function Key Settings' or similar option.
- Select F1, F2, or F3 and choose the desired function (e.g., Peaking Focus, False Color, Aspect Marker).
4. Menu Navigation and Settings
The monitor's menu system allows for comprehensive control over display settings, auxiliary functions, and system configurations.
- Main Menu Access: Tap the screen to bring up the main menu interface.
- Navigation: Use touch gestures to navigate through menu options.
- Auxiliary Functions: Access features like Peaking Focus Assist, False Color, Exposure, Histogram, Aspect Markers (including 9:16 vertical marker for social media content), and more.
- Language Settings: The FW759 PRO supports up to 12 languages. Adjust this in the system settings.
- Menu Setting Saving: The monitor supports saving up to 4 groups of menu settings. After configuring your desired settings, select a group (1-4) to save them automatically. These can be recalled or switched as needed for different shooting scenarios.
5. Audio Monitoring
Connect headphones to the 3.5mm headphone jack to monitor audio from your HDMI or AV input source.
Maintenance
Cleaning the Monitor
- Use a soft, lint-free cloth to gently wipe the screen and body of the monitor.
- For stubborn smudges, lightly dampen the cloth with water or a screen-cleaning solution specifically designed for electronics.
- Avoid using harsh chemicals, abrasive cleaners, or solvents, as these can damage the screen and finish.
Storage
- When not in use, store the monitor in a dry, cool place away from direct sunlight and extreme temperatures.
- Use a protective case or pouch to prevent scratches and impacts during transport.
- Remove batteries if storing for extended periods to prevent leakage.
Troubleshooting
If you encounter issues with your FW759 PRO monitor, refer to the following common solutions:
- No Power: Ensure the battery is charged and correctly inserted, or that the external power adapter is properly connected and supplying adequate power. Check the power button.
- No Signal: Verify that the HDMI or AV cable is securely connected to both the monitor and the video source. Confirm that the video source is outputting a signal and that the monitor's input source is correctly selected in the menu.
- Image Distortion/Poor Quality: Check the resolution and frame rate settings on your camera or video source to ensure compatibility with the monitor (up to 4K 30Hz). Inspect cables for damage.
- Touch Screen Unresponsive: Try restarting the monitor. Ensure the screen is clean and free of debris.
- Buttons Not Working: Restart the monitor. If the issue persists, contact support.
For further assistance, please refer to the official FEELWORLD support resources.
Specifications
| Feature | Specification |
|---|---|
| Model | FW759 PRO |
| Screen Size | 7 inches |
| Resolution | 1280x800 |
| Panel Type | IPS |
| Viewing Angle | 178° (Wide) |
| Input Ports | HDMI (4K 30Hz support), AV, Type-C (5V power) |
| Output Ports | 3.5mm Headphone Jack |
| Power Options | DC IN 12V, Type-C 5V, NP-F Series Battery |
| Power Consumption | 9W |
| Product Dimensions | 4.53 x 7.17 x 0.87 inches (11.5 x 18.2 x 2.2 cm) |
| Item Weight | 1.76 pounds (0.8 kg) |
| Languages Supported | Up to 12 languages |
Warranty and Support
FEELWORLD products are manufactured to high-quality standards. For warranty information, please refer to the warranty card included with your product or visit the official FEELWORLD website. Keep your purchase receipt as proof of purchase for warranty claims.
For technical support, product inquiries, or service, please contact FEELWORLD customer service through their official channels. You can often find support information on the manufacturer's website or through your authorized dealer.
Visit the FEELWORLD Store for more information and product updates.


