1. Introduction
Thank you for choosing the Hermitlux Portable Countertop Dishwasher. This manual provides essential information for the safe and efficient operation, installation, and maintenance of your appliance. Please read it thoroughly before use and retain it for future reference.
This compact dishwasher is designed for convenience in small living spaces, offering multiple washing programs and flexible water supply options without requiring permanent installation.
2. Safety Instructions
General Safety:
- Read all instructions before using the dishwasher.
- Ensure the power supply matches the voltage specified on the rating label.
- Do not operate the dishwasher if the power cord or plug is damaged.
- Keep children away from the appliance during operation and when the door is open.
- Do not immerse the appliance, cord, or plug in water or other liquids.
- Use only detergents and rinse aids specifically designed for dishwashers.
- Sharp items should be loaded with points down to prevent injury.
Electrical Safety:
- Plug the dishwasher into a grounded outlet.
- Do not use extension cords or ungrounded adapters.
- Unplug the dishwasher before cleaning or performing maintenance.
Water Safety:
- Ensure water connections are secure to prevent leaks.
- Do not use hot water above 140°F (60°C) for the water tank.
3. Product Overview
The Hermitlux Portable Countertop Dishwasher is designed for efficient dish cleaning in compact spaces. It features a 5-liter built-in water tank, eliminating the need for a permanent water hookup, and offers multiple washing programs to suit various dish types.

Figure 3.1: Overall view of the Hermitlux Portable Countertop Dishwasher.
Key Features:
- 5+1 Washing Programs: Includes Standard, Quick, Strong, ECO, Fruit, and an additional Dry function.
- Compact Size, Large Capacity: Measures 16.85"W x 16.73"D x 18.03"H, accommodating 4 full place settings and dishes up to 10.25 inches.
- 360° All-Around Cleaning: Equipped with upper and lower spray arms featuring 14 water jets for thorough cleaning.
- Water-Saving Design: Uses only 5 liters of water per cycle, saving up to 83% compared to handwashing.
- No Installation Needed: Offers two water supply modes: a built-in 5L water tank or direct faucet connection.
- Extra Drying & Stay Fresh: Features 60 minutes of hot air drying and 72 hours of automatic ventilation to prevent odors.
- LED Display & Touch Controls: User-friendly interface for easy program selection.
Included Components:
- Dishwasher Unit
- Cutlery Basket
- Drain Hose
- Inlet Hose
- User Manual
- Water Funnel (for tank filling)
4. Setup
4.1 Unpacking and Placement
- Carefully remove all packaging materials from the dishwasher.
- Place the dishwasher on a flat, stable, and heat-resistant surface. Ensure there is adequate clearance around the unit for ventilation and door opening. A minimum of 19.88 inches between the countertop and wall cabinets is recommended.
- Ensure the drain hose can reach a sink or drain point without kinks.
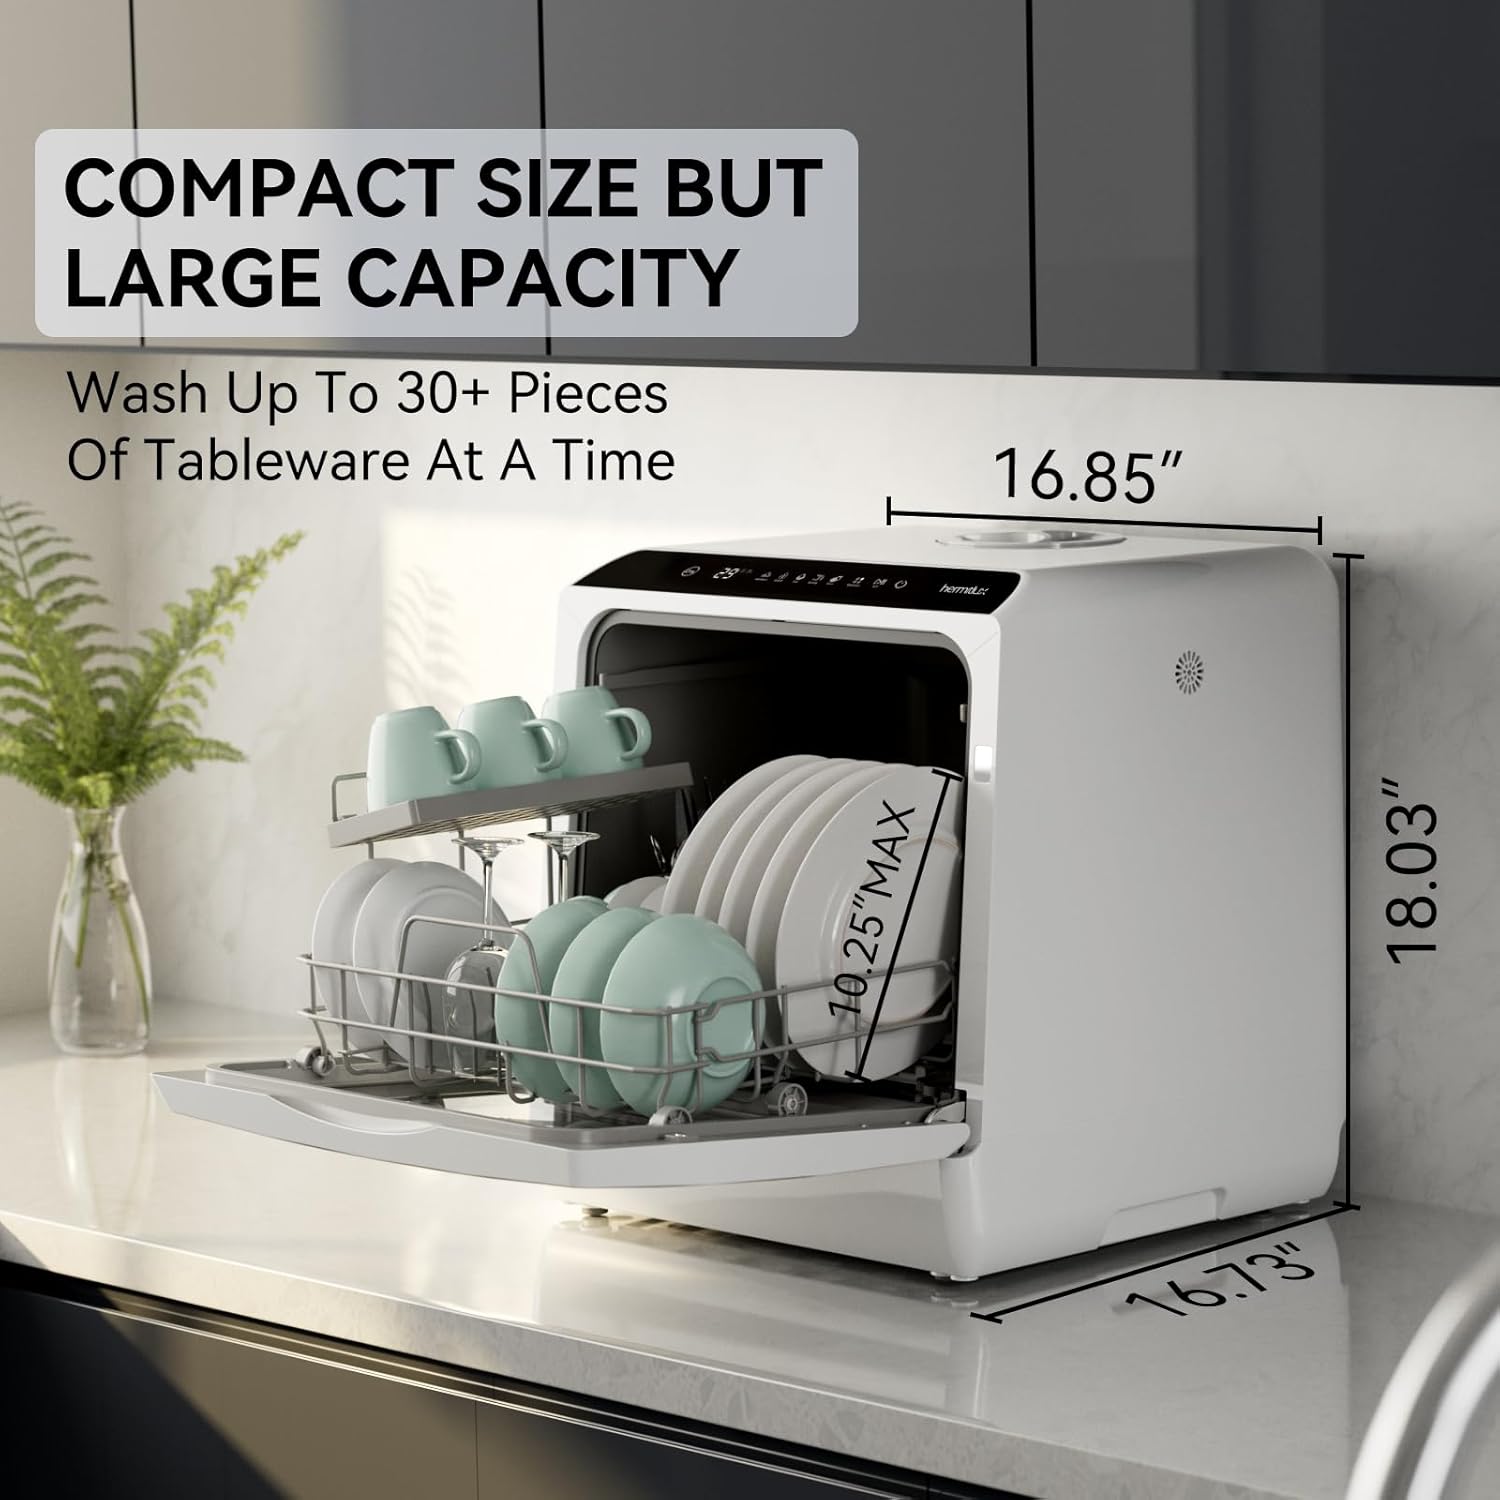
Figure 4.1: Dishwasher dimensions and capacity illustration.
4.2 Water Supply Options
Your dishwasher offers two methods for water supply:
Option 1: Built-in Water Tank (No Hookup Needed)
- Open the water tank cover located on the top of the dishwasher.
- Use the provided water funnel to slowly pour up to 5 liters of clean water into the tank.
- The dishwasher will emit a sound when the tank is full. Close the water tank cover.

Figure 4.2: Filling the built-in water tank.
Option 2: Faucet Connection
- Connect the inlet hose to the dishwasher's water inlet port.
- Connect the other end of the inlet hose to a compatible faucet. Ensure the connection is tight to prevent leaks.
- Turn on the faucet to supply water to the dishwasher.
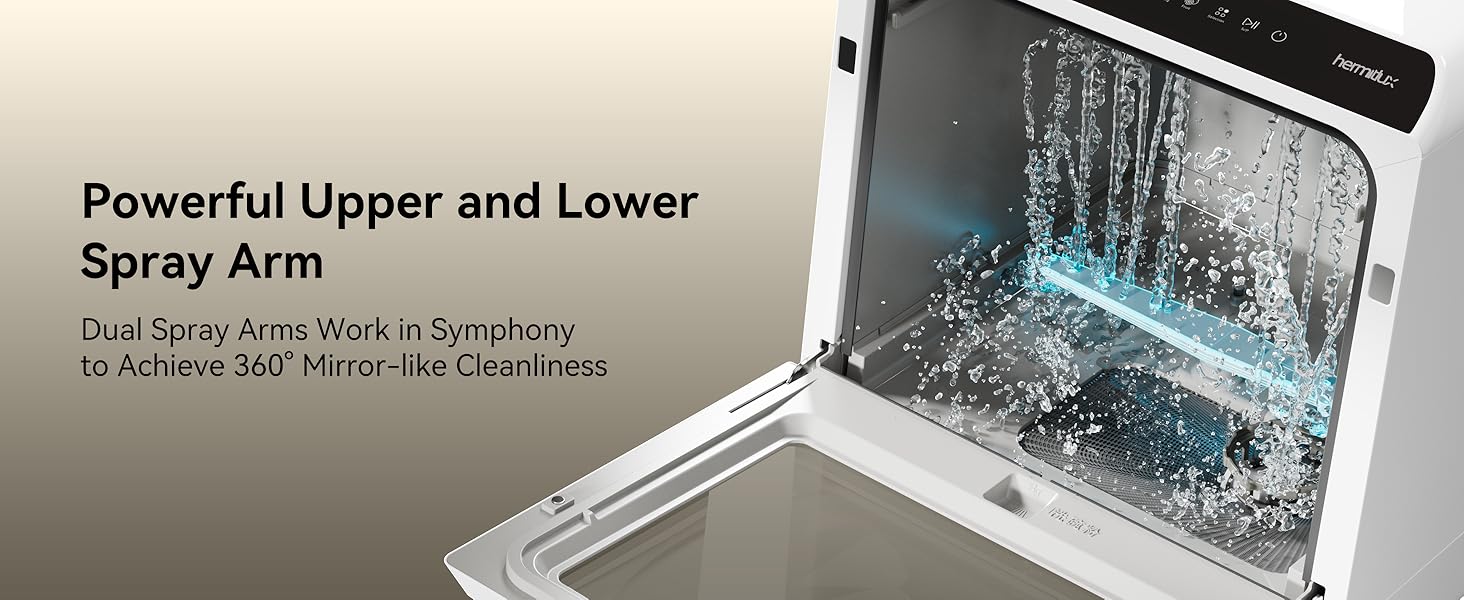
Figure 4.3: Water supply options: tank mode and faucet connection.
5. Operating Instructions
5.1 Control Panel
The dishwasher features an LED display and touch controls on the top panel for easy operation.

Figure 5.1: Clear LED display and touch controls.
5.2 Loading Dishes
Proper loading ensures optimal cleaning performance. The dishwasher can accommodate 4 place settings, including plates, cups, bowls, and cutlery.
- Scrape off large food particles before loading.
- Place larger items and heavily soiled dishes in the lower rack.
- Cups, glasses, and smaller items go in the upper rack or designated areas.
- Utilize the cutlery basket for forks, spoons, and knives (points down).
- Ensure dishes do not block the spray arms.
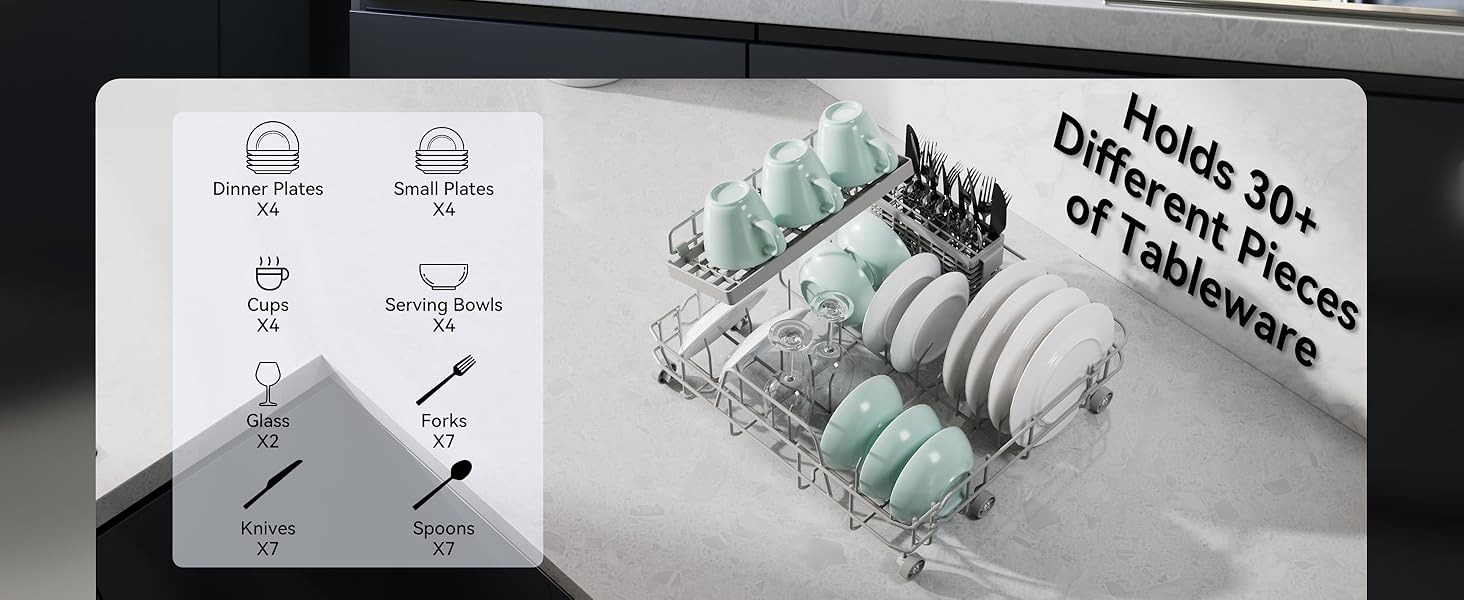
Figure 5.2: Dish loading capacity and arrangement.

Figure 5.3: Rack features including adjustable shelf and foldable tines.
5.3 Adding Detergent and Rinse Aid
Use only automatic dishwasher detergent. Place the recommended amount into the detergent dispenser. If using rinse aid, fill the rinse aid dispenser according to its indicator.
5.4 Selecting a Washing Program
The dishwasher offers 5 main washing programs and a dedicated Dry function:
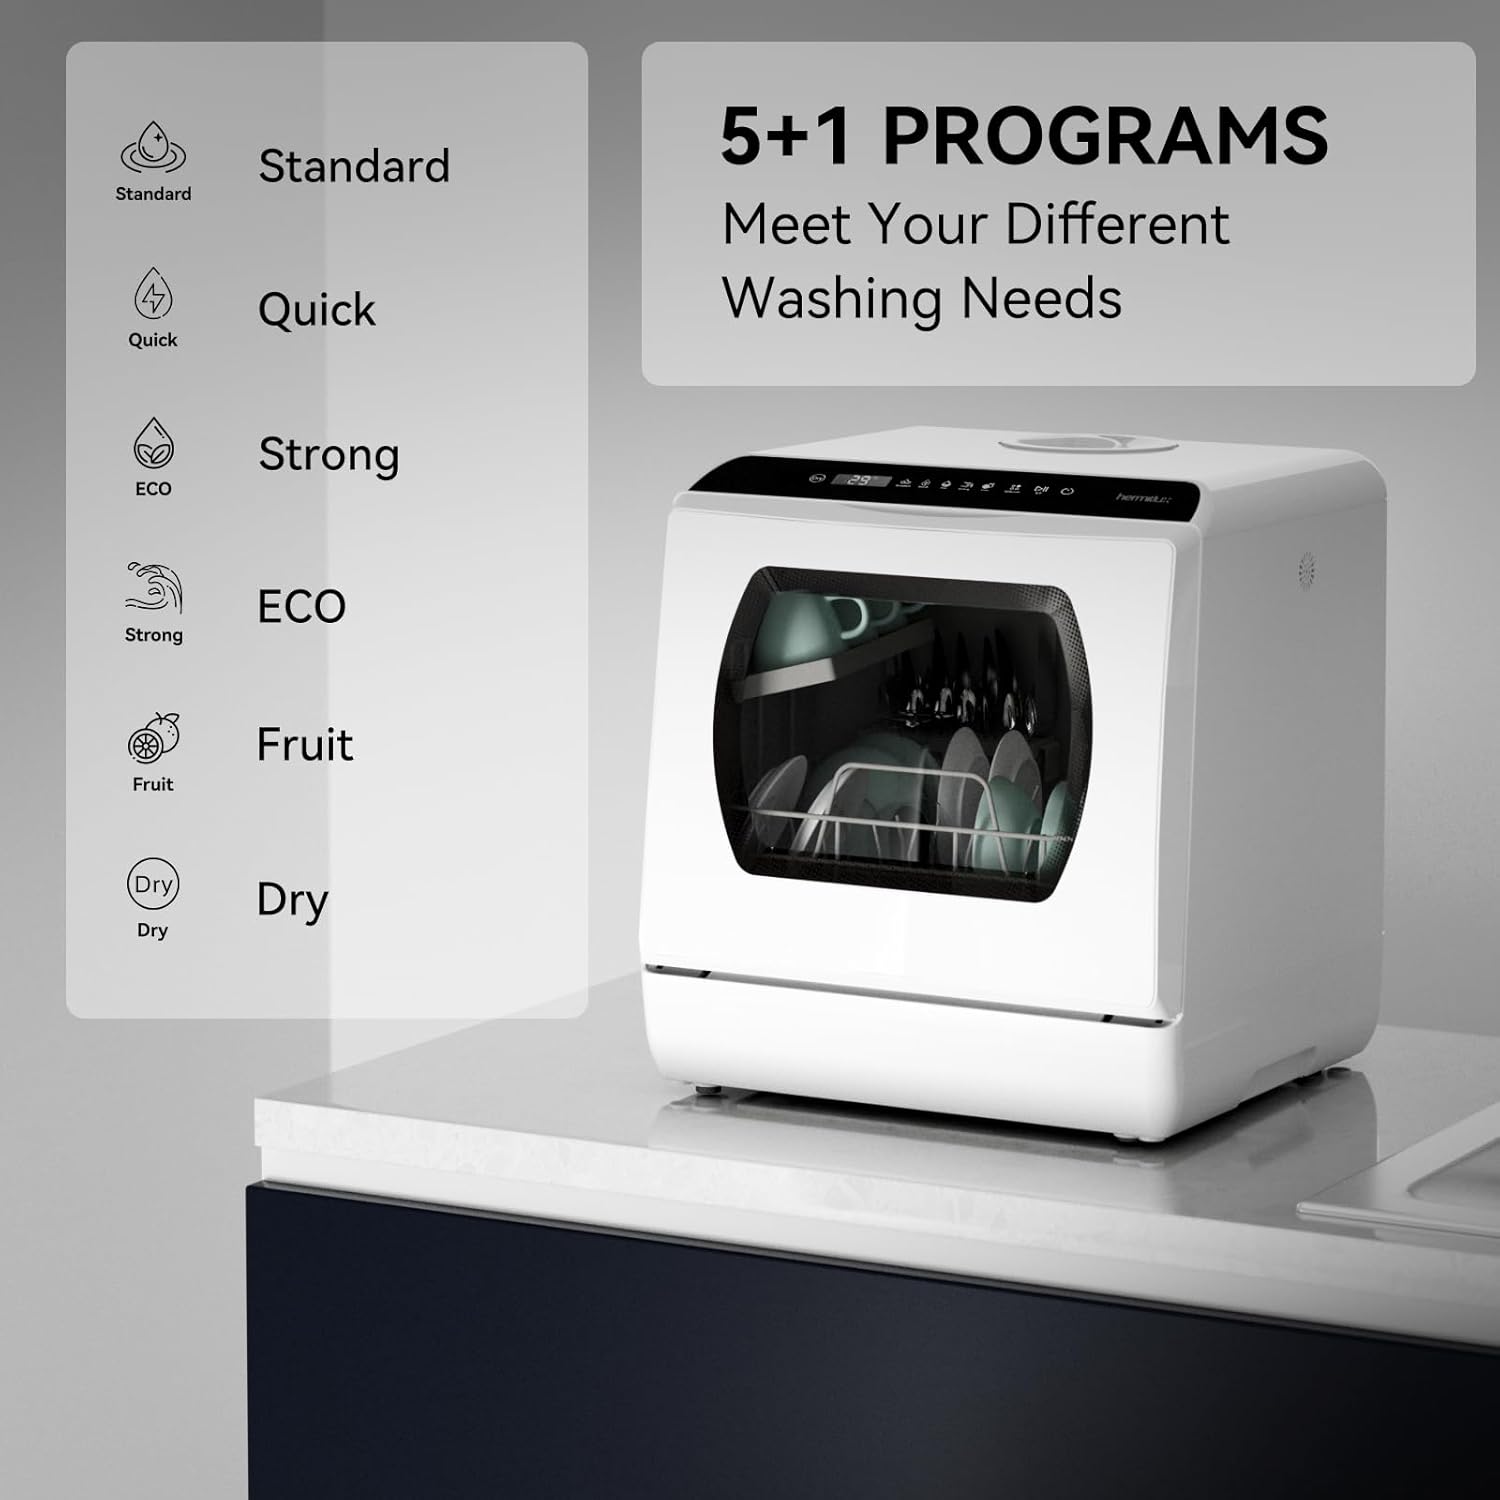
Figure 5.4: Available washing programs.
- Standard: For normal soiled dishes.
- Quick: For lightly soiled dishes that need a fast wash.
- Strong: For heavily soiled dishes and pots.
- ECO: Energy-saving program for daily use.
- Fruit: A gentle wash cycle for fruits and vegetables.
- Dry: An additional function for hot air drying.
To select a program, press the 'Selection' button on the control panel until the desired program indicator lights up.
5.5 Starting a Cycle
- Close the dishwasher door securely.
- Press the 'Power' button to turn on the dishwasher.
- Select your desired washing program.
- Press the 'Start/Pause' button to begin the cycle.
5.6 Drying Function
The dishwasher includes a hot air drying function (up to 162°F) and automatic ventilation to ensure dishes are dry and odor-free. The drying mode can be used with any wash cycle (except Fruit) or independently.

Figure 5.5: Hot air drying feature.
5.7 360° Cleaning Coverage
The dishwasher utilizes dual spray arms with 14 water ports to provide comprehensive cleaning from both the top and bottom, ensuring all dishes are thoroughly rinsed.
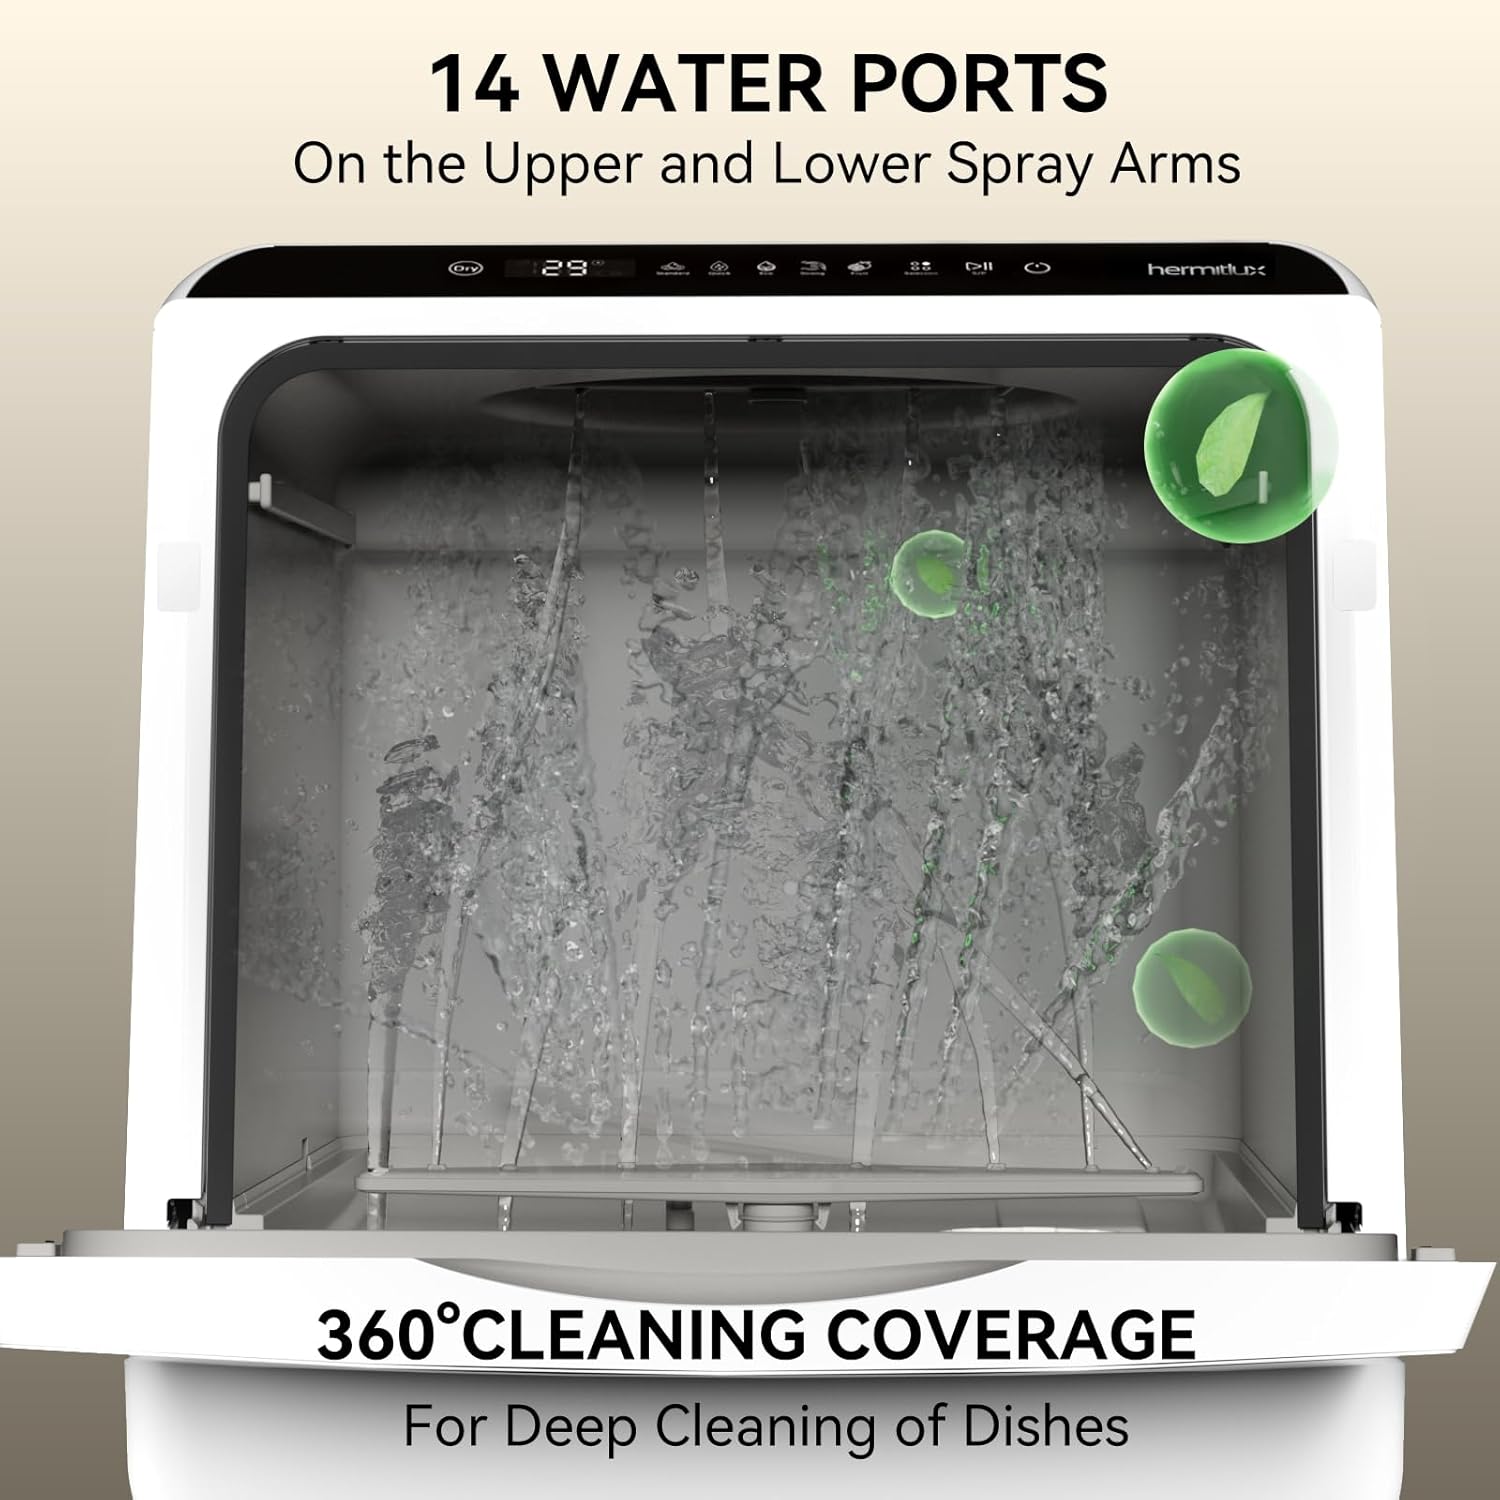
Figure 5.6: Illustration of 360° cleaning coverage.
5.8 Official Product Video
Video 5.1: An official video demonstrating the features and operation of the Hermitlux Portable Countertop Dishwasher, including its water tank and washing capabilities.
6. Maintenance
6.1 Cleaning the Filter
Regularly clean the food debris filter to maintain optimal washing performance and prevent blockages.
- Turn off and unplug the dishwasher.
- Locate the filter assembly at the bottom of the dishwasher tub.
- Twist and lift the filter to remove it.
- Rinse the filter under running water to remove any food particles. Use a brush if necessary.
- Reinsert the filter and twist to secure it in place.
Figure 6.1: Efficient food debris filter for easy cleaning.
6.2 Cleaning the Interior and Exterior
- Wipe the exterior with a soft, damp cloth. Do not use abrasive cleaners.
- Clean the interior periodically with a dishwasher cleaner or a mixture of vinegar and water to remove mineral buildup and odors.
6.3 Draining
Ensure the drain hose is always positioned to allow proper drainage into a sink or bucket. Periodically check the drain hose for blockages.
7. Troubleshooting
Before contacting support, review the following common issues and solutions:
| Problem | Possible Cause | Solution |
|---|---|---|
| Dishwasher does not start | No power; Door not closed properly; Water tank empty (if using tank mode) | Check power connection; Ensure door is latched; Fill water tank. |
| Dishes are not clean | Improper loading; Clogged spray arms; Insufficient detergent; Clogged filter | Reload dishes correctly; Clean spray arm nozzles; Add more detergent; Clean the filter. |
| Water leaks | Loose hose connections; Damaged door seal; Overfilling water tank | Tighten hose connections; Inspect and clean door seal; Do not overfill the water tank. |
| Unpleasant odor | Food residue in filter or interior; Infrequent cleaning | Clean filter and interior thoroughly; Run a cleaning cycle with dishwasher cleaner. |
8. Specifications
| Feature | Specification |
|---|---|
| Model Number | US HMX-DW03-1 |
| Voltage | 120 Volts |
| Product Dimensions (D x W x H) | 16.73 x 16.85 x 18.03 inches |
| Item Weight | 34.3 pounds |
| Water Tank Capacity | 5 Liters |
| Place Setting Capacity | 4 Place Settings |
| Max Dish Size | 10.25 inches (at an angle) |
| Washing Programs | Standard, Quick, Strong, ECO, Fruit |
| Drying Function | Heated Dry (up to 162°F), 72-hour Automatic Ventilation |
| Controls Type | Touch |
| Display Type | LED |
| Annual Energy Consumption | 83 Kilowatt Hours Per Year |
| Certification | ETL |
| Materials | Acrylonitrile Butadiene Styrene (ABS), Glass, Polypropylene (PP), Metal coated with PA powder |
9. Warranty and Support
This Hermitlux product comes with a standard manufacturer's warranty. For specific warranty details, please refer to the warranty card included with your purchase or contact Hermitlux customer service.
If you encounter any issues or have questions regarding your dishwasher, please contact Hermitlux customer support for assistance. Contact information can typically be found on the product packaging or the official Hermitlux website.


