1. Introduction
This manual provides detailed instructions for the installation, operation, and maintenance of your UNITOPSCI Android 15 Car Stereo. Please read this manual thoroughly before using the product to ensure proper functionality and safety. This unit is specifically designed for Lexus ES models from 2001 to 2005 (ES250, ES300, ES330).

Image 1.1: UNITOPSCI Android 15 Car Stereo with main accessories.
2. Package Contents
Verify that all items listed below are included in your package:
- 1 x Car Radio Unit
- 1 x Power Cable
- 1 x Car Rear View Camera
- 1 x Installation Tool Set
- 1 x GPS Antenna
- 1 x Rear Camera Input Cable
- 1 x RCA Cable
- 2 x USB Cables
- 1 x User Manual
- 1 x Microphone

Image 2.1: Visual representation of the package contents and unit dimensions.
3. Compatibility and Important Notes
This car stereo is designed for Lexus ES 2001-2005 ES250/300/330 models. It features a 9-inch IPS touchscreen with 1280*720P resolution and runs on Android 15 with 4GB RAM and 64GB ROM.
3.1 Wiring Harness and CANBUS
Important: If your vehicle's original CD player has an incompatible back interface (as shown in Image 3.1, types B, C, or D), you may need to purchase an additional wiring harness and CANBUS decoder separately. The standard wiring harness included is for basic configurations (Type A). Please consult customer support if you are unsure about your vehicle's specific configuration.
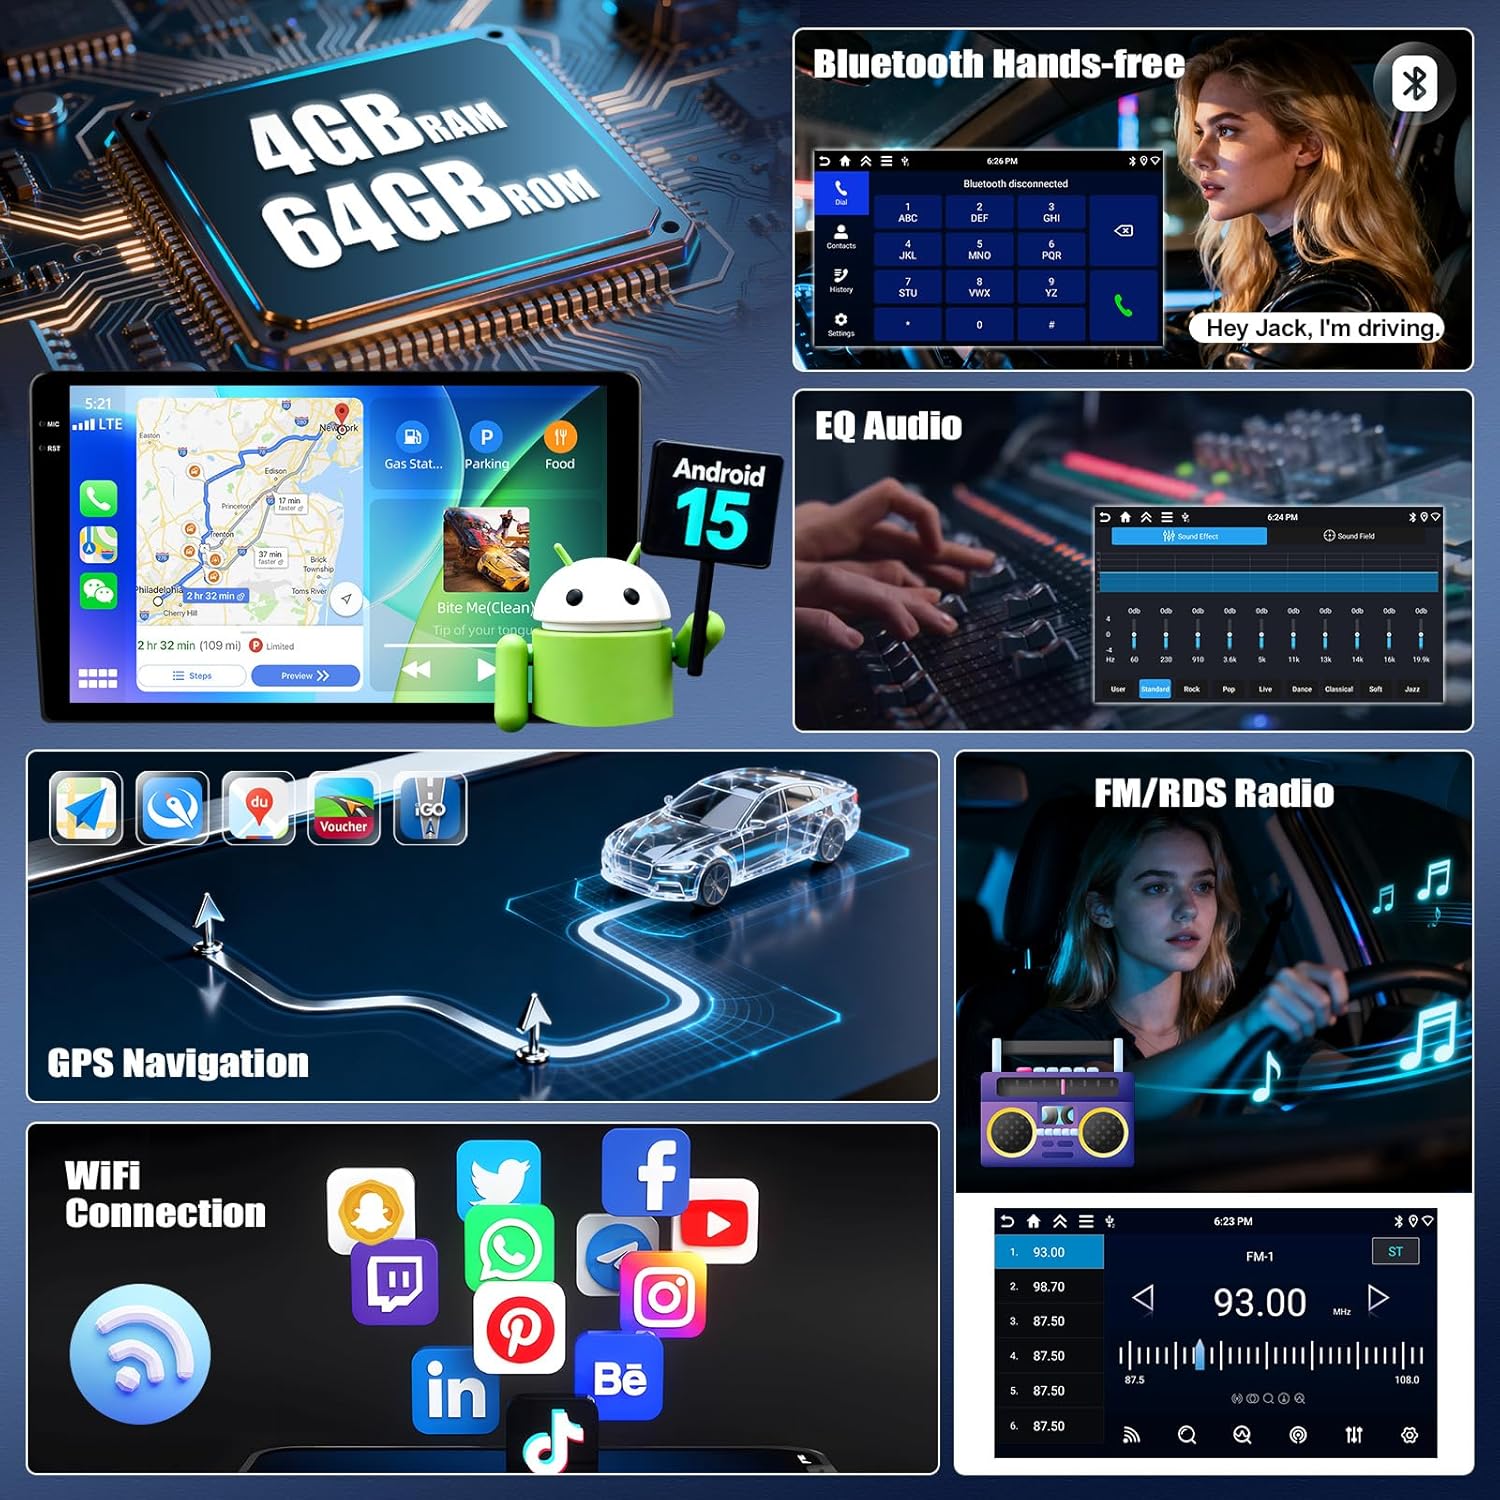
Image 3.1: Examples of compatible (A) and incompatible (B, C, D) CD player back interfaces.
4. Setup and Installation
Installation of this car stereo requires technical knowledge. It is recommended to seek professional installation to avoid damage to the unit or your vehicle. Ensure the vehicle's battery is disconnected before beginning installation.
4.1 General Installation Steps (Consult a professional or vehicle-specific guide for detailed steps):
- Remove the original car stereo unit from the dashboard.
- Connect the provided power cable, RCA cables, USB cables, GPS antenna, and rear camera input cable to the new head unit.
- If required, connect the additional wiring harness and CANBUS decoder.
- Carefully route all cables to their respective locations in the vehicle.
- Mount the new car stereo into the dashboard opening.
- Reconnect the vehicle's battery and test all functions.
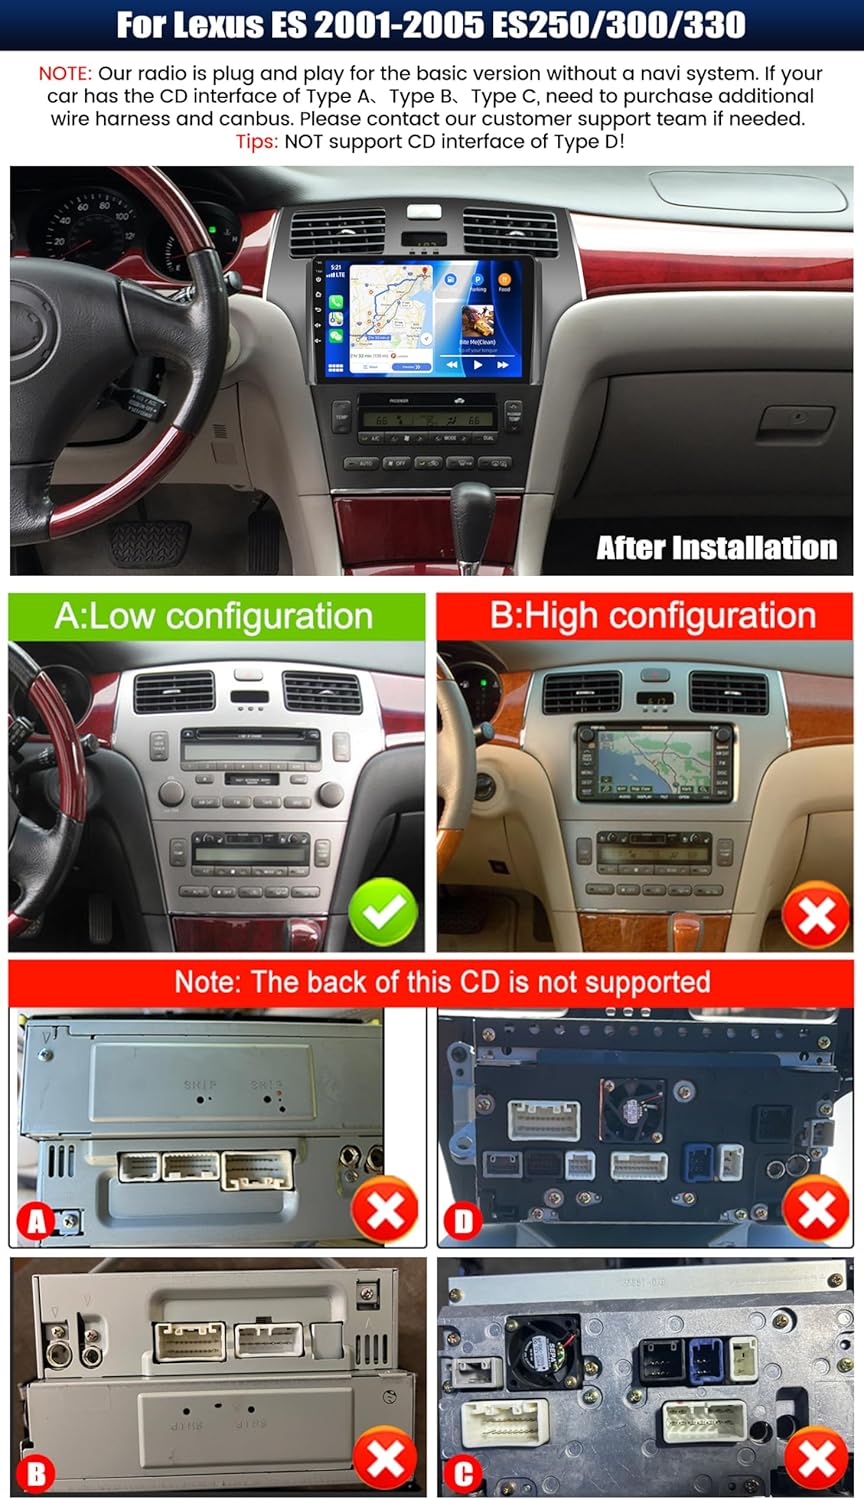
Image 4.1: Example of the car stereo installed in a Lexus ES dashboard.
5. Operating Instructions
5.1 Wireless CarPlay / Android Auto
The unit supports wireless CarPlay for iOS devices and wireless Android Auto for Android devices. This allows seamless integration of your smartphone's navigation, music, calls, and messaging functions directly on the car stereo display.
- Ensure Bluetooth and Wi-Fi are enabled on your smartphone.
- On the car stereo, navigate to the CarPlay or Android Auto application.
- Follow the on-screen prompts to pair your device.
- Once connected, you can access compatible apps and use voice commands (Siri or Google Assistant).

Image 5.1: Wireless CarPlay and Android Auto functionality.
5.2 Mirror Link Function
Mirror Link allows you to display your smartphone's screen on the car stereo. For Android devices, you can also control the phone directly from the stereo's touchscreen.
- Connect your smartphone to the car stereo via USB or Wi-Fi.
- Open the 'Mirror Link' application on the car stereo.
- Follow the instructions on the screen to establish the connection.
5.3 GPS Navigation
The unit features a built-in GPS module supporting both online and offline navigation. Pre-installed maps for North America and worldwide are available.
- To use online navigation, ensure the unit is connected to Wi-Fi.
- For offline navigation, download map data in advance.
- Access navigation through the dedicated 'GPS' or 'Maps' application.

Image 5.2: GPS Navigation and Wi-Fi connectivity.
5.4 Bluetooth 5.0
Connect your smartphone via Bluetooth for hands-free calling and audio streaming.
- Enable Bluetooth on your smartphone and the car stereo.
- Search for available devices on the car stereo and select your phone.
- Confirm the pairing code on both devices.
- Once paired, you can make/receive calls and play music wirelessly.
5.5 FM/RDS Radio
The built-in FM/RDS tuner provides enhanced radio signal reception. You can store up to 18 preset stations.
- Access the 'Radio' application.
- Use the scan function to find available stations.
- Press and hold a preset button to save the current station.
5.6 EQ Audio Settings
Adjust audio output with the integrated Equalizer (EQ) to customize your listening experience. Multiple preset sound effects are available.
- Navigate to 'Sound Settings' or 'EQ' in the main menu.
- Choose from various preset sound modes (e.g., Pop, Rock, Jazz) or manually adjust frequency bands.

Image 5.3: Bluetooth, FM/RDS Radio, and EQ Audio interfaces.
5.7 Steering Wheel Control (SWC)
The unit supports steering wheel controls, allowing you to manage audio functions (volume, track skipping, call answering) without taking your hands off the wheel.
- Access the 'Steering Wheel Control' settings in the system menu.
- Follow the on-screen instructions to program each button on your steering wheel to the desired function.
5.8 Split Screen Functionality
The split-screen feature allows you to run two applications simultaneously on the display, such as navigation and music playback. You can adjust the size and position of each app.
- From a running application, swipe from the side or long-press the recent apps button (method may vary by UI theme) to activate split-screen mode.
- Select a second application to run alongside the first.

Image 5.4: Display features including IPS touchscreen, UI themes, and split screen.
6. Rear View Camera Operation
The included AHD backup camera provides a clear view of the area behind your vehicle when reversing. It automatically activates when the vehicle is shifted into reverse gear.
- Ensure the rear camera is properly installed and connected to the 'Rear Camera Input' on the head unit.
- When the vehicle is in reverse, the display will automatically switch to the camera feed, showing parking assist lines.

Image 6.1: Steering Wheel Control interface and AHD Backup Camera view.
7. Specifications
| Feature | Specification |
|---|---|
| Operating System | Android 15 |
| RAM | 4GB |
| ROM | 64GB |
| Display Size | 9 Inches |
| Screen Resolution | 1280 x 720P IPS |
| Bluetooth Version | 5.0 |
| Connectivity | Bluetooth, Wi-Fi, USB |
| Special Features | Wireless CarPlay, Android Auto, Mirror Link, GPS Navigation, FM/RDS, EQ, Steering Wheel Control, AHD Backup Camera, Multiple UI Themes, Split Screen |
| Map Type | North America, Worldwide (offline/online) |
| Item Weight | 3.89 pounds |
| Package Dimensions | 15.35 x 9.65 x 3.35 inches |
8. Troubleshooting
If you encounter issues with your car stereo, refer to the following common troubleshooting steps:
- No Power: Check all power connections and fuses. Ensure the vehicle's battery is properly connected.
- No Sound: Verify speaker connections. Check volume levels and EQ settings. Ensure the correct audio source is selected.
- GPS Signal Loss: Ensure the GPS antenna is correctly installed and has a clear view of the sky. Check GPS settings in the unit.
- Bluetooth Connection Issues: Ensure Bluetooth is enabled on both devices. Delete previous pairings and attempt to re-pair.
- CarPlay/Android Auto Not Connecting: Ensure Wi-Fi and Bluetooth are active on your phone. Try restarting both the phone and the car stereo. Check for software updates for the car stereo.
- Rear Camera Not Displaying: Check the camera's power and video input connections. Ensure the reverse gear signal wire is correctly connected.
- Touchscreen Unresponsive: Try restarting the unit. If the issue persists, a factory reset may be necessary (note: this will erase all user data).
For persistent issues, please contact customer support.
9. Maintenance
Proper maintenance ensures the longevity and optimal performance of your car stereo.
- Cleaning the Screen: Use a soft, lint-free cloth to gently wipe the touchscreen. For stubborn smudges, slightly dampen the cloth with water or a screen-safe cleaner. Avoid harsh chemicals or abrasive materials.
- Software Updates: Periodically check for available software updates to ensure optimal performance and access to new features. Follow the instructions provided with the update.
- Environmental Conditions: Avoid exposing the unit to extreme temperatures, direct sunlight for prolonged periods, or excessive moisture.
- Cable Connections: Periodically check that all cables are securely connected to prevent intermittent issues.
10. Warranty and Support
UNITOPSCI offers comprehensive support for your product:
- Warranty: The product comes with a 12-month replacement service.
- Money-Back Guarantee: A 30-day money-back guarantee is provided.
- Returns: Enjoy 60-days no-worry returns.
- Technical Support: Dedicated 24/7 professional after-sales team is available to assist with installation or usage inquiries. Lifetime after-sales consultation and technical support are provided.
Contact Information:
For online support, please contact: UNITOPSCI@126.com

Image 10.1: UNITOPSCI customer support information.


