
Introduction
Thank you for choosing the QudosXy UHF 4-Channel Wireless Microphone System. This system is designed to provide clear, stable audio for various applications, including karaoke, live performances, speeches, and events. This manual will guide you through the setup, operation, and maintenance of your new wireless microphone system to ensure optimal performance and longevity.

Figure 1: QudosXy UHF 4-Channel Wireless Microphone System.
Package Contents
Please check the package carefully to ensure all items are present and in good condition:
- 1 x Receiver Unit
- 4 x Handheld Microphones (Transmitters)
- 1 x 1/4" Audio Cable
- 2 x Antennas
- 1 x Power Adapter
- 1 x User Manual
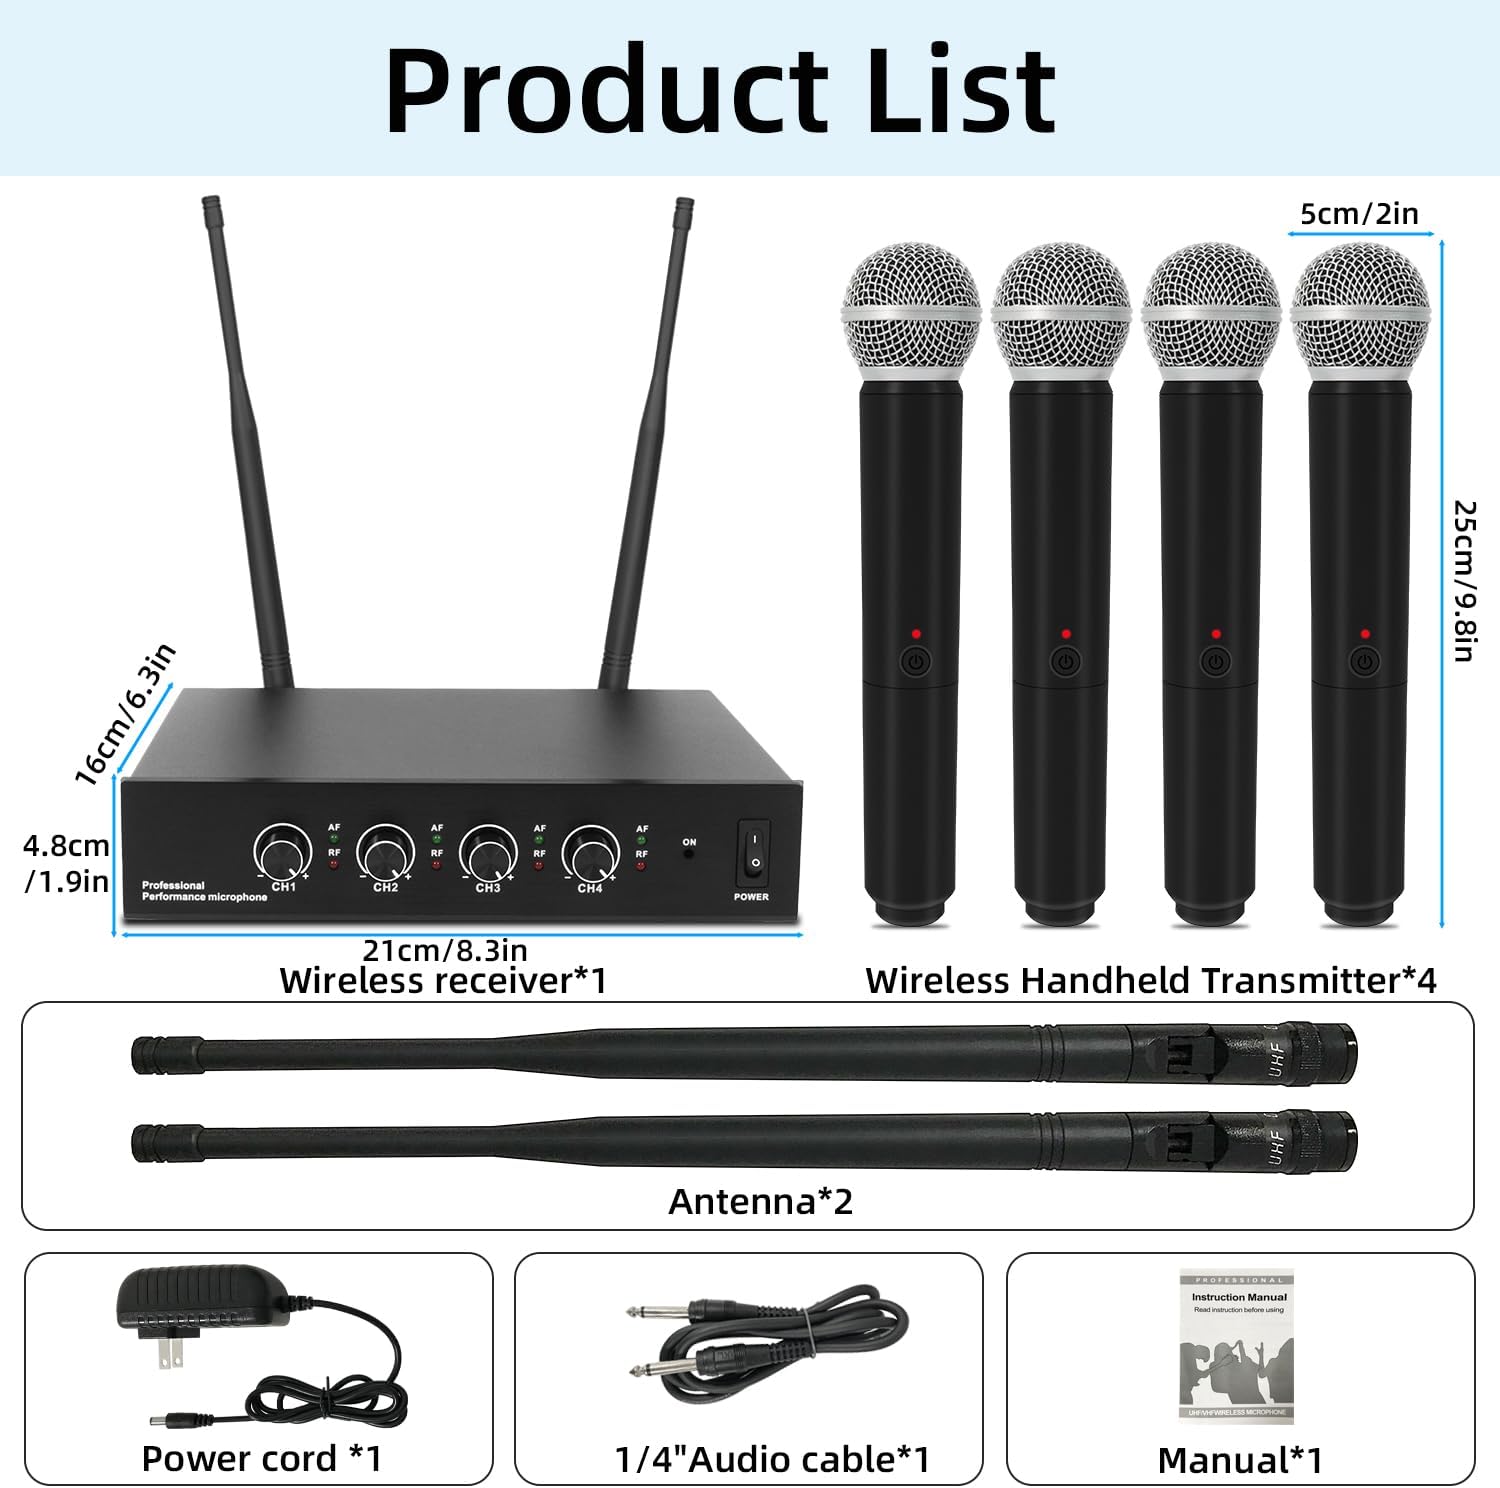
Figure 2: Complete package contents of the QudosXy G02-4*Microphones system.
Product Overview
Receiver Unit
The receiver unit is the central hub of your wireless microphone system, processing audio signals from the microphones and outputting them to your sound system. It features four independent channels, each with its own volume control.

Figure 3: Receiver unit controls and interfaces.
- Power Switch: Turns the receiver on or off.
- Volume Control Knobs (CH1-CH4): Adjusts the output volume for each microphone channel independently.
- RF/AF Indicators: RF (Radio Frequency) indicates signal reception; AF (Audio Frequency) indicates audio signal presence.
- XLR Balanced Outputs: Provides individual balanced audio outputs for each channel (XLR to XLR cable not included).
- 1/4" Mixed Output: Provides a combined unbalanced audio output for all channels.
- Antenna Connectors: For attaching the included antennas to ensure stable signal reception.
- Power Jack: Connects to the included power adapter.
Handheld Microphones
The system includes four handheld dynamic microphones, each designed for clear vocal pickup and robust performance.

Figure 4: Handheld microphone features.
- High-Quality Metal Mesh Head: Protects the microphone core and ensures durability.
- Power Light: Indicates microphone power status.
- Power Switch: Turns the microphone on or off.
- ABS Plastic Tube Body: Provides a comfortable grip and robust construction.
- Cardioid Pickup Pattern: Focuses on sound directly in front of the microphone, reducing background noise.
Setup Instructions
Follow these steps to set up your QudosXy wireless microphone system:
- Connect Antennas: Screw the two included antennas onto the antenna connectors at the rear of the receiver unit. Ensure they are securely tightened and positioned upright for optimal signal reception.
- Power Connection: Connect the power adapter to the DC 12-18V power jack on the receiver unit, then plug the adapter into a suitable power outlet.
- Audio Output Connection:
- For a mixed output, connect the supplied 1/4" audio cable from the receiver's 1/4" MIXED OUT jack to the input of your PA system, mixer, or speaker.
- For individual channel control, use XLR to XLR cables (not included) to connect each channel's XLR BALANCED OUT to separate inputs on your audio mixer.
- Microphone Batteries: Open the battery compartment of each handheld microphone and insert two AA batteries (not included), ensuring correct polarity. Close the compartment securely.
- Power On: Turn on the receiver unit using its power switch. The display should illuminate. Then, turn on each handheld microphone using its power switch. The power light on the microphone should turn on.
- Automatic Pairing: The microphones and receiver are designed to pair automatically. The RF indicator on the receiver for each active microphone channel should light up, indicating a successful connection.

Figure 5: Receiver connection diagram.
Operating Instructions
Once the system is set up, follow these guidelines for operation:
- Volume Adjustment: Start with the receiver's channel volume knobs (CH1-CH4) set to a low level. Gradually increase the volume on your PA system or mixer, then fine-tune each microphone's volume using the corresponding knob on the receiver.
- Microphone Usage: Hold the microphone approximately 2-6 inches (5-15 cm) from your mouth for optimal sound quality. Avoid covering the microphone grille with your hand, as this can affect sound and signal.
- Range: The system offers a stable wireless range of up to 130 feet (40 meters) in open areas. Keep the receiver and microphones within this range for best performance. Obstacles like walls can reduce the effective range.
- Anti-Interference: The UHF system operates within the 540-590MHz frequency range with ±30ppm stability, designed to minimize interference. If you experience interference, try repositioning the receiver or microphones.
- Power Off: After use, turn off each handheld microphone first, then power off the receiver unit. This helps prevent unexpected noises through your sound system.

Figure 6: Recommended usage steps for the wireless microphone system.
Maintenance
Proper maintenance ensures the longevity and performance of your wireless microphone system:
- Cleaning: Use a soft, dry cloth to clean the receiver and microphones. Do not use liquid cleaners or solvents, as they may damage the finish or internal components.
- Battery Replacement: Replace microphone batteries when the power indicator light dims or audio quality degrades. Always use fresh, high-quality AA batteries. Remove batteries if the microphones will not be used for an extended period to prevent leakage.
- Storage: Store the system in a cool, dry place away from direct sunlight, extreme temperatures, and high humidity.
- Handling: Handle microphones and the receiver with care. Avoid dropping them or subjecting them to strong impacts.
Troubleshooting
If you encounter issues with your QudosXy wireless microphone system, refer to the following common problems and solutions:
| Problem | Possible Cause | Solution |
|---|---|---|
| No sound from microphone | Microphone off, low batteries, receiver off, incorrect cable connection, volume too low. | Ensure microphone and receiver are powered on. Replace batteries. Check all cable connections. Increase volume on receiver and connected audio device. |
| Interference or static noise | Other wireless devices, too far from receiver, obstacles blocking signal. | Move away from other electronic devices. Ensure line of sight between microphone and receiver. Reposition receiver or antennas. |
| Short wireless range | Antennas not properly connected/positioned, environmental interference, physical obstructions. | Ensure antennas are securely attached and upright. Minimize obstructions between receiver and microphones. Test in a different location. |
| Microphone not pairing | Microphone or receiver not powered on, frequency mismatch (rare for auto-pairing systems). | Ensure both devices are on. If issues persist, refer to advanced pairing instructions (if available in full manual) or contact support. |
Specifications
Key technical specifications for the QudosXy UHF 4-Channel Wireless Microphone System:
- Brand: QudosXy
- Model Name: G02
- Connectivity Technology: XLR
- Connector Type: 6.35 mm Jack, XLR
- Special Feature: Noise Reduction
- Compatible Devices: Karaoke Machine, PA System
- Color: Black
- Microphone Form Factor: Handheld
- Power Source: Battery Powered (Microphones)
- Signal-to-Noise Ratio: 80 dB
- Number of Channels: 4
- Frequency Response: 75 kHz - 12 kHz
- Enclosure Material: Metal
- Item Dimensions (Receiver): Approximately 10.4 x 4.4 x 11.6 inches
- Wireless Range: Up to 130 feet (40 meters)
- UHF Frequency Range: 540-590 MHz
Warranty and Support
Warranty: This QudosXy product is covered by a 1-Year Manufacturer's Warranty. Please retain your proof of purchase for warranty claims.
Customer Support: For technical assistance, troubleshooting beyond this manual, or warranty inquiries, please contact QudosXy customer support through the retailer where you purchased the product or visit the official QudosXy website for contact information.
We are committed to providing high-quality audio solutions and support for our customers.