1. Important Safeguards
Please read all instructions carefully before using your MERIOR BM901 Bread Maker. Retain this manual for future reference. Improper use can result in electric shock, fire, or injury.
- Electrical Safety: Ensure your household voltage matches the rating label on the appliance. Do not immerse the power cord, plug, or the appliance itself in water or other liquids.
- Supervision: Close supervision is necessary when the appliance is used by or near children. Do not allow children to operate the bread maker.
- Hot Surfaces: The bread maker's exterior and interior parts become very hot during operation. Always use oven mitts when handling hot parts, such as the bread pan or removing bread.
- Ventilation: Place the appliance on a stable, heat-resistant surface with adequate space around it for proper ventilation. Do not operate near flammable materials.
- Maintenance: Unplug the appliance from the outlet when not in use and before cleaning. Allow it to cool completely before attaching or removing parts, and before cleaning.
- Damage: Do not operate any appliance with a damaged cord or plug, or after the appliance malfunctions or has been damaged in any manner.
2. Product Overview
The MERIOR BM901 is an advanced 25-in-1 automatic bread maker designed to simplify homemade bread preparation. It offers a variety of programs for different bread types, doughs, and even cakes, along with convenient features for ease of use.
Key Features:
- 25-in-1 Multifunctionality: Offers 14 types of bread, 2 cake recipes, 4 special menus, and 5 custom settings to meet diverse baking needs.
- 2-Lb Capacity with Adjustable Settings: Allows selection of 1.1lb, 1.5lb, or 2lb loaf sizes and three crust colors (Light, Medium, Dark).
- Touchscreen Display & Visible Lid: Features an intuitive touchscreen for easy program selection and a transparent lid to monitor the baking process.
- 13-Hour Delay Timer & Automatic Nut Dispenser: Program baking up to 13 hours in advance and automatically add nuts or fruits at the optimal time.
- Food-Grade Materials & Easy Cleaning: Constructed with food-grade materials, including a detachable, non-stick bread pan that is dishwasher-friendly.

Image: The MERIOR BM901 Bread Maker, showcasing its sleek stainless steel design and closed lid.
3. Package Contents
Please check the package contents upon unboxing to ensure all items are present:
- 1 x MERIOR Bread Machine
- 1 x Measuring Cup
- 1 x Stirring Knife (Kneading Paddle)
- 1 x Non-Stick Bread Pan
- 1 x Fruit Nut Dispenser
- 1 x User Manual (this document)
- 1 x Recipe Book
- 1 x Hook (for removing kneading paddle)
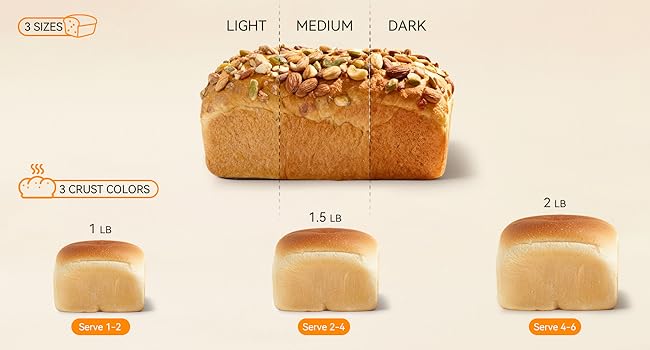
Image: All components included in the MERIOR BM901 Bread Maker package, including the machine, bread pan, measuring tools, and accessories.
4. Setup and First Use
Follow these steps to set up your bread maker for the first time:
- Unpacking: Carefully remove all packaging materials and inspect the appliance for any damage.
- Initial Cleaning: Wash the bread pan, kneading paddle, and fruit nut dispenser with warm, soapy water. Rinse thoroughly and dry completely. Wipe the exterior of the bread maker with a damp cloth.
- Placement: Place the bread maker on a clean, dry, stable, and heat-resistant countertop. Ensure there is at least 4 inches of clearance on all sides for proper ventilation.
- Install Bread Pan: Insert the bread pan into the baking chamber. Push down and turn it clockwise until it locks securely into place.
- Connect Power: Plug the power cord into a grounded 120V AC electrical outlet. The display will briefly illuminate, and a default program will be shown.
5. Operating Instructions
5.1 Control Panel Overview

Image: Detailed view of the MERIOR BM901 bread maker's intelligent touchscreen control panel, showing the LCD display and various function buttons.
The MERIOR BM901 features an intuitive touchscreen control panel:
- MENU: Press to cycle through the 25 available programs (e.g., Basic, French, Whole Wheat, Cake, Dough).
- COLOR: Selects the desired crust darkness: Light, Medium, or Dark.
- LOAF/DOUGH: Selects the loaf size: 1.1 lb, 1.5 lb, or 2 lb.
- TIME (+/-): Adjusts the delay timer or custom program times.
- START/STOP: Press once to start the selected program. Press and hold for 3 seconds to stop a program.
- DELAY: Activates the delay timer function, allowing you to set a deferred start time.
5.2 Basic Bread Making Steps
- Add Kneading Paddle: Place the kneading paddle onto the shaft at the bottom of the bread pan.
- Add Ingredients: Follow your recipe carefully. Typically, liquid ingredients are added first, followed by dry ingredients. Create a small well in the dry ingredients for the yeast, ensuring it does not come into direct contact with liquid or salt initially.
- Close Lid: Close the bread maker lid securely.
- Select Program: Press the "MENU" button repeatedly until the desired program number appears on the display.
- Adjust Settings: Use the "COLOR" button to choose your preferred crust darkness and the "LOAF/DOUGH" button to select the appropriate loaf size for your recipe.
- Automatic Nut Dispenser (Optional): If your recipe includes nuts, seeds, or dried fruits, open the automatic dispenser lid and place them inside. The machine will dispense them at the correct time.
- Start Baking: Press the "START/STOP" button to begin the program. The machine will automatically perform all steps: mixing, kneading, rising, and baking.
- Delay Timer (Optional): If you wish to delay the start of the program, set your desired program, then use the "TIME (+/-)" buttons to adjust the delay time. Press "DELAY" to activate, then "START/STOP".
- Remove Bread: Once the program is complete, the machine will beep. Press "START/STOP" to end the cycle. Using oven mitts, carefully remove the hot bread pan from the baking chamber. Invert the pan to release the bread onto a wire rack to cool completely before slicing. Use the provided hook to remove the kneading paddle if it remains embedded in the bread.

Image: Visual guide showing the three steps: Put Ingredients, Select Menu, Get Bread, demonstrating the simplicity of operation.

Image: Illustration of the 13-hour delay timer, showing ingredients added at 8 PM for bread ready by 6 AM.
6. Maintenance and Cleaning
Regular cleaning ensures optimal performance and extends the life of your bread maker.
- Unplug and Cool: Always unplug the appliance from the power outlet and allow it to cool completely before cleaning any part.
- Bread Pan and Kneading Paddle: Remove the bread pan and kneading paddle. Wash them with warm, soapy water using a soft sponge or cloth. The non-stick bread pan is dishwasher-friendly for convenience. Do not use abrasive cleaners, metal scouring pads, or sharp objects as these can damage the non-stick coating.
- Automatic Nut Dispenser: Clean the dispenser thoroughly after each use, especially if sticky ingredients were used, to prevent residue buildup.
- Exterior: Wipe the exterior of the bread maker with a damp cloth. Do not use harsh chemicals or immerse the main unit in water.
- Interior: Wipe the interior of the baking chamber with a damp cloth. Remove any crumbs or residue.
- Storage: Ensure all parts are completely dry before reassembling and storing the bread maker in a cool, dry place.

Image: A hand washing the non-stick bread pan under running water, highlighting its easy-to-clean, food-grade material.
7. Troubleshooting Guide
Refer to this guide for common issues and their solutions:
| Problem | Possible Cause | Solution |
|---|---|---|
| Bread does not rise or rises poorly | Expired or inactive yeast, incorrect water temperature, too much salt or sugar, insufficient liquid. | Check yeast expiration date. Use lukewarm water (105-115°F / 40-46°C). Ensure accurate ingredient measurements. |
| Bread is too dense or heavy | Too much flour, not enough liquid, incorrect program selected, old yeast. | Measure ingredients precisely using a kitchen scale if possible. Verify program selection. Check yeast activity. |
| Crust is too dark or too light | Incorrect crust setting selected. | Adjust the "COLOR" setting to Light, Medium, or Dark according to your preference. |
| Kneading paddle stuck in bread | Common occurrence. | Allow bread to cool slightly. Use the provided hook tool to carefully remove the kneading paddle from the bottom of the loaf. |
| Machine beeps and displays an error code (e.g., E01, E02) | Overheating, ingredient imbalance, or mechanical issue. | Unplug the machine and let it cool down for 20-30 minutes. Check for any obstructions in the bread pan or baking chamber. Restart the program. If the error persists, contact customer support. |
8. Specifications
Technical details for the MERIOR BM901 Bread Maker:
| Specification | Detail |
|---|---|
| Brand | MERIOR |
| Model Number | BM901 |
| Color | Stainless steel |
| Product Dimensions (D x W x H) | 13.76" x 14.39" x 11.42" |
| Item Weight | 11.44 pounds |
| Wattage | 600 watts |
| Voltage | 120 Volts |
| Number of Programs | 25 |
| Material | Metal |
| UPC | 797465370488 |
| Manufacturer | Zhongshan Aouball Electric Appliances Co., Ltd. |

Image: Diagram showing the dimensions of the MERIOR BM901 Bread Maker: 13.76"D x 14.39"W x 11.42"H.
9. Warranty and Support
For detailed warranty information, please refer to the warranty card included with your product. If you require technical assistance, have questions about operation, or need to report an issue, please contact MERIOR customer service. You can typically find contact information on the manufacturer's official website or through the retailer where you purchased the product. Please have your model number (BM901) and proof of purchase readily available when contacting support.
