1. Introduction
This manual provides detailed instructions for the installation, operation, and maintenance of the Y&H 100A MPPT Solar Charge Controller. This device is designed to efficiently manage power from solar panels to charge various battery types, including AGM, Gel, Flooded, and Lithium batteries, across 12V, 24V, 36V, and 48V systems. It features a clear LCD display for monitoring and comprehensive protection functions to ensure safe and reliable operation.

Figure 1: Front view of the Y&H 100A MPPT Solar Charge Controller.
2. Safety Information
Please read all safety instructions carefully before installation and operation. Failure to follow these instructions may result in electric shock, fire, or serious injury.
- Ensure all wiring is performed by qualified personnel.
- Always disconnect the battery and solar panel power before installing or adjusting the controller.
- Do not reverse the positive and negative terminals during connection.
- Install the controller in a well-ventilated area, away from direct sunlight, high temperatures, and moisture.
- Do not attempt to repair or modify the controller yourself. Contact customer support for assistance.
3. Product Overview
The Y&H 100A MPPT Solar Charge Controller is designed for optimal solar power management. Key features include:
- High Precision MPPT Tracking: Achieves over 99.5% tracking efficiency and up to 98% conversion efficiency.
- Automatic Voltage Detection: Supports 12V, 24V, 36V, and 48V systems.
- Wide PV Input Range: Maximum PV panel input up to 150V (Voc) and 5200W (48V system).
- Battery Type Support: Compatible with Gel, Sealed (AGM), Flooded, and Lithium (LiFePO4/Li(NiCoMn)O2) batteries.
- Comprehensive Protection: Includes over-voltage, over-discharge, reverse connection, overload, and over-temperature protection.
- LCD Display: Clear display of status and data, with easy mode and setting switching.

Figure 2: Overview of controller features and capabilities.
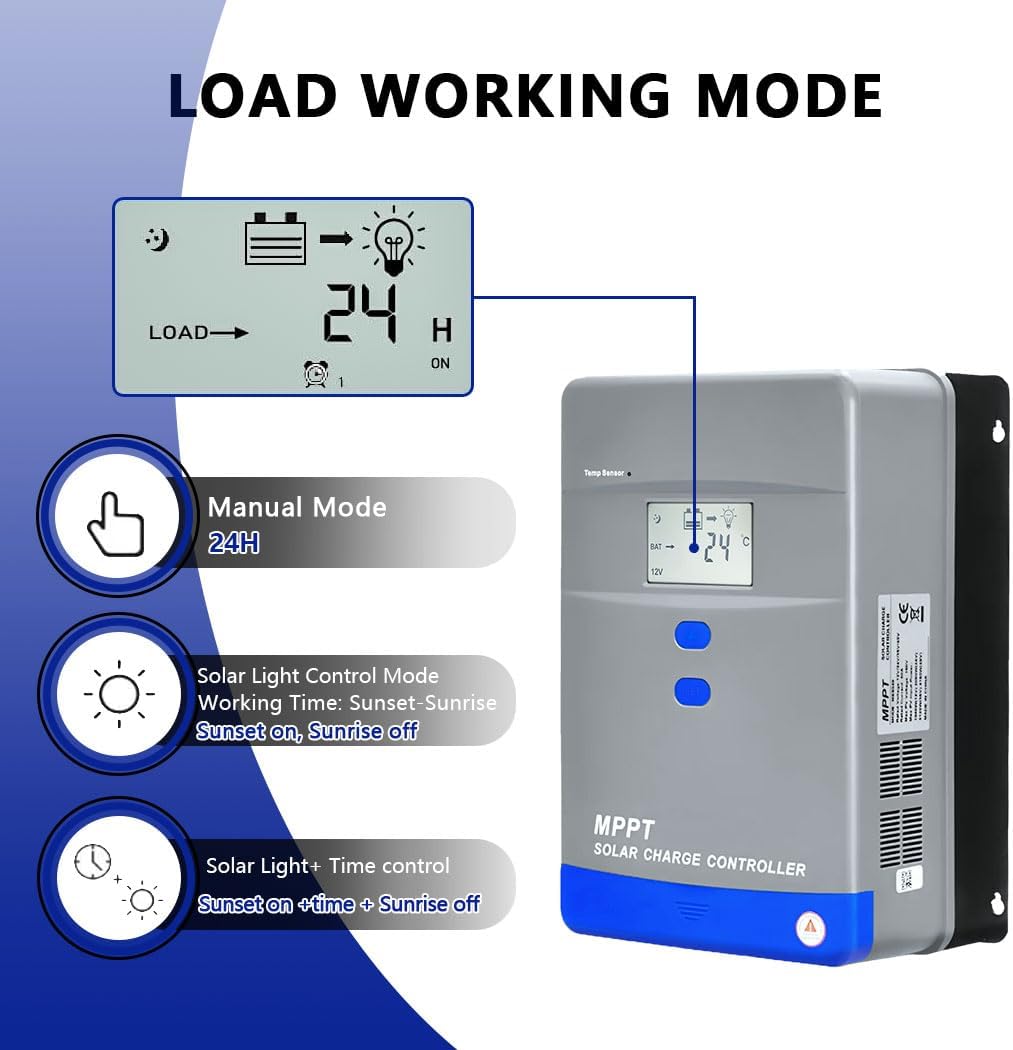
Figure 3: Product dimensions (10.24in x 7.48in x 4.33in, 5.39 pounds).
4. Setup and Wiring
Follow these steps for proper installation and wiring of your Y&H MPPT Solar Charge Controller.
4.1 Wiring Procedure
- Open the Bottom Cover: First, open the bottom cover of the product to access the wiring terminals.
- Connect the Battery: Connect the battery to the controller first. Ensure correct polarity (positive to positive, negative to negative) to avoid damage.
- Connect the Solar Panel (PV): Connect the solar panel to the controller.
- Connect the Load: Connect your DC load to the controller.
Video 1: Step-by-step guide on wiring the solar charge controller, including opening the cover, connecting the battery, solar panel, and load.

Figure 4: Wiring diagrams illustrating connections for 12V and 24V systems, showing solar panels, controller, battery, and load.
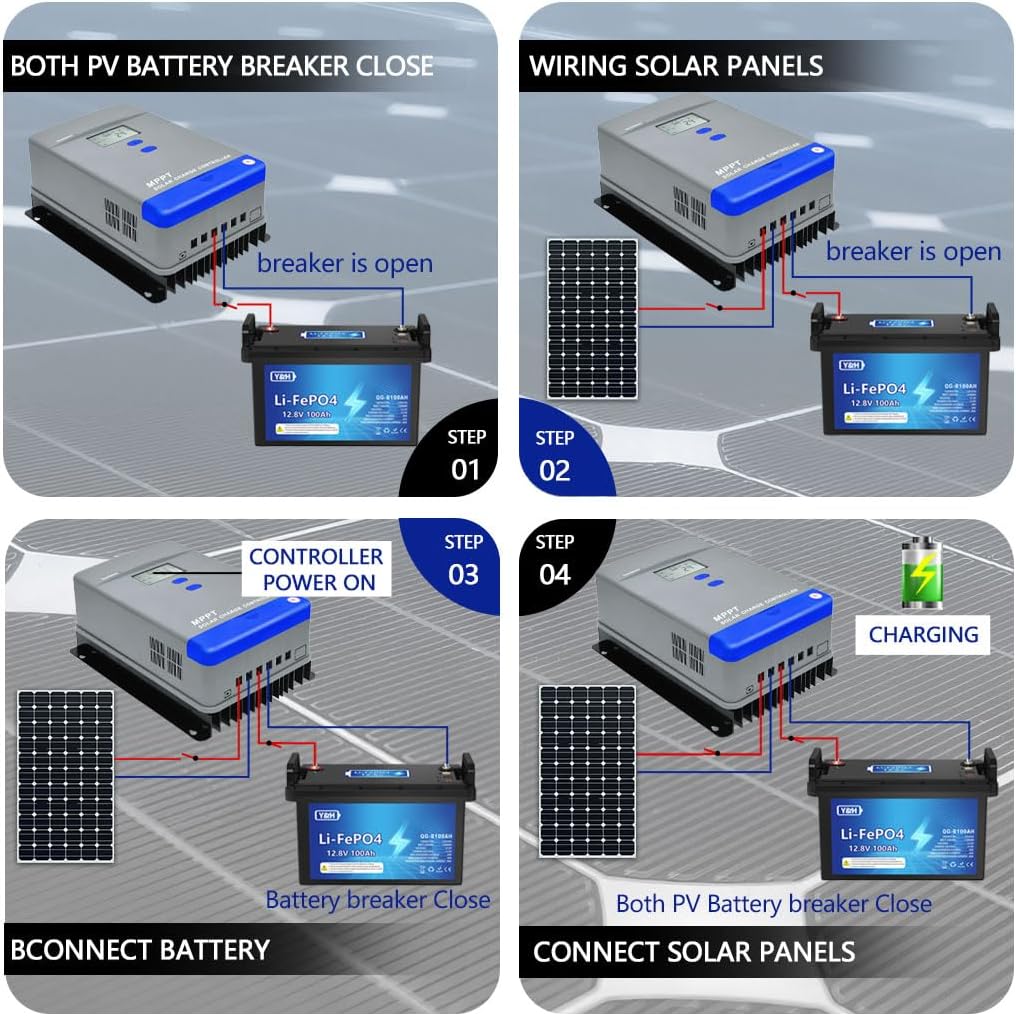
Figure 5: Visual guide for connecting the battery and solar panels to the controller, emphasizing the sequence of connections.
4.2 Initial Settings: Battery System Voltage and Type
Before operation, it is crucial to set the correct battery system voltage and battery type. Lithium batteries require manual voltage setting.
- Enter Setup Page: Press and hold the "▲" (Up) button for over 5 seconds to enter the setup page.
- Set Battery System Voltage:
- Briefly press the "▲" button 8 times to navigate to the battery voltage interface (e.g., "12V").
- Press and hold "▲" for over 5 seconds until the numbers begin flashing.
- Use "▲" or "SET" to adjust the voltage to match your system (e.g., 12V, 24V, 36V, 48V).
- Press and hold "▲" for over 5 seconds to save the setting.
- Set Battery Type:
- Briefly press the "▲" button 7 times to navigate to the battery type interface (e.g., "USr 1").
- Press and hold "▲" for over 5 seconds until the digits begin flashing.
- Briefly press the "▲" button 4 times to cycle through battery types (e.g., SLd for Sealed/AGM, GEL, FLd for Flooded, USr for User-defined/Lithium). Select the appropriate type for your battery.
- Press and hold "▲" for over 5 seconds to save the setting.
- Exit Setup: Press and hold "SET" for over 5 seconds to return to the main interface.
Note: All lithium batteries must be manually set to the correct voltage and user-defined type for proper charging.
Video 2: Instructions for setting the battery system voltage and battery type on the controller's LCD display.
5. Operating Instructions
5.1 LCD Display Navigation
The LCD display shows the controller's status and data. Use the "▲" (Up) and "SET" buttons to navigate and adjust parameters.
- Brief Press "▲": Cycles through various battery parameters on the main page.
- Brief Press "SET": Activates or deactivates the controller's load switch.
- Press and Hold "SET" (in settings interface): Exits back to the main interface.

Figure 6: Visual guide for navigating the LCD display using the "Up" and "SET" buttons to check charging parameters.
5.2 Load Operation Mode Settings
The controller supports various load working modes:
- Enter Setup Page: Press and hold the "▲" (Up) button for over 5 seconds to enter the setup page.
- Navigate to Load Mode Interface: Briefly press the "▲" button 10 times to reach the load mode interface (e.g., "Ld4").
- Adjust Load Mode:
- Press and hold "▲" for over 5 seconds until the digits begin flashing.
- Use "▲" or "SET" briefly to switch between modes:
- Ld1: Manual Mode (24H) - Load is always on.
- Ld2: Solar Light Control Mode - Load turns on at sunset, off at sunrise.
- Ld3: Solar Light + Time Control - Load turns on at sunset for a set duration, off at sunrise.
- Ld4: Test Mode - Load is always on for testing.
- Press and hold "▲" for over 5 seconds to save the setting.
- Exit Setup: Press and hold "SET" for over 5 seconds to return to the main interface.

Figure 7: Illustration of the different load working modes available on the controller.
6. Specifications
| Feature | Specification |
|---|---|
| Brand | Y&H |
| Model | 100A MPPT Solar Charge Controller |
| System Voltage | 12V/24V/36V/48V Auto |
| Max PV Input Voltage (Voc) | 150V |
| Max PV Input Power | 1300W (12V) / 2600W (24V) / 3900W (36V) / 5200W (48V) |
| Rated Charge Current | 100A |
| Tracking Efficiency | 99.5% |
| Conversion Efficiency | 98% |
| Battery Types Supported | AGM, Gel, Flooded, Lithium (LiFePO4/Li(NiCoMn)O2) |
| Protection Functions | Over-voltage, Over-discharge, Reverse Connection, Overload, Over-temperature |
| Operating Temperature | -20℃ to +55℃ |
| IP Grade | IP30 |
| Product Dimensions | 26 x 19 x 11 cm (10.24 x 7.48 x 4.33 inches) |
| Product Weight | 2.36 kg (5.20 lbs) |
| UPC | 704334627062 |
7. Maintenance
Regular maintenance ensures the longevity and optimal performance of your solar charge controller.
- Cleanliness: Keep the controller clean and free from dust and debris. Use a dry cloth for cleaning.
- Ventilation: Ensure the installation area remains well-ventilated to prevent overheating.
- Connections: Periodically check all wiring connections for tightness and corrosion. Loose connections can cause power loss or overheating.
- Environmental Conditions: Verify that the controller is not exposed to extreme temperatures, direct moisture, or corrosive environments beyond its specified operating range.
8. Troubleshooting
If you encounter issues with your Y&H MPPT Solar Charge Controller, refer to the following common problems and solutions:
- No Display/No Power:
- Check battery connections and ensure they are secure and correctly polarized.
- Verify battery voltage is within the controller's operating range.
- Battery Not Charging:
- Check solar panel connections and ensure they are receiving adequate sunlight.
- Verify solar panel voltage is within the controller's input range.
- Ensure the correct battery type and system voltage are set in the controller's settings.
- Load Not Working:
- Check load connections and ensure the load is not exceeding the controller's rated current.
- Verify the load operation mode is correctly set (e.g., not in a timed mode when continuous operation is desired).
- Briefly press the "SET" button to activate the load switch.
- Over-temperature Warning:
- Ensure the controller is installed in a well-ventilated area.
- Reduce the load or solar input if possible, or improve ventilation.
For persistent issues or complex problems, please contact Y&H customer support.
9. Warranty and Support
Y&H products are manufactured with high-quality standards. For warranty information, technical support, or service inquiries, please refer to the contact details provided with your purchase or visit the official Y&H website. Please have your product model and purchase date available when contacting support.


