Introduction
Thank you for choosing the Lafocuse Digital LCD Alarm Clock. This manual provides detailed instructions for the setup, operation, and maintenance of your new alarm clock. This device features a large 4.7-inch LCD display, multiple alarm settings, a snooze function, backlight, temperature display, and date information. Please read this manual thoroughly before use to ensure proper functionality and to maximize your user experience.
Product Overview
The Lafocuse Digital LCD Alarm Clock is designed for ease of use and clear readability. Below is an overview of the clock's components and controls.

Image: Top and rear view of the Lafocuse Digital Alarm Clock, showing button layout and battery compartment.
- Light/Snooze Button: Located on the top of the clock. Press to activate the backlight or to snooze a sounding alarm.
- '-' Button: Decreases values during setting.
- '+ (°C/°F) Button: Increases values during setting. Also used to switch between Celsius and Fahrenheit temperature display.
- Alarm Set Button: Used to enter and adjust alarm settings.
- Time Set (12/24H) Button: Used to enter and adjust time settings. Also used to switch between 12-hour and 24-hour time formats.
- Battery Compartment: Located on the rear, holds 3 AAA batteries.
Setup
- Install Batteries: Open the battery compartment cover on the back of the clock. Insert 3 new AAA batteries (not included), ensuring correct polarity (+/-). Close the battery compartment cover.
- Initial Power-On: The clock will power on automatically once batteries are installed. The display will show a default time and date.
Operating Instructions
1. Setting Time and Date
- Press and hold the Time Set (12/24H) button for approximately 3 seconds to enter time setting mode. The hour digits will flash.
- Use the '+' and '-' buttons to adjust the hour.
- Press the Time Set (12/24H) button again to confirm the hour and move to minute setting. The minute digits will flash.
- Use the '+' and '-' buttons to adjust the minutes.
- Press the Time Set (12/24H) button again to confirm the minutes and move to year setting. The year digits will flash.
- Use the '+' and '-' buttons to adjust the year.
- Press the Time Set (12/24H) button again to confirm the year and move to month setting. The month digits will flash.
- Use the '+' and '-' buttons to adjust the month.
- Press the Time Set (12/24H) button again to confirm the month and move to day setting. The day digits will flash.
- Use the '+' and '-' buttons to adjust the day.
- Press the Time Set (12/24H) button one last time to exit time and date setting mode.
2. 12/24 Hour Format Selection
In normal time display mode, press the Time Set (12/24H) button briefly to switch between 12-hour (with AM/PM indicator) and 24-hour formats.
3. Temperature Unit Selection
In normal time display mode, press the '+ (°C/°F) button briefly to switch between Celsius (°C) and Fahrenheit (°F) temperature display.
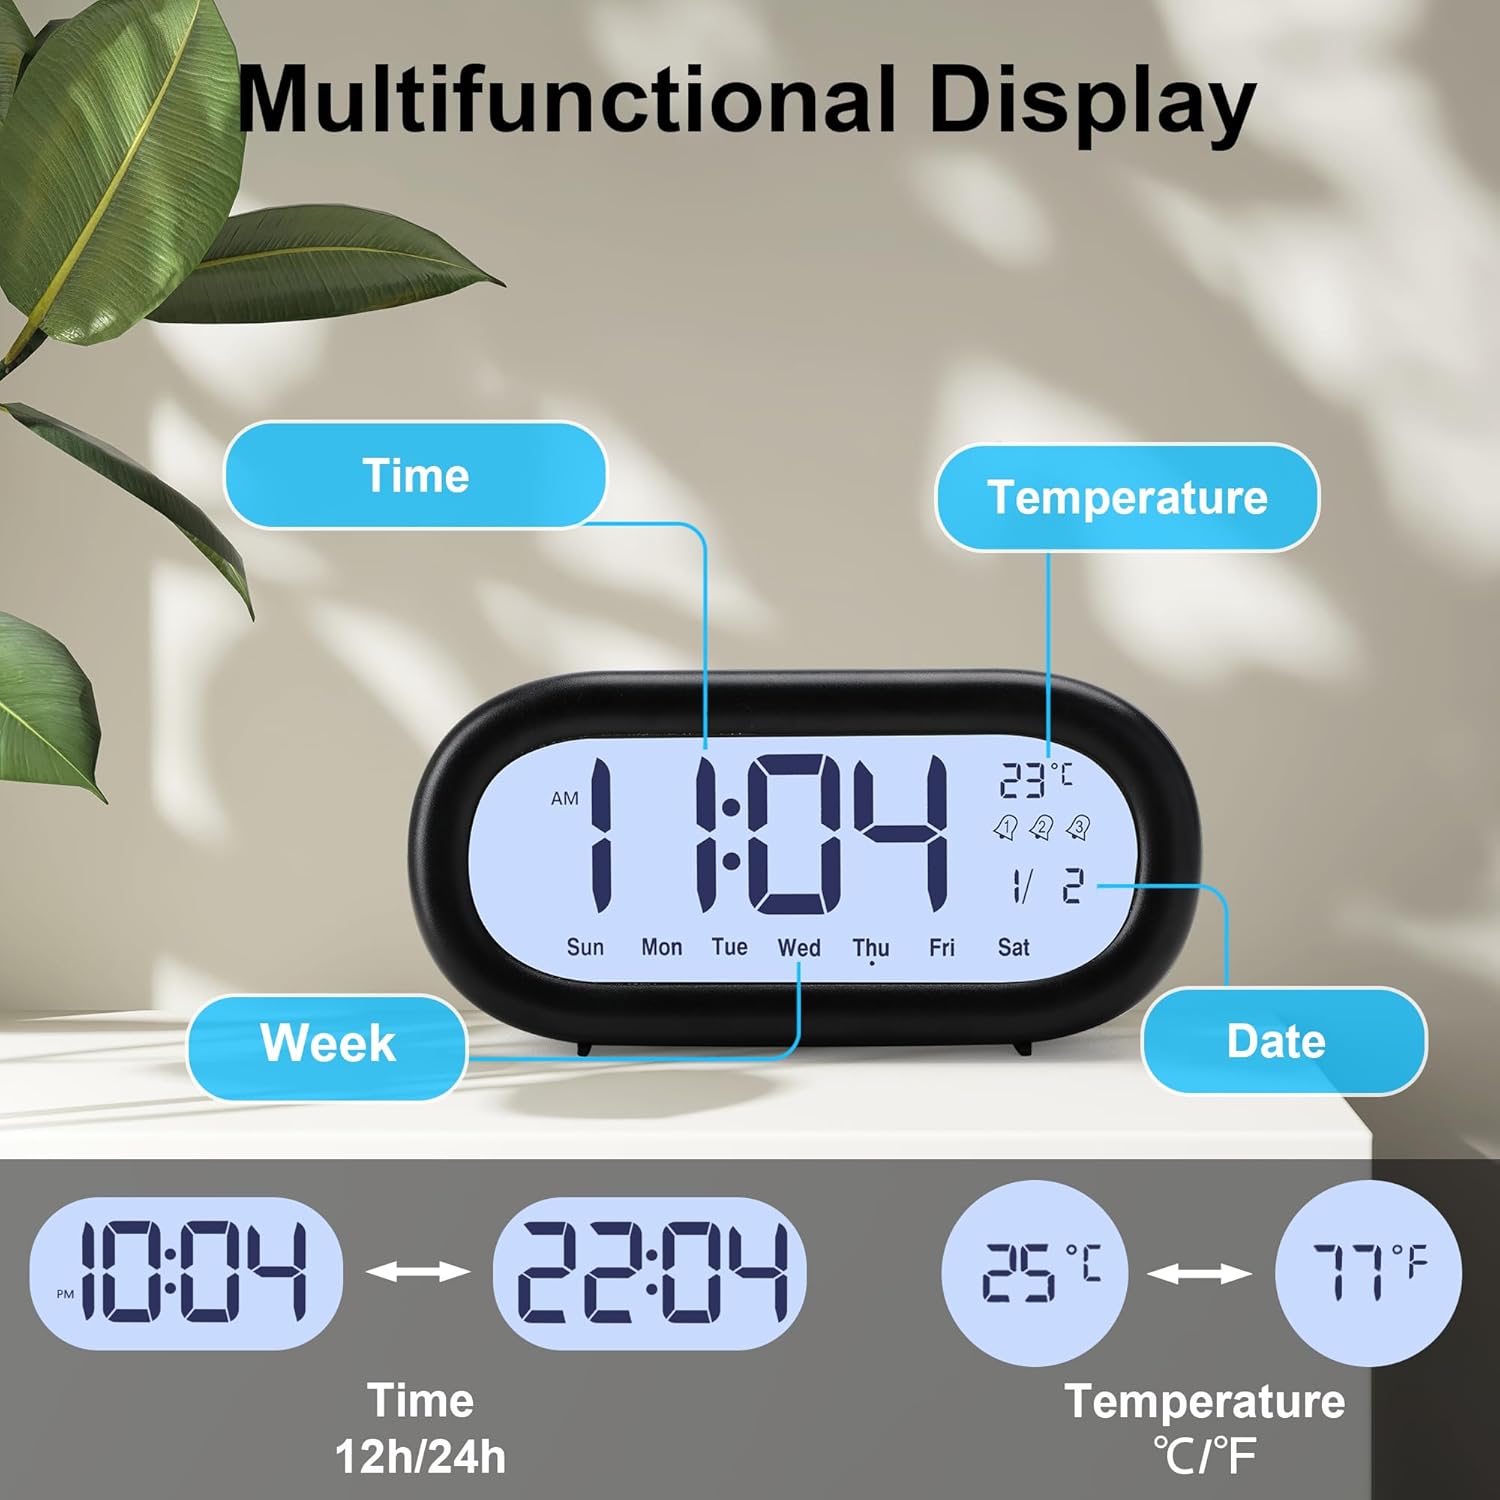
Image: Multifunctional display showing time, date, day of week, and temperature, with options for 12/24 hour and °C/°F.
4. Setting Alarms (Alarm 1, Alarm 2, Alarm 3)
The clock supports three independent alarms. Each alarm can be set for different times and working modes (Monday-Friday, Monday-Saturday, or Monday-Sunday).

Image: Visual representation of setting three distinct alarms for different schedules.
- Press the Alarm Set button repeatedly to cycle through Alarm 1, Alarm 2, and Alarm 3 settings. The corresponding alarm icon (1, 2, or 3) will appear on the display.
- To set an alarm, press and hold the Alarm Set button for approximately 3 seconds when the desired alarm icon is displayed. The hour digits for that alarm will flash.
- Use the '+' and '-' buttons to adjust the alarm hour.
- Press the Alarm Set button again to confirm the hour and move to minute setting. The minute digits will flash.
- Use the '+' and '-' buttons to adjust the alarm minutes.
- Press the Alarm Set button again to confirm the minutes and move to alarm working mode selection. The current mode will flash (e.g., '1-5' for Mon-Fri).
- Use the '+' and '-' buttons to select the desired working mode:
- 1-5: Alarm sounds Monday to Friday.
- 1-6: Alarm sounds Monday to Saturday.
- 1-7: Alarm sounds Monday to Sunday.
- Press the Alarm Set button one last time to exit alarm setting mode. The alarm icon will remain on the display, indicating the alarm is active.
- To deactivate an alarm, press the Alarm Set button briefly until the alarm icon disappears from the display.
5. Snooze Function
When an alarm sounds, press the large Light/Snooze button on the top of the clock. The alarm will pause for 5 minutes and then sound again. This can be repeated multiple times.

Image: Activating the snooze function with the large top button.
To stop the alarm completely when it is sounding (without snoozing), press any button on the back of the clock.
6. Backlight Function
The clock features a soft backlight for viewing the display in low-light conditions. Press the large Light/Snooze button on the top of the clock to activate the backlight. The backlight will remain on for approximately 10 seconds and then automatically turn off to conserve battery power.

Image: Activating the backlight for night viewing.
Maintenance
- Cleaning: Wipe the clock with a soft, dry cloth. Do not use abrasive cleaners or solvents, as these may damage the display or casing.
- Battery Replacement: When the display dims or the clock functions become erratic, replace all three AAA batteries with new ones. Ensure correct polarity.
- Storage: If the clock will not be used for an extended period, remove the batteries to prevent leakage and damage.
Troubleshooting
| Problem | Possible Cause | Solution |
|---|---|---|
| Display is dim or blank. | Low or dead batteries. | Replace all 3 AAA batteries with new ones. |
| Display is difficult to read from certain angles. | LCD displays have optimal viewing angles. | Adjust the viewing angle of the clock. The display is typically clearest when viewed from slightly above. |
| Alarm does not sound. | Alarm is not activated or set incorrectly. | Ensure the alarm time is set correctly and the alarm icon (1, 2, or 3) is visible on the display. |
| Alarm sounds but does not stop after pressing the top button. | Top button activates snooze, not full stop. | To stop the alarm completely, press any button on the back of the clock. The top button is for snooze only. |
| Time or date is incorrect. | Time/date not set or batteries were removed. | Follow the 'Setting Time and Date' instructions to reset the current time and date. |
Specifications
| Feature | Detail |
|---|---|
| Model Number | ZH0175A |
| Display Type | Digital LCD |
| Screen Size | 4.7 inches |
| Dimensions (L x W x H) | 15 x 3.81 x 7 cm (5.9 x 1.5 x 2.8 inches) |
| Weight | 180 grams (0.4 lbs) |
| Material | Plastic |
| Power Source | 3 x AAA Batteries (not included) |
| Special Features | Backlight, Snooze, Temperature Display, Date Display, 3 Alarms, 12/24 Hour Format |
| Color | Black |
Warranty and Support
This product is covered by a standard manufacturer's warranty. For specific warranty details, please refer to the documentation provided at the time of purchase or contact your retailer. If you encounter any issues or require technical assistance, please contact Lafocuse customer support through the retailer's platform or the official Lafocuse website. Please have your model number (ZH0175A) and purchase information ready when contacting support.
