1. Introduction
This manual provides essential information for the safe operation, maintenance, and troubleshooting of your MechMaxx 0831V 8x16 Inch Mini Metal Lathe Machine. Please read this manual thoroughly before operating the machine to ensure proper use and to prevent injury or damage. Keep this manual accessible for future reference.
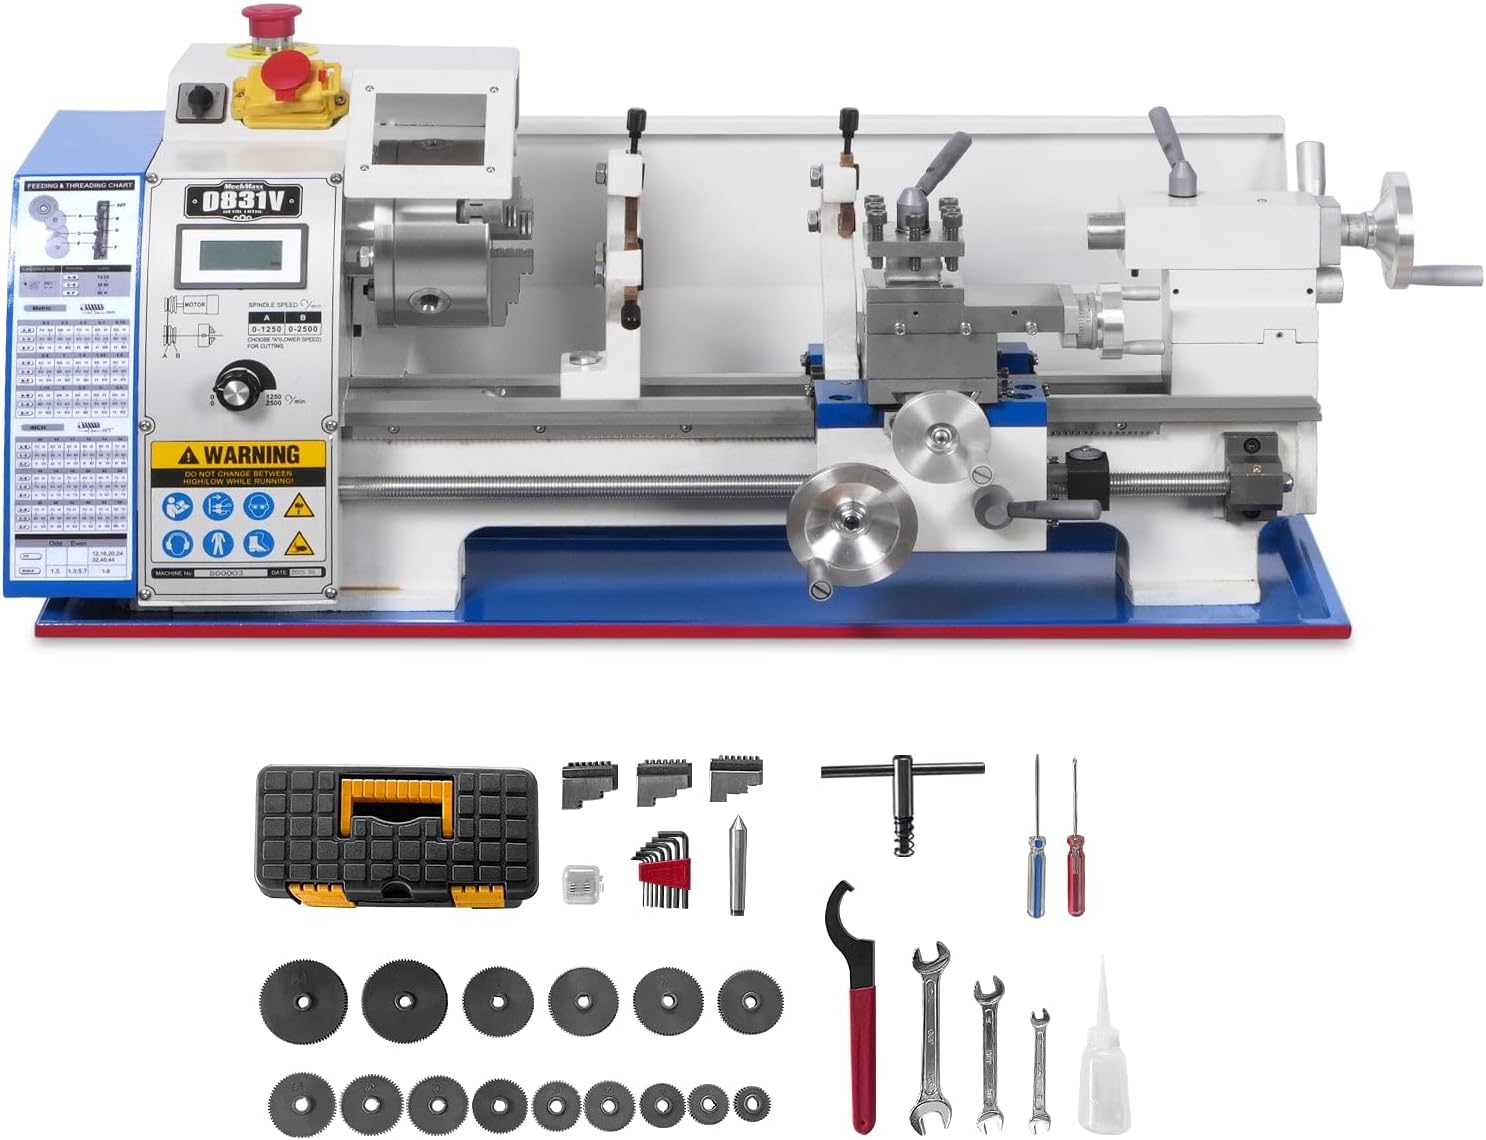
Figure 1.1: The MechMaxx 0831V Mini Metal Lathe Machine with various tools and accessories.
2. Safety Instructions
Always prioritize safety when operating any machinery. Failure to follow these safety guidelines can result in serious injury or damage to the equipment.
- Eye Protection: Always wear safety glasses or a face shield to protect against flying debris.
- Proper Attire: Avoid loose clothing, jewelry, and long hair that can get caught in moving parts.
- Work Area: Keep your work area clean, well-lit, and free of clutter. Ensure adequate space around the machine.
- Secure Workpiece: Always ensure the workpiece is securely clamped in the chuck or collet before starting the machine.
- Emergency Stop: Familiarize yourself with the location and operation of the emergency stop button.
- Power Disconnection: Disconnect power before performing any adjustments, maintenance, or when changing accessories.
- Machine Guards: Ensure all safety guards are in place and functioning correctly before operation.
- Read Manual: Do not operate the machine until you have read and understood all instructions and warnings in this manual.
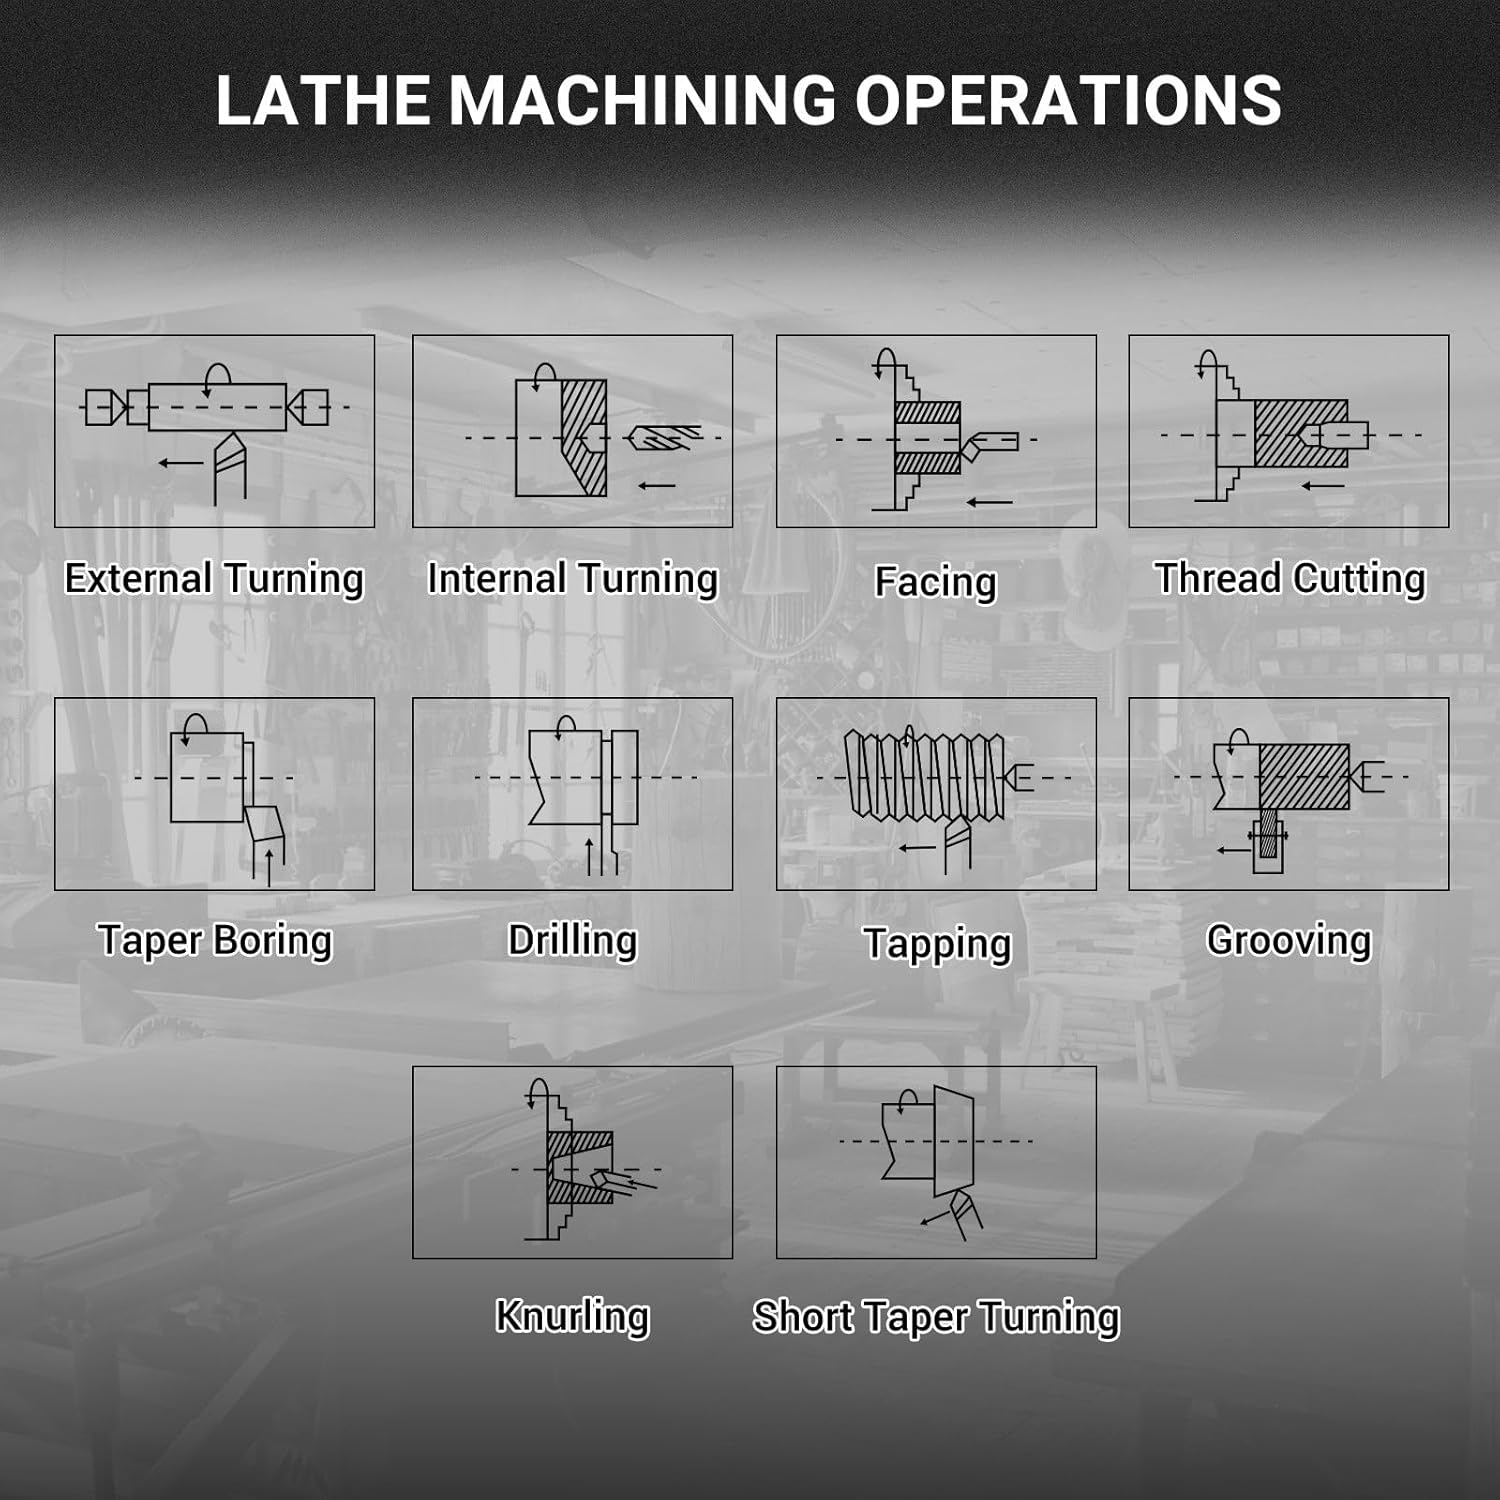
Figure 2.1: Safety warning labels on the machine, including a caution against changing belts while running and general PPE requirements.
3. Components Overview
The MechMaxx 0831V metal lathe consists of several key components designed for precision metalworking.
- Headstock: Houses the main spindle, motor, and speed control mechanisms.
- Chuck: Holds the workpiece securely. This model features a 1.5-inch spindle bore.
- Tailstock: Supports the far end of long workpieces and can hold drilling tools.
- Carriage: Moves along the bed, carrying the cross slide and tool post.
- Cross Slide: Moves perpendicular to the lathe bed, allowing for facing operations.
- Compound Slide: Rotates and moves for angled cuts and fine adjustments.
- Tool Post: Holds the cutting tools.
- Lathe Bed: The main frame providing a stable base for all components, featuring double-V ways for precise movement.
- Lead Screw: Used for automatic feeding and thread cutting.
- Control Panel: Includes power switch, emergency stop, and speed display.

Figure 3.1: The 1.5-inch spindle bore of the lathe chuck, allowing for larger diameter stock to pass through.

Figure 3.2: Detailed specifications for the tool post, including maximum tool bit size (15/32"), cross slide travel (3-1/2"), and compound slide travel (2-3/4").

Figure 3.3: The double-V ways design of the lathe bed, ensuring stable and accurate movement of the carriage and tailstock.
4. Setup
Proper setup is crucial for the performance and safety of your lathe.
- Unpacking: Carefully remove the lathe and all accessories from the packaging. Retain packaging for future transport or storage.
- Placement: Place the lathe on a sturdy, level workbench or an optional stand. Ensure it is securely fastened to prevent movement during operation.
- Cleaning: Remove any protective coatings or grease from the machine surfaces using a suitable cleaner. Lubricate all moving parts as indicated in the maintenance section.
- Power Connection: Connect the machine to a grounded 110V AC power outlet. Ensure the power switch is in the 'OFF' position before plugging in.
- Initial Inspection: Check all bolts and fasteners for tightness. Ensure all components move freely without excessive play.

Figure 4.1: The lathe machine shown mounted on an optional stand (SKU: 510001A), providing a stable and ergonomic working height.
5. Operating Instructions
This section covers the basic steps for operating your MechMaxx 0831V lathe.
5.1 Powering On and Speed Control
- Ensure the emergency stop button is disengaged (pulled out).
- Turn the main power switch to 'ON'.
- The lathe features variable speed control (0-2500 RPM). Adjust the speed using the control knob.
- The machine has two speed ranges: 'A' (Low Speed: 0-1250 RPM) and 'B' (High Speed: 0-2500 RPM). Select the appropriate range based on your machining task and material.

Figure 5.1: The accurate speed display showing current RPM and the selection for low (0-1250 RPM) or high (0-2500 RPM) speed ranges.
5.2 Basic Machining Operations
The lathe is capable of various operations, including:
- External Turning: Reducing the diameter of a workpiece.
- Internal Turning (Boring): Enlarging an existing hole.
- Facing: Creating a flat surface perpendicular to the spindle axis.
- Thread Cutting: Creating external or internal threads using the lead screw and appropriate gears. The thread dial indicator assists in precise thread engagement.
- Taper Boring/Turning: Creating conical shapes.
- Drilling: Creating holes along the workpiece axis using the tailstock.
- Grooving: Cutting grooves into the workpiece.
- Knurling: Creating a textured pattern on the workpiece surface.
Figure 5.2: Visual representations of common lathe machining operations, including external turning, internal turning, facing, thread cutting, taper boring, drilling, tapping, grooving, knurling, and short taper turning.
5.3 Precision Adjustments
The handwheels for the cross slide and compound slide are graduated for precise material removal. Each increment on the handwheel typically represents 0.01 inch of travel.

Figure 5.3: The handwheels feature clear markings for 0.01 inch increments, allowing for accurate depth of cut and positioning.
6. Maintenance
Regular maintenance ensures the longevity and accuracy of your lathe.
- Cleaning: After each use, clean the machine thoroughly, removing all chips and debris. Use a brush or vacuum; never use compressed air directly on moving parts as it can force chips into bearings.
- Lubrication: Regularly lubricate the lathe bed ways, lead screw, and other moving parts with appropriate machine oil. Refer to the lubrication points indicated in the machine diagram (if available).
- Belt Tension: Periodically check the drive belt tension. Adjust if necessary to prevent slippage or excessive wear. Always disconnect power before checking or adjusting belts.
- Inspection: Routinely inspect all components for wear, damage, or loose fasteners. Tighten or replace parts as needed.
- Storage: When not in use, cover the lathe to protect it from dust and moisture.
7. Troubleshooting
This section addresses common issues you might encounter with your lathe.
| Problem | Possible Cause | Solution |
|---|---|---|
| Machine does not start | No power; Emergency stop engaged; Loose wiring | Check power connection; Disengage emergency stop; Inspect wiring (with power disconnected) |
| Motor runs but spindle does not turn | Drive belt broken or loose | Inspect and replace/tighten drive belt (power disconnected) |
| Inaccurate cuts | Loose tool post; Worn cutting tool; Unstable workpiece; Loose gibs | Tighten tool post; Replace/sharpen tool; Secure workpiece; Adjust gibs |
| Excessive vibration | Unbalanced workpiece; Loose mounting; Worn bearings | Balance workpiece; Securely mount lathe; Inspect and replace bearings if necessary |
8. Specifications
Key technical specifications for the MechMaxx 0831V Mini Metal Lathe Machine:
| Feature | Specification |
|---|---|
| Model Number | 0831V |
| Swing Over Bed | 8-1/4 inches |
| Distance Between Centers | 15-3/4 inches |
| Spindle Bore | 1.5 inches |
| Motor Power | 1.5 HP (Brushless) |
| Spindle Speed | 0-2500 RPM (Variable, two ranges) |
| Voltage | 110 Volts AC |
| Cross Slide Travel | 3-1/2 inches |
| Compound Slide Travel | 2-3/4 inches |
| Maximum Tool Bit Size | 15/32 inches |
| Threading Capability | Metric and Inch threads |
| Item Weight | 190 pounds |
| Product Dimensions | 12.2 x 4.92 x 7.87 inches |
9. Warranty and Support
For warranty information, technical support, or to purchase replacement parts, please contact MechMaxx customer service. Refer to your purchase documentation for specific warranty terms and contact details.
You can also visit the official MechMaxx store for additional product information and support: MechMaxx Store


