1. Introduction
Thank you for choosing the PROFI-PARTNER Cordless Grass Trimmer Model 52506. This manual provides essential information for the safe and efficient operation, assembly, maintenance, and troubleshooting of your new garden tool. Please read these instructions carefully before first use and keep them for future reference.
This grass trimmer is designed for precise lawn edge trimming and general grass cutting in domestic gardens. Its unique guide skids ensure a consistent cutting height and effortless gliding, while the telescopic handle and adjustable auxiliary handle provide ergonomic operation.

Figure 1.1: Overview of the PROFI-PARTNER Cordless Grass Trimmer Model 52506.
2. Safety Instructions
Always observe basic safety precautions when using electrical garden tools to reduce the risk of fire, electric shock, and personal injury. Failure to follow these instructions may result in serious injury.
- Read the entire manual: Understand all instructions before operating the trimmer.
- Wear appropriate personal protective equipment (PPE): Always wear safety glasses, long trousers, sturdy footwear, and hearing protection. Avoid loose clothing or jewelry that could get caught in moving parts.
- Keep bystanders away: Ensure children, pets, and other people are at a safe distance (at least 15 meters) from the operating area.
- Inspect the work area: Before starting, remove any objects that could be thrown by the trimmer, such as stones, sticks, or wires.
- Check the trimmer before use: Ensure all parts are correctly assembled and securely fastened. Do not use if any part is damaged.
- Battery safety: Use only the specified battery and charger. Do not expose the battery to water, heat, or direct sunlight.
- Maintain a firm grip: Always hold the trimmer with both hands during operation.
- Avoid contact with cutting parts: Never touch the cutting blades while the trimmer is running or the battery is inserted.
- Disconnect power: Always remove the battery before cleaning, maintenance, or when leaving the trimmer unattended.
- Work in good visibility: Operate the trimmer only in daylight or good artificial light.
- Do not overreach: Maintain proper footing and balance at all times.
- Store safely: Store the trimmer in a dry, secure place, out of reach of children.
3. Package Contents
Please check the package contents upon receipt to ensure all items are present and undamaged. If any parts are missing or damaged, contact your retailer.
- PROFI-PARTNER Cordless Grass Trimmer unit
- Telescopic handle
- Auxiliary handle
- Safety guard
- Guide skids (pre-installed or to be attached)
- 20x Plastic cutting blades
- 2x Cutting bars (for specific applications)
- Rechargeable battery (18V 2Ah Li-ion)
- Battery charger
- Wrench for blade changes
- Instruction Manual

Figure 3.1: Included battery, charger, and wrench.
4. Setup
4.1. Charging the Battery
- Connect the charger to a suitable power outlet.
- Insert the battery into the charger. Ensure it clicks into place.
- Allow the battery to charge fully. The charger's indicator light will change (refer to charger manual for specific light patterns).
- Once charged, remove the battery from the charger.
4.2. Assembling the Trimmer
- Attach the Safety Guard: Secure the safety guard to the trimmer head using the provided fasteners. Ensure it is firmly attached to protect against debris.
- Install the Telescopic Handle: Connect the telescopic handle to the main trimmer body. Ensure it locks securely.
- Attach the Auxiliary Handle: Slide the auxiliary handle onto the telescopic shaft and adjust it to a comfortable position for two-handed operation. Tighten the locking mechanism.
- Insert the Battery: Align the charged battery with the battery compartment on the trimmer and push it in until it clicks securely into place.
- Check Cutting Blades: Ensure a plastic cutting blade or cutting bar is correctly installed on the trimmer head. Refer to section 5.4 for blade replacement.
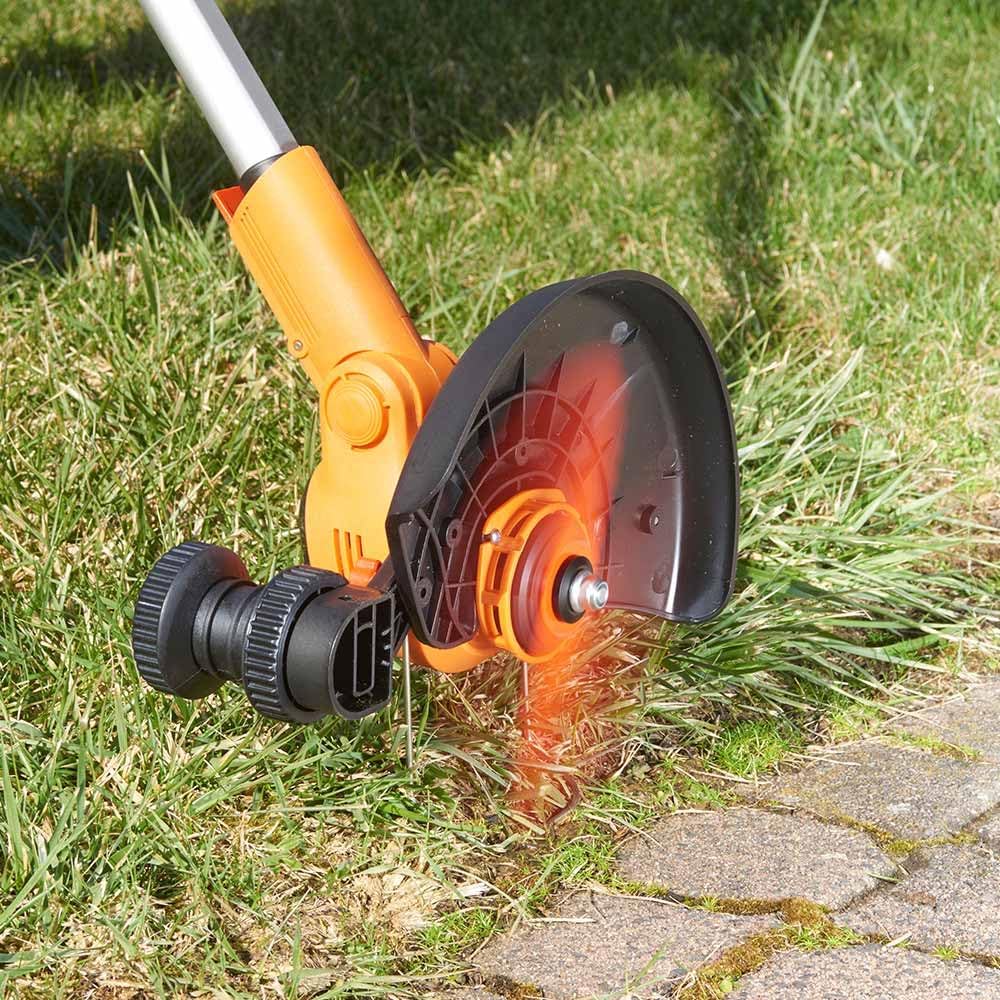
Figure 4.1: Trimmer head with safety guard and cutting blade installed.

Figure 4.2: Adjusting the auxiliary handle for ergonomic use.
5. Operating Instructions
5.1. Adjusting for Use
- Telescopic Handle: Adjust the length of the telescopic handle to your height for comfortable operation, ensuring you can maintain an upright posture.
- Auxiliary Handle: Position the auxiliary handle to allow for a balanced and firm two-handed grip.
- Guide Skids: The integrated guide skids are designed to maintain a consistent cutting height and allow the trimmer to glide smoothly over the ground. Ensure they are clear of obstructions.

Figure 5.1: Proper operating posture with the trimmer.
5.2. Starting and Stopping
- To Start: Press and hold the safety lock button, then squeeze the trigger switch.
- To Stop: Release the trigger switch. The cutting blade will stop rotating.
5.3. Trimming and Edging
- General Trimming: Hold the trimmer firmly with both hands. Move the trimmer in a sweeping motion across the grass, allowing the guide skids to maintain the desired cutting height.
- Edge Trimming: The motor head can be rotated 90 degrees for precise vertical cutting along paths, walls, and flowerbeds. To rotate, disengage the locking mechanism, turn the head, and re-engage the lock.
- Plant Protection: Utilize the fold-out plant protection bracket to shield flowers, shrubs, and tree bark from accidental cuts and prevent blade wear against hard surfaces.

Figure 5.2: Using the plant protection bracket to trim near obstacles.
5.4. Blade Replacement
Always remove the battery before changing blades.
- Remove the battery from the trimmer.
- Using the provided wrench, loosen the nut securing the cutting blade/bar.
- Remove the worn blade/bar.
- Place a new plastic cutting blade or cutting bar onto the spindle, ensuring it is correctly seated.
- Tighten the nut securely with the wrench. Do not overtighten.

Figure 5.3: View of the cutting blade and guide skids for replacement.
6. Maintenance
Regular maintenance ensures the longevity and optimal performance of your trimmer. Always remove the battery before performing any maintenance.
- Cleaning: After each use, clean the trimmer head, guard, and housing with a damp cloth. Remove any grass clippings, dirt, or debris. Do not use harsh chemicals or abrasive cleaners.
- Blade Inspection: Regularly inspect the plastic cutting blades for wear or damage. Replace them promptly if they show signs of dullness, cracks, or breakage.
- Battery Care: Store the battery in a cool, dry place. Do not store fully discharged for extended periods. Charge the battery before long-term storage and periodically during storage.
- Storage: Store the trimmer in a dry, well-ventilated area, away from direct sunlight and extreme temperatures. Ensure it is out of reach of children.
7. Troubleshooting
If you encounter issues with your PROFI-PARTNER Cordless Grass Trimmer, refer to the table below for common problems and solutions.
| Problem | Possible Cause | Solution |
|---|---|---|
| Trimmer does not start |
|
|
| Poor cutting performance |
|
|
| Excessive vibration |
|
|
8. Specifications
| Feature | Detail |
|---|---|
| Brand | PROFI-PARTNER |
| Model Number | 52506 |
| Power Source | Battery (Cordless) |
| Battery Type | 18V 2Ah Li-ion (included) |
| Cutting Width | 25 cm |
| Product Dimensions | 140 x 20 x 12.7 cm |
| Item Weight | 1.99 kg |
| Color | Orange |
| Special Features | Guide Skids, Telescopic Handle, 90° Rotatable Motor Head, Plant Protection Bracket |
9. Warranty and Support
PROFI-PARTNER products are manufactured to high-quality standards. This product comes with a standard manufacturer's warranty. For specific warranty terms and conditions, please refer to the warranty card included with your purchase or visit the official PROFI-PARTNER website.
For technical support, spare parts, or any questions regarding your PROFI-PARTNER Cordless Grass Trimmer, please contact your retailer or the PROFI-PARTNER customer service department. Contact details can typically be found on the product packaging or the official brand website.
Manufacturer: EUROtops