1. Introduction
This manual provides detailed instructions for the setup, operation, and maintenance of your EasySMX X05Pro Wireless PC Controller. Please read this manual thoroughly before using the product to ensure optimal performance and longevity.
2. Product Overview
The EasySMX X05Pro is a versatile wireless gaming controller designed for use with PC, Nintendo Switch, Android, and iOS devices. It features advanced components for enhanced gaming experiences.

Figure 1: EasySMX X05Pro Wireless PC Controller and 2.4G USB dongle.
Key Features:
- Quiet-Press Buttons: Redesigned with silicone dampers for reduced noise during operation.
- Dual-Stage Impulse Triggers: Adjustable trigger travel (3mm for quick shooting, 9mm for precise racing) with 2+2 built-in rumble motors for tactile feedback.
- Programmable Buttons: Two customizable buttons (M1, M2) located on the top of the controller to prevent accidental activation.
- Hall Effect Joysticks: High-precision, drift-free 11-bit sensors for accurate control and durability.
- 1000Hz Polling Rate: Available in wired and 2.4G wireless modes for ultra-fast response. Bluetooth mode operates at 125Hz.
- Ergonomic Skin-Like Grip: Soft-touch silicone coating provides a sweat-resistant, non-slip hold.
- Upgraded 8-Way D-Pad: Features dome switches and a recessed pivot for smooth diagonal input and precise 8-directional control.
- Long Battery Life: Integrated 1000mAh rechargeable battery.
- Multi-Platform Compatibility: Supports Windows PC, Nintendo Switch, Android, and iOS. Not compatible with Xbox or PlayStation consoles.
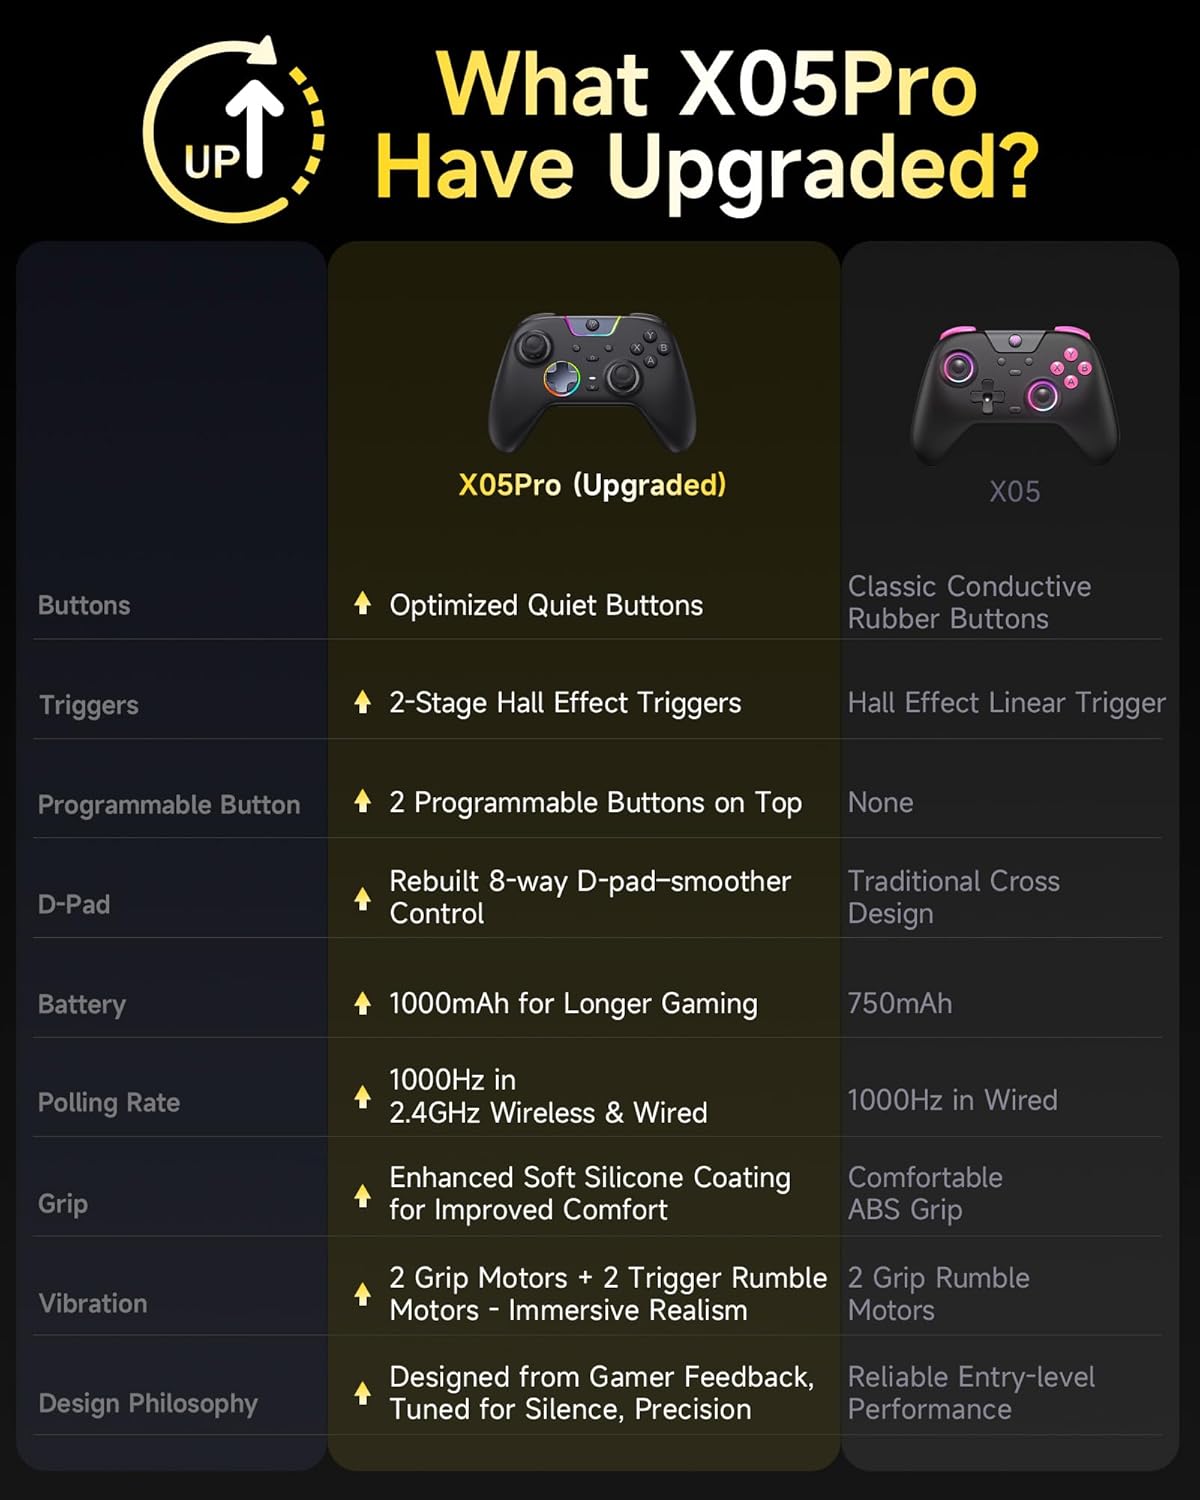
Figure 2: Feature comparison between X05Pro and X05 models.
3. Setup and Connection
3.1 Charging the Controller
Before first use, fully charge the controller using the provided USB-C cable. Connect the cable to the controller's USB-C port and a power source (e.g., PC USB port, USB wall adapter). The LED indicators will show charging status. The controller has a built-in 1000mAh rechargeable battery.
3.2 Connection Modes
The EasySMX X05Pro supports multiple connection methods. Ensure the mode switch on the back of the controller is set correctly for your desired connection type.

Figure 3: Supported connection modes and platforms.
3.2.1 Wired Connection (PC)
- Connect the USB-C cable to the controller and the other end to a USB port on your PC.
- The controller will be automatically recognized by your PC.
- This mode supports a 1000Hz polling rate.
3.2.2 2.4G Wireless Connection (PC)
- Insert the 2.4G USB dongle into an available USB port on your PC.
- Turn on the controller. It should automatically pair with the dongle.
- This mode supports a 1000Hz polling rate.
3.2.3 Bluetooth Connection (PC, Android, iOS)
- Ensure the controller is powered on.
- On your device (PC, Android, iOS), go to Bluetooth settings and search for new devices.
- Select "EasySMX X05Pro" from the list of available devices to pair.
- This mode operates at a 125Hz polling rate, suitable for mobile or casual gaming.
3.2.4 Nintendo Switch Connection
- On your Nintendo Switch, go to System Settings > Controllers and Sensors > Pro Controller Wired Communication (ensure it's ON).
- Connect the controller to the Switch dock via USB-C cable.
- Alternatively, for wireless pairing, follow the Bluetooth connection steps, ensuring the controller is in Switch mode (if applicable via a switch on the back or button combination).
Important Note: The EasySMX X05Pro is not compatible with Xbox or PlayStation consoles.
4. Operating Instructions
4.1 Button Layout and Functions
The controller features standard gaming buttons, joysticks, and an 8-way D-pad.

Figure 4: Detailed view of controller components.
- A/B/X/Y Buttons: Standard action buttons.
- Left/Right Joysticks: For movement and camera control.
- D-Pad: 8-directional input for precise control.
- LB/RB (Shoulder Buttons): Top-mounted buttons.
- LT/RT (Triggers): Pressure-sensitive triggers with dual-stage functionality.
- M Button: Mode/Menu button.
- Programmable Buttons (M1, M2): Located on the top of the controller, near the shoulder buttons.
4.2 Programmable Buttons (M1, M2)
The M1 and M2 buttons can be programmed to replicate other button inputs.

Figure 5: Location and programming options for M1 and M2 buttons.
- Press and hold the M button, then press either M1 or M2.
- Press the button(s) you wish to map to M1/M2 (e.g., A, B, X, Y, LB, RB, LT, RT, L3, R3).
- Press the M button again to save the mapping.
4.3 Dual-Stage Impulse Triggers
The LT and RT triggers offer adjustable travel distance for different gaming needs.

Figure 6: Dual-stage trigger functionality for varied gameplay.
- Shorter Distance (3mm): Ideal for quick actions like shooting in FPS games.
- Longer Distance (9mm): Suitable for precise control, such as acceleration in racing games.
The triggers also provide impulse vibration feedback, enhancing immersion in supported games.

Figure 7: Impulse trigger vibration modes.
4.4 RGB Lighting Effects
The controller features customizable RGB lighting around the joysticks and central area.

Figure 8: RGB lighting effects on the controller.
Refer to the full product manual (if available from manufacturer's website) for specific instructions on changing colors and lighting modes (Brightness, Breathing, Colorful, Fade-Off).
4.5 Turbo Function
The controller includes a Turbo function for rapid, repeated button presses. Consult the full manual for activation and assignment details.
5. Maintenance
- Keep the controller clean by wiping it with a dry, soft cloth.
- Avoid exposing the controller to extreme temperatures, humidity, or direct sunlight.
- Do not attempt to disassemble the controller, as this may void the warranty and cause damage.
- Store the controller in a safe place when not in use to prevent physical damage.
6. Troubleshooting
6.1 Connection Issues
- Controller not connecting via USB: Ensure the USB-C cable is securely connected to both the controller and the PC. Try a different USB port or cable.
- 2.4G Wireless connection unstable: Ensure the USB dongle is fully inserted and within range. Avoid obstructions between the controller and the dongle.
- Bluetooth pairing failure: Make sure the controller is in pairing mode. On your device, try forgetting the device and re-pairing. Ensure no other Bluetooth devices are causing interference.
- Switch connection issues: Verify "Pro Controller Wired Communication" is enabled in Switch settings. For wireless, ensure the controller is in the correct mode for Switch.
6.2 Input Lag or Unresponsiveness
- Wireless lag: For optimal performance, especially in competitive gaming, use wired or 2.4G wireless mode (1000Hz polling rate). Bluetooth mode (125Hz) may have higher latency.
- Drift: The Hall Effect joysticks are designed to prevent drift. If you experience drift, ensure the controller's firmware is up to date (check EasySMX official website).
6.3 Battery Life
- If battery life seems shorter than expected, ensure the controller is fully charged before use.
- Reduce RGB lighting brightness or turn it off to conserve battery.
- Battery performance can degrade over time with repeated charge cycles.
7. Specifications
| Feature | Detail |
|---|---|
| Model Number | X05Pro |
| Connectivity | Wired (USB-C), 2.4G Wireless (USB Dongle), Bluetooth |
| Polling Rate | 1000Hz (Wired & 2.4G), 125Hz (Bluetooth) |
| Battery Capacity | 1000mAh (Rechargeable) |
| Joysticks | Hall Effect, 11-bit precision |
| Triggers | Dual-Stage Impulse Triggers |
| Programmable Buttons | 2 (M1, M2) |
| D-Pad | Upgraded 8-Way with recessed pivot |
| Vibration | 4-Zone (2 grip motors + 2 trigger rumble motors) |
| Compatibility | Windows PC, Nintendo Switch, Android, iOS |
| Incompatibility | Xbox, PlayStation consoles |
| Dimensions | 7.05 x 5.75 x 2.91 inches |
| Weight | 13.7 ounces |
8. Warranty and Support
For warranty information and technical support, please refer to the official EasySMX website or contact their customer service directly.
Manufacturer: EasySMX
Website: www.easysmx.com (Note: This is a placeholder URL. Please refer to your product packaging or official documentation for the correct support website.)