Introduction
Thank you for choosing the iMounTEK 650W Handheld Electric Paint Sprayer. This high-power HVLP (High Volume Low Pressure) spray gun is designed for efficient and even application of various coatings on surfaces such as fences, walls, furniture, and cabinets. Please read this manual thoroughly before operation to ensure safe and optimal performance of your paint sprayer.
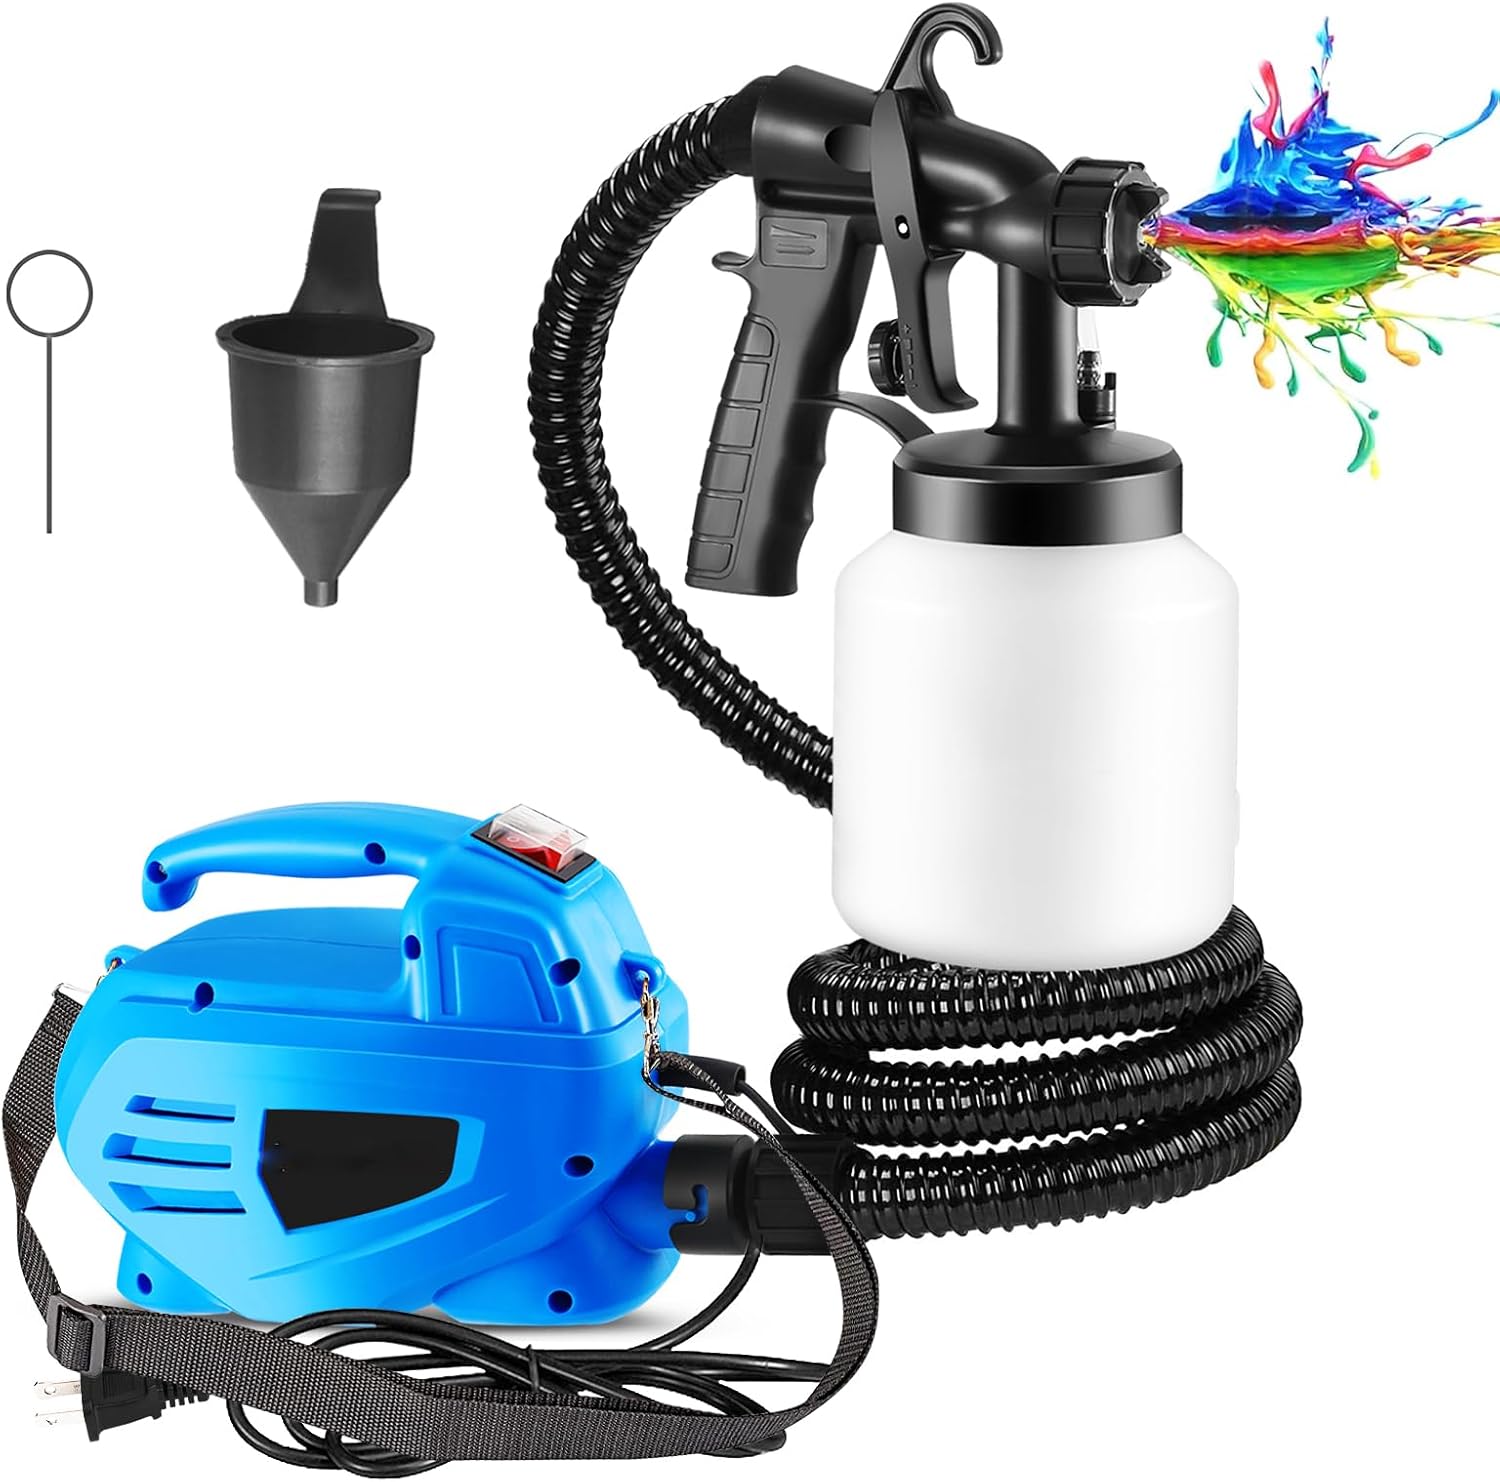
Figure 1: Overview of the iMounTEK 650W Handheld Electric Paint Sprayer and its main components, including the motor unit, spray gun, paint container, and hose.
Important Safety Instructions
WARNING: Read all safety warnings and instructions. Failure to follow the warnings and instructions may result in electric shock, fire, and/or serious injury.
- Always wear appropriate personal protective equipment (PPE) including safety glasses, gloves, and a respirator or mask when operating the paint sprayer.
- Ensure the work area is well-ventilated to prevent the buildup of flammable vapors.
- Do not spray near open flames, pilot lights, or other ignition sources.
- Never immerse the motor unit in water or other liquids.
- Disconnect the power plug from the power source before cleaning, performing maintenance, or storing the sprayer.
- Keep children and bystanders away while operating the paint sprayer.
- Use only manufacturer-recommended accessories and replacement parts.
- Do not spray food products or use with highly corrosive or abrasive materials.
Product Components
The iMounTEK Paint Sprayer comes with the following components:
- Motor Unit (650W)
- Spray Gun with Nozzle and Air Cap
- 800ML Detachable Paint Container
- Flexible Hose
- Viscosity Measuring Cup
- Cleaning Clip
- Shoulder Strap
- User Manual (this document)

Figure 2: Key components of the paint sprayer, illustrating the motor unit, spray gun, hose, and paint container, along with the adjustable spray patterns.
Setup and Preparation
1. Viscosity Measurement and Thinning
Proper paint viscosity is crucial for optimal spraying performance. Use the included viscosity measuring cup to determine if your paint needs thinning. Different materials require different thinning levels.
- Stir the paint thoroughly.
- Dip the viscosity cup into the paint until it is full.
- Lift the cup and measure the time it takes for the liquid to completely drain out.
- Refer to the table below for recommended run-out times. If the time is longer, thin the paint with the appropriate solvent (e.g., water for latex, mineral spirits for oil-based paints) until the desired viscosity is achieved.
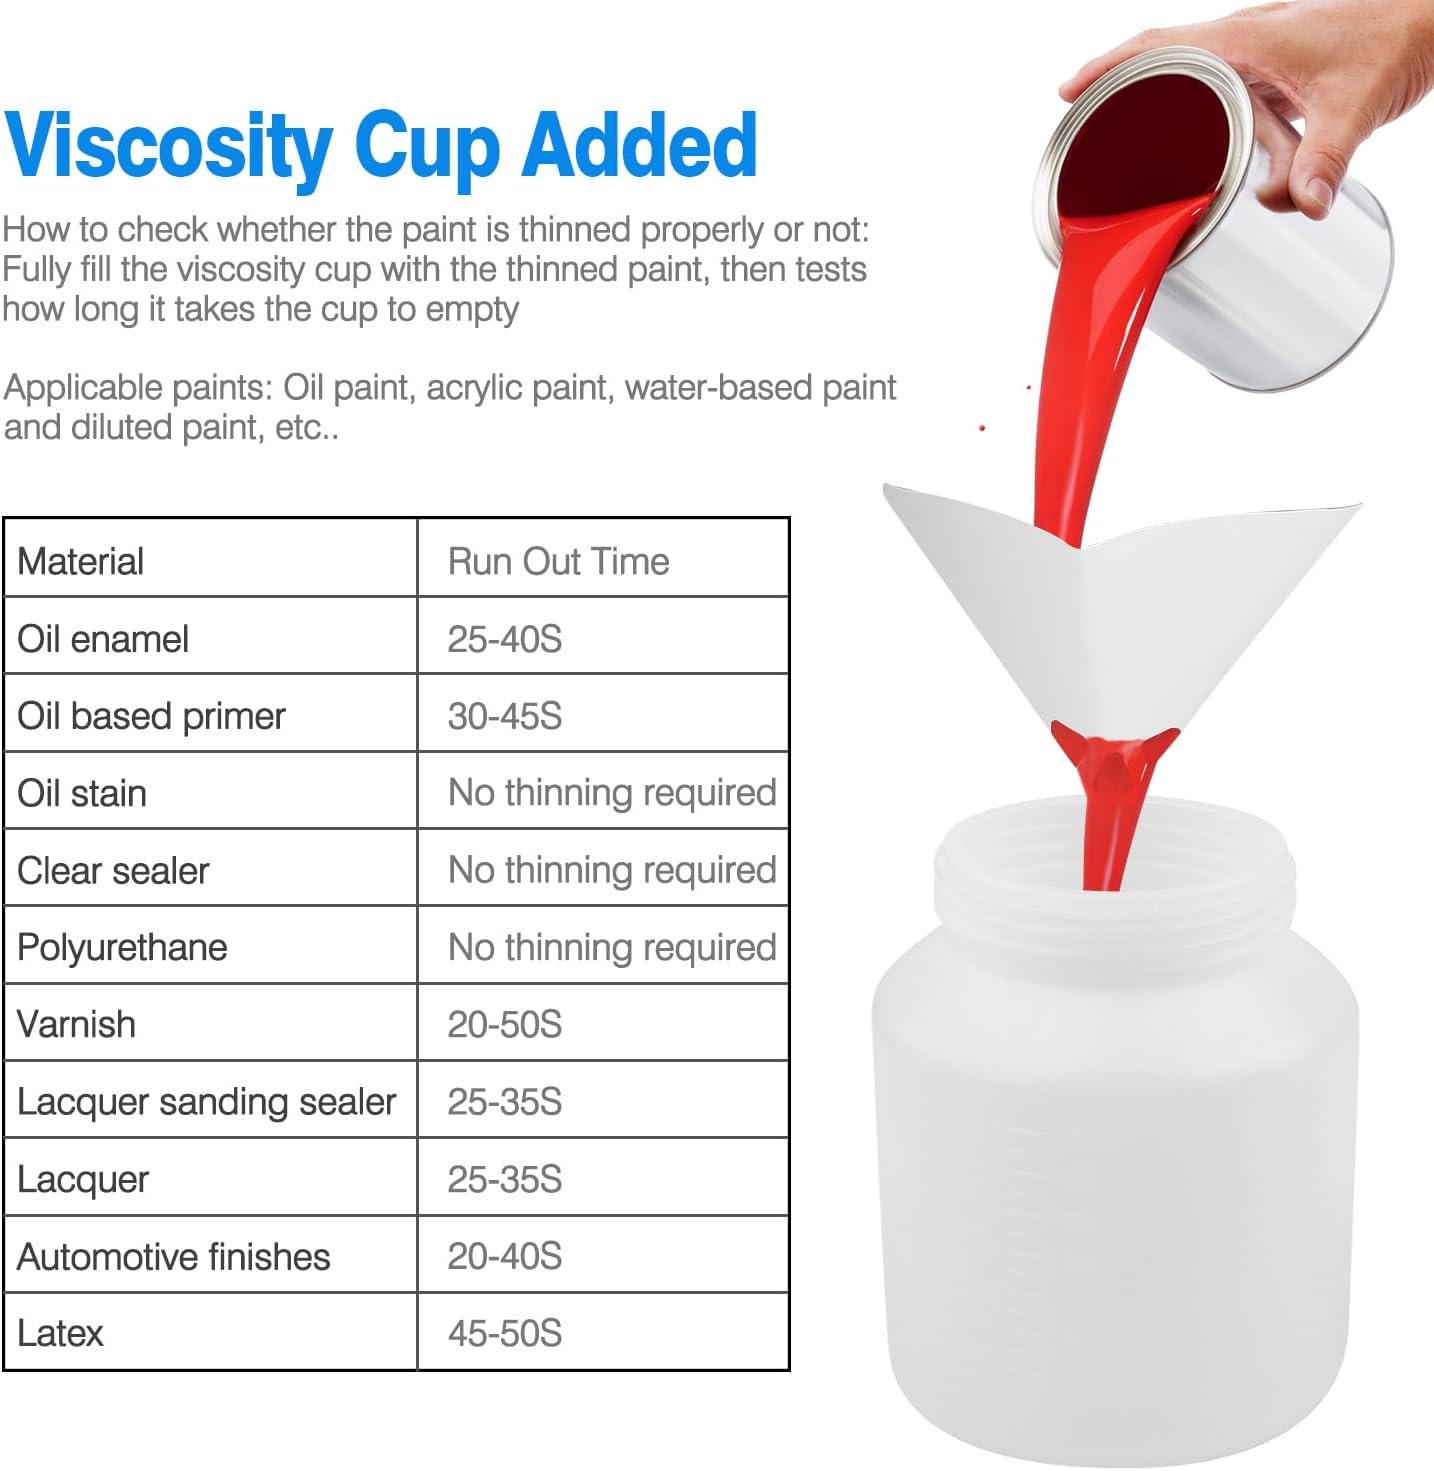
Figure 3: Instructions for using the viscosity cup and a table providing recommended run-out times for various paint types, indicating when thinning is required.
| Material | Run Out Time (Seconds) |
|---|---|
| Oil enamel | 25-40S |
| Oil based primer | 30-45S |
| Oil stain | No thinning required |
| Clear sealer | No thinning required |
| Polyurethane | No thinning required |
| Varnish | 20-50S |
| Lacquer sanding sealer | 25-35S |
| Lacquer | 25-35S |
| Automotive finishes | 20-40S |
| Latex | 45-50S |
2. Assembly Steps
- Fill the Paint Container: Unscrew the paint container from the spray gun. Fill it with your prepared paint. Securely reattach the container to the spray gun.
- Connect the Hose: Connect one end of the flexible hose to the motor unit and the other end to the spray gun handle. Ensure connections are tight to prevent air leaks.
- Adjust Spray Pattern: The sprayer offers three spray patterns: Vertical (for side-to-side spraying), Horizontal (for up-and-down spraying), and Circular (for irregular or round objects). Rotate the air cap on the nozzle to select the desired pattern.
- Adjust Output Volume: Rotate the flow control knob on the spray gun to adjust the paint output volume and thickness.
- Power On: Connect the power cord to a suitable electrical outlet. Press the ON/OFF button on the motor unit to power on the sprayer.

Figure 4: A visual guide detailing the six steps for setting up the paint sprayer, from filling the container to adjusting the output and powering on.
Operating Instructions
1. Spraying Techniques
- Test Spray: Before starting your project, always test spray on a piece of scrap material to check the pattern and flow.
- Distance: Hold the spray gun approximately 6-12 inches (15-30 cm) from the surface.
- Movement: Move the spray gun in smooth, even strokes, keeping it perpendicular to the surface. Overlap each pass by about 50% to ensure even coverage.
- Trigger Control: Press the trigger fully to start spraying. Release the trigger at the end of each stroke to avoid paint buildup.
- Suction Tube Orientation: For horizontal surfaces, turn the suction tube forward. For overhead spraying, turn the suction tube backward. This ensures continuous paint flow regardless of the sprayer's angle.

Figure 5: Illustration demonstrating how to correctly orient the suction tube within the paint container for spraying horizontal surfaces and overhead objects to maintain optimal paint flow.

Figure 6: Detailed view of the three available spray patterns: Vertical (for side-to-side), Horizontal (for up-and-down), and Circular (for irregular shapes), showing how to adjust the air cap.
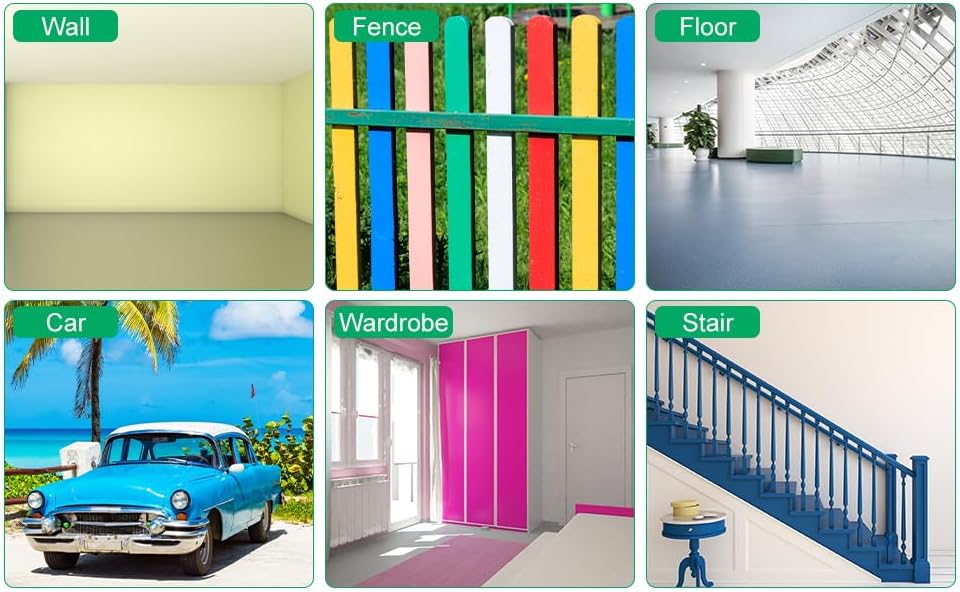
Figure 7: Examples of common applications for the paint sprayer, including interior walls, outdoor fences, flooring, vehicle painting, furniture like wardrobes, and staircases.
Maintenance and Cleaning
Proper cleaning after each use is essential to prolong the life of your paint sprayer and ensure consistent performance.
- Empty Container: Empty any remaining paint from the container back into its original can.
- Initial Rinse: Fill the container with appropriate cleaning solution (water for latex, mineral spirits for oil-based paints). Spray the solution through the gun until it runs clear.
- Disassemble: Disconnect the spray gun from the hose and disassemble the nozzle, air cap, and paint container.
- Thorough Cleaning: Clean all disassembled parts with the appropriate cleaning solution and the included cleaning clip/brush. Pay special attention to the nozzle and air cap to remove any dried paint.
- Clean Motor Unit: Wipe down the exterior of the motor unit with a damp cloth. Do not immerse the motor unit in liquid.
- Dry and Store: Ensure all parts are completely dry before reassembling or storing. Store the sprayer in a clean, dry place away from direct sunlight and extreme temperatures.

Figure 8: The detachable 800ML paint container, designed for easy removal and cleaning, simplifying post-use maintenance.
Troubleshooting
If you encounter issues with your paint sprayer, refer to the table below for common problems and their solutions.
| Problem | Possible Cause | Solution |
|---|---|---|
| No spray or weak spray |
|
|
| Uneven spray pattern |
|
|
| Paint dripping |
|
|
| Motor not starting |
|
|
Specifications
| Feature | Detail |
|---|---|
| Model Name | T1230 |
| Power Consumption | 650W |
| Container Volume | 800ML |
| Max Paint Flow | Up to 1000ml/min |
| Max Viscosity | 130 DIN-seconds |
| Motor Speed | 27000 RPM |
| Spray Patterns | 3 (Vertical, Horizontal, Circular) |
| Product Dimensions | 6.8"W x 5"H (approx.) |
| Item Weight | 4 pounds (approx.) |
| Power Source | Corded Electric |

Figure 9: The paint sprayer in action, demonstrating its use for automotive painting, with key specifications like 650W power consumption and 800ml container volume highlighted.
Warranty and Support
iMounTEK products are designed for quality and reliability. For any questions, technical support, or warranty claims, please refer to the contact information provided with your purchase or visit the official iMounTEK website. Please retain your proof of purchase for warranty purposes.


