
1. Introduction
This manual provides detailed instructions for the installation, operation, and maintenance of your HGLRC 60A 6S V1 4-in-1 Electronic Speed Controller (ESC). This high-performance ESC is designed for FPV racing drones and freestyle applications, offering stable power output and support for DShot600/300/150 digital protocols.
2. Safety Information
Please read and understand all safety warnings before operating this product. Failure to follow these instructions may result in damage to the product, property, or serious injury.
- Always disconnect the battery before performing any installation, maintenance, or inspection.
- Ensure correct polarity when connecting the battery. Reverse polarity will cause irreversible damage to the ESC.
- Avoid short circuits. Double-check all connections before applying power.
- Operate in a well-ventilated area. ESCs can generate heat during operation.
- Keep away from water and moisture.
- This product is not a toy. Keep out of reach of children.
- If you are unsure about any installation steps, seek assistance from an experienced professional.
3. Package Contents
Verify that all items listed below are included in your package:
- 1x HGLRC 60A 6S V1 ESC
- 1x 30AWG 25mm Double-ended SH1.0-8P ribbon cable
- 1x 12AWG 100mm power cable (black/red)
- 1x XT60H-M black male connector
- 1x 50V 470UF solid-state capacitor
- 1x HGLRC 2023 sticker
- 4x 3*8 shock-absorbing columns
- 1x QR code card

Image 3.1: Contents of the HGLRC 60A 6S V1 ESC package. Includes the ESC, various cables, a capacitor, connector, stickers, and mounting hardware.
4. Specifications
| Product Name | HGLRC 60A 6S V1 ESC |
| Input Voltage | 7.4V-25.2V (2S-6S LiPo) |
| Operating Current | Rated current per channel 60A, Four-way maximum current 190A |
| ESC Firmware | Q-H-40 (BLHeli_S) |
| Dimensions | 37mm x 43mm |
| Mounting Hole | 30.5mm x 30.5mm, M3 |
| Weight | 14g |
| Digital Protocols Supported | DShot600/300/150 |

Image 4.1: Visual representation of the HGLRC 60A 6S V1 ESC with key specifications highlighted.
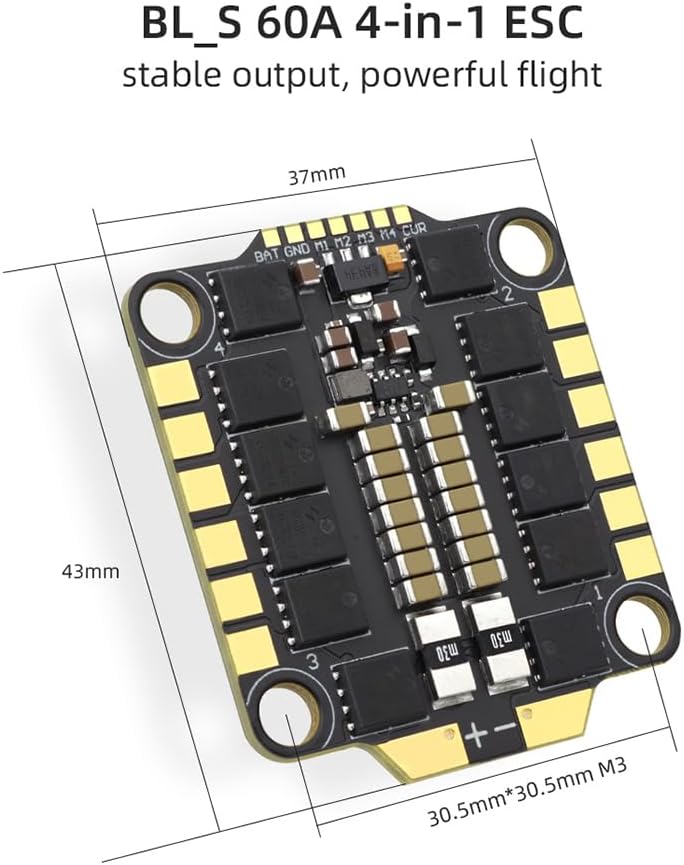
Image 4.2: Detailed view of the HGLRC 60A 6S V1 ESC showing its physical dimensions (37mm x 43mm) and mounting hole spacing (30.5mm x 30.5mm M3).

Image 4.3: Illustration of the ESC's size and weight, including the total package weight.
5. Setup and Installation
Proper installation is crucial for the performance and longevity of your ESC. Follow these steps carefully:
- Mounting the ESC: Use the provided shock-absorbing columns to mount the ESC onto your drone frame. Ensure the ESC is securely fastened and oriented correctly according to your flight controller's setup. The mounting holes are 30.5mm x 30.5mm with M3 diameter.
- Power Connection: Solder the included 12AWG power cable (red for positive, black for negative) to the large '+' and '-' pads on the ESC. Connect the XT60H-M connector to the other end of this cable. Ensure strong, clean solder joints. Connect the provided 50V 470UF solid-state capacitor across the main battery pads (positive to positive, negative to negative) to filter power spikes.
- Flight Controller Connection: Connect the 8-pin SH1.0 ribbon cable from the ESC to your flight controller. Refer to your flight controller's manual for the correct pinout. Typically, this cable carries motor signals (M1-M4), ground (GND), battery voltage (BAT), and current sensor (CUR) signals.
- Motor Connection: Solder your drone's motor wires to the corresponding motor pads (M1, M2, M3, M4) on the ESC. Ensure correct motor rotation direction. This can be adjusted later in the flight controller software or BLHeliSuite.
- Initial Power-Up: Before connecting the main battery, it is highly recommended to use a smoke stopper to prevent damage in case of a short circuit. Connect the battery and observe for any smoke or unusual heat.

Image 5.1: Top and bottom views of the HGLRC 60A 6S V1 ESC, showing solder pads for battery, motors (M1-M4), and the flight controller connector.

Image 5.2: Close-up of the immersion gold pads on the ESC, designed for reliable soldering and high current resistance.
6. Operating Instructions
Once the ESC is physically installed and wired, software configuration is required.
- Firmware: The ESC comes pre-flashed with Q-H-40 BLHeli_S firmware. For advanced configuration or updates, you can connect the ESC to a computer via your flight controller using BLHeliSuite32 or a similar tool.
- Digital Protocols: This ESC supports DShot600, DShot300, and DShot150 digital protocols. Configure your flight controller to use one of these protocols for optimal performance and reliability. PWM and OneShot protocols are also generally supported by BLHeli_S ESCs, but DShot is recommended.
- Motor Direction: After initial setup, verify motor direction in your flight controller's configurator (e.g., Betaflight Configurator). If a motor spins in the wrong direction, you can reverse it in BLHeliSuite or by swapping any two motor wires.
- Calibration: DShot protocols do not require ESC calibration. If using older protocols (e.g., PWM), ESC calibration might be necessary.
Image 6.1: The HGLRC 60A 6S V1 ESC is designed to support DShot600/300/150 digital protocols for precise motor control.
7. Maintenance
Regular inspection and basic maintenance can extend the lifespan of your ESC.
- Visual Inspection: Periodically inspect the ESC for any signs of physical damage, burnt components, loose wires, or corrosion.
- Cleanliness: Keep the ESC free from dust, dirt, and debris. Use a soft brush or compressed air to clean it. Avoid using liquids.
- Solder Joints: Check all solder joints for cracks or cold joints, especially after hard crashes. Re-solder if necessary.
- Heat Management: Ensure adequate airflow around the ESC during operation to prevent overheating.
8. Troubleshooting
If you encounter issues with your ESC, consider the following common problems and solutions:
- ESC Not Powering On:
- Check battery connection and polarity.
- Inspect for short circuits on the ESC pads or between components.
- Ensure the flight controller is providing power to the ESC (if applicable).
- Motor Not Spinning / Stuttering:
- Verify motor wire connections to the ESC.
- Check motor signal wire connection from ESC to flight controller.
- Ensure correct DShot protocol is selected in the flight controller.
- Inspect motor for damage.
- Check for bent motor shafts or debris in the motor.
- ESC Overheating:
- Ensure adequate airflow.
- Check for propeller obstructions or bent propellers causing excessive motor load.
- Verify motor KV and propeller size are appropriate for the ESC's rating.
- Check for motor desync issues (often indicated by stuttering or erratic motor behavior).
- Random Motor Stops / Desyncs:
- Ensure the capacitor is properly installed and functioning.
- Check for loose motor wires or poor solder joints.
- Try updating ESC firmware to the latest version.
- Adjust motor timing settings in BLHeliSuite (usually 'Auto' is fine, but sometimes 'Medium-High' can help).
9. Warranty and Support
HGLRC products are manufactured to high standards. For warranty information, technical support, or further assistance, please visit the official HGLRC website or contact your retailer. Please have your product model and purchase details ready when seeking support.
Official HGLRC Store: HGLRC Amazon Store