1. Introduction
Welcome to the Ossuret Car Radio user manual. This document provides comprehensive instructions for the installation, operation, and maintenance of your new Android 13 car multimedia system. Please read this manual thoroughly before using the product to ensure proper functionality and safety. This unit is specifically designed for Nissan Juke models manufactured between 2010 and 2014.
2. Safety Information
- Professional Installation Recommended: Due to the complexity of car electrical systems, professional installation is highly recommended to prevent damage to the unit or your vehicle.
- Driving Safety: Do not operate the system in a way that distracts you from driving. Always prioritize road safety.
- Power Supply: Ensure the unit is connected to a 12V DC power supply with a negative ground. Incorrect wiring can cause damage.
- Temperature: Avoid exposing the unit to extreme temperatures or direct sunlight for prolonged periods.
- Moisture: Keep the unit dry. Exposure to moisture can lead to malfunction or electric shock.
- Cleaning: Use a soft, dry cloth for cleaning. Do not use abrasive cleaners or solvents.
3. Package Contents
Please check that all the following items are included in your package:
- Ossuret Car Radio Unit
- USB Cable
- RCA Cable
- GPS Antenna
- Canbus Decoder
- Power Harness (Vehicle Specific)
- Installation Brackets and Screws
4. Specifications
| Feature | Specification |
|---|---|
| Operating System | Android 13 |
| RAM | 2GB |
| ROM | 32GB |
| CPU | Quad-Core A53 1.5Ghz |
| Screen Size | 9 inches |
| Screen Resolution | 1280 x 720 |
| Touchscreen Type | Capacitive Multi-touch |
| Special Features | Wireless CarPlay, Android Auto, GPS Navigation |
| Connectivity | USB, Bluetooth, WiFi (802.11b/g/n) |
| Map Type | Europe (pre-loaded offline maps) |
| Audio Output Mode | Stereo |
| Manufacturer | Hitour Tech |
| Package Dimensions | 36.5 x 23.5 x 10.7 cm |
| Package Weight | 1.48 kg |
5. Setup
5.1 Installation
The Ossuret Car Radio is designed for direct fitment in Nissan Juke models from 2010-2014. It replaces the factory radio unit. Due to the specific wiring and CANbus integration required, professional installation is strongly recommended.
- Disconnect Battery: Before starting, disconnect the vehicle's negative battery terminal to prevent electrical shorts.
- Remove Factory Radio: Carefully remove the existing factory radio and trim panels. Refer to your vehicle's service manual for specific instructions.
- Connect Wiring Harness: Connect the provided wiring harness, RCA cables, and GPS antenna to the corresponding ports on the Ossuret unit and your vehicle's wiring. Ensure the CANbus decoder is correctly connected.
- Install Unit: Mount the Ossuret car radio into the dashboard opening using the provided brackets and screws.
- Reconnect Battery: Reconnect the vehicle's negative battery terminal.
- Test Functionality: Power on the unit and test all functions (radio, audio, touchscreen, steering wheel controls, etc.) before reassembling the dashboard trim.

This image illustrates the dashboard of a Nissan Juke before and after the installation of the Ossuret car radio, highlighting the integrated fit and modern display.
5.2 Initial Power-On
Upon first power-on, the system will boot up to the Android interface. You may be prompted to set up basic preferences such as language and time zone. Ensure the GPS antenna is positioned correctly for optimal signal reception.
6. Operating Instructions
6.1 Wireless CarPlay / Android Auto
The unit supports wireless Apple CarPlay and Android Auto via the pre-installed Z-Link application. This allows seamless integration of your smartphone for navigation, music, calls, and other apps.
- Enable Bluetooth/WiFi: On your smartphone, ensure Bluetooth and WiFi are enabled.
- Open Z-Link: On the car radio, open the 'Z-Link' application.
- Pair Device: Follow the on-screen instructions to pair your smartphone via Bluetooth. Once paired, the system will automatically establish a WiFi connection for CarPlay or Android Auto.
- Access Features: Your phone's compatible apps and features will now be accessible on the car radio's display.

This image demonstrates the wireless CarPlay and Android Auto system, showing how smartphone applications like Phone, Music, Maps, and Messages are displayed on the car radio screen.
6.2 Bluetooth Function
The built-in Bluetooth module allows for hands-free calling and wireless audio streaming.
- Pairing: Go to the Bluetooth settings on the car radio and enable Bluetooth. Search for available devices on your smartphone and select the car radio (usually named 'CarBT' or similar). Confirm the pairing code if prompted.
- Hands-Free Calling: Once paired, you can make and receive calls directly from the car radio's interface. The built-in microphone ensures clear communication.
- Phonebook Download: The system supports downloading your phone's contact list for easy access.
- Bluetooth Music: Stream audio from your smartphone to the car's speakers wirelessly.

This image displays the Bluetooth calling interface on the car radio, showing a dial pad and contact search function for hands-free communication.
6.3 USB Connection
Connect external USB devices to play audio and video files. The unit supports USB storage devices up to 2TB.
- Connect USB Device: Insert your USB drive into one of the provided USB ports.
- Access Files: The system will automatically detect the device. Navigate to the 'File Manager' or 'Music/Video Player' app to browse and play content.

This image shows the file browsing interface when a USB device is connected, allowing users to access various media files and folders.
6.4 Steering Wheel Control
The unit is compatible with your vehicle's factory steering wheel controls, allowing you to manage audio functions without taking your hands off the wheel.
- Automatic Recognition: After proper installation with the CANbus decoder, the steering wheel controls should be automatically recognized.
- Customization (if needed): If controls are not functioning correctly, navigate to the 'Steering Wheel Control' settings in the system menu to manually map the buttons.
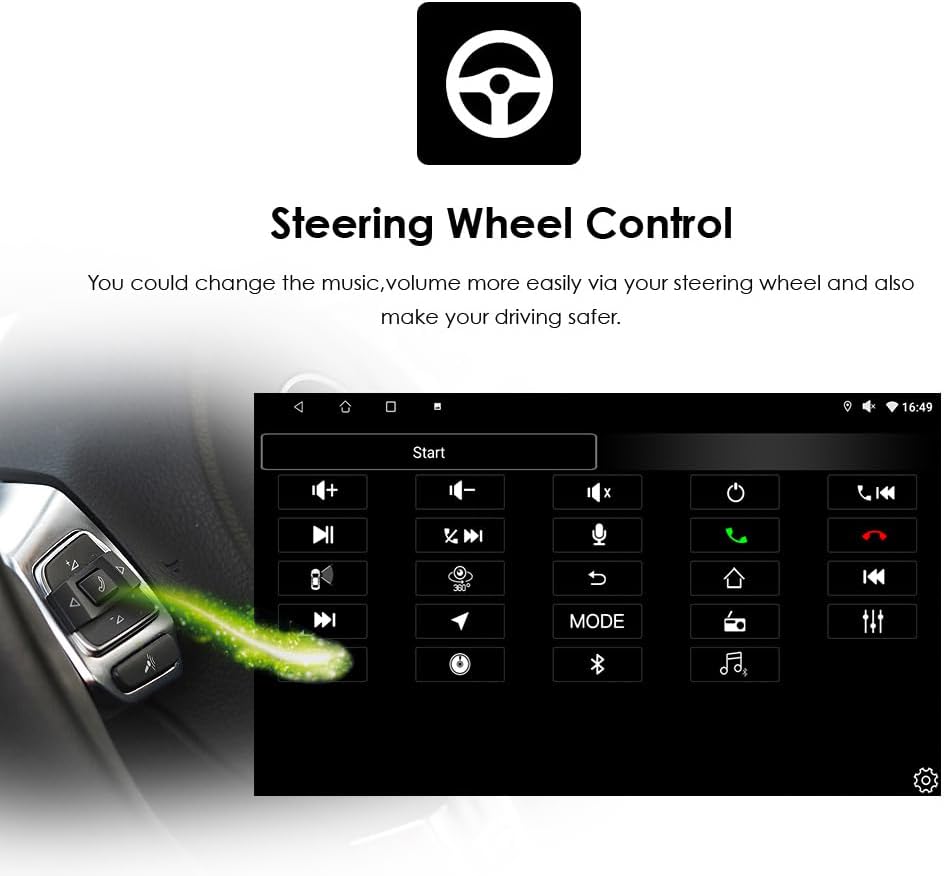
This image illustrates the steering wheel control setup screen, showing how various functions can be assigned to the vehicle's steering wheel buttons for convenient operation.
6.5 Radio Function (RDS)
The car radio features an FM tuner with RDS support, allowing you to listen to your favorite radio stations.
- FM Tuning Range: 87.5-108MHz
- FM Increment: 0.05MHz (EU) / 0.1MHz (US)
- Regional Support: Europe, USA1, USA2, Japan, Russia
- Scanning and Presets: Use the radio application to scan for stations and save your preferred frequencies as presets.

This image shows the radio interface, displaying current frequency, station presets, and controls for tuning and band selection.
6.6 GPS Navigation
The unit comes with pre-loaded European offline maps and supports online navigation.
- Offline Navigation: Access the pre-installed navigation app to use the offline European maps without an internet connection.
- Online Navigation: Connect to WiFi to use online navigation apps (e.g., Google Maps, Waze) for real-time traffic updates and broader map coverage.
- Voice Guidance: The system supports voice guidance for turn-by-turn directions.
- Dual Zone Function: Navigate while playing music or other media in the background.
6.7 Rear View Camera Input
Enhance safety with a rear-view camera (sold separately). The system automatically displays the camera feed when reversing.
- Connection: Connect a compatible rear-view camera to the dedicated input on the unit.
- Automatic Display: When the vehicle is shifted into reverse gear, the screen will automatically switch to display the rear-view camera feed, helping to identify obstacles and blind spots.
6.8 Multimedia Playback
The unit supports various audio and video formats for local playback or streaming.
- Supported Music Formats: MP3, WMA, AAC, RM, FLAC, etc.
- Supported Video Formats: MPEG-1/2/4, H264, H263, VC1, RV, RMVB, DivX, Sorenson Spark, VP8, AVS Stream, etc.
- Video Output: Synchronize all functions with external displays such as headrest monitors or overhead screens.

This image shows the car radio display actively playing a video, demonstrating its multimedia capabilities.
7. Maintenance
- Screen Cleaning: Use a soft, lint-free cloth to gently wipe the touchscreen. For stubborn smudges, slightly dampen the cloth with water or a screen-safe cleaner. Do not spray cleaner directly onto the screen.
- Software Updates: Periodically check for software updates through the system settings or the manufacturer's website to ensure optimal performance and access to new features.
- Avoid Liquids: Prevent any liquids from entering the unit, as this can cause severe damage.
- Environmental Conditions: Operate the unit within recommended temperature ranges. Extreme heat or cold can affect performance and lifespan.
8. Troubleshooting
If you encounter issues with your Ossuret Car Radio, refer to the following common problems and solutions:
| Problem | Possible Solution |
|---|---|
| Unit does not power on | Check power connections and vehicle's fuse box. Ensure the battery is properly connected. |
| No sound | Verify speaker connections. Check volume levels and mute settings. Ensure audio output mode is correct. |
| Touchscreen unresponsive | Perform a soft reset (refer to system settings for reset option). Ensure the screen is clean and free of debris. |
| Bluetooth/CarPlay/Android Auto not connecting | Ensure Bluetooth and WiFi are enabled on both the unit and your smartphone. Restart both devices. Clear previous pairings and try again. Check Z-Link app status. |
| GPS signal weak or inaccurate | Ensure the GPS antenna is properly installed and has a clear view of the sky. Avoid obstructions. |
| Steering wheel controls not working | Verify CANbus decoder connection. Check steering wheel control settings in the unit's menu for proper mapping. |
If the problem persists after attempting these solutions, please contact customer support for further assistance.
9. Warranty and Support
Your Ossuret Car Radio is covered by a standard manufacturer's warranty. Please refer to the warranty card included in your package or contact your retailer for specific warranty terms and conditions.
For technical support, troubleshooting assistance, or warranty claims, please contact the seller or manufacturer directly. Keep your purchase receipt and product serial number handy when contacting support.


