1. Introduction
This manual provides essential information for setting up, operating, maintaining, and troubleshooting your Lenovo ThinkCentre Neo 50q Gen 5 Tiny PC. Please read this guide thoroughly before using your device to ensure proper function and safety.
2. Product Overview
The Lenovo ThinkCentre Neo 50q Gen 5 Tiny PC is a compact and powerful business desktop designed for efficiency and performance. It features an Intel Core 5 210H Processor, 32GB DDR5 memory, and a 1TB SSD, running on Windows 11 Pro.
2.1 Package Contents
- Lenovo ThinkCentre Neo 50q Gen 5 Tiny Business PC
- AC Adapter / Power Supply (90W)
- USB Calliope Mouse (Black)
- USB Calliope Keyboard (Black - English US QWERTY)
- Documentation (Quick Start Guide, Safety Information)
2.2 Front and Rear Ports & Slots
Familiarize yourself with the various ports and connectors on your ThinkCentre Neo 50q Gen 5 Tiny PC.

Image: Detailed diagram illustrating the location and function of all front and rear ports and slots on the ThinkCentre Neo 50q Gen 5 Tiny PC.
- Front Ports:
- 1x USB-C (USB 10Gbps / USB 3.2 Gen 2), with data transfer and 5V@3A charging
- 1x USB-A (USB 10Gbps / USB 3.2 Gen 2), with Always On and 5V@2.1A charging
- 1x Headphone / microphone combo jack (3.5mm)
- Power button
- Rear Ports:
- 2x USB-A (Hi-Speed USB / USB 2.0), one supports Smart Power On
- 2x USB-A (USB 10Gbps / USB 3.2 Gen 2)
- 1x HDMI 2.1 TMDS (supports resolution up to 4K@60Hz)
- 1x DisplayPort 1.4b
- 1x Ethernet (GbE RJ-45)
- 1x Power connector
- Kensington Security Slot™
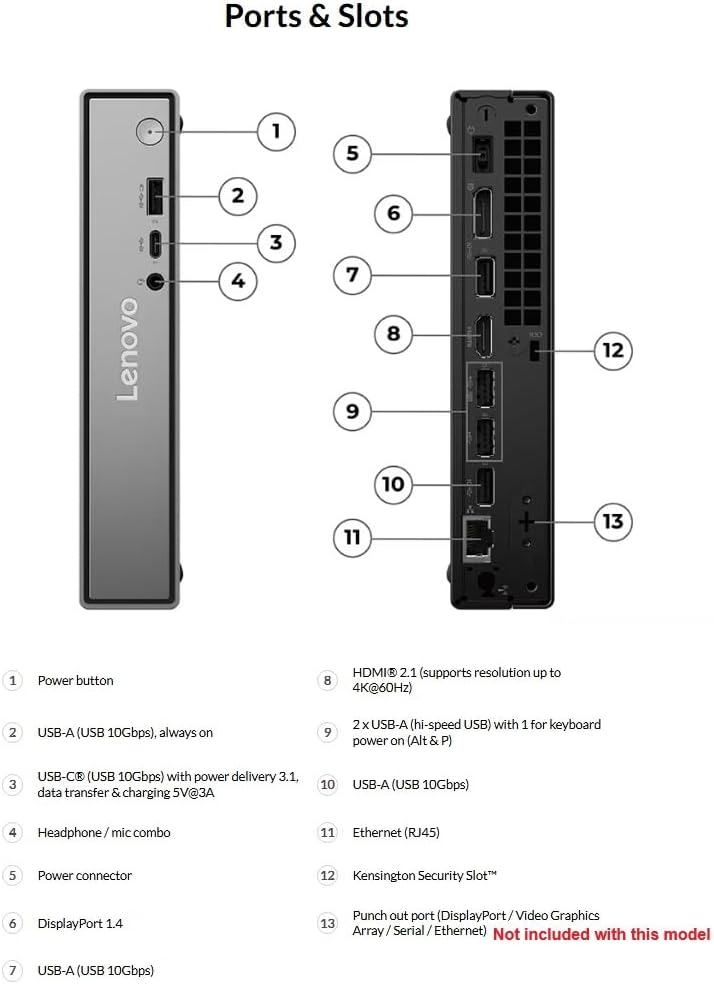
Image: Front angled view of the ThinkCentre Neo 50q Gen 5 Tiny PC, highlighting the power button, USB ports, and headphone jack.

Image: Rear view of the ThinkCentre Neo 50q Gen 5 Tiny PC, showing the various video outputs, USB ports, Ethernet, and power connector.
3. Setup Instructions
Follow these steps to set up your ThinkCentre Neo 50q Gen 5 Tiny PC.
- Unpack the PC: Carefully remove the PC and all accessories from the packaging.
- Connect Peripherals:
- Connect the USB keyboard and mouse to the available USB-A ports on the front or rear of the PC.
- Connect your monitor(s) to the HDMI or DisplayPort outputs on the rear of the PC.
- If using a wired network, connect an Ethernet cable to the RJ-45 port on the rear.
- Connect Power: Connect the power adapter to the power connector on the rear of the PC, then plug the power cord into a wall outlet.
- Power On: Press the power button located on the front of the PC. The system will boot up.
- Initial Windows Setup: Follow the on-screen instructions to complete the Windows 11 Pro setup, including language, region, network connection, and user account creation.
4. Operating Instructions
Your ThinkCentre Neo 50q Gen 5 Tiny PC comes pre-installed with Windows 11 Pro. This section covers basic operation.
4.1 Power Management
- Turning On: Press the power button on the front of the PC.
- Shutting Down: Click the Start button in Windows, then select Power > Shut down.
- Restarting: Click the Start button in Windows, then select Power > Restart.
- Sleep Mode: Click the Start button in Windows, then select Power > Sleep.
4.2 Connecting to Networks
- Wired Connection: If an Ethernet cable is connected, your PC should automatically connect to the network.
- Wireless Connection (Wi-Fi 6):
- Click the Wi-Fi icon in the taskbar.
- Select your desired Wi-Fi network from the list.
- Enter the network security key (password) if prompted.
- Click Connect.
4.3 Using USB Devices
Connect USB devices such as external hard drives, printers, or webcams to any available USB-A or USB-C ports. Windows will typically install the necessary drivers automatically.
5. Maintenance
Regular maintenance helps ensure the longevity and optimal performance of your PC.
- Keep it Clean: Regularly clean the exterior of the PC with a soft, dry cloth. Use compressed air to clear dust from ventilation grilles to prevent overheating.
- Software Updates: Keep your Windows operating system and drivers updated. Go to Settings > Windows Update to check for updates.
- Antivirus Protection: Ensure your antivirus software is up-to-date and performing regular scans to protect against malware.
- Data Backup: Regularly back up important data to an external drive or cloud storage to prevent data loss.
- Avoid Obstructions: Ensure the PC's ventilation openings are not blocked to allow for proper airflow.
6. Troubleshooting
This section provides solutions to common issues you might encounter.
6.1 No Power
- Ensure the power adapter is securely connected to both the PC and a working electrical outlet.
- Test the outlet with another device.
- Verify the power button is fully pressed.
6.2 No Display on Monitor
- Check that the monitor is powered on and its power cable is securely connected.
- Ensure the video cable (HDMI or DisplayPort) is firmly connected to both the PC and the monitor.
- Try a different video cable or monitor if available.
- Ensure the correct input source is selected on your monitor.
6.3 PC is Slow or Unresponsive
- Close unnecessary applications running in the background.
- Check for and install any pending Windows updates.
- Run a full system scan with your antivirus software.
- Restart the PC.
- Ensure adequate ventilation to prevent overheating.
6.4 Network Connectivity Issues
- For wired connections, ensure the Ethernet cable is properly connected and the router/modem is working.
- For Wi-Fi, ensure Wi-Fi is enabled, you are connected to the correct network, and the password is correct.
- Restart your router/modem and the PC.
- Run the Windows Network Troubleshooter (Settings > Network & internet > Advanced network settings > Network troubleshooter).
7. Specifications
| Feature | Specification |
|---|---|
| Processor | Intel Core 5 210H (E-cores up to 3.60 GHz, P-cores up to 4.80 GHz) |
| Memory (RAM) | 32 GB DDR5-5600MT/s (SODIMM) |
| Storage | 1 TB SSD M.2 2280 PCIe Gen4 TLC Opal |
| Graphics | Integrated Intel Graphics |
| Operating System | Windows 11 Pro 64-bit |
| Connectivity | Intel Wi-Fi 6 AX203 2x2 AX, Bluetooth 5.2, Gigabit Ethernet (RJ-45) |
| Front Ports | 1x USB-C (USB 10Gbps), 1x USB-A (USB 10Gbps with Always On), 1x Headphone/Mic Combo |
| Rear Ports | 2x USB-A (USB 2.0), 2x USB-A (USB 10Gbps), 1x HDMI 2.1 TMDS, 1x DisplayPort 1.4b, 1x Ethernet (RJ-45), 1x Power Connector |
| Dimensions (H x W x D) | 19.37 x 9.84 x 5.04 inches (approximate) |
| Weight | Approximately 6.65 lbs (3.02 kg) |
| Color | Raven Black |
8. Warranty and Support
8.1 Warranty Information
Your Lenovo ThinkCentre Neo 50q Gen 5 Tiny PC comes with a 1 Year On-Site Lenovo Warranty. For detailed terms and conditions, please refer to the warranty documentation included with your product or visit the official Lenovo support website.
8.2 Technical Support
For technical assistance, driver downloads, or further information, please visit the official Lenovo Support website:
You will need your product's serial number, which can typically be found on a label on the device or within the system information in Windows.