
Introduction
This manual provides essential instructions for the safe and efficient operation, setup, and maintenance of your USHA S2 Direct Drive Single Needle Lockstitch Sewing Machine. Please read this manual thoroughly before using the machine to ensure proper function and longevity.
The USHA S2 is designed for high-speed, precise stitching on light to medium fabrics, making it suitable for garment production, tailoring, and stitching workshops. It features a 550W direct drive motor, programmable speed, LED needle light, and automatic lubrication.
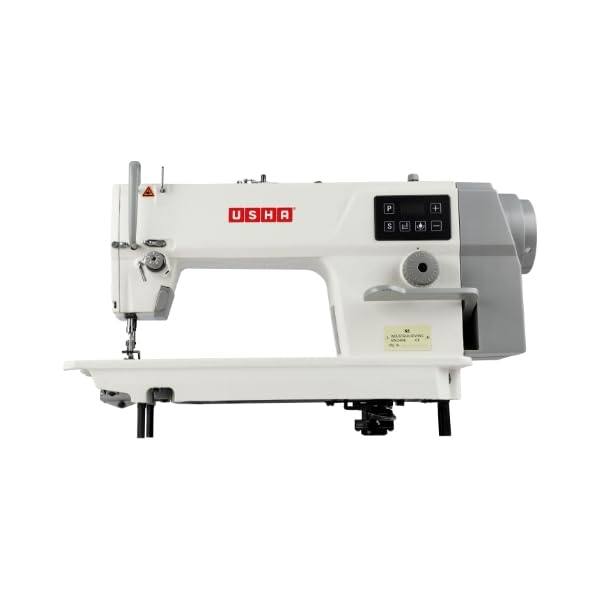
Image: Front view of the USHA S2 Direct Drive Single Needle Lockstitch Sewing Machine, showcasing its compact design and control panel.
Safety Instructions
- Always disconnect the machine from the power supply before cleaning, servicing, or when not in use.
- Keep fingers away from the needle area and moving parts during operation.
- Do not operate the machine with damaged cords or if it has been dropped or damaged.
- Ensure proper lighting in your work area.
- Use only genuine USHA replacement parts and accessories.
- Keep the machine out of reach of children.
Product Overview and Components
The USHA S2 machine comes with the following components:
- Sewing Machine Head
- Motor (550W Direct Drive)
- Table Stand
- Thread Stand
- LED Light
- Accessory Kit (needles, bobbins, screwdriver, etc. - specific contents may vary)
Setup
1. Unpacking
Carefully remove all components from the packaging. Retain packaging for future transport or storage. Verify all listed components are present.
2. Assembly
- Table Stand Assembly: Assemble the table stand according to the provided diagrams (not included in this manual, refer to separate assembly guide if applicable). Ensure it is stable and level.
- Motor Installation: The direct drive motor is typically integrated into the machine head. If separate, follow the motor installation instructions carefully, ensuring secure mounting.
- Machine Head Placement: Carefully place the sewing machine head onto the assembled table stand, aligning it with the designated mounting points. Secure it firmly.
- Thread Stand Setup: Assemble the thread stand and place it in its designated position on the table.
- LED Light Attachment: Attach the LED needle light to the machine head, ensuring it illuminates the needle area effectively.
3. Power Connection
Connect the machine's power cord to a suitable electrical outlet. Ensure the voltage matches the machine's requirements. The machine is equipped with an eco-friendly 550W direct drive motor.
Operating Instructions
1. Winding the Bobbin
- Place an empty bobbin onto the bobbin winder spindle.
- Guide the thread from the spool through the tension disc for bobbin winding.
- Wrap the thread a few times around the bobbin.
- Engage the bobbin winder.
- Start the machine; the bobbin will wind automatically and stop when full.
2. Threading the Machine
- Place the thread spool on the thread stand.
- Follow the numbered threading path indicated on the machine, passing through all guides and tension discs.
- Thread the needle from front to back.
- Insert the wound bobbin into the bobbin case and then into the shuttle hook area.
- Turn the handwheel to bring the bobbin thread up through the needle plate.
3. Adjusting Stitch Length
The USHA S2 allows for a maximum stitch length of 5 mm. Use the stitch length adjustment dial or lever, typically located on the machine head, to set the desired stitch length. Refer to the machine's markings for specific settings.
4. Programmable Sewing Speed
The machine features programmable sewing speed, allowing precise control up to 5000 stitches per minute (SPM). Use the control panel to set your desired speed. This is particularly useful for different fabric types and intricate work.
5. Half Stitch Function
Engage the half stitch function via the control panel for precise, incremental stitching, ideal for corners, pivots, and detailed work.
6. Needle Position Control
Utilize the needle position control feature to set the needle to stop in either the up or down position. This facilitates easier fabric handling, especially when turning corners or removing fabric from the machine.
7. Fabric Compatibility
This machine is designed for stitching light to medium fabrics. Ensure appropriate needle and thread combinations for the fabric type to achieve optimal results.
Maintenance
1. Automatic Lubrication System
The USHA S2 is equipped with an automatic lubrication system. Regularly check the oil level in the reservoir and refill with recommended sewing machine oil as needed. This system ensures smooth operation and extends the machine's service life by reducing wear and tear.
2. Cleaning
- Daily Cleaning: Use a soft brush to remove lint and dust from the needle plate, feed dogs, and bobbin area.
- Periodic Cleaning: Remove the needle plate and bobbin case to thoroughly clean accumulated lint and thread bits. A small vacuum cleaner or compressed air can be used carefully.
- Wipe the exterior of the machine with a soft, damp cloth. Avoid harsh chemicals.
3. Needle Replacement
Replace the needle regularly, especially if it becomes bent, dull, or if you notice skipped stitches. Always use the correct needle type and size for your fabric.
Troubleshooting
| Problem | Possible Cause | Solution |
|---|---|---|
| Skipped Stitches | Incorrect needle, bent needle, improper threading, wrong needle size for fabric. | Replace needle, re-thread machine, use correct needle type/size. |
| Thread Breakage | Incorrect tension, poor quality thread, burrs on needle plate, improperly wound bobbin. | Adjust tension, use quality thread, check for burrs, re-wind bobbin. |
| Uneven Stitches | Incorrect tension, worn needle, inconsistent fabric feeding. | Adjust tension, replace needle, ensure smooth fabric feeding. |
| Machine Not Starting | Power cord not connected, power switch off, motor issue. | Check power connection, ensure switch is on. If problem persists, contact service. |
For issues not listed here or if problems persist, please contact USHA Customer Care.
Specifications
Below are the key specifications for the USHA S2 Direct Drive Single Needle Lockstitch Sewing Machine:
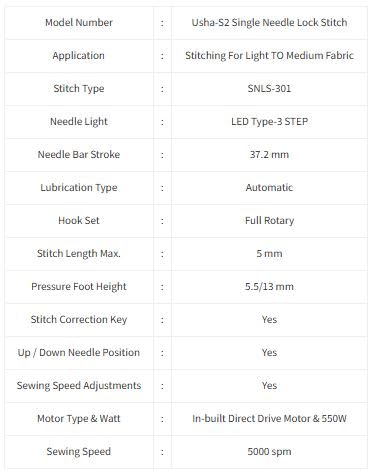
Image: Detailed specifications table for the USHA S2 Sewing Machine, listing features like stitch type, needle light, lubrication type, and sewing speed.
| Feature | Detail |
|---|---|
| Brand | USHA |
| Model Number | S2b |
| Application | Stitching for Light to Medium Fabric |
| Stitch Type | Single Needle Lockstitch |
| Sewing Speed | Up to 5000 SPM (Stitches Per Minute) |
| Motor Type & Wattage | In-built Direct Drive Motor, 550W |
| Needle Light | LED Needle Light |
| Lubrication Type | Automatic |
| Max. Stitch Length | 5 mm |
| Item Weight | 25 kg |
| Product Dimensions | 50D x 120W x 85H Centimeters |
| Included Components | Sewing Machine, LED Light, Thread Stand, Table Stand, Motor |
Warranty and Support
For warranty information, service, or technical support, please contact USHA Customer Care. Keep your purchase receipt as proof of purchase.
Importer: Usha International Limited, India
Customer Care: Refer to the official USHA website or product packaging for the most current contact information.