Introduction
This manual provides detailed instructions for the installation, operation, and maintenance of your CAMECHO 4-Channel Dash Cam. Please read this manual thoroughly before using the device to ensure proper functionality and safety. Keep this manual for future reference.

Image: Overview of the CAMECHO 4-Channel Dash Cam, highlighting its adjustable cameras and 3-inch display.
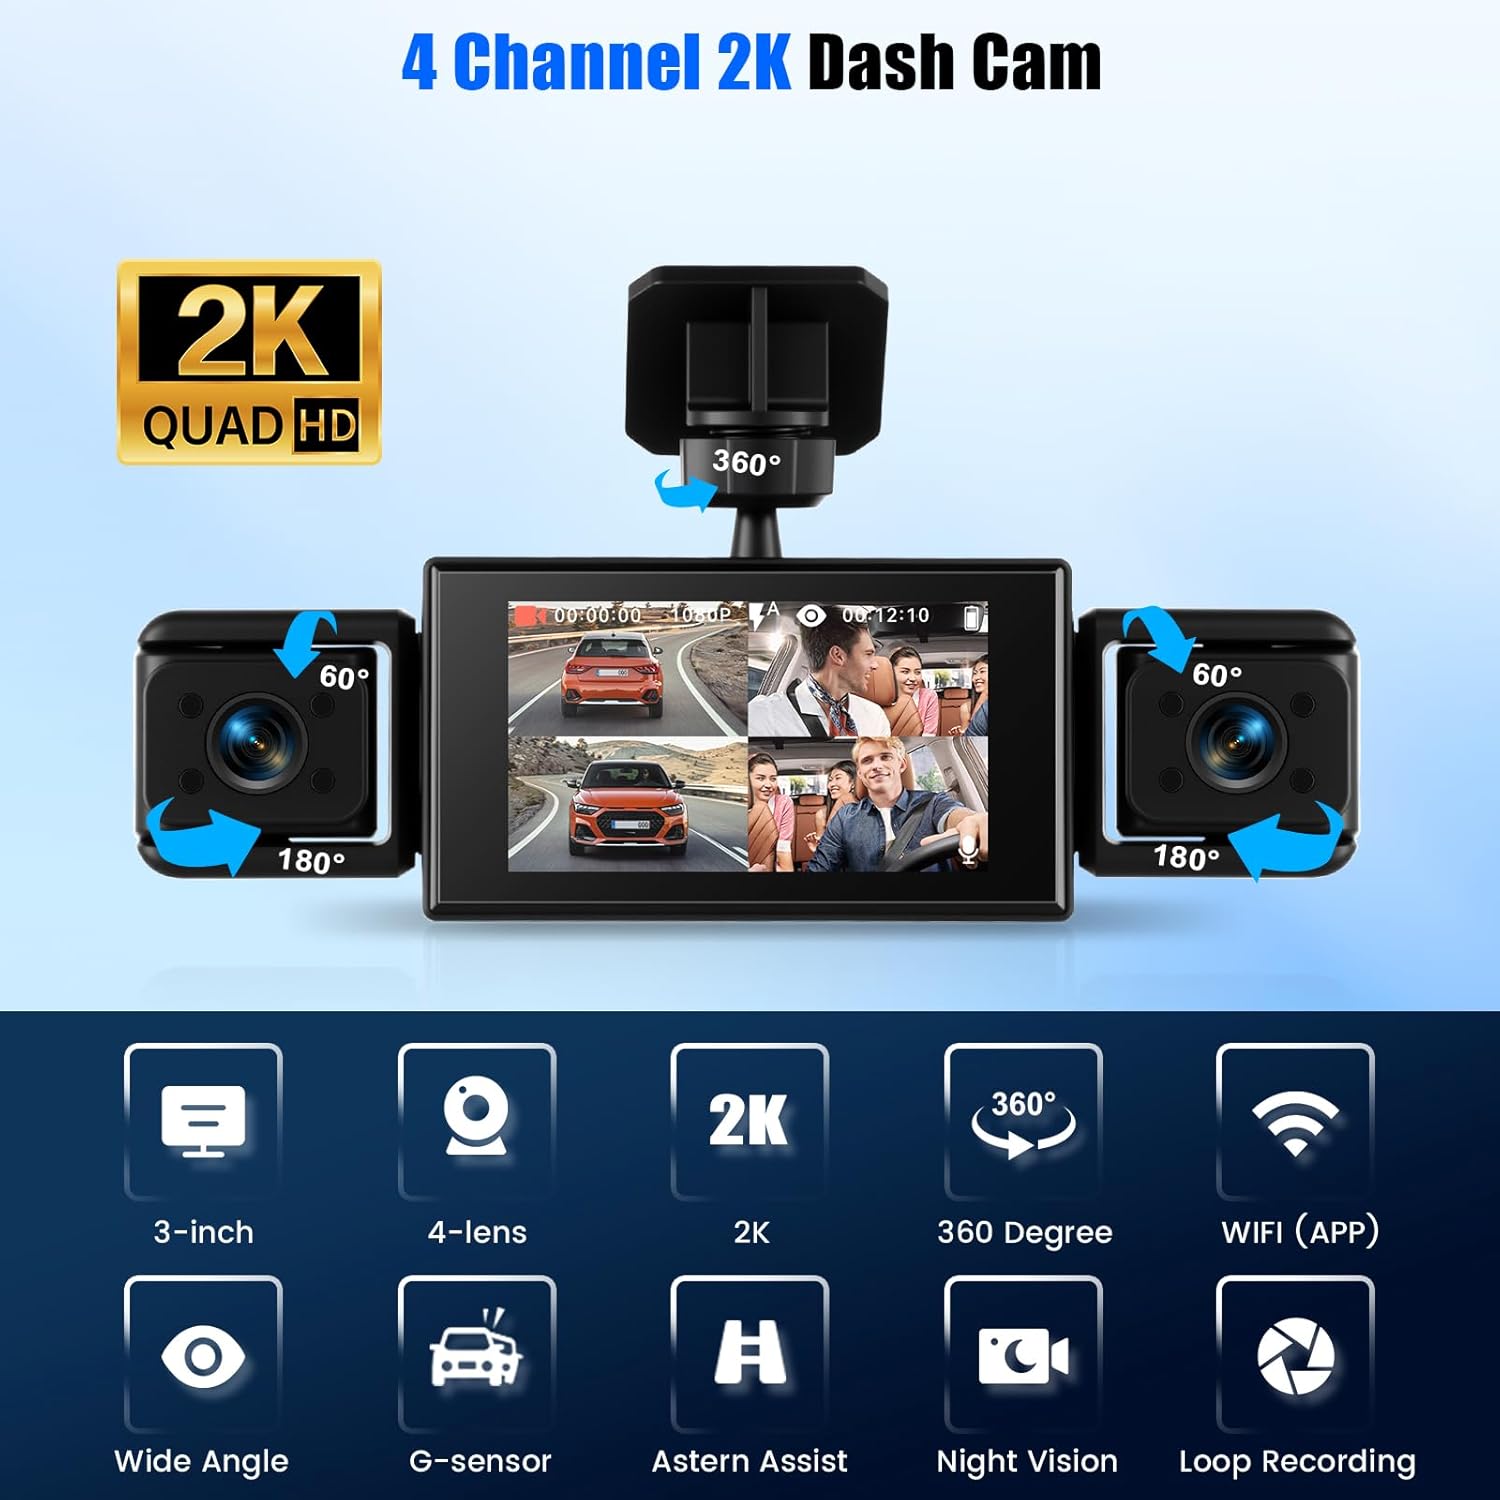
Image: Key features of the dash cam, including its 3-inch display, four lenses, 2K resolution, 360-degree coverage, and various functions.
Setup Guide
Package Contents
Before installation, please verify that all components are present:
- CAMECHO 4-Channel Dash Cam Unit
- Suction Cup Mount
- Adhesive Mount
- 5.5m Cable for Rear View Camera
- Cigarette Lighter Adapter (Power Cable)
- User Manual
- Anti-slip mats
Installation Steps
Follow these steps for proper installation of your dash cam:
- Step 1: Prepare the Surface. Use a clean rag to wipe the glass surface where the dash cam will be mounted. Ensure the area is free of dust and grease for optimal adhesion.
- Step 2: Mount the Bracket. Attach the mounting bracket to the cleaned area.
- Step 3: Secure the Dash Cam. Remove the protective film from the adhesive sticker on the dash cam mount and firmly press it onto the desired position on your windshield.
- Step 4: Connect and Route Cables. Connect the rear view camera cable (if applicable) and route it neatly along the vehicle's interior.
- Step 5: Connect Power. Plug the cigarette lighter adapter into your vehicle's 12V power outlet and connect it to the dash cam.
- Step 6: Adjust Angle. Power on the dash cam and adjust the camera angles to ensure optimal viewing coverage for all four cameras.
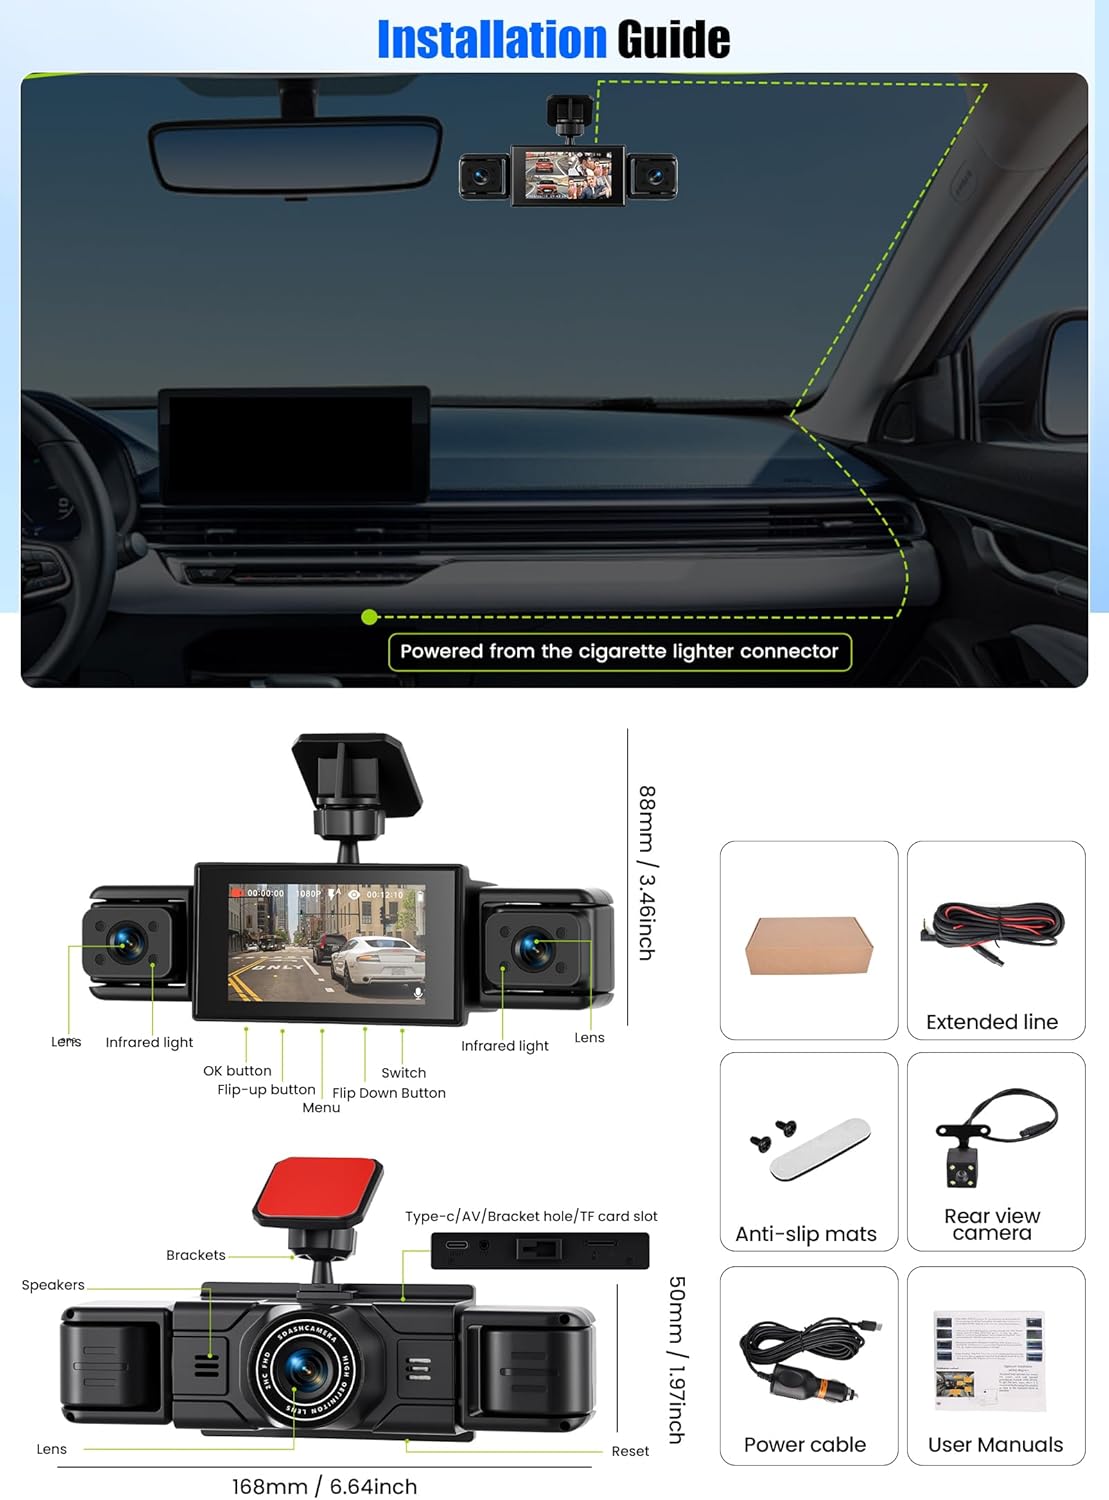
Image: Visual guide illustrating the six steps for installing the dash cam.
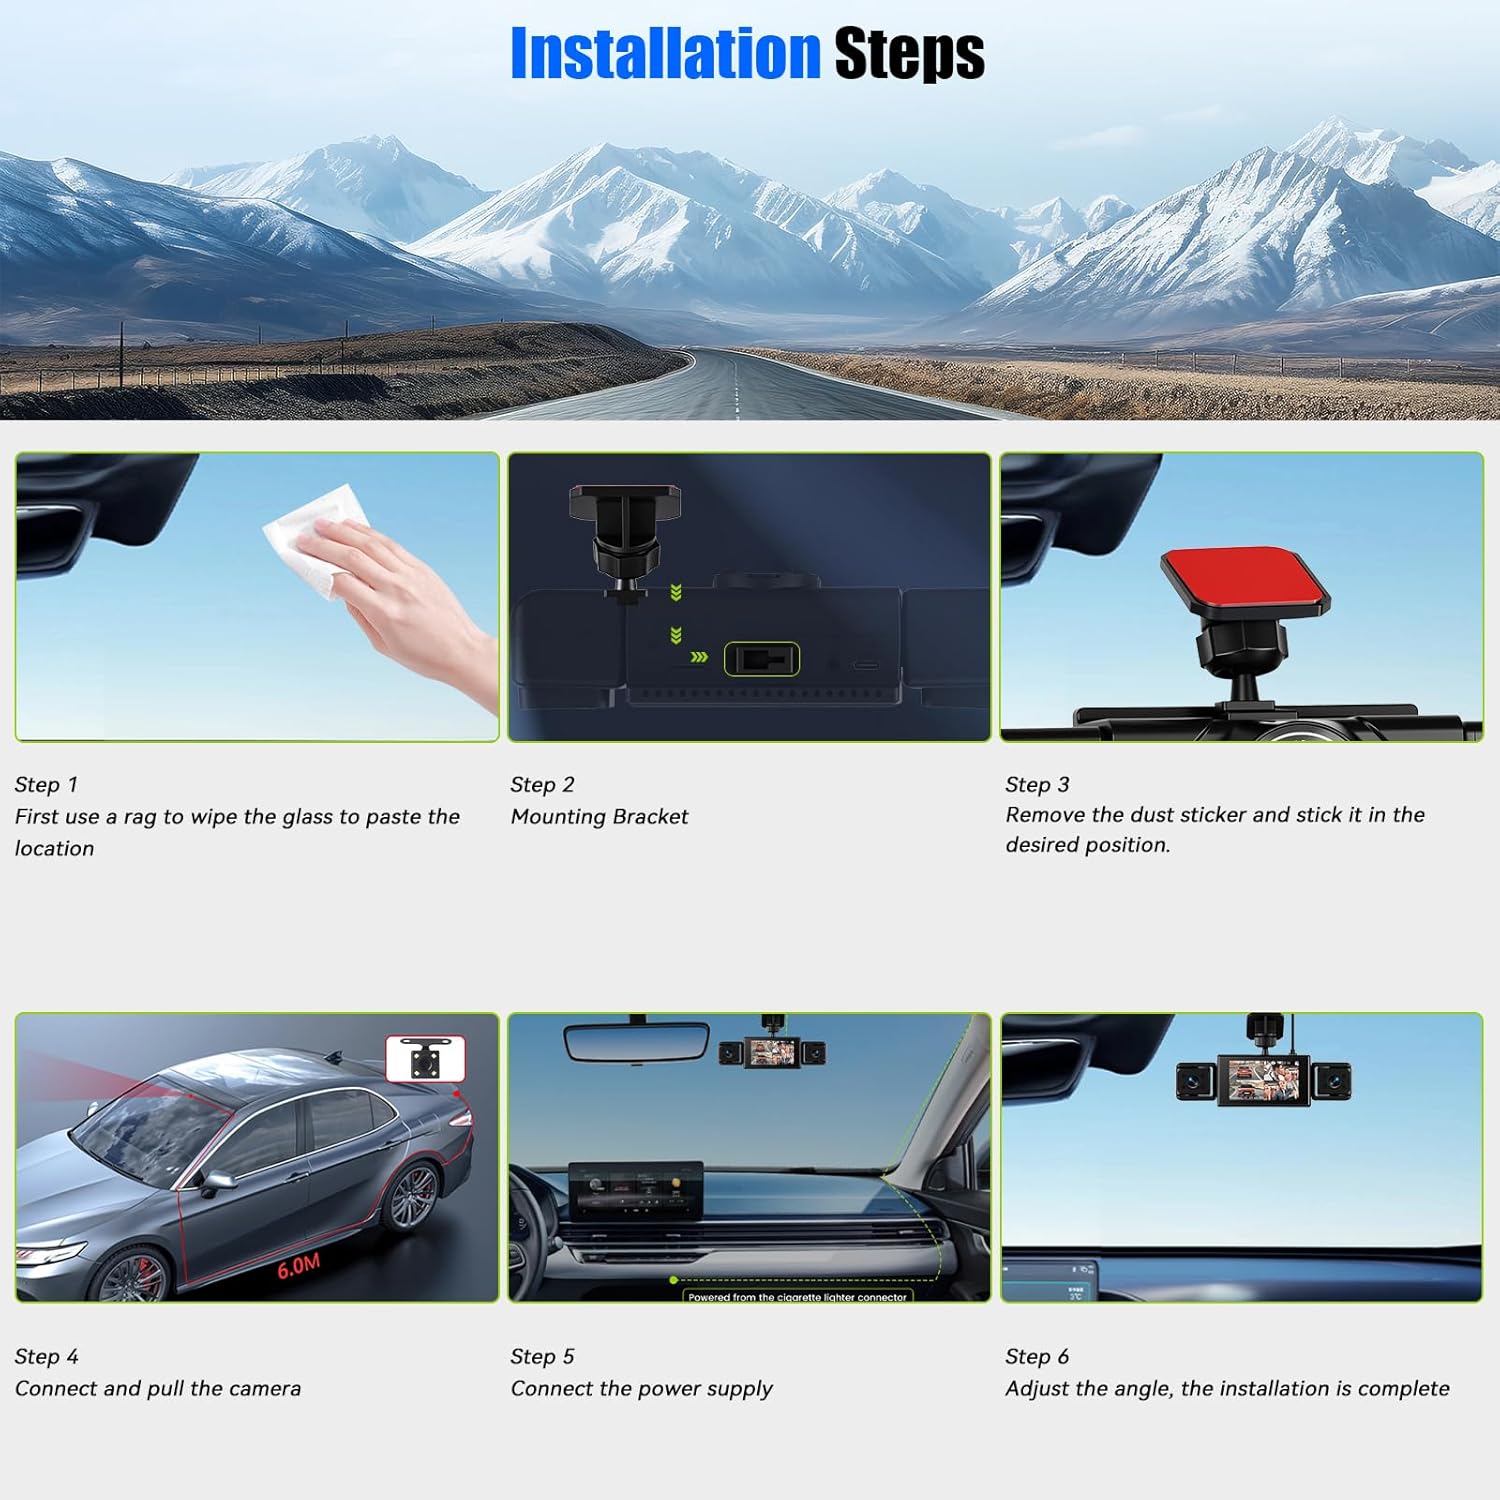
Image: Installation guide showing the dash cam's components and included accessories.
Operating Instructions
Basic Functions
The CAMECHO Dash Cam features a 3-inch IPS display and records in 1080P resolution. It is equipped with four adjustable cameras providing a 360-degree all-round view, with a 150-degree wide-angle front camera and 120-degree side cameras.
Image: Illustration of the 360-degree coverage provided by the dash cam's multiple cameras.
Loop Recording
The dash cam supports continuous loop recording. When the memory card is full, the oldest files are automatically overwritten by new recordings. This ensures uninterrupted recording without manual intervention. Important: Regularly back up any critical video files to a computer or mobile device before the card is formatted or overwritten.

Image: Explanation of the loop recording function, showing how older files are replaced by new ones.
Reversing Aid
When the vehicle is shifted into reverse gear, the dash cam automatically switches to a full-screen reverse view on the 3-inch display. Dynamic guide lines appear on the screen to assist with parking maneuvers.
Night Vision
Equipped with 4 infrared LEDs and an F1.8 lens, the dash cam provides enhanced night vision capabilities. This feature, combined with a WDR (Wide Dynamic Range) algorithm, ensures clear video capture in low-light conditions, improving safety during nighttime driving.
Exposure Compensation
The WDR algorithm also provides exposure compensation, balancing lighting in both bright and dark scenes to prevent overexposure or underexposure, resulting in clearer and more detailed recordings.

Image: Demonstrations of the reversing aid, super night vision, and exposure compensation features.
Motion Detection
When motion detection is enabled, the dash cam will automatically begin recording if it detects movement around your vehicle. Recording stops when no motion is sensed, conserving memory space.
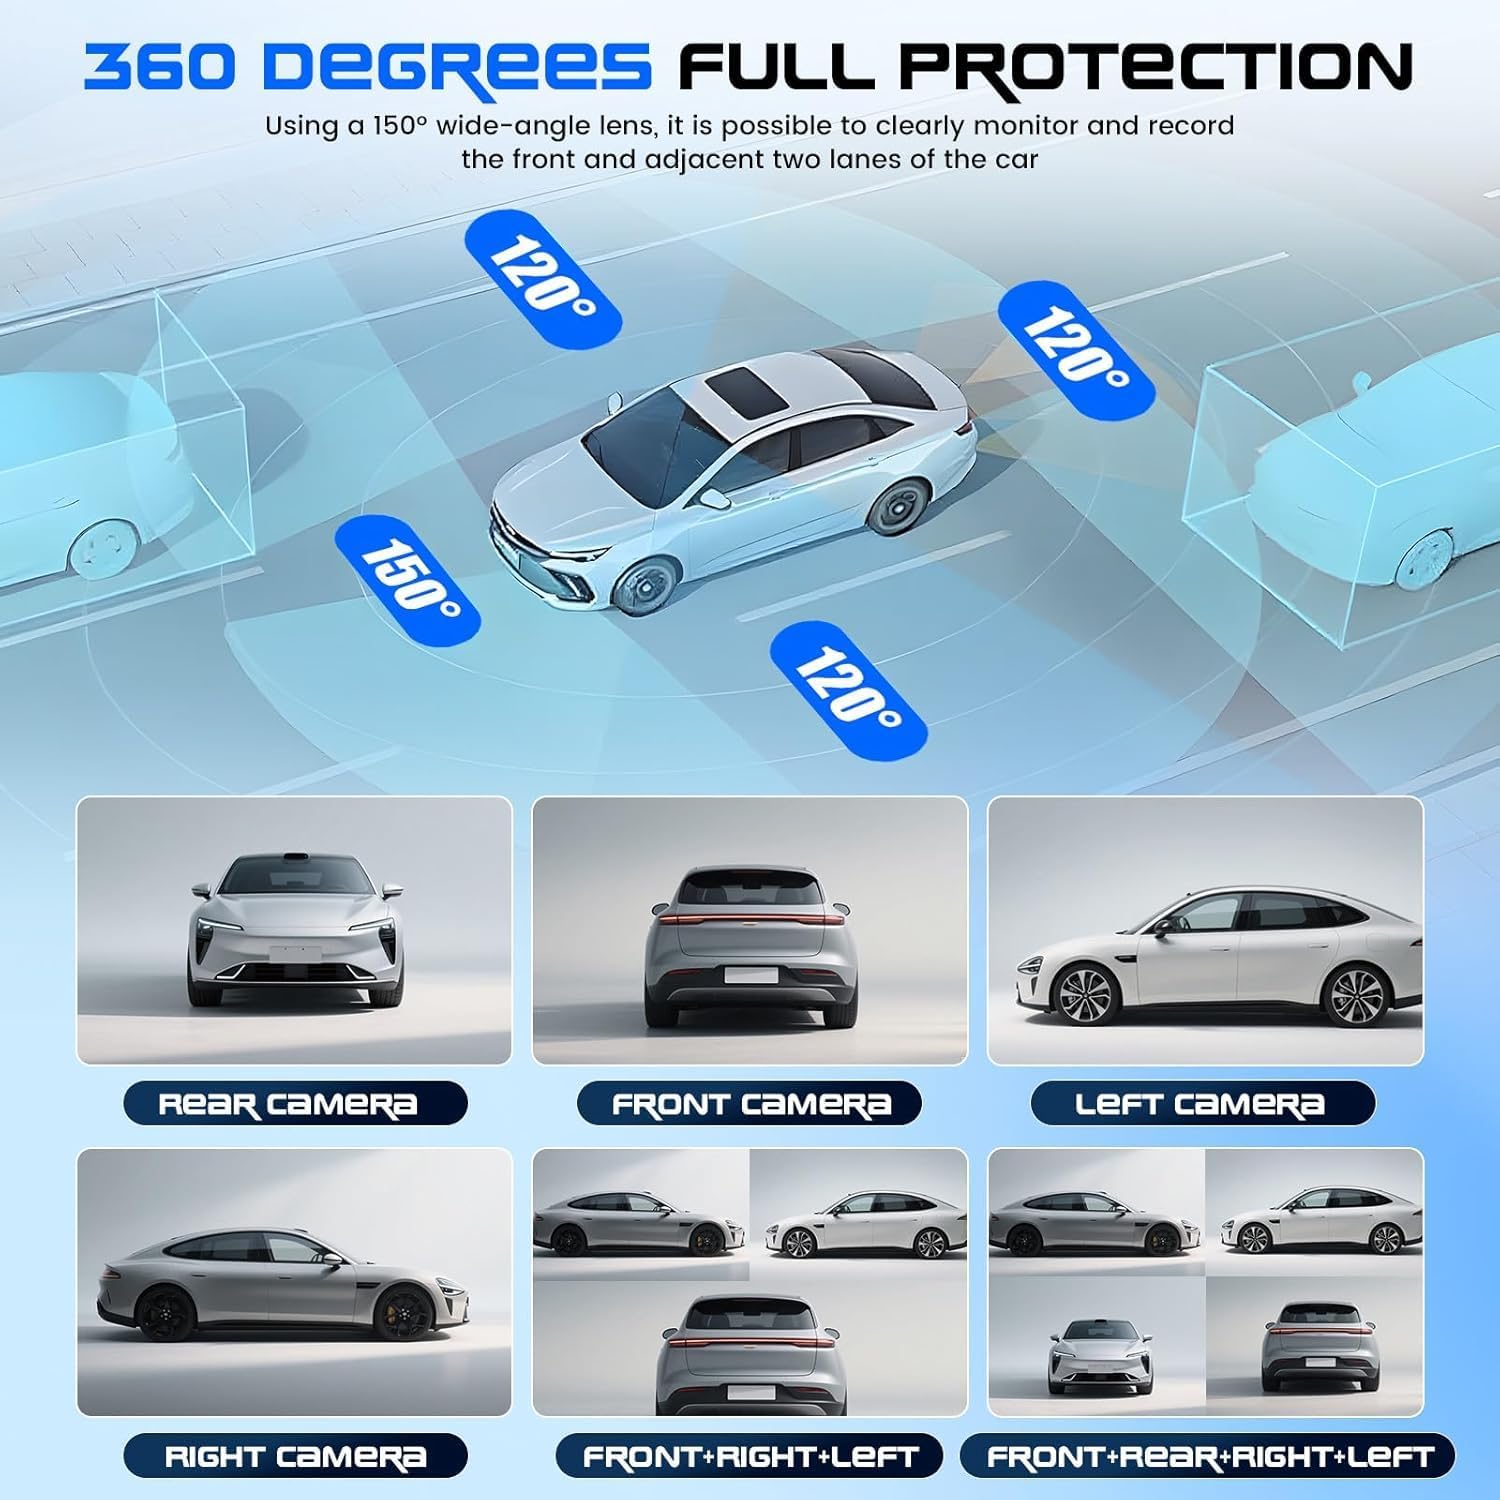
Image: Illustration of the motion detection feature, showing the dash cam activating when movement is detected near the vehicle.
Intelligent Parking Monitoring
In standby mode, the dash cam monitors the vehicle's surroundings. The integrated motion sensor detects image changes, such as a person or another car approaching too closely while parked. The device will wake up within seconds, automatically record the event, and save the clip to the micro SD card. This feature provides 24/7 evidence, even when you are not present, with extremely low power consumption.
Maintenance
Memory Card Management
To ensure optimal performance and prevent recording issues, it is recommended to format the TF (micro SD) card every 2 weeks to 1 month. This helps maintain the card's health and prevents data corruption. Always back up important videos before formatting.
Cleaning
Use a soft, dry cloth to clean the dash cam's display and lenses. Avoid using abrasive cleaners or solvents, as these can damage the device. Keep the camera lenses clear of dust and smudges for clear recordings.
Troubleshooting
Common Issues and Solutions
- Dash cam does not power on:
- Ensure the power cable is securely connected to both the dash cam and the vehicle's cigarette lighter adapter.
- Check if the vehicle's 12V power outlet is functioning.
- Recording stops unexpectedly:
- The memory card may be full. Format the card (after backing up important files).
- Ensure you are using a C10 high-speed TF memory card (Max 64GB). Slower cards may cause recording issues.
- Check for loose power connections.
- Poor video quality:
- Clean the camera lenses.
- Ensure the protective film has been removed from the lenses.
- Verify that the recording resolution is set to 1080P in the settings.
- Reversing aid lines not appearing:
- Ensure the rear view camera is properly connected and functioning.
- Check the dash cam settings to ensure the reversing aid feature is enabled.
Technical Specifications
| Feature | Specification |
|---|---|
| Installation Type | Suitable for all vehicles |
| Screen Size (Display) | 3 inch IPS display |
| Camera Sensor | 1080P |
| Video Format | AVI |
| OSD Language Support | Chinese, English, French, German, Italian, Spanish, Russian, Polish, Dutch, Japanese, Korean, Portuguese, Thai |
| Frames Per Second | 30 |
| Time Supported | Synchronized |
| Photo Format | JPG |
| Video Resolution | 1080P (Front) + 3*480P (Side/Rear) |
| TF Memory Card | Max 64GB, C10 High Speed Card (Included Memory Card Size: 64 GB) |
| Built-in Stereo | Support |
| Viewing Angle | 150 degrees (Front) or 120 degrees (Side) |
| Motion Detection | Yes |
| Product Dimensions | 7.48 x 7.09 x 2.36 inches (18.99cm D x 18.21cm W x 5.99cm H) |
| Item Weight | 14.1 ounces (400 grams) |
| Display Type | LED |
| Batteries Included | No |
Warranty and Support
For technical support or after-sales inquiries, please contact CAMECHO customer service via email:
- After-sales email: CAMECHOVIP@126.com
- Technical Support email: CAMECHOVIP@126.com
Please provide your product model number and a detailed description of the issue when contacting support to ensure a prompt resolution.


