2. Package Contents
The LILYGO T-Embed CC1101 Plus package includes the following items:
- 1 x LILYGO T-Embed CC1101 Plus Development Board
- 1 x User Manual

Figure 2.1: LILYGO T-Embed CC1101 Plus package contents, including the device and user manual.
Please read this manual carefully before using the LILYGO T-Embed CC1101 Plus. This device is an electronic development board and should be handled with care. Improper use may result in damage to the device or personal injury.
The LILYGO T-Embed CC1101 Plus package includes the following items:
Figure 2.1: LILYGO T-Embed CC1101 Plus package contents, including the device and user manual.
The LILYGO T-Embed CC1101 Plus is a versatile development board featuring an ESP32-S3 microcontroller, a 1.9-inch IPS TFT LCD, and various wireless communication modules. Its compact design includes a transparent shell and a magnetic attraction design for easy assembly.

Figure 3.1: Overview of the LILYGO T-Embed CC1101 Plus, highlighting key features like the ESP32-S3 MCU, wireless connectivity, transceivers, display, and power supply.

Figure 3.2: Detailed pinout diagram for the LILYGO T-Embed CC1101 Plus, showing connections for LCD, LORA, SD Card, Microphone, RGB LED, Encoder, PN532, and USB Type-C.
The LILYGO T-Embed CC1101 Plus comes with a transparent shell that uses a magnetic attraction design for easy assembly and disassembly. The device includes a built-in 1300mAh Li-Po battery.
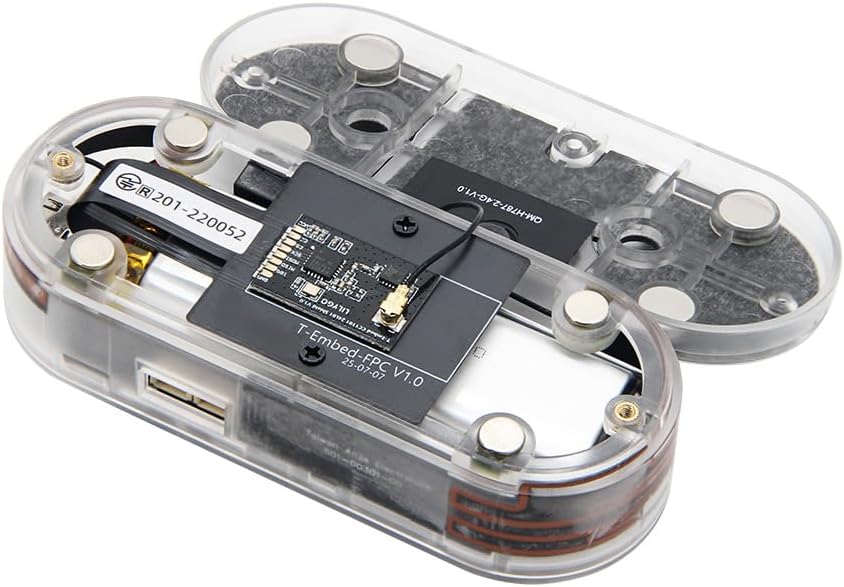
Figure 4.1: The LILYGO T-Embed CC1101 Plus with its transparent shell disassembled, showing the internal components and battery.
To power on the device, locate the power button on the board inside the shell. This may require removing the back cover. Once powered on, the device will boot up and display the user interface.
The device features a round encoder with a button for navigation and interaction with the 1.9-inch IPS TFT LCD. Rotate the encoder to scroll through menus and press the button to select options.
Video 4.1: This video demonstrates the basic operation of the LILYGO T-Embed CC1101 Plus, including navigating the user interface, adjusting RGB LEDs, and using various functions like Sub-1G, NFC, Infrared, Music playback, and Microphone FFT.
Use the rotary encoder to navigate through the menus and select options. The 1.9-inch IPS TFT LCD provides visual feedback for all operations.
The device supports 2.4 GHz Wi-Fi and BLE 5. Access the 'Wireless' menu to configure Wi-Fi networks or manage Bluetooth connections.
The integrated PN532 NFC module allows for near-field communication. Access the 'NFC' menu to interact with NFC tags or devices.
The CC1101 module enables Sub-1 GHz radio frequency communication. This can be used for various applications within its supported frequency bands (300-348 MHz, 387-464 MHz, 779-928 MHz).
The device includes IR TX and RX capabilities, allowing for infrared communication. This can be used for remote control applications or data transfer.
The device supports music playback. Ensure music files are in MP3 format and have English names for proper functionality.
The built-in microphone can be used for Fast Fourier Transform (FFT) analysis, allowing for visualization of audio waveforms.
The LILYGO T-Embed CC1101 Plus is an open-source development board. Firmware can be installed or updated using various development environments. The source code and 3D models are available on the official GitHub repository: github.com/Xinyuan-LilyGO/T-Embed-CC1101.
PlatformIO is a professional development environment for embedded systems. To install and burn firmware using PlatformIO:
Arduino IDE is a popular environment for ESP32 development. To install and burn firmware using Arduino IDE:
Micropython allows you to program the ESP32-S3 using Python. To install and burn Micropython firmware:
ESP-IDF is Espressif's IoT Development Framework. To install and burn firmware using ESP-IDF:
| Component | Detail |
| MCU | ESP32-S3 Dual-core LX7 microprocessor |
| Wireless Connectivity | 2.4 GHz Wi-Fi, BLE 5 |
| Transceivers | CC1101, PN532, nRF24L01 |
| Display | 1.9 inch ST7789V IPS TFT LCD |
| RAM | LPDDR4 |
| Operating System | Linux |
| Item Weight | 4.9 ounces |
| Color | Transparent Shell |
LILYGO provides product service and support. If you have any questions or suggestions about the product, please feel free to contact us. We will answer your question as soon as possible.
For further assistance, please refer to the official LILYGO website or contact customer support.
 |
LILYGO T-Embed User Guide A comprehensive user guide for the LILYGO T-Embed development board, covering setup, Arduino IDE integration, and Wi-Fi command reference. |
 |
LILYGO T-BEAM-S3 User Guide: Setup and Development This user guide provides comprehensive instructions for setting up the LILYGO T-BEAM-S3 development board. Learn how to configure the software environment using Arduino IDE, connect the board, and utilize its Wi-Fi, BLE, GPS, and LoRa capabilities for IoT projects. |
 |
LILYGO T-Display-S3 User Guide A user guide for the LILYGO T-Display-S3 development board, covering setup, Arduino IDE usage, and basic Wi-Fi commands. |
 |
LILYGO T-Dongle-S3 User Guide: Getting Started with ESP32-S3 Development A comprehensive user guide for the LILYGO T-Dongle-S3 development board. Learn how to set up your Arduino development environment, program the ESP32-S3 module, and explore Wi-Fi and Bluetooth features. |
 |
LILYGO T-WATCH S3 User Guide: Setup and Development with Arduino Learn to develop IoT applications with the LILYGO T-WATCH S3. This guide covers setting up the Arduino IDE, programming the ESP32-S3, and using SSC commands, provided by Xinyuan. |
 |
LILYGO T-QT Pro User Guide A comprehensive user guide for the LILYGO T-QT Pro development board, detailing setup, configuration, and usage with Arduino and ESP32-S3 module. |