Introduction
This manual provides detailed instructions for the setup, operation, and maintenance of your EXknight Mini Keyboard M4. This compact wireless Bluetooth keyboard is designed for compatibility with various devices, including smartphones, tablets, and PCs running iOS, Android, and Windows operating systems. Its portable design and responsive keys aim to enhance your typing experience across different environments.
Product Overview
The EXknight Mini Keyboard M4 is a compact and lightweight input device. Below are visual representations of the product and its key features.

Figure 1: The EXknight Mini Keyboard M4, demonstrating its small form factor when held in an average adult hand.
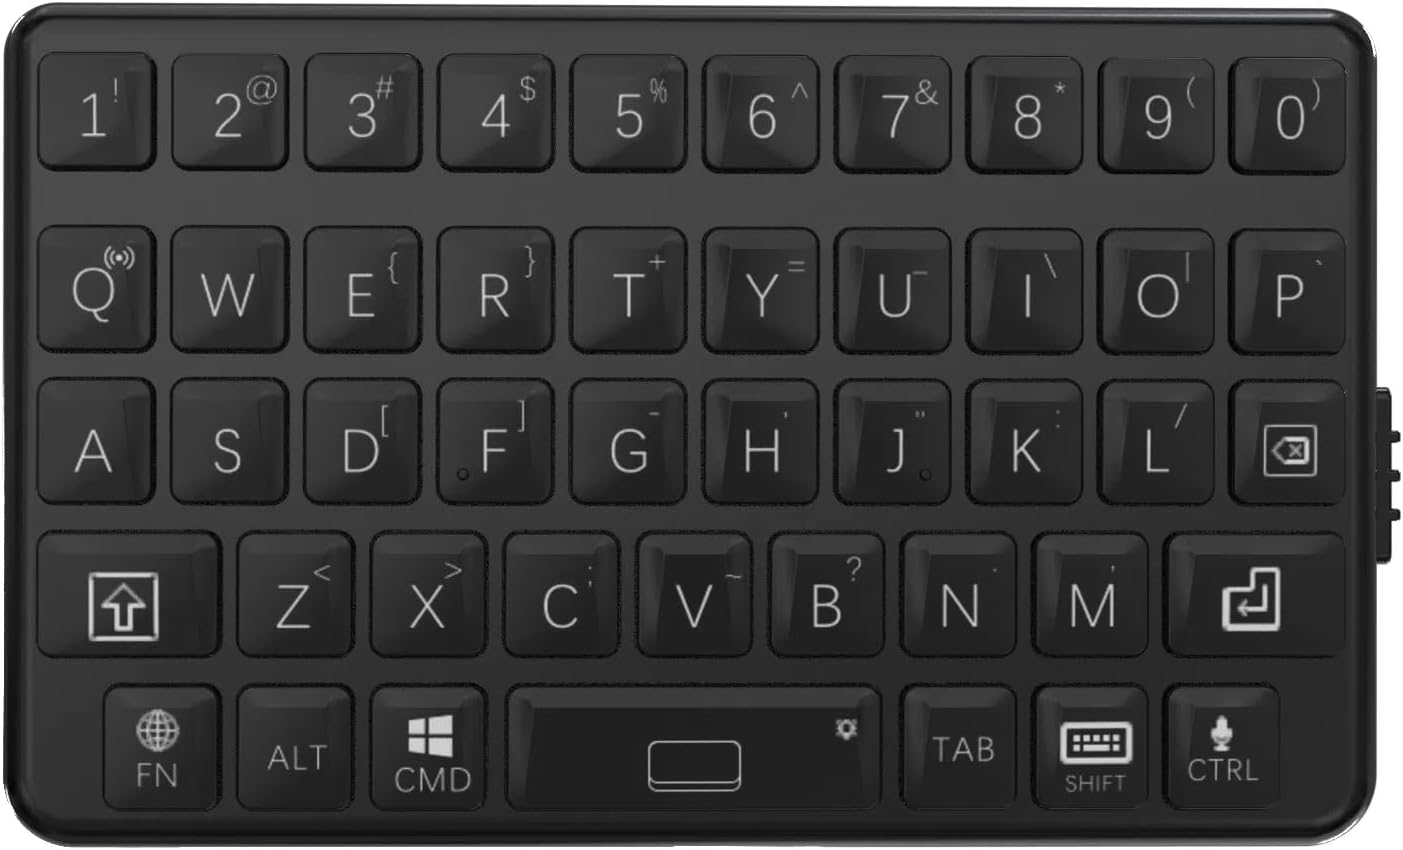
Figure 2: A detailed view of the keyboard's QWERTY layout, including function keys and special characters.

Figure 3: The physical dimensions of the keyboard, measuring 7.5 cm in length and 4.5 cm in width.

Figure 4: Key design principles of the M4 Mini Keyboard: Compact Design, Portable, and Classic Tactile Keys. It emphasizes efficient space utilization, ease of transport, and a comfortable typing experience.

Figure 5: Side view of the EXknight Mini Keyboard M4, illustrating the location of the charging port.
Specifications
| Feature | Detail |
|---|---|
| Brand | EXknight |
| Model Number | M4 |
| Product Dimensions | 7.5 x 4.5 x 1.2 cm |
| Item Weight | 40 g |
| Connectivity Technology | Bluetooth 5.0 |
| Compatible Devices | Smartphones, Tablets, Laptops, PCs (iOS, Android, Windows) |
| Keyboard Layout | QWERTY |
| Keyboard Description | Membrane |
| Special Features | Portable, Lightweight, Ultra-low latency (4ms) |
| Battery Type | 1 Non-standard Battery (included, contained in equipment) |
| Battery Life | Up to 12 hours continuous use on a single charge |
| Material | ABS |
Setup
1. Charging the Keyboard
Before initial use, fully charge the EXknight Mini Keyboard M4. Connect the provided charging cable to the keyboard's charging port (refer to Figure 5 for port location) and to a standard USB power source. The charging indicator light will illuminate during charging and typically turn off or change color when fully charged. A full charge takes approximately 2 hours and provides up to 12 hours of continuous use.
2. Bluetooth Pairing
- Ensure the keyboard is sufficiently charged.
- Turn on the keyboard using the power switch (location typically on the side or back). A status indicator light may flash, indicating it's in pairing mode.
- On your device (smartphone, tablet, PC), navigate to the Bluetooth settings.
- Enable Bluetooth and search for available devices.
- Select "EXknight M4" or a similar name from the list of found devices.
- If prompted, enter the pairing code displayed on your device into the EXknight Mini Keyboard M4 and press Enter.
- Once paired, the keyboard's indicator light will typically stop flashing and remain solid, or turn off, indicating a successful connection.
The keyboard features automatic device recognition for iOS, Android, and Windows, eliminating the need for drivers.
Operating Instructions
Basic Typing
The EXknight Mini Keyboard M4 features a QWERTY layout with a tactile key feel for comfortable and accurate typing. Press keys firmly for optimal response.
Function Keys and Special Characters
- Fn Key: The Fn key is used in combination with other keys to access secondary functions or special characters. For example, to input symbols not directly printed on the main keycap, press and hold Fn and then press the corresponding key.
- OS Switching: The keyboard automatically recognizes the operating system (iOS/Android/Windows). However, if manual switching is needed, specific key combinations might be available (refer to the keyboard's keycap markings for OS-specific function keys, e.g., Fn + Q for iOS, Fn + W for Android, Fn + E for Windows).
- Backlight Control: Some models may feature a backlight. To activate or adjust the backlight, press and hold the Space key. Note that backlight functionality may vary by product batch, with some units having full backlight and others only partial (e.g., top two rows).
- Capital Letters: To type capital letters, use the Shift key as you would on a standard keyboard.
- Language Switching: To switch between input languages (e.g., English and Japanese), press the Shift key twice in quick succession.
Note: Due to the compact design, some keys may have multiple functions. Refer to the keycap legends for all available functions. For Windows users, some CTRL key combinations might behave differently compared to a full-sized keyboard.
Maintenance
- Cleaning: Use a soft, dry cloth to clean the keyboard surface. For stubborn dirt, a slightly damp cloth with mild soap can be used, ensuring no liquid enters the keyboard. Do not use harsh chemicals or abrasive cleaners.
- Storage: Store the keyboard in a cool, dry place away from direct sunlight and extreme temperatures.
- Battery Care: To prolong battery life, avoid fully discharging the keyboard frequently. Charge it regularly, even if not in constant use.
Troubleshooting
- Keyboard does not turn on:
- Ensure the keyboard is fully charged. Connect it to a power source and allow it to charge for at least 30 minutes before attempting to turn it on again.
- Unable to pair via Bluetooth:
- Make sure Bluetooth is enabled on your device and the keyboard is in pairing mode.
- Ensure the keyboard is within the effective Bluetooth range (typically 10 meters).
- Forget the device from your device's Bluetooth settings and attempt to pair again.
- Restart both the keyboard and your device.
- Keys are not responding or typing incorrectly:
- Check the battery level. Low battery can affect performance.
- Ensure the keyboard is correctly paired and connected to your device.
- Verify that the correct operating system mode is selected on the keyboard (if applicable).
- Clean any debris from around the keys.
- Backlight not working or only partially lit:
- Press and hold the Space key to activate or cycle through backlight modes.
- Ensure the keyboard has sufficient battery charge, as backlighting consumes power.
- Note that backlight functionality may vary by product batch; some units may have full backlight, while others may only illuminate specific sections (e.g., top two rows).
Warranty and Support
For warranty information and technical support, please refer to the documentation included with your purchase or visit the official EXknight website. Contact information for customer service is typically available on the product packaging or the brand's online presence.
For further assistance, you may also contact the seller directly through the platform where the product was purchased.