
YESWELDER CUT-65DS PLUS
YESWELDER CUT-65DS PLUS Plasma Cutter Instruction Manual
Model: CUT-65DS PLUS | Brand: YESWELDER
1. Introduction
This manual provides essential information for the safe and effective operation, setup, and maintenance of your YESWELDER CUT-65DS PLUS Plasma Cutter. Please read this manual thoroughly before operating the machine to ensure proper usage and to prevent injury or damage.

Figure 1.1: YESWELDER CUT-65DS PLUS Plasma Cutter and included accessories.
Key Features:
- 4-In-1 Multifunctionality: Capable of Plate Cutting, Grid Cutting, Gouging, and Marking.
- Non-High Frequency Start: Utilizes a "blow-back" start system for smooth, interference-free ignition, ensuring safety and compatibility with other electrical equipment.
- Powerful Cutting Capacity: 65A maximum current. Ideal Clean Cut: 5/16" (8mm) at 110V, 9/16" (14mm) at 220V. Maximum Cut: 5/8" (16mm) at 110V, 1" (25mm) at 220V.
- Non-Touch Pilot Arc: The IPT40 torch allows cutting without direct contact, improving cut quality and extending consumable life.
- Digital Display: Real-time display of air pressure, voltage, and current, with an error code system for diagnostics.
- Safety Features: IP21 water rating, overload protection, and overheating protection.
2. Safety Information
Operating plasma cutting equipment requires strict adherence to safety protocols to prevent injury and equipment damage. Always wear appropriate personal protective equipment (PPE) including welding helmets with proper shade, gloves, protective clothing, and safety footwear.
General Safety Precautions:
- Ensure the work area is well-ventilated to disperse fumes.
- Keep flammable materials away from the cutting area.
- Always disconnect power before performing maintenance or changing consumables.
- Do not operate the machine in damp or wet conditions.
- Ensure proper grounding of the equipment.
Integrated Safety Features:
- IP21 Water Rating: Provides protection against vertically falling water drops.
- Overload Protection: Automatic shutdown system to prevent damage from excessive current.
- Overheating Protection: Automatic shutdown if internal temperatures exceed safe limits.
- Electrostatic Protection: Unique coating designed to prevent shock transfer.

Figure 2.1: Overview of the plasma cutter's integrated safety features.
3. Product Overview and Components
Machine Overview:
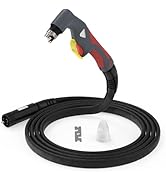
Figure 3.1: Main components of the plasma cutter.
- Central Connector: For connecting the plasma torch.
- Ground Clamp Connector: For connecting the ground clamp.
- Air Compressor Filter: Filters incoming air supply.
- Power Cable: Connects the unit to the power supply.
- Power Switch: Turns the unit on/off.
- Cooling Fan: Provides necessary cooling during operation.
- Air Pressure Adjustment Button: Rotates to augment pressure, swivels to diminish pressure.
Control Panel Introduction:
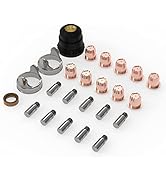
Figure 3.2: Front panel controls and digital display.
- Cut Mode Button: Selects between different cutting modes (Plate, Grid, Gouging, Marking).
- Steps Mode Button: Toggles between 2T (Two-Touch) and 4T (Four-Touch) operation.
- Unit Button: Changes units for displayed parameters (e.g., PSI/BAR).
- Post Flow Button: Adjusts the post-flow time for air.
- Center Knob: Adjusts current and other parameters.
- Digital Panel: Displays real-time air pressure, voltage, and current.
Included Accessories:
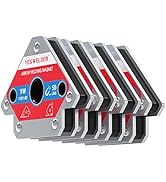
Figure 3.3: Standard accessories included with the CUT-65DS PLUS.
- Plasma Cutter Unit
- Ground Clamp
- Air Compressor Filter
- 220V to 110V Adapter
- Air Hose
- IPT40 Plasma Cutting Torch
- PC10-02 Air Connector
- Cutting Torch Consumables
4. Setup Instructions
4.1 Power Connection:
- Ensure the power switch is in the OFF position.
- Connect the power cable to a suitable 110V or 220V power outlet. Use the provided adapter for 110V if necessary.
- Verify that the power source meets the machine's requirements (e.g., 30A for 240V, 15A for 120V).
4.2 Air Supply Connection:
- Connect the air hose to the PC10-02 Air Connector on the plasma cutter.
- Connect the other end of the air hose to your external air compressor.
- The unit features a built-in air pressure regulator. Adjust the air pressure using the Air Pressure Adjustment Button to the recommended PSI for your cutting task.

Figure 4.1: Connecting the air supply to the built-in regulator.
4.3 Torch and Ground Clamp Connection:
- Connect the IPT40 Plasma Cutting Torch to the Central Connector on the front panel.
- Attach the ground clamp cable to the Ground Clamp Connector.
- Securely attach the ground clamp to the workpiece, ensuring good electrical contact.
5. Operating Instructions
5.1 Powering On and Initial Settings:
- After all connections are secure, turn on the Power Switch.
- The Digital Panel will illuminate, displaying current parameters.
- Use the Unit Button to select desired units (PSI or BAR for air pressure).
- Adjust the air pressure using the Air Pressure Adjustment Button to the recommended level for your material thickness.

Figure 5.1: The intelligent digital screen display provides real-time operational data.
5.2 Selecting Cutting Mode:
- Press the Cut Mode Button to cycle through the available modes: Plate Cutting, Grid Cutting, Gouging, and Marking.
- Select the mode appropriate for your task.

Figure 5.2: The 4-in-1 multifunctionality of the plasma cutter.
5.3 Adjusting Cutting Parameters:
- Use the Center Knob to adjust the cutting current (Amps) according to the material type and thickness. Refer to the specifications for recommended settings.
- The Post Flow Button allows adjustment of the air post-flow time, which helps cool the torch and extend consumable life.
5.4 2T/4T Function:
- Press the Steps Mode Button to switch between 2T (Two-Touch) and 4T (Four-Touch) modes.
- 2T Mode: Press and hold the torch trigger to start the arc; release to stop. Suitable for short, accurate cuts.
- 4T Mode: Press and release the trigger to start the arc; press and release again to stop. Ideal for long, continuous cuts to reduce operator fatigue.

Figure 5.3: Explanation of 2T and 4T operating modes.
5.5 Cutting Operation:
- Position the non-touch pilot arc torch approximately 1/8" to 1/4" above the workpiece.
- Initiate the arc by pressing the torch trigger (2T mode) or pressing and releasing (4T mode).
- Maintain a consistent travel speed and torch height for optimal cut quality.
- The non-touch pilot arc allows efficient cutting through rough, painted, or rusty surfaces.

Figure 5.4: Illustrates the cutting capacity at different voltages.
6. Maintenance
Regular maintenance ensures the longevity and optimal performance of your plasma cutter.
6.1 Consumables:
- Periodically inspect the torch consumables (electrode, nozzle, shield cup) for wear.
- Replace worn consumables promptly to maintain cut quality and prevent damage to the torch.
- The non-touch pilot arc technology helps extend consumable life.

Figure 6.1: The IPT40 torch offers enhanced performance and consumable longevity.
6.2 Air Filter:
- Check the air compressor filter regularly for accumulated moisture and debris.
- Drain any collected moisture and clean or replace the filter element as needed to ensure a clean air supply.
6.3 General Cleaning:
- Keep the machine clean and free from dust and metal particles.
- Ensure cooling vents are unobstructed to allow proper airflow for the cooling fan.
7. Troubleshooting
The digital display includes an error code system to assist in diagnosing issues. If a problem occurs, an error code will appear on the screen.
Common Issues and Solutions:
- No Arc / Weak Arc:
- Check ground clamp connection to workpiece.
- Inspect torch consumables for wear and replace if necessary.
- Verify air pressure is set correctly.
- Ensure power supply voltage is adequate.
- Machine Shuts Down (Overload/Overheat):
- Allow the machine to cool down. The cooling fan will continue to operate.
- Reduce cutting current or duty cycle.
- Ensure cooling vents are not blocked.
- Poor Cut Quality:
- Check and replace worn consumables.
- Adjust cutting speed and torch height.
- Verify air pressure and current settings are appropriate for the material.
- Error Code Displayed:
- Consult the specific error code in the full product manual (if available) or contact customer support for detailed diagnostics.
8. Specifications

Figure 8.1: Technical specifications of the CUT-65DS PLUS.
| Parameter | Value |
|---|---|
| Model | CUT-65DS PLUS |
| Input Voltage (U1) | 110V / 220V |
| Max Input Current (I1max) | 46A (110V) / 32A (220V) |
| Effective Input Current (I1eff) | 35.6A (110V) / 25A (220V) |
| Output Current (I2) | 65A (Max) |
| Duty Cycle (X) | 60% at 65A (110V/220V) |
| Open Circuit Voltage (U0) | 340V |
| Insulation Grade | F |
| Protection Class | IP21S |
| Cooling Mode | Fan Cooling |
| Item Weight | 21.9 pounds |
| Package Dimensions | 18.8 x 14 x 10.8 inches |
9. Warranty and Support
YESWELDER is committed to providing reliable products and customer satisfaction.
- 1-Year Warranty: The product is covered by a 1-year warranty from the date of purchase. Please retain your proof of purchase for warranty claims.
- Customer Support: For technical assistance, troubleshooting, or warranty inquiries, please contact YESWELDER customer support. Support is available 24/7.
Figure 9.1: YESWELDER warranty and customer support details.
For more information, visit the official YESWELDER website or contact their customer service department.
Related Documents - CUT-65DS PLUS
 |
YESWELDER CUT-65DS PLUS Air Plasma Cutter Operator's Manual Comprehensive operator's manual for the YESWELDER CUT-65DS PLUS Air Plasma Cutter, featuring IPT40 Torch and heavy-duty cutting capabilities up to 1 inch. Covers specifications, installation, operation, safety, maintenance, and troubleshooting. |
 |
YesWelder CUT-65DS Air Plasma Cutter Operator's Manual Operator's manual for the YesWelder CUT-65DS Air Plasma Cutter, covering safety precautions, installation, operation, maintenance, and troubleshooting. |
 |
YESWELDER CUT-55DS Plasma Cutter Air Pressure and Amperage Settings Guide This guide provides essential air pressure and amperage settings for the YESWELDER CUT-55DS plasma cutter, covering both 110V and 220V input voltages. It includes details on metal thickness, nozzle size, amperage, PSI, and cutting speed, along with important operational notes and installation instructions for accessories. |
 |
YesWelder CUT-55DS Pro Plasma Cutter User Manual Comprehensive user manual for the YesWelder CUT-55DS Pro Non-HF Non-Touch Pilot Arc Plasma Cutter. Covers safety, specifications, operation, troubleshooting, and maintenance for efficient metal cutting. |
 |
YesWelder CUT-45DS Air Plasma Cutter Operator's Manual This manual provides comprehensive safety precautions, operating instructions, and maintenance guidelines for the YesWelder CUT-45DS Air Plasma Cutter. Learn about the machine's features, parameters, controls, and troubleshooting. |
 |
YesWelder CUT-55DS NHF PLUS Air Plasma Cutter Operator's Manual Operator's manual for the YesWelder CUT-55DS NHF PLUS Air Plasma Cutter, covering safety, specifications, installation, operation, maintenance, and troubleshooting. |
Ask a question about this manual
Ask about setup, troubleshooting, compatibility, parts, safety, or missing instructions. Manuals+ will review the question and use this page’s manual context to help answer it.