
Introduction
Thank you for choosing the 5Rcom Single Monitor Arm. This manual provides detailed instructions for the safe and efficient installation, operation, and maintenance of your monitor arm. Please read this manual thoroughly before installation and keep it for future reference.

Image: The 5Rcom Single Monitor Arm installed on a desk, holding a monitor above a laptop, demonstrating how it frees up desk space.
Product Features
- Broad Compatibility: Designed to fit most 13 to 35 inch flat and curved computer screens.
- Heavy Duty Support: Constructed with premium alloy steel, securely holds screens weighing up to 22 lbs (10 kg).
- Ergonomic Viewing: Offers precise height adjustment up to 17.7 inches (450mm) and reach up to 21.2 inches (539mm). Monitor head tilts from -45° to +90°, swivels +90° to -90°, and the VESA plate rotates a full 360° (+180° to -180°).
- Integrated Cable Management: Built-in design efficiently routes and hides cables for a clutter-free workspace.
- Fast Installation: Engineered for quick setup with all necessary hardware and clear instructions.

Image: A diagram illustrating the key specifications of the monitor arm, including maximum load capacity (22 lbs/10 kg), compatible screen sizes (17-35 inches), and VESA mounting patterns (75x75mm to 100x100mm).
Package Contents
Please verify that all components are present before beginning installation. If any parts are missing or damaged, please contact customer support.
- Monitor Arm Assembly
- Desk Clamp Base
- Grommet Mount Base
- VESA Plate
- Mounting Hardware (screws, washers, spacers)
- Hex Keys / Adjustment Tools
- Cable Management Clips
Safety Information
- Do not exceed the maximum weight capacity of 22 lbs (10 kg).
- Ensure your desk surface is stable and strong enough to support the combined weight of the monitor arm and your monitor.
- Always use the provided hardware. Do not substitute with other parts unless explicitly instructed.
- Perform a safety check after installation to ensure all connections are secure.
- Keep children and pets away during installation.
- Adjust the gas spring tension carefully to match your monitor's weight to prevent sudden movements.
Setup and Installation
The 5Rcom Single Monitor Arm supports two installation methods: C-Clamp and Grommet Mount. Choose the method suitable for your desk.
1. Choose Your Mounting Method

Image: A visual comparison of the C-Clamp and Grommet Mount installation methods, detailing the compatible desk thickness (0.39"-2.76") for both, and hole diameter for grommet mount (0.39"-1.77").
- C-Clamp Installation: Ideal for desks with an edge. Compatible with desk thickness from 0.39" to 2.76" (10mm to 70mm).
- Grommet Mount Installation: Requires a pre-drilled hole in your desk. Compatible with desk thickness from 0.39" to 2.76" (10mm to 70mm) and hole diameter from 0.39" to 1.77" (10mm to 45mm).
2. Attach the Desk Mount
Follow the instructions specific to your chosen method to securely attach the base to your desk.

Image: The monitor arm base securely attached to a wooden desk using the C-clamp method, with a monitor mounted.
3. Attach the VESA Plate to Your Monitor
Align the VESA plate with the mounting holes on the back of your monitor (75x75mm or 100x100mm patterns). Use the appropriate screws and spacers provided.
4. Mount the Monitor to the Arm
Carefully slide the VESA plate with the attached monitor onto the monitor arm's head. Ensure it clicks into place or is secured with the locking mechanism.
5. Adjust Gas Spring Tension
Use the provided hex key to adjust the gas spring tension. Turn clockwise to increase tension for heavier monitors, and counter-clockwise to decrease tension for lighter monitors. Adjust until the monitor stays at any desired height without drifting up or down. This step is crucial for proper function and safety.
Video: Official product video demonstrating the installation process and various adjustments of the 5Rcom Single Monitor Arm for 13 to 35 Inch Screens.
Operating Instructions
Once installed, your 5Rcom monitor arm offers extensive adjustability for an ergonomic workspace.
Height Adjustment
Gently push or pull the monitor up or down to your desired eye level. The gas spring mechanism will hold it in place once the tension is correctly set.
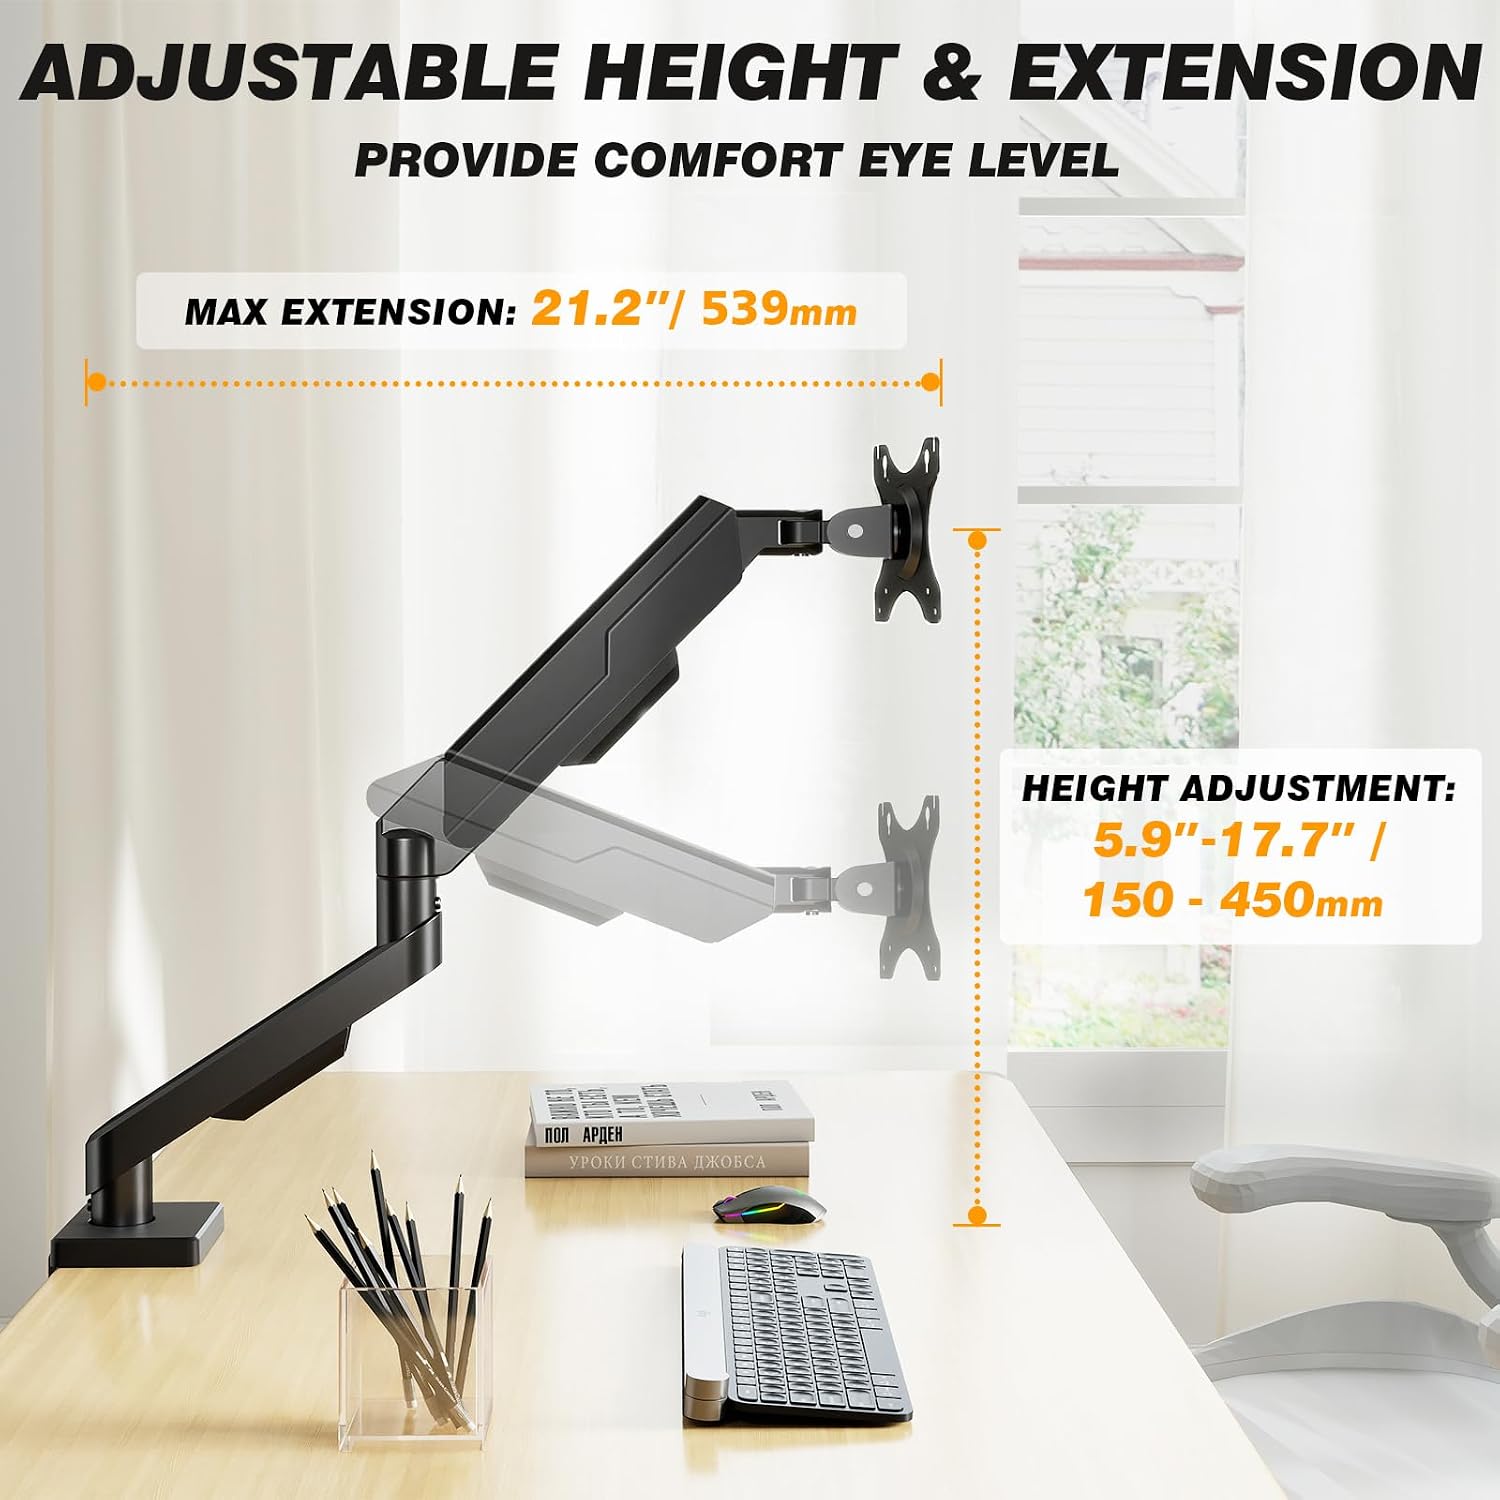
Image: A diagram illustrating the height adjustment range (5.9"-17.7") and maximum extension (21.2") of the monitor arm.
Tilt, Swivel, and Rotation
The monitor arm allows for flexible positioning:
- Tilt: Adjust the monitor screen from -45° to +90° to reduce glare and optimize viewing angles.
- Swivel: Rotate the monitor arm +90° to -90° horizontally to share your screen or change viewing direction.
- Rotation: Rotate the VESA plate a full 360° (+180° to -180°) to switch between landscape and portrait modes.

Image: A diagram detailing the full motion adjustment capabilities of the monitor arm, including 360-degree rotation, +/-90-degree swivel, and maximum arm height and extension.
Cable Management
Route your monitor cables through the integrated cable management channels on the arm to maintain a tidy workspace.
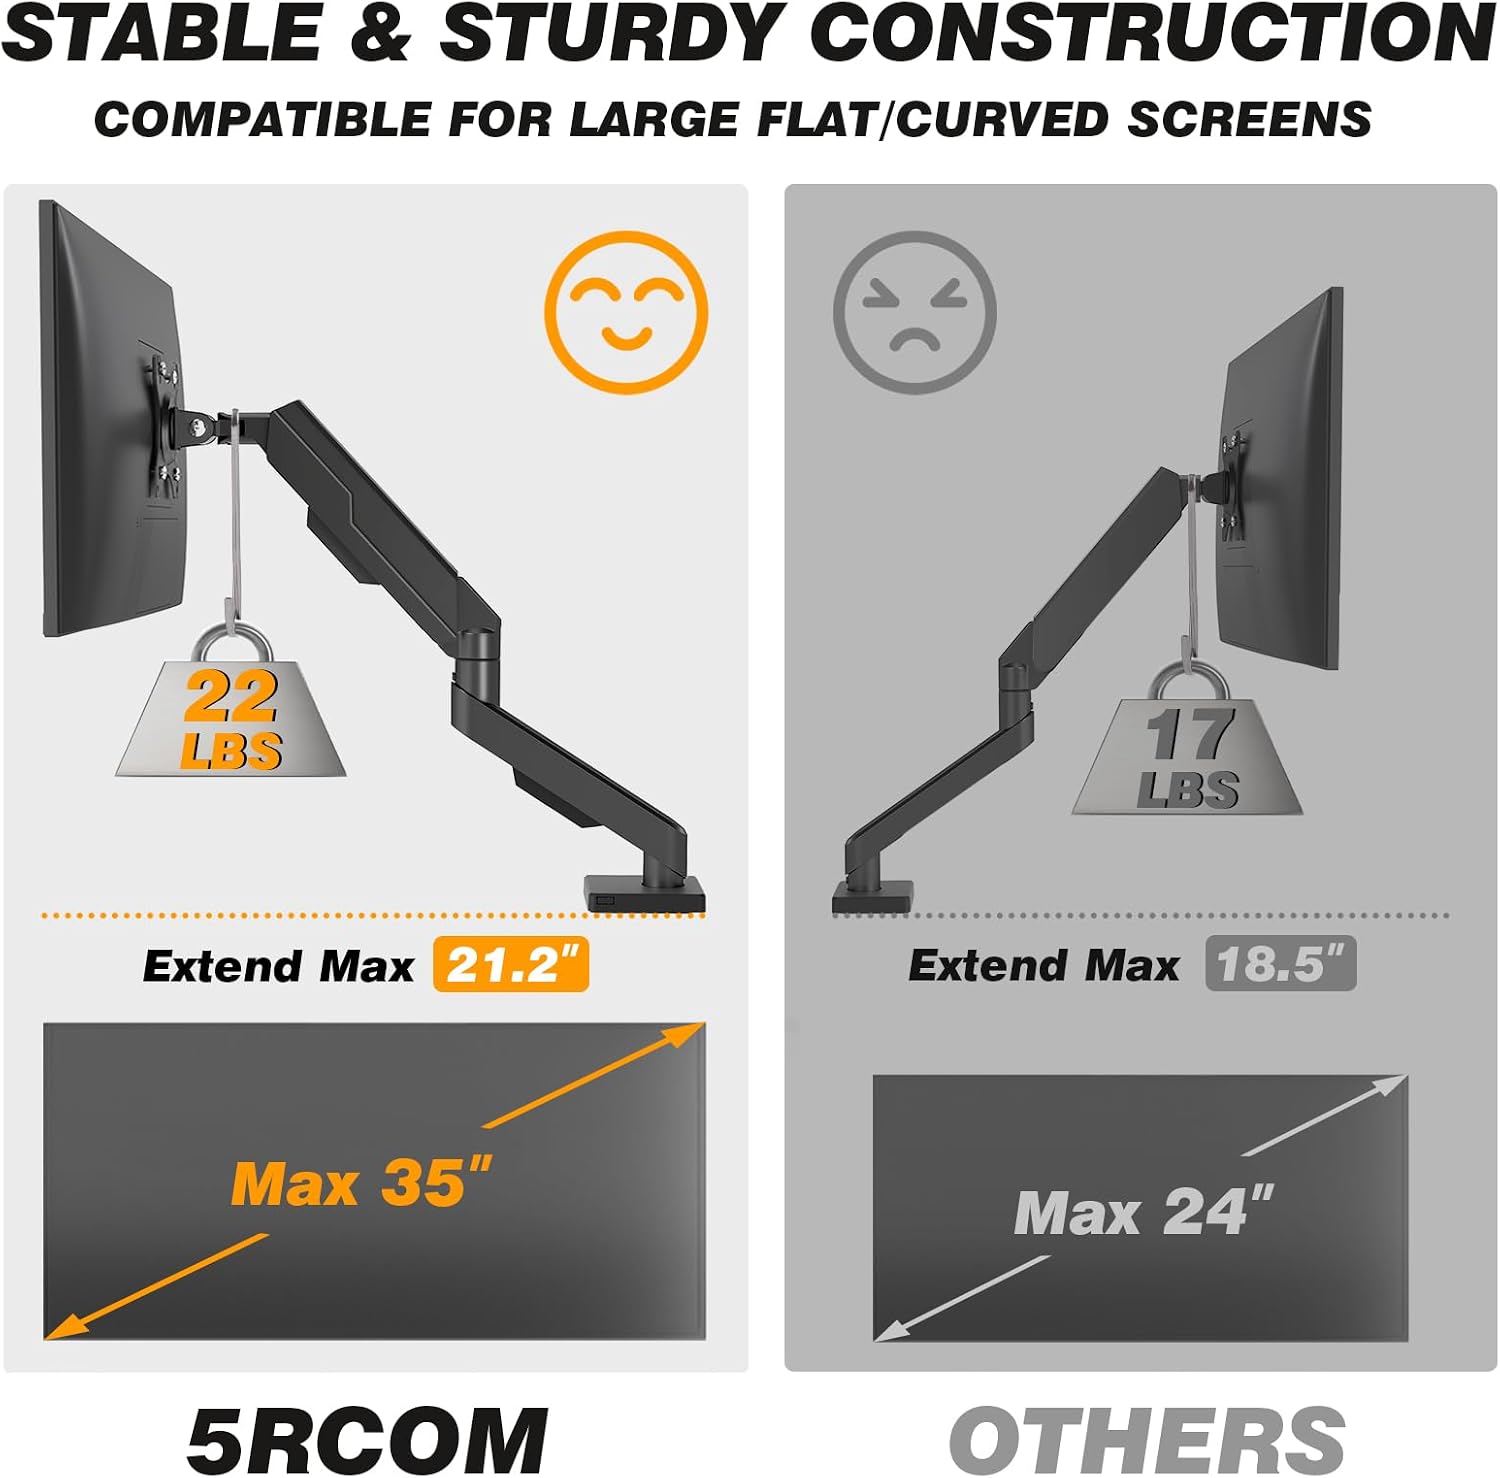
Image: A close-up view of the monitor arm's integrated cable management system, showing cables neatly routed through the arm.
Maintenance
- Regularly check all screws and connections to ensure they remain tight and secure.
- Clean the monitor arm with a soft, damp cloth. Avoid abrasive cleaners or solvents.
- Periodically re-adjust the gas spring tension if you change monitors or notice the arm drifting.
Troubleshooting
| Problem | Possible Cause | Solution |
|---|---|---|
| Monitor arm drifts up or down, or is difficult to adjust height. | Gas spring tension is not correctly set for the monitor's weight. | Adjust the gas spring tension using the provided hex key. Turn clockwise to increase tension for heavier monitors, counter-clockwise for lighter monitors. Ensure the monitor is mounted before adjusting. |
| Monitor is wobbly or unstable. | Mounting base is not securely tightened to the desk, or VESA plate is not secure. | Check and tighten all screws on the desk clamp/grommet mount and the VESA plate connection to the monitor arm. Ensure the desk is stable. |
| Monitor cannot rotate or tilt smoothly. | Joints may be too tight or obstructed. | Check for any obstructions. Some joints may have adjustment screws that can be slightly loosened if movement is too stiff. |
Specifications
- Model: DHZ
- Material: Alloy Steel
- Color: Black
- Compatible Screen Size: 13 - 35 inches
- Load Capacity: 4.4 - 22 lbs (2 - 10 kg)
- VESA Compatibility: 75x75mm, 100x100mm
- Height Adjustment: Up to 17.7 inches (450mm)
- Arm Extension: Up to 21.2 inches (539mm)
- Tilt Range: -45° to +90°
- Swivel Range: -90° to +90°
- Rotation: 360°
- Desk Thickness (C-Clamp/Grommet): 0.39" - 2.76" (10mm - 70mm)
- Grommet Hole Diameter: 0.39" - 1.77" (10mm - 45mm)
Warranty and Support
This 5Rcom Single Monitor Arm comes with a 1-Year Warranty from the date of purchase. This warranty covers manufacturing defects and material flaws under normal use.
For technical support, warranty claims, or if you have any questions regarding your product, please contact 5Rcom customer service through the retailer where you purchased the product or visit the official 5Rcom website for contact information.