1. Introduction
This manual provides detailed instructions for the setup, operation, and maintenance of your VSDISPLAY 8 Inch 1280x800 IPS LCD Monitor. This portable display is designed for monitoring computer system data such as CPU, GPU, and RAM temperature, and features a built-in theme editor for customization. Please read this manual thoroughly before use to ensure proper functionality and longevity of the product.
2. Package Contents
Please verify that all items listed below are included in your package:
- 1x VSDISPLAY 8 inch 1280x800 VS080SJ01-B LCD Monitor (Black Case)
- 1x 9 Pin Signal Cable
- 1x USB Cable
- 1x User Manual (includes software information)
- Mounting brackets and screws

Figure 2.1: Package Contents. This image displays the VSDISPLAY 8-inch monitor along with its accessories: a USB cable, a 9-pin signal cable, mounting screws, and mounting brackets.
3. Product Features
- Display: 8-inch IPS LCD with 1280x800 resolution.
- Monitoring: Designed for displaying CPU, GPU, and RAM temperature data from your computer.
- Customization: Built-in theme editor allows for DIY image wallpapers and videos.
- Connectivity: Connects via USB-C or a 9-pin cable.
- Orientation: Supports both horizontal and vertical display modes.
- Design: Durable metal case.
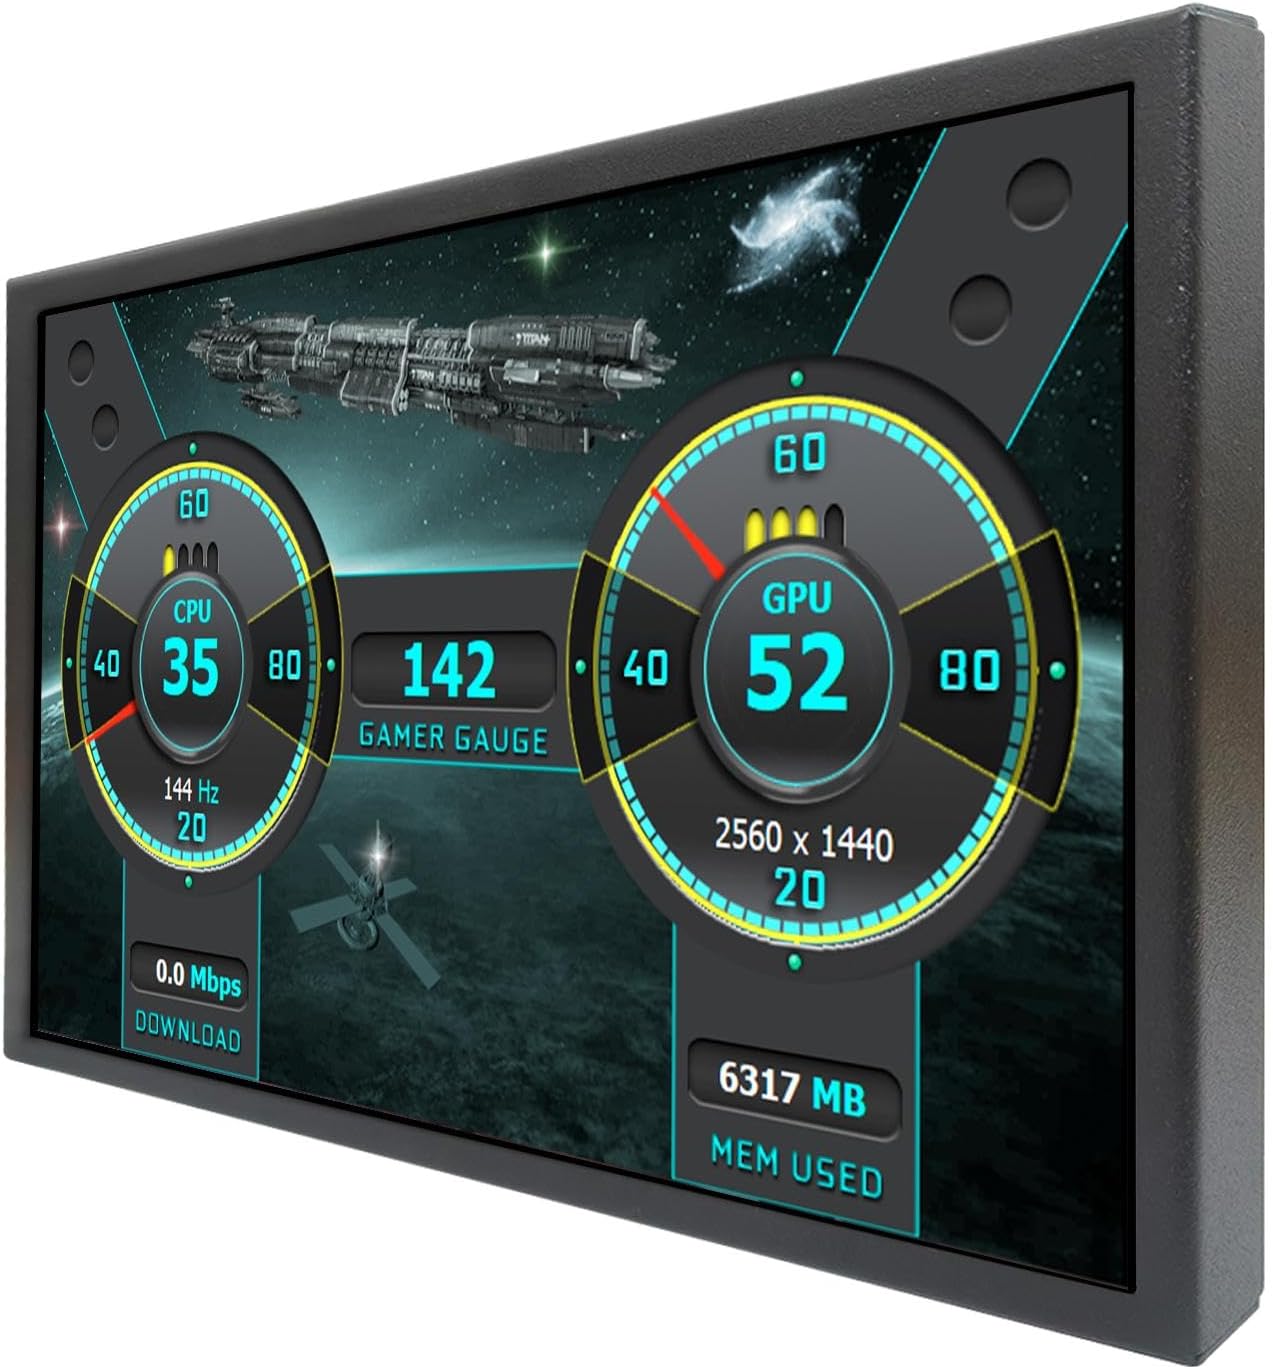
Figure 3.1: VSDISPLAY 8 Inch Monitor in operation, showing system statistics.
4. Setup Guide
4.1. Connecting the Monitor
The monitor offers two primary connection methods to your computer:
- USB-C Connection: Connect the monitor to a USB port on your host computer using a USB-C cable. This method provides both power and data transfer.
- 9-Pin Header Connection: For internal PC case installation, connect the monitor to a 9-pin USB header on your motherboard using the provided 9-pin cable. This connection also supplies power and data.
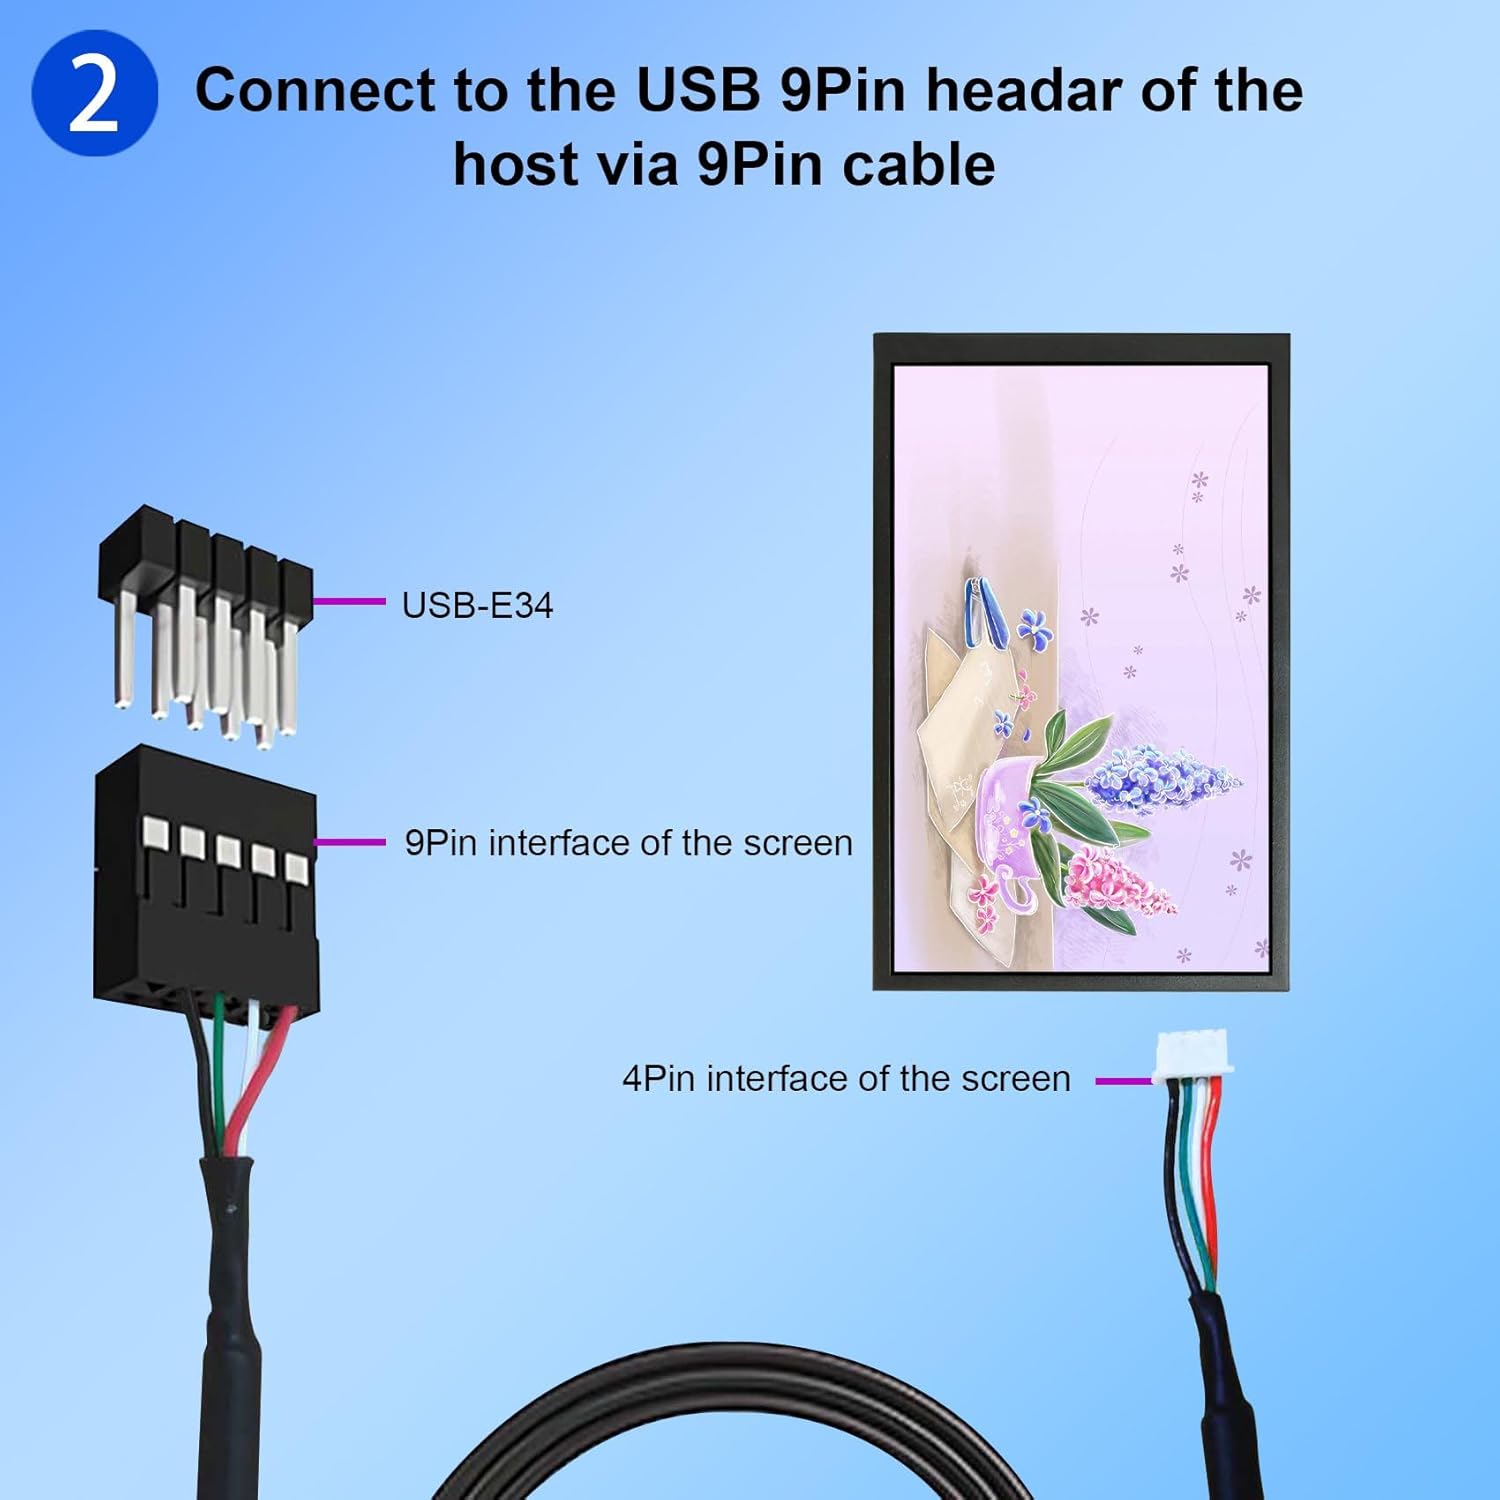
Figure 4.1: USB-C Connection. The image illustrates connecting the monitor to a computer's USB port via a USB-C cable.

Figure 4.2: 9-Pin Header Connection. This diagram shows the connection of the monitor's 9-pin interface to a motherboard's USB-E34 header.
The monitor features both a standard USB port and a USB-C port for connectivity. Refer to Figure 4.3 for port locations.

Figure 4.3: Monitor Ports. A close-up view of the monitor's side, indicating the USB and USB-C input ports.
4.2. Software Installation
To utilize the full functionality of the VSDISPLAY monitor, including system monitoring and theme customization, you must install the dedicated software. The software is typically provided on a USB drive included in the package. If not, it can be downloaded from the official website.
- Insert USB Drive: Insert the provided USB drive into an available USB port on your computer.
- Open USB Drive: Navigate to and open the USB drive in your computer's file explorer.
- Download/Install Software: Locate and run the setup file for the VSDISPLAY software. Follow the on-screen prompts to complete the installation. Ensure you run the installer as an administrator if prompted.
- Launch Software: Once installed, launch the VSDISPLAY application.
Software Download Link: If the USB drive is not available or you need an update, the software can be downloaded from: https://smartdisplay.lanzouo.com/b04lebxba
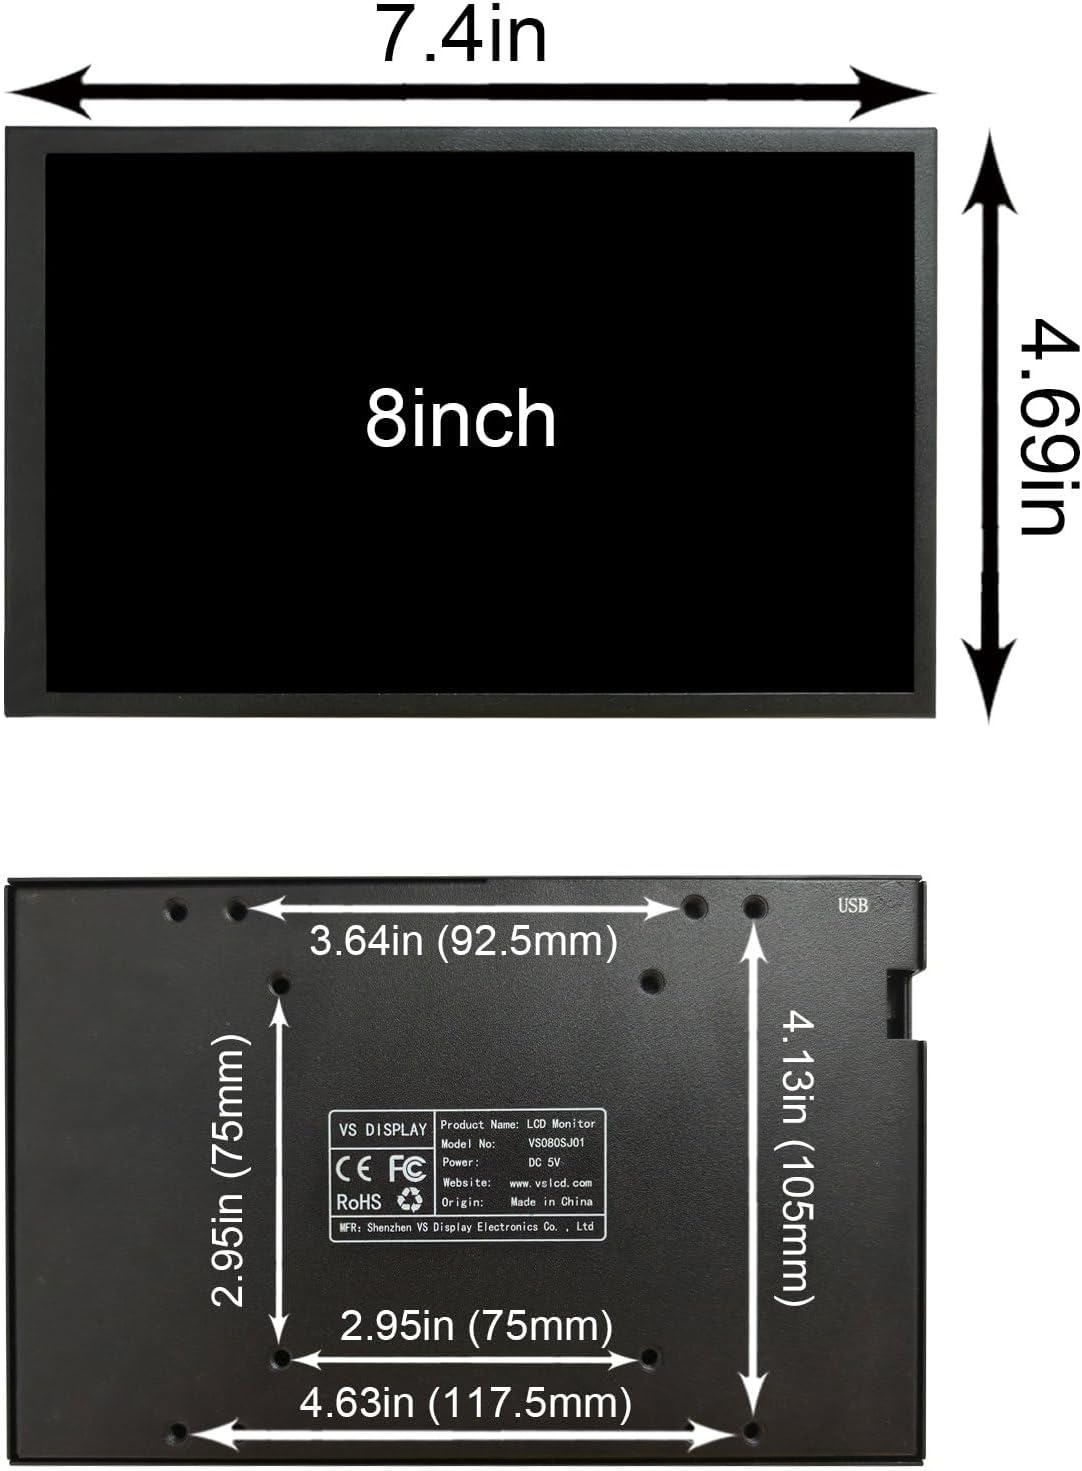
Figure 4.4: Software Installation Steps. This image guides users through inserting the USB drive, opening it, installing the software, and getting started with the application.
Important Note:
- This monitor is designed for displaying system data and themes; it cannot be used as a standard extended display for your computer desktop.
- The software requires Windows 7, 8, 10, or 11. It is not compatible with macOS.

Figure 4.5: Monitor Usage Clarification. This image demonstrates the monitor connected to a laptop, emphasizing that it functions as a system data display, not an extended desktop.
5. Operating Instructions
5.1. Displaying System Data
Once the VSDISPLAY software is installed and running, the monitor will automatically display real-time data from your computer, such as CPU, GPU, and RAM usage and temperature. The software collects this data and renders it on the monitor according to the selected theme.
5.2. Using the Theme Editor
The VSDISPLAY software includes a built-in theme editor that allows for extensive customization of the display. You can:
- Select from a variety of pre-installed themes.
- Create your own custom themes using images and videos as backgrounds.
- Adjust the layout and elements displayed on the screen to suit your preferences.
Refer to the software interface for detailed options and controls within the theme editor. The software does not require graphics card resources for its operation.

Figure 5.1: VSDISPLAY Theme Editor. This image shows the software interface for selecting and customizing display themes, including options for official and personal themes.
5.3. Display Orientation
The monitor supports both horizontal and vertical display modes. You can adjust the orientation within the VSDISPLAY software settings to match your physical setup.
6. Maintenance
- Cleaning: Use a soft, dry, lint-free cloth to clean the screen and casing. Avoid using abrasive cleaners, solvents, or aerosol sprays, as these can damage the surface.
- Storage: When not in use for extended periods, store the monitor in a cool, dry place, away from direct sunlight and extreme temperatures.
- Handling: Handle the monitor with care to prevent physical damage. Avoid dropping or subjecting it to strong impacts.
7. Troubleshooting
- No Display/Black Screen:
Ensure the monitor is properly connected to your computer via either the USB-C or 9-pin cable. Verify that the cable is securely plugged into both the monitor and the computer/motherboard.
Confirm that the VSDISPLAY software is installed and running on your computer. The monitor requires this software to function.
Try a different USB port on your computer. Some ports may not provide sufficient power or data.
- Software Not Installing/Running:
Ensure your operating system is Windows 7, 8, 10, or 11. The software is not compatible with macOS.
Run the installer as an administrator. Right-click the setup file and select "Run as administrator."
If using the provided USB drive, check if it's corrupted. Try downloading the software from the official link: https://smartdisplay.lanzouo.com/b04lebxba
Temporarily disable antivirus software during installation, then re-enable it.
- Incorrect Data Displayed:
Ensure the VSDISPLAY software is up-to-date. Check the official website for the latest version.
Restart the VSDISPLAY software and your computer.
Verify that your computer's system monitoring services are functioning correctly.
- Monitor Not Recognized by Computer:
This monitor is not a standard plug-and-play display for extending your desktop. It requires the VSDISPLAY software to interpret and display system data. It will not appear as a secondary monitor in your display settings.
Ensure the correct drivers are installed if prompted by the software.
8. Specifications

Figure 8.1: Product Specifications Table. This table provides detailed technical specifications for several VSDISPLAY monitor models, including the VS080SJ01-B.
| Feature | Specification |
|---|---|
| Model Number | VS080SJ01-B |
| Screen Size | 8 Inches |
| Resolution | 1280x800 Pixels |
| Display Area | 172.24 × 107.64 mm (H×V) |
| Outline Size | 188 × 117 × 15 mm (H×V×D) |
| Screen Brightness | 350 cd/m² |
| Screen Contrast | 800:1 |
| View Angle | 89/89/89/89 (Typ.)(CR≥10) [Left / Right / Up / Down] |
| Response Time | <8ms |
| Input | USB / 9Pin PH2.54 USB |
| Operating Temperature | 0°C to 45°C |
| Storage Temperature | -20°C to 60°C |
| Net Weight (N.W.) | 0.36kg / 0.79lb |
| Gross Weight (G.W.) | 0.62kg / 1.37lb |
| Case | Metal Case Black |
| Compatible OS | Windows 7/8/10/11 (Not compatible with Mac) |
9. Warranty and Support
For warranty information or technical support, please refer to the documentation included with your product or visit the official VSDISPLAY website. If you encounter issues not covered in this manual, please contact VSDISPLAY customer service for assistance.
Official Website: While specific support contact details are not provided in this manual, general information can often be found on the manufacturer's website, typically www.vsdisplay.com or www.vslcd.com.


