
1. Product Overview
The Tecmojo 4U 10-inch Mini Server Rack is designed for efficient organization of IT and A/V equipment in compact spaces. Its open-frame structure and translucent side panels provide both optimal airflow and dust protection, making it suitable for desktops, home labs, small offices, or dedicated A/V setups.
This rack supports 10-inch rack-mountable equipment such as patch panels, network switches, cable organizers, and power strips. Constructed from high-strength steel with premium acrylic side panels, it offers durability and stability for sensitive electronics.

Image: Key features of the Tecmojo 10-inch Mini Rack, including the acrylic top panel, non-slip feet, and versatile mounting holes.
2. Package Contents
Verify that all components are present before beginning assembly:

Image: All components included in the package, such as the rack shelf, blank panel, screws, and cage nuts.
- Rack Frame Components (Side Panels, Cross Beams)
- 1U Blank Panel (x1)
- 10in x 8in Rack Shelf (x1)
- Mounting Brackets (x2)
- 10-32 Screws (x16)
- 10-32 Cage Nuts (x16)
- M5x10mm Screws (x4)
- M4x8mm Screws (x4)
- M4x14mm Screws (x4)
3. Setup and Assembly
Follow these steps to assemble your Tecmojo 4U 10-inch Mini Server Rack. A power drill with appropriate bits is recommended for faster assembly.
- Attach Cross Beams: Secure the cross beams to the side panels using the M5x10mm screws. Ensure all connections are firm.
- Secure Bottom Panel: Place the bottom panel and secure it to the frame using the M4x8mm screws.
- Install Top Panel: Position the top panel and fasten it with the remaining M4x8mm screws.
- Attach Handles: Secure the top handles to the designated points on the top panel using the M4x14mm screws.
- Install Mounting Brackets: Attach the mounting brackets to the side panels for enhanced stability, if desired.
- Insert Cage Nuts: For equipment requiring cage nuts, insert them into the square holes on the rack rails at the desired U-heights.
- Mount Shelf and Blank Panel: Install the included rack shelf and blank panel using the 10-32 screws and cage nuts (if applicable) to organize your space.
Video: Official Tecmojo installation guide for the 10-inch Desktop Mini Rack, demonstrating assembly steps.

Image: Detail of the mounting brackets that enhance the rack's stability.
4. Operating Instructions
The Tecmojo 4U 10-inch Mini Server Rack is designed for passive operation, providing a structured environment for your equipment. No active controls are present on the rack itself.
- Equipment Installation: Mount your 10-inch rack-compatible devices (e.g., network switches, patch panels, mini PCs) using the provided screws and cage nuts. Ensure proper alignment and secure fastening.
- Cable Management: Utilize the open design and any additional cable organizers (not included) to route cables neatly, preventing obstruction of airflow and ensuring easy access.
- Airflow: The open-frame design promotes natural convection. Ensure adequate space around the rack for optimal air circulation, especially if installing heat-generating devices.
- Cooling Fan Compatibility: The rack is adaptable for 80x80mm or 120x120mm cooling fans (fans are not included). Consider adding fans for active cooling if your equipment generates significant heat.

Image: Illustration of fan mounting options for 80x80mm and 120x120mm cooling fans (fans not included).
5. Maintenance
Regular maintenance ensures the longevity and optimal performance of your rack and the equipment housed within it.
- Cleaning: Periodically wipe down the steel frame and acrylic panels with a soft, damp cloth. Avoid abrasive cleaners that may scratch the surfaces.
- Dust Removal: Use compressed air or a soft brush to remove dust from inside the rack and from equipment vents to maintain proper airflow.
- Fastener Check: Annually inspect all screws and fasteners to ensure they remain tight. Re-tighten if necessary to maintain structural integrity.
- Cable Inspection: Check cables for any signs of wear, damage, or improper routing that could impede airflow or create safety hazards.
6. Troubleshooting
This section addresses common issues you might encounter with your rack.
- Rack Instability:
- Ensure all assembly screws are fully tightened.
- Verify the rack is placed on a flat, stable surface.
- Confirm that the mounting brackets are correctly installed.
- Equipment Not Fitting:
- Confirm your equipment is 10-inch rack-mountable. This rack is not compatible with standard 19-inch equipment.
- Check the depth of your equipment against the rack's 7.87-inch depth specification.
- Overheating Equipment:
- Ensure proper cable management to avoid blocking airflow.
- Verify the rack is not placed in an enclosed space without ventilation.
- Consider installing compatible cooling fans if heat dissipation is insufficient.
7. Specifications
| Brand | Tecmojo |
| Model | 4U/10in |
| Color | White |
| Product Dimensions (D x W x H) | 7.87"D x 11.02"W x 11"H (200mm D x 280mm W x 280.2mm H) |
| Material | Alloy Steel (Frame), Acrylic (Side Panels) |
| Item Weight | 6.1 pounds |
| Mounting Type | Rack Mount |
| Compatible Devices | 10-inch Rack-Mountable IT Equipment, A/V Devices |
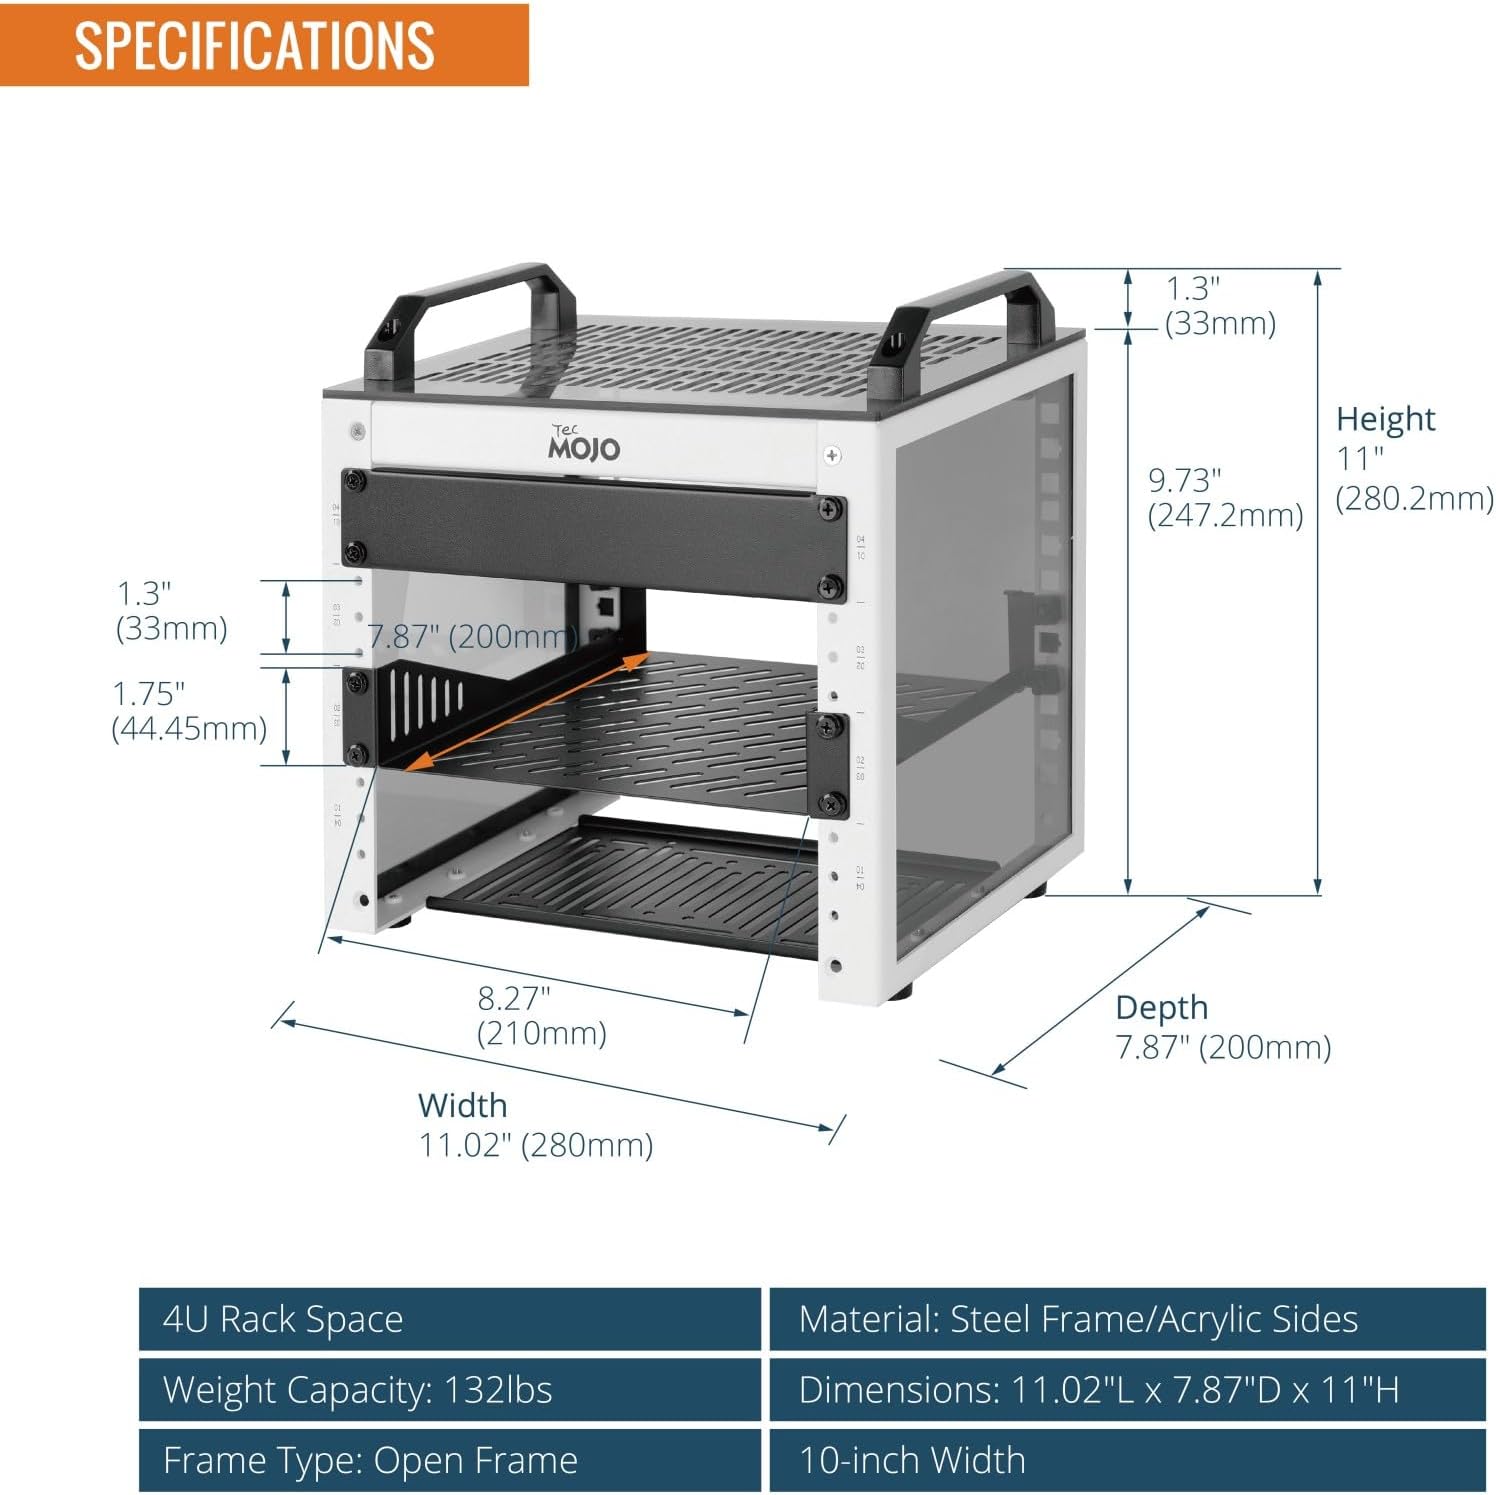
Image: Dimensional drawing and key specifications of the Tecmojo 4U 10-inch Mini Server Rack.
8. Warranty Information
This Tecmojo product comes with a 3-year manufacturer's warranty. This warranty covers defects in materials and workmanship under normal use. Please retain your proof of purchase for warranty claims.
For detailed warranty terms and conditions, please refer to the official Tecmojo website or contact customer support.
9. Support
For further assistance, technical support, or to inquire about additional products and accessories, please visit the official Tecmojo website or contact their customer service department.
Official Tecmojo Store: Visit the Tecmojo Store on Amazon


