
1. Introduction
This manual provides detailed instructions for the installation, operation, and maintenance of your AINAVI 11.5-inch QLED Car Stereo Radio. This unit is designed to upgrade the infotainment system in compatible Chevy Silverado and GMC Sierra models from 2014 to 2018, offering features such as Wireless CarPlay, Android Auto, GPS Navigation, and a high-resolution touch screen.
Please read this manual thoroughly before installation and use to ensure proper functionality and to avoid any damage to the unit or your vehicle.
2. Safety Information
- Professional Installation Recommended: Due to the complexity of vehicle electronics, professional installation is highly recommended.
- Power Disconnection: Always disconnect the vehicle's battery before performing any electrical work to prevent short circuits or damage.
- Compatibility Check: Ensure your car's power cable port is compatible. This unit does not support vehicles with optical fiber output or power cord interfaces with only two cables.
- Driving Safety: Do not operate the unit in a way that distracts you from driving. Always prioritize road safety.
- Cable Management: Secure all cables properly to prevent interference with vehicle controls or damage from moving parts.
3. Package Contents
Verify that all items listed below are included in your package:
- Car Head Unit with Frame for Chevrolet Silverado GMC Sierra 2014-2018 (1)
- User Manual for Chevy Silverado Radio (1)
- Power Cable (1)
- AHD 1080P Rear View Camera (1)
- Microphone (1)
- Crowbar/Frame Removal Tool (1)
- GPS Antenna (1)
- USB Cables (4Pin & 6Pin)
- RCA Cable Set
- Radio Cable
- OEM USB Cable
- Backup Camera Extension Cable
- Backup Camera Video Input Cable

Figure 3.1: Included Components
Video 3.1: Unboxing and Overview of Included Components
4. Setup & Installation
Follow these steps carefully for proper installation. Refer to the installation video for visual guidance.
4.1 Initial Checks & Preparation
- Before starting, ensure your vehicle is turned off and the battery is disconnected.
- Use the provided frame removal tool to carefully pry off the main frame around your existing radio unit.
- Gently pull out the cables connected to the air conditioning control panel and remove the panel.
- Use a 7mm socket wrench to remove the screws securing the CD player. Disconnect its cables and remove the CD player.
- Remove the passenger storage box (glove compartment) to access wiring behind the dashboard.
- Remove the steering wheel cover to access the OEM steering wheel control cable.
4.2 Wiring Connections
Connect the new unit's wiring harness to your vehicle's existing wiring. Pay close attention to the specific connectors.
- OEM Power Cable & CANBUS: Unplug the OEM power cable and the CANBUS cable from the vehicle. Find the OEM power interface on the device's power cable and connect them. Connect the OEM CANBUS cable. Note: Do not unplug the gray connector.
- Steering Wheel Control: Remove the OEM steering wheel control cable. Connect the provided steering wheel control cable according to the video instructions.
- AUX Input: Locate the AUX input cable connector in the center armrest box area. Connect the "AUX IN" cable from the RCA cable set to the "AUDIO OUT" on the RCA cable. Set up the AUX Input in the dashboard menu according to the video instructions.
- GPS Antenna & USB Cables: Install the GPS antenna and USB cables, routing them neatly.
- Backup Camera:
- For Sedans & SUVs: Install the rearview camera at the vehicle's license plate location. Thread the camera's power cable into the vehicle interior through the license plate light housing or another gap. Route the cable along the door frame all the way to the car radio area. If your car does not have CANBUS functionality, connect the red wire from the red-black cable to the reverse light's positive pole, and insulate the black wire. Connect the yellow plug of the camera extension cable to the "Backup camera video input Cable". Connect the blue wire on the other end to the "Rear CAM Control" wire in the power harness.
- For Pickup Trucks: Install the rearview camera at the vehicle's license plate location. Route the camera extension cable from the vehicle's chassis to the car radio compartment. Connect the red wire from the black-red cable to the reverse light's positive pole, and insulate the black wire. Connect the yellow plug to the reverse signal input cable. Finally, connect the signal wire to the device.
Video 4.1: Detailed Installation Guide for Android Radio
Video 4.2: Aftermarket Backup Camera Installation Guide for Sedans & SUVs
Video 4.3: Aftermarket Backup Camera Installation Guide for Pickup Trucks
4.3 Installing the New Unit
- Once all connections are made, carefully place the new head unit into the dashboard opening.
- Secure the unit with screws if applicable.
- Reattach the air conditioning control panel and the main frame.
- Reconnect the vehicle battery.
5. Operating Instructions
5.1 Basic Functions
- Power On/Off: The unit powers on with the vehicle ignition.
- Manual Knobs: The left knob rotates to adjust volume (+/-) and presses to mute. The right knob rotates for previous/next track and presses for play/pause.
- Steering Wheel Control: The unit supports existing steering wheel controls for audio and call management.
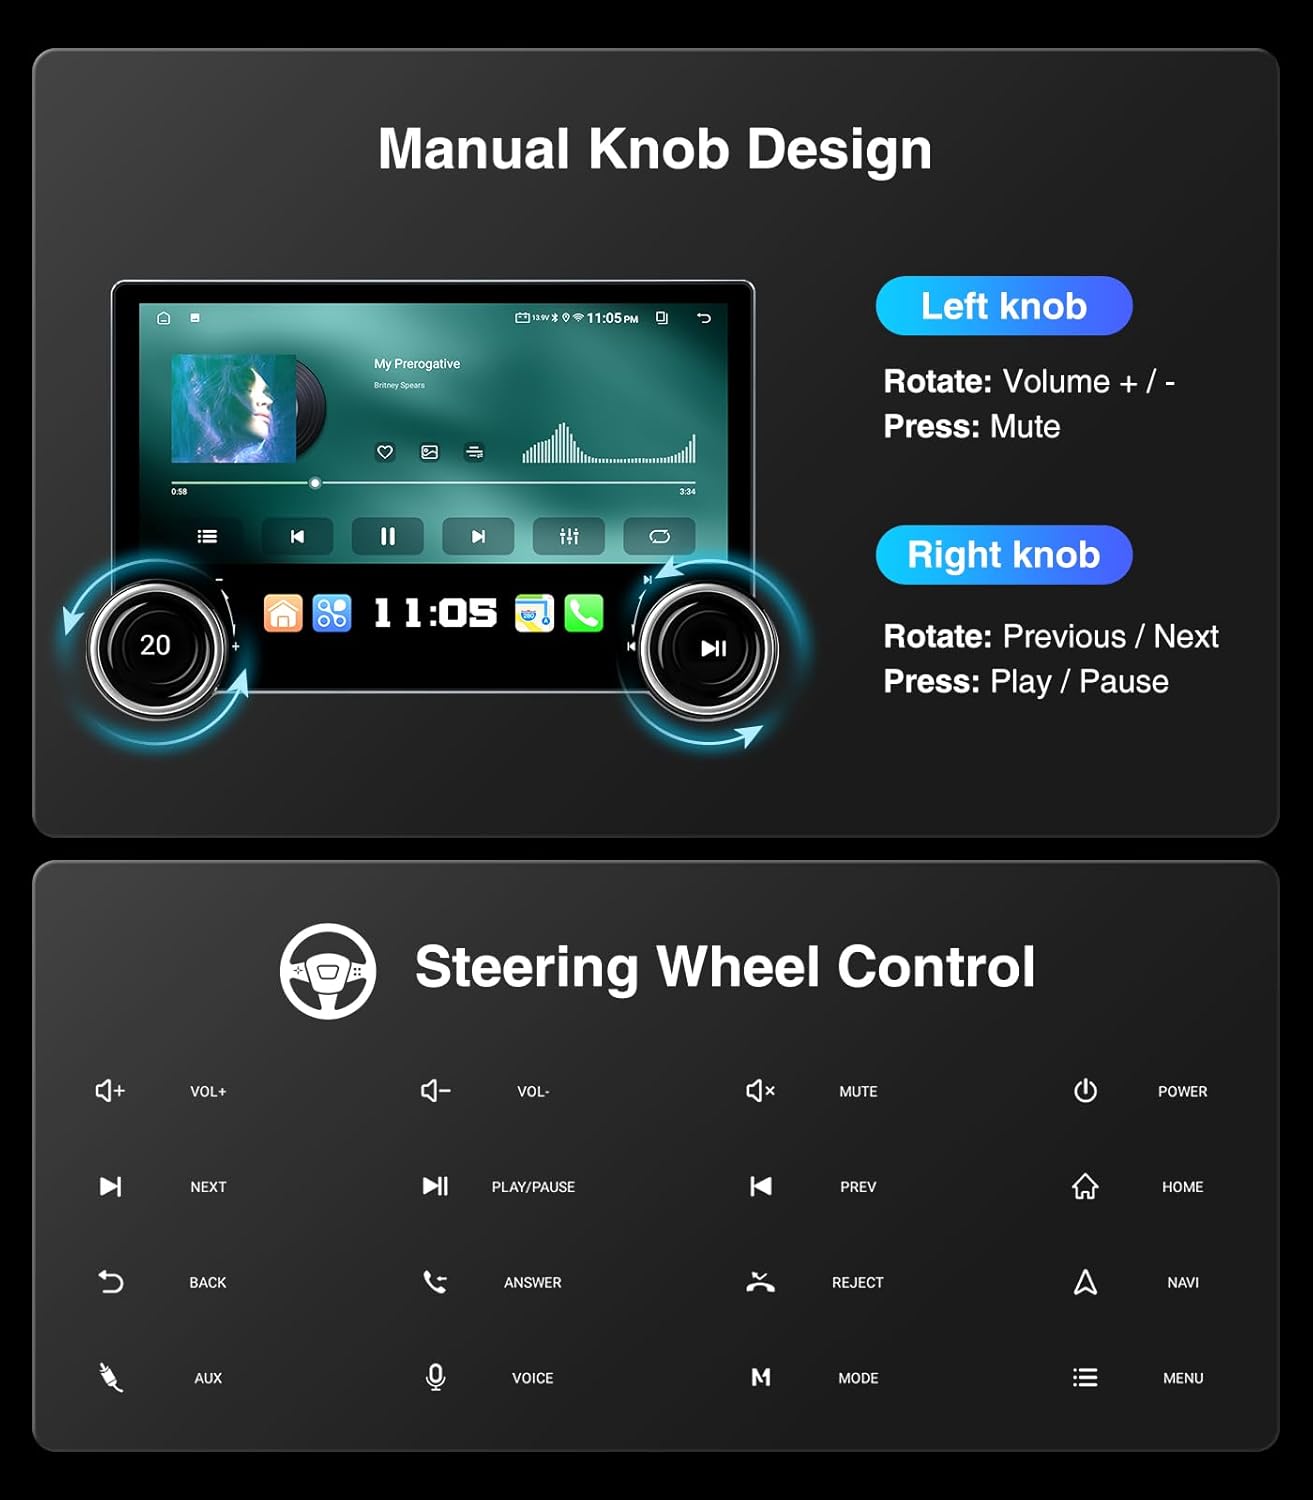
Figure 5.1: Manual Knob and Steering Wheel Controls
5.2 Wireless CarPlay & Android Auto
Connect your smartphone wirelessly for navigation, music, messaging, and hands-free calls.
- Ensure Bluetooth is enabled on your smartphone.
- On the head unit, navigate to the CarPlay/Android Auto application (e.g., Zlink).
- Follow the on-screen prompts to pair your phone via Bluetooth.
- Confirm pairing on both devices.

Figure 5.2: Wireless CarPlay & Android Auto Interface
Video 5.1: 11.5-inch Touchscreen CarPlay and Android Auto Radio with Knobs
5.3 GPS Navigation
The unit supports various satellite services and 5G WiFi for accurate navigation. Pre-installed maps for North America are included.
- Access Google Maps or other navigation apps from the main menu.
- Utilize 2D and 3D perspectives, voice functions, and real-time traffic information.

Figure 5.3: GPS Navigation Interface
5.4 Split Screen Display
Display two applications simultaneously for enhanced multitasking.
- Drag an app icon to one side of the screen to activate split-screen mode.
- Select another app to fill the remaining screen space.
Video 5.2: 11.5-inch Big Knobs Touchscreen Stereo Radio Split Screen Functionality
5.5 Bluetooth Connectivity
Connect your phone via Bluetooth for music streaming and hands-free calling.
- Enable Bluetooth on your phone and search for the device.
- Pair the devices to access contacts, call history, and audio streaming.

Figure 5.4: Bluetooth Hands-Free Connection
5.6 Radio (AM/FM/RDS)
Access local radio stations with clear reception.
- Select the Radio application from the main menu.
- Tune to desired AM/FM frequencies. RDS (Radio Data System) provides station information where available.

Figure 5.5: AM/FM/RDS Radio Interface
5.7 Media Playback
Play audio and video files from various sources.
- Connect USB devices to play stored media.
- Stream music via Bluetooth from your smartphone.
- The unit supports 1080P video playback.
5.8 Rear View Camera
The included 1080P rearview camera provides clear visuals for safer reversing.
- The camera automatically activates when the vehicle is put into reverse.
- Dynamic ruler lines assist with parking and obstacle avoidance.

Figure 5.6: 1080P Rearview Camera Display
5.9 USB to RCA Output
Connect external headrest monitors via a USB to RCA adapter (not included) to provide independent video playback for backseat passengers.

Figure 5.7: USB to RCA Output Function
6. Maintenance
- Screen Cleaning: Use a soft, lint-free cloth to clean the QLED touch screen. Avoid abrasive cleaners or solvents.
- Software Updates: Periodically check for software updates to ensure optimal performance and access to new features.
- General Care: Keep the unit free from dust and debris. Avoid exposing it to extreme temperatures or direct sunlight for prolonged periods.
7. Troubleshooting
If you encounter any issues, refer to the following common problems and solutions:
- No Power: Check all power connections and ensure the vehicle battery is properly connected. Verify fuses are intact.
- No Sound: Ensure all audio cables are correctly connected. Check the volume settings on the unit and your vehicle's audio system. Verify AUX input is selected if using that connection method.
- CarPlay/Android Auto Not Connecting: Ensure Bluetooth is on and paired. Check the Zlink app settings. For wired connections, ensure the USB cable is functioning correctly.
- Backup Camera Not Displaying: Verify the camera's power and video input cables are correctly connected. Ensure the "Rear CAM Control" wire is properly connected in the power harness.
- Weak Bluetooth/Wi-Fi Signals: Ensure the Bluetooth and Wi-Fi antennas are securely connected.
- Screen Freezing/Unresponsive: Try restarting the unit by turning off and on the vehicle ignition. If the issue persists, a factory reset may be necessary (refer to the unit's settings menu).
8. Specifications
| Feature | Detail |
|---|---|
| Model Number | 4+64G |
| Display Size | 11.5 Inches |
| Operating System | Android |
| Processor | 4-Core CPU, Dual-Core GPU |
| RAM | 4GB |
| ROM | 64GB |
| Screen Type | QLED Touch Screen, 1280*800 Resolution |
| Connectivity | 5G WiFi (2.4aHZ & 5aHZ), Bluetooth, USB, Wireless/Wired CarPlay & Android Auto |
| Special Features | EQ (Sound Point Control) + Premium DSP, Split Screen Function, RDS, Equalizer, Siri Voice Control, Volume Control, FM/AM, Music Streaming, RCA, Screen Mirroring, Subwoofer, Spotify, Rear View Camera Input, Full RCA Video Output for Back Seat Headrest Monitor |
| Included Components | Head Unit with Frame, User Manual, Power Cable, AHD 1080P Rear View Camera, Microphone, Crowbar, GPS Antenna, USB Cables |
9. Warranty & Support
Your AINAVI Car Stereo Radio comes with a 12-Month Manufacturer Guarantee.
For technical support, installation assistance, or any inquiries, please contact our professional technical support team. We are available to assist you with pre-sale and after-sale services.
- Customer Service Phone: +1 833 858 5016
- Working Hours: 01:00 PM to 00:00 AM EST
- Email: info@ainavi.com

Figure 9.1: Customer Support Information