1. Introduction
The Homelist Dimmable Candle Warmer Lamp provides a flameless method to enjoy your favorite scented candles. Utilizing a halogen bulb, it gently melts candle wax from the top down, releasing fragrance without an open flame, smoke, or soot. This design enhances safety and extends the life of your candles by preserving the wax. It also functions as an ambient light source, offering adjustable brightness and a convenient timer function.

Image 1.1: The Homelist Dimmable Candle Warmer Lamp in use, illuminating a scented candle.
2. Safety Information
Please read and understand all safety instructions before using this product. Failure to follow these instructions may result in electric shock, fire, or serious injury.
- Flameless Operation: This lamp melts wax using heat from a halogen bulb, eliminating the need for an open flame. However, the bulb and surrounding areas can become hot.
- Burn Hazard: Do not touch the lampshade, lamp stem, or bulb after using the lamp for an extended period, as these surfaces can become very hot and cause burns.
- Children and Pets: Keep the candle warmer lamp out of reach of children and pets to prevent accidental burns or damage.
- Placement: Place the lamp on a stable, flat, heat-resistant surface away from flammable materials, curtains, or other objects that could catch fire.
- Candle Use: Do not use the lamp and light candles at the same time. This product is designed for flameless wax melting.
- Movement: Do not move the candle warmer lamp while in operation or immediately after use, especially if there is melted wax, to avoid spills or burns.
- Power: Use only the provided power adapter and bulb. Do not attempt to modify the electrical components.
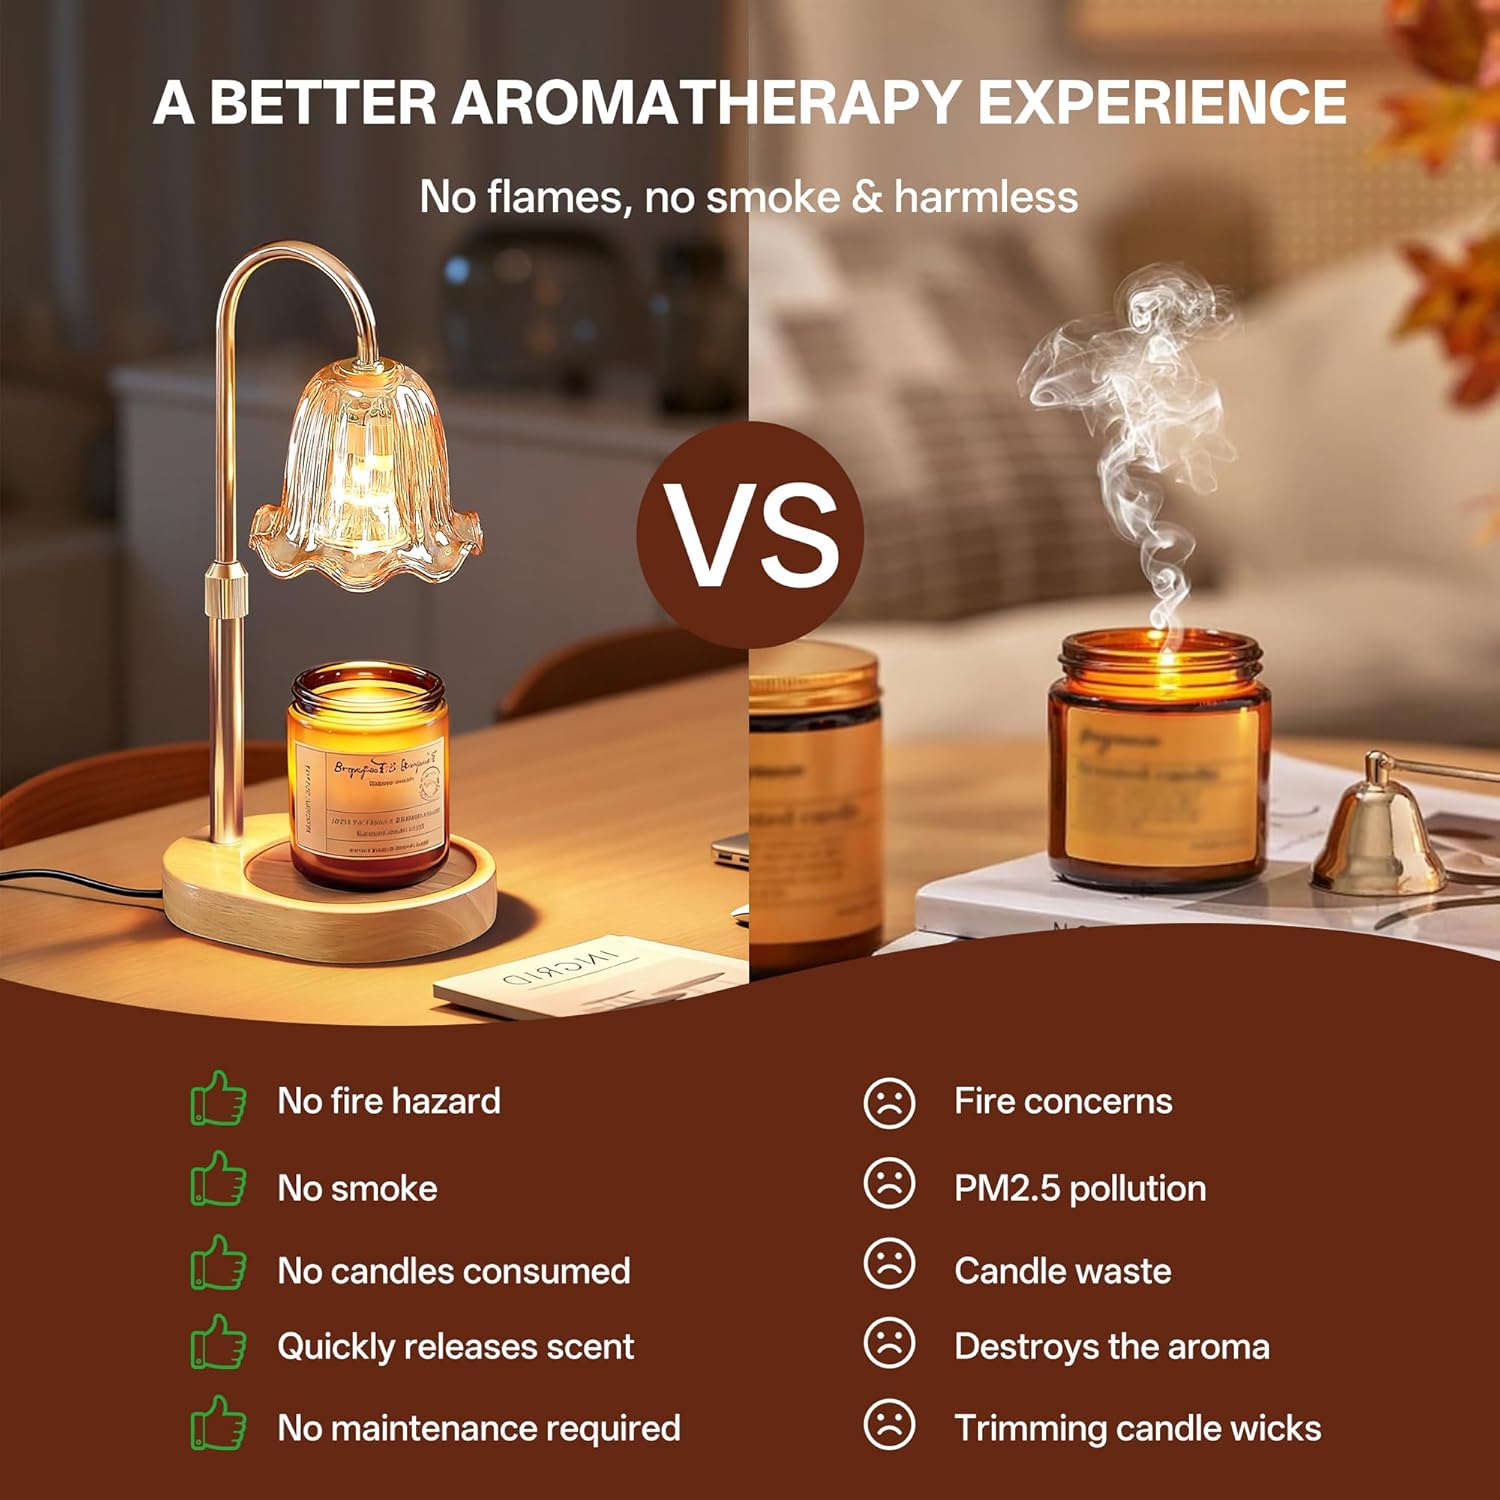
Image 2.1: Visual comparison highlighting the safety benefits of flameless operation over traditional candles.

Image 2.2: The candle warmer lamp provides a safe alternative for households with children and pets.
3. Package Contents
Verify that all items are present and in good condition upon unpacking.
- Candle Warmer Lamp Unit (Base, Stem, Lampshade)
- Halogen Bulbs (2 included)
- User Manual

Image 3.1: The candle warmer lamp and its included components as packaged.
4. Setup
Follow these steps to assemble your Homelist Candle Warmer Lamp:
- Unpack: Carefully remove all components from the packaging.
- Insert Bulb: Gently screw one of the provided halogen bulbs into the socket located inside the lampshade. Ensure it is securely fastened.
- Assemble Lamp: Attach the lamp arm with the lampshade to the wooden base. Twist the adjustable knob on the lamp stem to secure it at your desired height.
- Place Candle: Position your desired scented candle on the center of the wooden base.
- Connect Power: Plug the power cord into a standard electrical outlet.

Image 4.1: The lamp features an adjustable height mechanism to accommodate various candle sizes.
5. Operating Instructions
The Homelist Candle Warmer Lamp is operated via an in-line control switch on the power cord.
- Power On/Off: Press the power button (usually marked with a circle and a vertical line) to turn the lamp on or off.
- Adjust Brightness/Heat: Use the '+' and '-' buttons to increase or decrease the brightness of the halogen bulb. Higher brightness results in faster wax melting and stronger fragrance release.
- Set Timer: Press the timer button (usually marked with a clock icon) to cycle through the available timer settings: 2 hours, 4 hours, or 8 hours. The lamp will automatically turn off after the selected duration.
- Adjust Height: Loosen the knob on the lamp stem to slide the lampshade up or down, positioning the bulb closer or further from the candle. This allows you to optimize melting for different candle heights.

Image 5.1: The lamp features controls for adjusting brightness and setting a timer for convenience.

Image 5.2: The remote control allows for easy adjustment of light intensity and timer settings.
Video 5.3: This video demonstrates the setup and operation of the Homelist Candle Warmer Lamp, including its adjustable height, dimming, and timer features.
6. Maintenance
- Cleaning: Ensure the lamp is unplugged and completely cool before cleaning. Wipe the base and stem with a soft, dry cloth. The glass lampshade can be gently wiped with a damp cloth if needed, then dried thoroughly.
- Wax Management: After using the wax melting lamp multiple times, it is recommended to pour off the melted wax on the surface of the candle to enhance the fragrance. This prevents the wax from becoming oversaturated with fragrance oils and allows for a fresh layer to melt.
- Bulb Replacement: If the bulb burns out, ensure the lamp is unplugged and cool. Carefully unscrew the old bulb and replace it with one of the new halogen bulbs provided.
7. Troubleshooting
- Lamp Not Turning On:
- Check if the power cord is securely plugged into the outlet and the lamp.
- Ensure the halogen bulb is properly screwed into the socket.
- Test the outlet with another device to confirm it is receiving power.
- Replace the bulb with a new one if it appears burnt out.
- Candle Wax Not Melting:
- Increase the brightness setting using the '+' button on the control switch.
- Adjust the lamp height to bring the bulb closer to the candle.
- Ensure the bulb is functioning correctly and emitting heat.
- Weak Fragrance Release:
- Increase the brightness setting to generate more heat.
- Pour off the top layer of melted wax to expose fresh, more fragrant wax.
- Consider using a candle with a stronger scent throw.
8. Specifications
| Brand | Homelist |
| Model Name | MF105-KJ |
| Item Model Number | MF105-KJ |
| Color | Golden |
| Material | Iron |
| Number of Light Sources | 2 (includes 2 bulbs) |
| Mounting Type | Tabletop |
| Indoor/Outdoor Usage | Indoor |
| Product Dimensions | 5.3 x 9.84 x 8.98 inches |
| Item Weight | 2.13 pounds (0.97 Kilograms) |

Image 8.1: Details of the carefully selected high-quality materials used in the candle warmer lamp.
9. Warranty and Support
For warranty information or technical support, please refer to the product packaging or contact Homelist customer service directly. Keep your purchase receipt for any warranty claims.


