1. Introduction
This manual provides comprehensive instructions for the installation, operation, and maintenance of your PUTORSEN Quad Monitor Mount (Model: B0FLXV7B8D). This monitor mount is designed to support multiple displays, enhancing your workspace ergonomics and productivity. Please read this manual thoroughly before installation and retain it for future reference.

Image 1.1: Overview of the PUTORSEN Quad Monitor Mount supporting four displays.
2. Safety Information
Please observe the following safety precautions during installation and use:
- Do not exceed the maximum weight capacity for each arm and the top bracket. Refer to the Specifications section for details.
- Ensure the mounting surface (desk) is stable and capable of supporting the combined weight of the mount and all attached monitors.
- Verify that all screws and connections are securely tightened before use. Loose connections can lead to instability and potential damage.
- Keep children and pets away from the installation area. Small parts may pose a choking hazard.
- If you encounter any difficulties during installation, consult a qualified professional.
3. Package Contents
Verify that all components are present and undamaged before proceeding with installation. If any parts are missing or damaged, contact customer support.
- Main Pole and Base Assembly
- Upper Monitor Bracket
- Lower Monitor Arms (2)
- VESA Plates (4)
- C-Clamp Mounting Hardware
- Grommet Base Mounting Hardware
- Cable Management Clips
- Assembly Tools (Hex Keys, Wrench)
- Instruction Manual
4. Specifications
| Feature | Detail |
|---|---|
| Model Number | B0FLXV7B8D |
| Brand | PUTORSEN |
| Upper Monitor Support | Up to 49" Ultrawide (Flat: 44 lbs / 20 kg, Curved: 30.8 lbs / 14 kg) |
| Lower Monitor Support | Three 27" monitors or two 32" monitors (15.4 lbs / 7 kg each) |
| VESA Compatibility | 75x75mm, 100x100mm |
| Desk Thickness (C-Clamp/Grommet) | 0.39" - 1.77" (10mm - 45mm) |
| Pole Height | 800mm (16.1") |
| Arm Full Extension | 1322mm (52.04") |
| Tilt (Center Bracket) | +50° / -20° |
| Tilt (Lower Arms) | ±35° |
| Swivel | 180° |
| Rotation | 360° |
| Item Weight | 18.04 pounds |
| Package Dimensions | 17.83 x 10.04 x 7.17 inches |
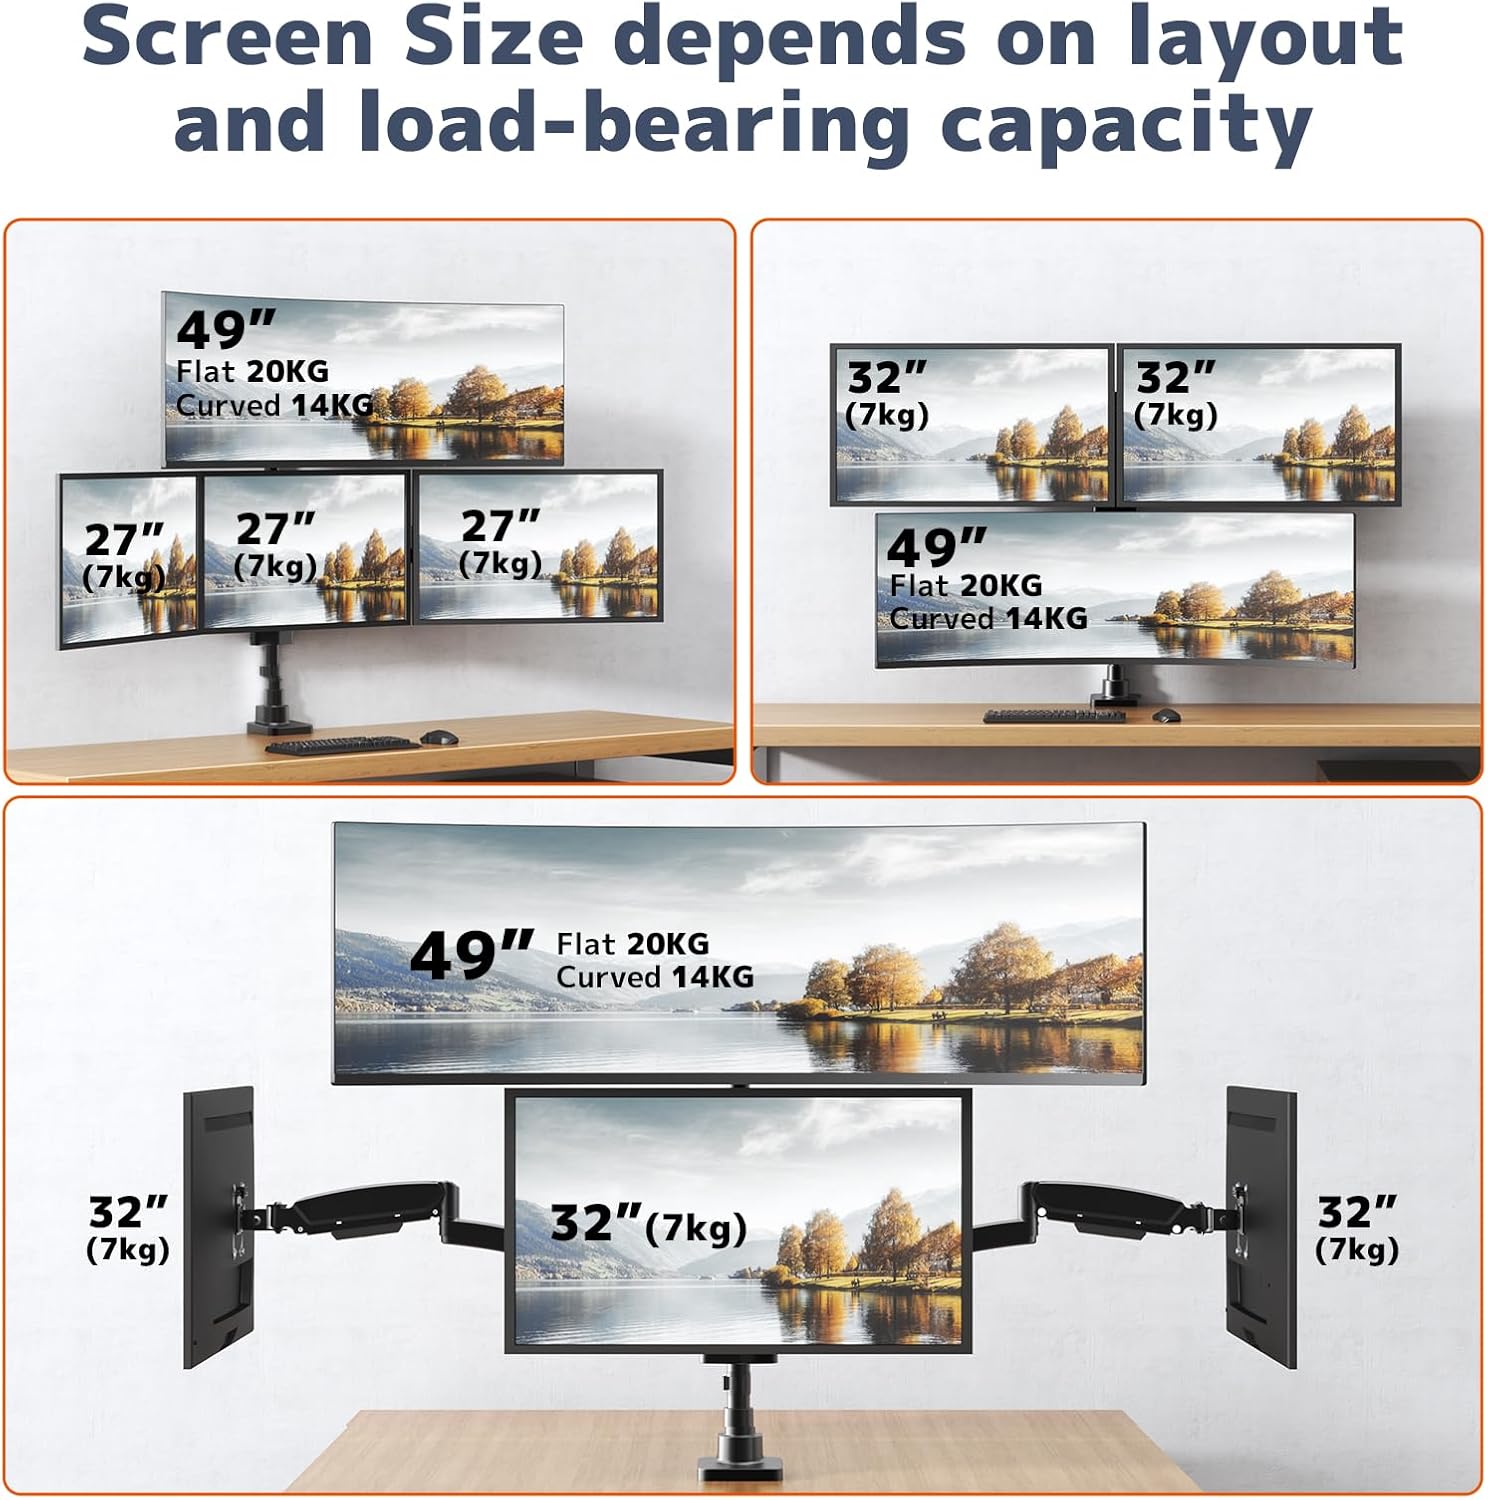
Image 4.1: Supported screen sizes and load capacities for different monitor layouts.

Image 4.2: Detailed product dimensions and articulation ranges for tilt, swivel, and rotation.
5. Setup and Installation
Follow these steps to assemble and install your monitor mount:
5.1 Choose Your Mounting Option
The mount supports both C-clamp and grommet base installation. Select the option best suited for your desk.
- C-Clamp Installation: Attach the C-clamp to the edge of your desk. Ensure the desk thickness is between 0.39" and 1.77". Tighten the clamp securely.
- Grommet Base Installation: If your desk has a grommet hole, use the grommet base hardware. Ensure the hole diameter and desk thickness are compatible with the provided hardware.
5.2 Assemble the Pole and Arms
- Attach the main pole to your chosen base (C-clamp or grommet).
- Slide the upper monitor bracket onto the pole and secure it at the desired height.
- Attach the two lower monitor arms to the pole, positioning them below the upper bracket.
- Ensure all connections are firm.
5.3 Attach Monitors
- Attach the VESA plates to the back of each monitor using the appropriate screws.
- Carefully slide the monitors (with VESA plates attached) onto the corresponding arms/bracket until they click into place.
- Tighten any security screws on the VESA plates to prevent accidental detachment.

Image 5.1: Fully assembled monitor mount with monitors attached.
5.4 Adjusting Arm Length
The 3-section arm design allows for adjustment of arm length. If a monitor is too close or too far from the wall, you can remove one or two segments from the arm to shorten its extension.
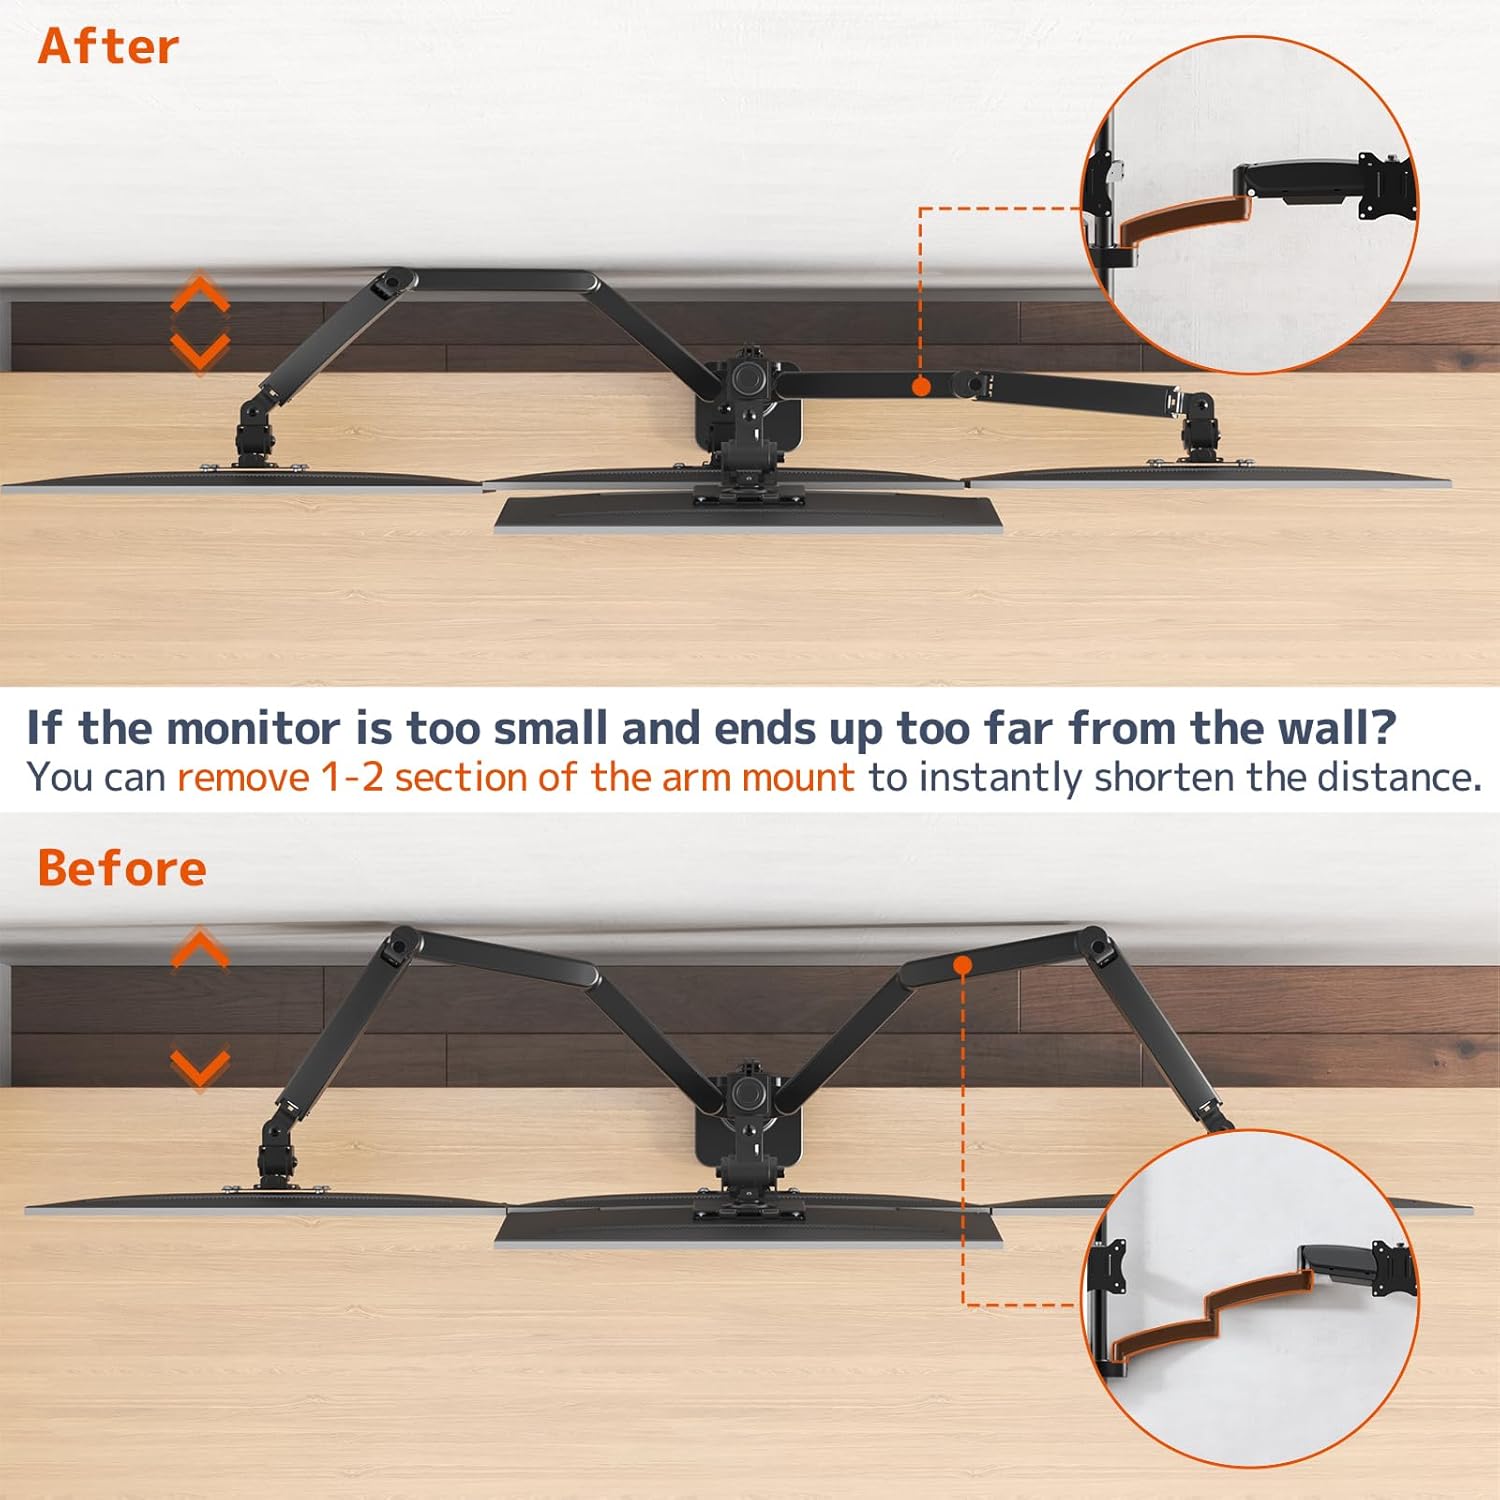
Image 5.2: Illustration of shortening the monitor arm by removing segments.

Image 5.3: Guide for required desk-to-wall distance based on screen width.
6. Operating and Adjustments
The PUTORSEN Quad Monitor Mount offers extensive adjustability for optimal viewing comfort.
6.1 Gas Spring Tension Adjustment
The gas spring arms allow for smooth height adjustment. If a monitor sags or rises too easily, adjust the gas spring tension using the provided hex key. Turn clockwise to increase tension (for heavier monitors) or counter-clockwise to decrease tension (for lighter monitors).

Image 6.1: Illustration of the sturdy gas spring arm design for stable equilibrium.
6.2 Tilt, Swivel, and Rotation
- Tilt: Adjust the monitor screen vertically to reduce glare and optimize viewing angles. The center bracket tilts +50°/-20°, and lower arms tilt ±35°.
- Swivel: Pivot the monitor horizontally up to 180° to share your screen or change viewing direction.
- Rotation: Rotate the monitor 360° to switch between landscape and portrait orientations.

Image 6.2: Users adjusting the position of their monitors for ergonomic comfort.

Image 6.3: Examples of flexible monitor arrangements, including stacked and side-by-side setups.
7. Maintenance
Regular maintenance ensures the longevity and safe operation of your monitor mount.
- Cleaning: Wipe the mount surfaces with a soft, damp cloth. Avoid abrasive cleaners or solvents that could damage the finish.
- Check Connections: Periodically inspect all screws and bolts to ensure they remain tight. Re-tighten if necessary.
- Gas Spring Check: If you notice a change in the gas spring's performance, re-adjust the tension as described in the Operating section.
8. Troubleshooting
Refer to this section for solutions to common issues.
8.1 Monitor Sags or Does Not Stay in Position
- Cause: Gas spring tension is too low for the monitor's weight.
- Solution: Increase the gas spring tension by turning the adjustment screw clockwise with the provided hex key.
- Cause: Monitor weight exceeds the arm's capacity.
- Solution: Verify your monitor's weight against the specifications. Do not exceed the maximum weight capacity.
8.2 Monitor Rises Too Easily
- Cause: Gas spring tension is too high for the monitor's weight.
- Solution: Decrease the gas spring tension by turning the adjustment screw counter-clockwise with the provided hex key.
8.3 Mount Feels Unstable
- Cause: Mounting clamp/grommet is not sufficiently tightened.
- Solution: Re-tighten the C-clamp or grommet base to the desk. Ensure the desk surface is robust.
- Cause: Monitor arm connections are loose.
- Solution: Check and tighten all screws connecting the arms to the pole and the VESA plates to the monitors.

Image 8.1: Illustration demonstrating improved stability of the current design compared to older models.
9. Warranty and Support
For warranty information or technical support, please refer to the product packaging or contact PUTORSEN customer service directly. Keep your purchase receipt as proof of purchase.


