1. Introduction
The AERMOTOR V880 OBD2 Scanner is a professional-grade diagnostic tool designed to help users identify and resolve vehicle issues efficiently. This manual provides detailed instructions for operating the device, understanding diagnostic trouble codes (DTCs), and performing various vehicle tests. It is compatible with all OBD2 protocol vehicles manufactured since 1996.

2. Safety Information
Always exercise caution when working on a vehicle. Ensure the vehicle is in park with the ignition off before connecting or disconnecting the scanner. Do not operate the scanner while driving. Refer to your vehicle's service manual for specific safety procedures.
3. Package Contents
Verify that all items are present in your package:
- 1 x AERMOTOR V880 OBD2 Car Scanner
- 1 x User's Manual
Note: No charger or adapter is needed as the device draws power directly from the vehicle's OBDII port.

4. Product Overview
The AERMOTOR V880 features a rugged design with a 2.8-inch TFT color screen and tactile silicone buttons for easy navigation. It connects directly to your vehicle's OBDII port.

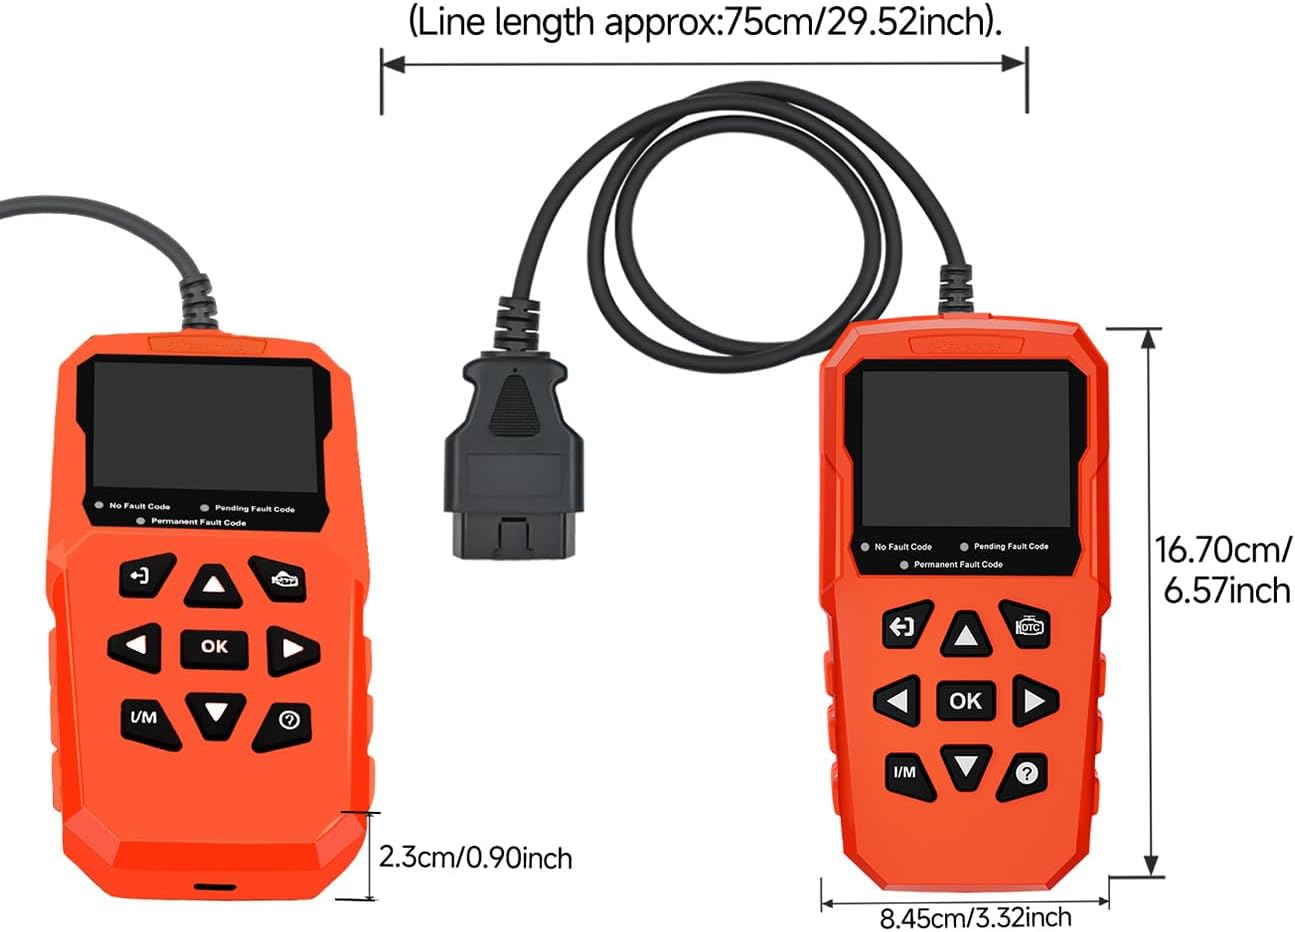
Device Dimensions
The scanner measures approximately 6.57"L x 3.32"W x 0.9"H, with an OBDII cable length of approximately 29.52 inches.
5. Setup
- Locate the OBDII Port: The OBDII port is typically located under the dashboard on the driver's side of the vehicle. Refer to your vehicle's manual if you cannot find it.
- Connect the Scanner: With the vehicle's ignition off, firmly plug the scanner's OBDII connector into the vehicle's OBDII port.
- Power On: Turn the vehicle's ignition to the "ON" position (do not start the engine unless instructed by a specific test). The scanner will automatically power on and begin communicating with the vehicle's onboard computer.
6. Operating Instructions
The V880 scanner offers various diagnostic functions accessible via its intuitive menu system and dedicated hotkeys.
6.1. Read and Clear DTCs (Diagnostic Trouble Codes)
This function allows you to read current, pending, and permanent DTCs, and clear them after repairs.
- From the main menu, select "Read Codes" to view stored, pending, and permanent DTCs.
- To clear codes, select "Clear DTCs". Confirm the action when prompted. Note: Clearing codes will turn off the Check Engine Light (MIL), but if the underlying issue is not resolved, the light will reappear.


6.2. I/M Readiness
This function checks the status of the vehicle's emission-related monitoring systems to determine if they are ready for an inspection/maintenance (smog) test.
- Press the dedicated "I/M" hotkey or select "I/M Readiness" from the menu.
- The screen will display the status of various monitors (e.g., MIL, MIS, FUE, CCM, CAT, O2S, EVAP). "OK" or a green indicator means the monitor has completed its test cycle.

6.3. Live Data Stream
View real-time operational parameters of the vehicle's engine, such as RPM, coolant temperature, fuel trim, and O2 sensor readings. This helps in diagnosing intermittent issues.
- From the main menu, select "Live Data".
- Choose "View Data Stream" to see numerical values or "View Graphic Items" to see data plotted on a graph.
- Use the arrow keys to scroll through different data parameters.


6.4. Freeze Frame Data
When an emission-related fault occurs, the ECU stores certain vehicle operating conditions at the time of the fault. This "freeze frame" data can help pinpoint the cause of the issue.
- From the main menu, select "Freeze Frame".
- View the recorded parameters.

6.5. O2 Sensor Test (Mode 6 & Mode 8)
The V880 supports advanced diagnostic modes, including O2 Sensor Test, EVAP Leak Test (Mode 8), and On-Board Component Test (Mode 6).
- O2 Sensor Test: Retrieves O2 sensor monitoring test results for the most recently completed tests from the vehicle's on-board computer.
- Mode 6 (On-Board Monitoring Test): Retrieves test results for emission-related powertrain components and systems that are not continuously monitored.
- Mode 8 (EVAP System Test): Initiates a leak test for the vehicle's Evaporative Emission Control System (EVAP).
Note: Availability of these tests may vary by vehicle. Some Nissan cars may not support the O2 sensor function due to protocol limitations.

6.6. DTC Lookup
The V880 has a built-in library of over 99,876 DTC definitions. Enter a code to get an instant explanation.
- From the main menu, select "DTC Lookup".
- Use the arrow keys to input the DTC characters.
- Press "OK" to view the definition.

6.7. Battery Voltage Test
Monitor your vehicle's battery voltage to prevent unexpected breakdowns.
- From the main menu, select "Battery Test".
- The scanner will display the current battery voltage and status (e.g., normal, low, overvoltage).

6.8. Printing Diagnostic Reports
Connect the V880 to a computer via USB to print professional-grade diagnostic reports.
- Connect the scanner to a PC using a USB cable.
- Follow the on-screen prompts on the scanner to select data for printing (e.g., DataStream, FreezeData, DTC).
- Use the provided software (if applicable, or standard printer drivers) on your PC to print the report.

6.9. Language Settings
The V880 supports multiple languages for its interface.
- From the main menu, navigate to "Settings".
- Select "Language" and choose your preferred language from the list (e.g., English, German, French, Spanish, Italian, Polish, Chinese, Russian).

7. Maintenance
- Cleaning: Use a soft, damp cloth to clean the scanner's exterior. Do not use abrasive cleaners or solvents.
- Storage: Store the device in a dry, cool environment away from direct sunlight and extreme temperatures.
- Firmware Updates: The AERMOTOR V880 supports lifetime free firmware updates. Visit the official AERMOTOR website for instructions on how to update your device to ensure optimal performance and compatibility with new vehicle models.
8. Troubleshooting
| Problem | Possible Cause | Solution |
|---|---|---|
| Scanner does not power on. | Loose connection; vehicle ignition off; vehicle battery low. | Ensure the OBDII connector is firmly plugged in. Turn ignition to "ON". Check vehicle battery voltage. |
| "Link Error" message. | Vehicle not OBDII compliant; faulty connection; communication protocol issue. | Verify vehicle is OBDII compliant (1996+). Check connection. Try on another OBDII compliant vehicle. |
| Cannot clear DTCs. | Underlying fault not repaired; ignition not in "ON" position. | Ensure the vehicle fault has been physically repaired. Turn ignition to "ON" (engine off). |
| Certain functions show "Not Supported". | Vehicle ECU does not support the specific function. | This is normal for some vehicles and functions. No action required. |
9. Specifications
- Model: V880
- Brand: AERMOTOR
- Product Dimensions: 6.57"L x 3.32"W x 0.9"H
- Item Weight: 11 ounces
- Screen Size: 2.8 Inches
- Operating System: Built-in System
- Power Source: Corded Electric (via OBDII port)
- Supported Protocols: SAE J1850 PWM, SAE J1850 VPW, ISO9141-2, ISO14230-4 KWP, ISO15765-4 CAN
- Language: English (multi-language support available)
- Compatibility: Universal Fit for OBDII Protocol Vehicles (1996 US-based, 2003 EU-based, 2007 Asia-based)
- DTC Library: Over 99,876 definitions
10. Vehicle Compatibility
The AERMOTOR V880 OBD2 Scanner is designed to be compatible with most vehicles that support the OBD2 protocol. This includes:
- US-based Cars: Manufactured after 1996 (e.g., Chevrolet, Ford, Cadillac, Chrysler, Dodge, Jeep, Lincoln, Rivian, Canoo, Buick, Tesla).
- EU-based Cars: Manufactured after 2003 (e.g., BMW, Audi, Porsche, Volkswagen, Land Rover, Renault, Fiat, Bugatti, Maserati, Vauxhall).
- Asia-based Cars: Manufactured after 2007 (e.g., Toyota, Lexus, Honda, Acura, Nissan, Infiniti, Mazda, Subaru, Mitsubishi, Suzuki, Hyundai, Kia).
Important Note: The V880 OBD2 Car Scanner is not compatible with new energy vehicles, hybrid vehicles, or diesel vehicles.

11. Warranty & Support
The AERMOTOR V880 engine light code reader is protected by a 3-year warranty. For any questions, technical assistance, or warranty claims, please contact AERMOTOR customer service. 24/7 customer service is available to assist you.
For the latest information, firmware updates, and support resources, please visit the official AERMOTOR website.


