1. Introduction
Welcome to the user manual for your WDYQJE R36MAX Retro Handheld Game Console. This guide provides essential information to help you set up, operate, maintain, and troubleshoot your device. Please read this manual thoroughly to ensure optimal performance and longevity of your console.
2. Product Overview
2.1 Package Contents
Upon unboxing, verify that all items listed below are present:
- Handheld Game Console (R36MAX)
- Type-C Charging Cable
- Protective Case
- Screen Protector
- User Manual (this document)
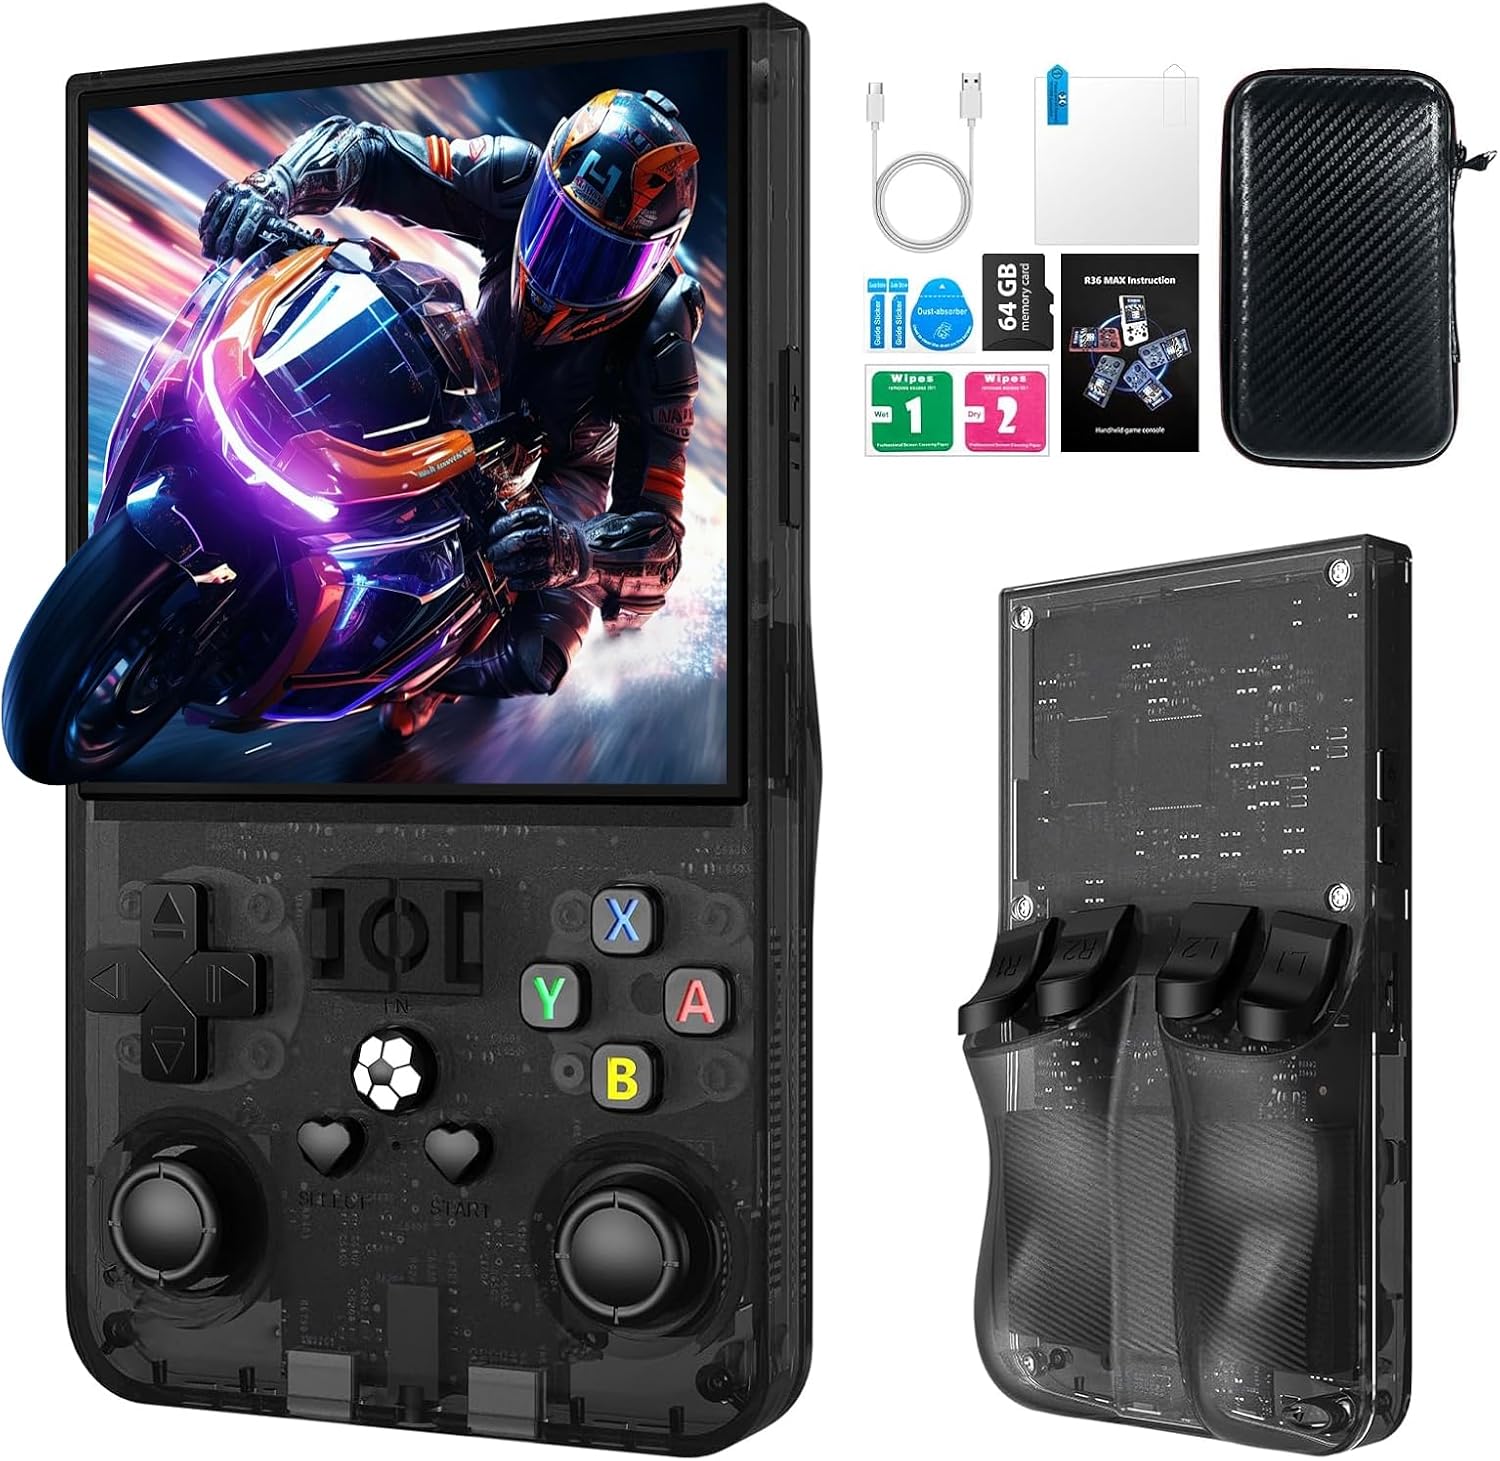
Image Description: The R36MAX handheld game console displayed alongside its accessories, including a Type-C cable, screen protector, 64GB TF card, and a protective carrying case.
2.2 Console Features
- Processor: 1.5GHz 64-bit RK3326 CPU with ARM64bit quad-core Cortex-A35 CPU.
- Operating System: Linux-based system.
- Display: 4.0-inch IPS HD screen with 720x720 pixel resolution, covered with tempered glass.
- Storage: Built-in 64GB TF card, expandable via additional TF card slot.
- Battery: 4000mAh rechargeable battery, providing up to 10 hours of playtime.
- Audio: Built-in speakers and 3.5mm headphone jack.
- Connectivity: Type-C charging port.
2.3 Device Layout and Controls
Familiarize yourself with the console's buttons and ports:

Image Description: A detailed diagram of the R36MAX handheld game console, highlighting the location and function of each button and port.
Front View: Features a 4.0-inch screen at the top. Below the screen, from left to right, are:
- Left Rocker (analog joystick)
- Directional Pad (D-pad)
- Select button
- FN (Function) button
- Start button
- Right Rocker (analog joystick)
- A, B, X, Y action buttons
- Volume keys (+ and -) on the right side.
- Power and Reset buttons on the left side.
- TF-game and TF1-OS card slots on the top edge.
Top View: Shows R1, R2, L1, L2 shoulder buttons.
3. Setup
3.1 Initial Charging
- Connect the provided Type-C charging cable to the charging port at the bottom of the console.
- Connect the other end of the cable to a compatible USB power adapter (5V/1A or 5V/2A recommended).
- Allow the console to charge fully before first use. The charging indicator light will typically change color or turn off when charging is complete.
Important: Do not play games while the console is charging, as this may potentially damage the TF card or the device's internal components.
3.2 Inserting/Removing TF Cards
The console comes with a pre-installed 64GB TF card for games. You can also insert an additional TF card for expanded storage.
- Locate the TF card slots on the top edge of the console (TF-game and TF1-OS).
- To insert a card, gently push the TF card into the slot until it clicks into place. Ensure the card is oriented correctly.
- To remove a card, gently push it inward again until it springs out.
Caution: Always power off the console before inserting or removing TF cards to prevent data corruption.
4. Operating Instructions
4.1 Power On/Off
- Power On: Press and hold the Power button (located on the left side) for a few seconds until the screen illuminates.
- Power Off: Press and hold the Power button until a power-off menu appears, then select "Shutdown" or "Power Off". Alternatively, a quick press of the power button may put the device into sleep mode.
- Reset: In case of a system freeze, use the Reset button (small pinhole next to Power button) with a thin object to restart the console.
4.2 Basic Navigation
- Use the Directional Pad (D-pad) or Left/Right Rockers to navigate through menus and game selections.
- Press the A button to confirm selections.
- Press the B button to go back or cancel.
- The Select and Start buttons are typically used for in-game functions or menu options.
4.3 Playing Games
The console supports various emulators. To play a game:
- From the main menu, navigate to the desired emulator or game list.
- Select a game using the D-pad/rockers and press the A button to launch it.
- During gameplay, use the console's buttons as per the original game's controls.
4.4 Adjusting Screen Rotation (RetroArch Menu)
For certain games or preferences, you may need to adjust the screen orientation:
- Enter any game.
- Press Select + X simultaneously to open the RetroArch Quick Menu.
- Press the B button to return to the main RetroArch menu.
- Navigate to Settings and press A.
- Select Video and press A.
- Select Output and press A.
- Select Video Rotation and press A.
- Choose Normal or other desired rotation options and press A to confirm.
- Exit the RetroArch menu to apply changes.
4.5 Volume Control
Use the Volume keys (+ and -) located on the right side of the console to adjust the audio output level.
4.6 Headphone Connection
Connect standard 3.5mm headphones to the OTC Headset port at the bottom of the console for private listening.
5. Maintenance
5.1 Cleaning the Console
- Use a soft, dry, lint-free cloth to wipe the screen and body of the console.
- For stubborn marks, slightly dampen the cloth with water or a mild screen cleaner. Avoid harsh chemicals.
- Do not spray liquids directly onto the console.
5.2 Battery Care
- To prolong battery life, avoid fully discharging the battery frequently.
- Store the console in a cool, dry place when not in use for extended periods.
- If storing for a long time, charge the battery to approximately 50% capacity.
5.3 Software Updates
Periodically check the manufacturer's official website or community forums for potential software or firmware updates. Follow instructions carefully when performing updates to avoid system damage.
6. Troubleshooting
If you encounter issues with your R36MAX console, refer to the following common problems and solutions:
| Problem | Possible Cause | Solution |
|---|---|---|
| Console does not power on. | Low battery; System crash. | Charge the console for at least 30 minutes. If still unresponsive, use the Reset button. |
| Games do not load or crash. | Corrupted game file; TF card issue; Emulator error. | Ensure TF card is properly inserted. Try restarting the console. Verify game file integrity if possible. |
| Buttons are unresponsive or incorrect. | Software glitch; Button mapping issue. | Restart the console. Check in-game or emulator settings for button remapping options. |
| Screen is blank or flickering. | System error; Display connection issue. | Restart the console. If the problem persists, contact customer support. |
If the issue persists after attempting these solutions, please refer to the Warranty and Support section for further assistance.
7. Specifications
| Feature | Detail |
|---|---|
| Model | R36MAX |
| Processor | 1.5GHz 64-bit RK3326 CPU, ARM64bit quad-core Cortex-A35 |
| Operating System | Linux |
| Screen | 4.0-inch IPS HD, 720x720 pixels, Tempered Glass |
| Memory Storage Capacity | 64 GB (expandable via TF card) |
| Battery | 4000mAh (1 D battery included) |
| Battery Life | Up to 10 hours |
| Charging Port | Type-C |
| Audio Output | Built-in speakers, 3.5mm headphone jack |
| Product Dimensions | 5.7 x 3.2 x 1.8 inches |
| Item Weight | 12.6 ounces |
| Material | Plastic |
| Manufacturer | WDYQJE |
| Recommended Age | 12 months and up |

Image Description: An image illustrating the R36MAX console's battery features, including "More than 6-8 hours of playback", "4000mAh High Capacity", "USB C charge cable", and "Maximum 5V 1.5A or 2A Charging". A close-up of the USB-C charging port is also visible.
8. Warranty and Support
For warranty information and customer support, please refer to the documentation included with your purchase or visit the official WDYQJE website. Keep your proof of purchase for any warranty claims.
Return Policy: The product typically includes a 30-day return/replacement policy. Please check your purchase details for specific terms.
For additional assistance, you may contact WDYQJE customer service through their official channels.