1. Introduction
This manual provides comprehensive instructions for the installation, operation, and maintenance of your Chamberlain 41A5273-14 Wall Control Panel. This panel is designed to replace existing 2-button wall controls for Chamberlain Security+ garage door openers manufactured between 2005 and 2011. Please read these instructions carefully before proceeding with installation or operation to ensure proper function and safety.
2. Product Overview
The Chamberlain 41A5273-14 is a 2-button wall control panel that allows you to operate your compatible garage door opener. It typically features one large button for opening/closing the garage door and a smaller button for controlling the garage door opener's light.
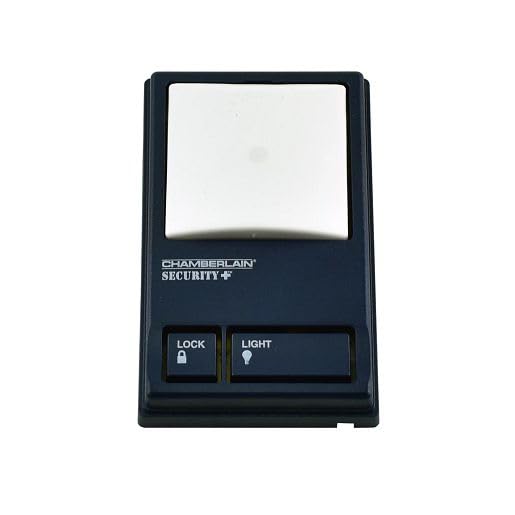
Image 1: Front view of the Chamberlain 41A5273-14 Wall Control Panel. This image displays the two-button layout, with a larger button for door operation and a smaller button for light control.
3. Compatibility
This wall control panel is compatible with Chamberlain Security+ garage door openers manufactured from 2005 to 2011. It is designed to replace legacy part numbers such as 041A6318, 945CB, 41C0494-1, 41A5273-2, and 41A5273-8.
IMPORTANT: This door control is NOT compatible with Security+ 2.0 models, which typically feature a yellow learn button on the garage door opener. Please verify your garage door opener's compatibility before installation.
4. Installation
4.1 Safety Precautions
- Always disconnect power to the garage door opener before performing any wiring or installation.
- Ensure all wiring is done according to local electrical codes.
4.2 Tools Required
- Flathead screwdriver
- Wire strippers (if new wire is needed)
- Drill (if mounting in a new location)
4.3 Wiring Instructions
- Disconnect Power: Unplug the garage door opener from the electrical outlet or turn off the circuit breaker.
- Remove Old Panel (if applicable): Carefully remove the existing wall control panel. Note the wiring connections.
- Connect Wires: Connect the two low-voltage wires from your garage door opener to the two terminals on the back of the new 41A5273-14 wall control panel. The polarity of these wires typically does not matter for this type of control.
- Mount Panel: Secure the new wall control panel to the wall using the provided screws. Ensure it is mounted at a convenient height, out of reach of small children.
- Restore Power: Plug the garage door opener back into the electrical outlet or turn on the circuit breaker.
5. Operation
5.1 Opening/Closing the Garage Door
Press the large button on the wall control panel once to open or close the garage door. Pressing it again while the door is in motion will stop the door.
5.2 Controlling the Garage Door Opener Light
Press the smaller button on the wall control panel once to turn the garage door opener's light on or off. The light will remain on for a preset time (usually 4-1/2 minutes) before automatically turning off, or it can be turned off manually by pressing the button again.
6. Maintenance
The Chamberlain 41A5273-14 Wall Control Panel requires minimal maintenance.
- Cleaning: Wipe the surface of the panel with a soft, damp cloth as needed. Avoid using abrasive cleaners or solvents.
- Wiring Check: Periodically inspect the wiring connections at the back of the panel and at the garage door opener terminals to ensure they are secure.
7. Troubleshooting
7.1 Panel Does Not Respond
- Check Power: Ensure the garage door opener is plugged in and receiving power.
- Verify Wiring: Confirm that the low-voltage wires are securely connected to both the wall control panel and the garage door opener terminals. Loose or corroded connections can prevent operation.
- Check Compatibility: Reconfirm that your garage door opener is a Security+ model (2005-2011) and not a Security+ 2.0 model.
7.2 Light Button Does Not Work
- Check Bulb: Ensure the light bulb in the garage door opener is functional and properly screwed in.
- Verify Wiring: As above, check wiring connections.
If issues persist, refer to your garage door opener's main instruction manual or contact the manufacturer's support.
8. Specifications
| Feature | Detail |
|---|---|
| Model Number | 41A5273-14 |
| Product Dimensions | 3 x 2 x 4 inches |
| Included Components | Wall Panel |
| Compatibility | Chamberlain Security+ Garage Door Openers (2005-2011) |
9. Warranty and Support
For warranty information and technical support, please refer to the original documentation provided with your Chamberlain garage door opener or visit the official Chamberlain/LiftMaster website. Specific warranty terms for replacement parts may vary.