Introduction
This manual provides essential instructions for the safe operation, setup, maintenance, and troubleshooting of your Korffe Mini Drone SQN-051. Please read this manual thoroughly before operating the drone to ensure proper use and to maximize your flying experience.
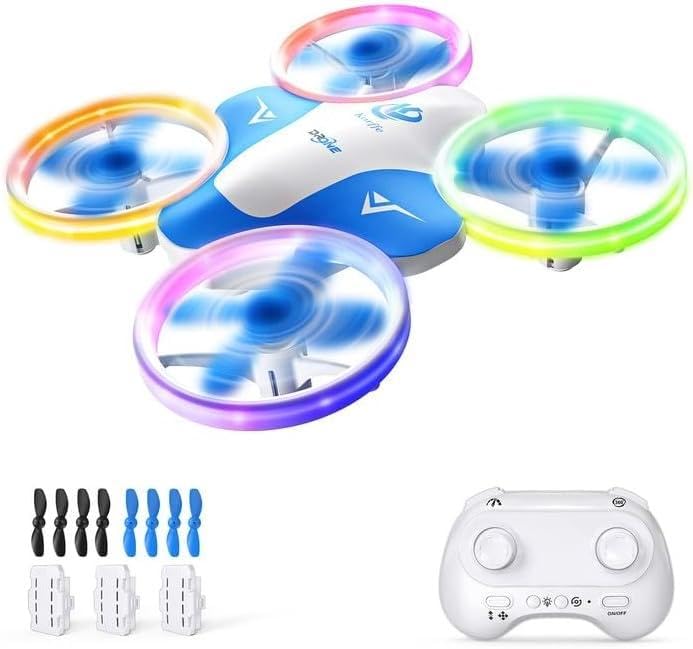
Image of the Korffe Mini Drone SQN-051, showcasing its compact design and blue and white color scheme.
1. Setup
1.1 Package Contents
Verify that all components are present in the package:
- Korffe Mini Drone SQN-051
- Remote Control
- 3 Rechargeable Drone Batteries (300 mAh each)
- USB Charging Cable
- 8 Spare Propellers (4 blue, 4 white)
- Instruction Manual (this document)
1.2 Charging the Drone Batteries
- Connect one end of the USB charging cable to a drone battery.
- Connect the other end of the USB charging cable to a USB power source (e.g., computer, USB wall adapter).
- The indicator light on the USB cable will show the charging status. Refer to the cable's specific instructions for light indications (usually red for charging, off or green for fully charged).
- Charging time is approximately 30 minutes per battery.
- Once fully charged, disconnect the battery from the charging cable.
Note: Each fully charged battery provides approximately 10 minutes of flight time, for a total of 30 minutes with all three included batteries.
1.3 Installing Remote Control Batteries
The remote control requires three (3) AAA batteries (not included).
- Open the battery compartment on the back of the remote control.
- Insert three AAA batteries, ensuring correct polarity (+/-).
- Close the battery compartment securely.
1.4 Installing Drone Battery
- Carefully insert a charged drone battery into the battery compartment on the drone.
- Ensure the battery is securely connected and the compartment cover (if any) is closed.
1.5 Pairing the Drone with the Remote Control
- Place the drone on a flat, level surface.
- Turn on the drone by pressing its power button. The drone's LED lights will flash.
- Turn on the remote control.
- Push the left joystick (throttle) all the way up, then all the way down. The drone's LED lights will stop flashing and become solid, indicating successful pairing.
- The drone is now ready for flight.
2. Operating Instructions
2.1 Basic Flight Controls
- One-Key Take-off/Landing: Press the dedicated one-key take-off/landing button on the remote control to automatically launch or land the drone.
- Throttle (Left Joystick):
- Push up: Increase altitude.
- Push down: Decrease altitude.
- Push left/right: Rotate drone left/right (yaw).
- Directional Control (Right Joystick):
- Push up: Fly forward.
- Push down: Fly backward.
- Push left: Fly left (strafe).
- Push right: Fly right (strafe).
2.2 Special Features
- LED Lights: The drone features 6 types of adjustable colored LED lights. Use the designated button on the remote control to cycle through different light patterns and colors.
- 360-Degree Flip: Press the 360-degree flip button, then push the right joystick in any direction to perform an aerial flip.
- Ring Flight: Activate the ring flight function (refer to remote control diagram for specific button) to make the drone fly in a circular pattern.
- Three-Speed Settings: The drone has three adjustable speed modes (low, medium, high) to accommodate different skill levels. Press the speed button to switch between modes.
- Low Battery Alarm: The drone will indicate a low battery status, typically by flashing its LED lights, prompting you to land it safely.
2.3 Flight Environment
- Indoor Use: The Korffe Mini Drone is ideal for indoor use due to its compact size and protective design. Ensure sufficient clear space to avoid collisions.
- Outdoor Use: While suitable for outdoor use, avoid flying in windy conditions as the drone's light weight can make it difficult to control. Fly in open areas away from obstacles, people, and animals.
3. Maintenance
3.1 Propeller Care and Replacement
The drone's propellers are designed to be detachable for easy cleaning and replacement. If a propeller becomes damaged or entangled with hair/debris, it can affect flight performance.
- Cleaning: Gently remove any hair or debris from the propellers and motor shafts.
- Replacement: If a propeller is bent or broken, carefully pull it off its shaft. Select a new propeller from the included spares (ensure it matches the original's rotation direction, usually indicated by a letter like A or B on the propeller and drone arm). Press the new propeller firmly onto the motor shaft.
Note: Eight spare propellers (four blue, four white) are included, allowing for customization and easy replacement.
3.2 Battery Storage
To prolong battery life, store drone batteries in a cool, dry place away from direct sunlight and extreme temperatures. Do not store fully charged or completely depleted batteries for extended periods.
4. Troubleshooting
| Problem | Possible Cause | Solution |
|---|---|---|
| Drone does not respond to remote control. | Not paired; remote control batteries low/incorrectly installed; drone battery low. | Re-pair the drone and remote (Section 1.5); Check/replace remote batteries; Charge drone battery. |
| Drone flies erratically or drifts. | Not calibrated on a flat surface; damaged propellers; debris in motors. | Ensure drone is placed on a flat surface before pairing; Check and replace damaged propellers (Section 3.1); Clean motors/propellers. |
| Short flight time. | Drone battery not fully charged; old battery; flying against strong wind. | Ensure battery is fully charged (Section 1.2); Consider replacing old batteries; Avoid flying in windy conditions. |
| Drone's LED lights are flashing rapidly. | Low drone battery. | Land the drone immediately and charge the battery. |
5. Specifications
- Model: SQN-051
- Brand: Korffe
- Manufacturer: SHANTOU SIQINUO TECHNOLOGY CO.,LTD
- Dimensions (L x W x H): 10 x 5 x 10 cm (approximately 3.94 x 1.97 x 3.94 inches)
- Weight: 260 g (approximately 0.57 lbs)
- Drone Battery: 300 mAh (x3 included)
- Flight Time: Approximately 10 minutes per battery (30 minutes total with all batteries)
- Charging Time: Approximately 30 minutes per battery
- Remote Control Batteries: 3 x AAA (not included)
- Connectivity: USB (for charging)
- Special Features: Colored LED lights, 360-degree flip, Ring flight, Three-speed settings, Low battery alarm
- Skill Level: Beginner
- Age Range: Child
- Color: Blue and White
- Video Recording Resolution: 720p (Note: Camera functionality is not explicitly detailed in product description, but this resolution is listed in specifications.)
6. Warranty and Support
For any questions, issues, or support needs regarding your Korffe Mini Drone SQN-051, please contact our customer service. We are committed to resolving your concerns within 24 hours to ensure your satisfaction.
Please refer to your purchase documentation or the seller's information for specific warranty details and contact methods.
This manual is provided for informational purposes only. Specifications and features are subject to change without notice.