
1. Introduction
This manual provides essential instructions for the safe installation, operation, and maintenance of your XtremepowerUS 1800 GPH Pool Cartridge Filter System with Pump, Model 75231. This system is designed for above-ground swimming pools up to 18,000 gallons, offering efficient water filtration to maintain clear and clean pool water. Please read this manual thoroughly before installation and use, and retain it for future reference.

Image 1.1: Overview of the XtremepowerUS Pool Cartridge Filter System.
2. Safety Information
Always observe basic safety precautions when installing and operating this electrical equipment. Failure to follow these instructions can result in serious injury or death.
- Electrical Safety: Connect only to a grounded, ground-fault circuit interrupter (GFCI) protected receptacle. Do not bypass the GFCI. Ensure the power cord is not damaged.
- Water and Electricity: Never operate the pump when people are in the pool. Keep the pump and electrical connections away from water.
- Pressure: Do not operate the system above the maximum recommended pressure (50 PSI). Always relieve pressure before servicing the filter.
- Children: Keep children away from the equipment. This appliance is not intended for use by persons with reduced physical, sensory or mental capabilities, or lack of experience and knowledge, unless they have been given supervision or instruction.
- Installation: Install the system on a solid, level surface. Ensure proper ventilation around the motor.
3. Components Overview
Your XtremepowerUS Pool Cartridge Filter System includes the following main components:
- Filter Housing with Cartridge
- 0.75 HP Pool Pump
- Base Plate
- Pressure Gauge
- Hoses (1.5" diameter)
- Adaptors and Clamps
- Sealing O-rings

Image 3.1: The filter system with pump and connected hoses.
4. Setup and Installation
Proper installation is crucial for the efficient and safe operation of your filter system. Follow these steps carefully.
4.1 Placement
- Position the filter system on a firm, level surface, preferably concrete or a sturdy deck.
- Ensure the system is located at least 10 feet (3 meters) from the pool edge and in an area that allows for adequate drainage.
- Maintain sufficient clearance around the pump and filter for ventilation and maintenance access.
4.2 Connecting Hoses and Adaptors
- Connect the pool's skimmer outlet to the pump's inlet port using one of the provided hoses and adaptors. Secure with clamps.
- Connect the pump's outlet port to the filter housing's inlet.
- Connect the filter housing's outlet to the pool's return inlet using the second hose and adaptors. Secure all connections tightly to prevent leaks.
- Install the pressure gauge onto the designated port on the filter housing.

Image 4.1: System dimensions and included accessories for connection.
4.3 Priming the Pump
Before starting the pump, it must be primed to ensure it is filled with water and can operate correctly.
- Ensure the pool is filled to the appropriate level, covering the skimmer and return inlets.
- Open all valves on the suction and return lines to the pool.
- Remove the clear lid from the pump's strainer basket. Fill the basket with water until it overflows.
- Replace the lid, ensuring it is securely tightened.
- Plug the pump into the GFCI-protected outlet. The pump should start drawing water. If it does not prime within a few minutes, turn it off, re-prime, and check for air leaks in the suction line.
Video 4.2: An overview of the pool cartridge filter system, including setup and cleaning demonstrations. (Duration: 0:45)
5. Operating Instructions
Once installed and primed, operating your filter system is straightforward.
5.1 Starting the System
After priming, simply plug the pump into the GFCI outlet. The pump will begin circulating and filtering pool water. The system is designed to circulate 18,000 gallons in approximately 10 hours.
5.2 Monitoring the Pressure Gauge
The pressure gauge indicates the internal pressure of the filter. Note the initial clean filter pressure reading. As the filter cartridge collects debris, the pressure will gradually rise. When the pressure gauge reads 8-10 PSI above the initial clean pressure, or if the flow rate significantly decreases, it is time to clean or replace the filter cartridge.
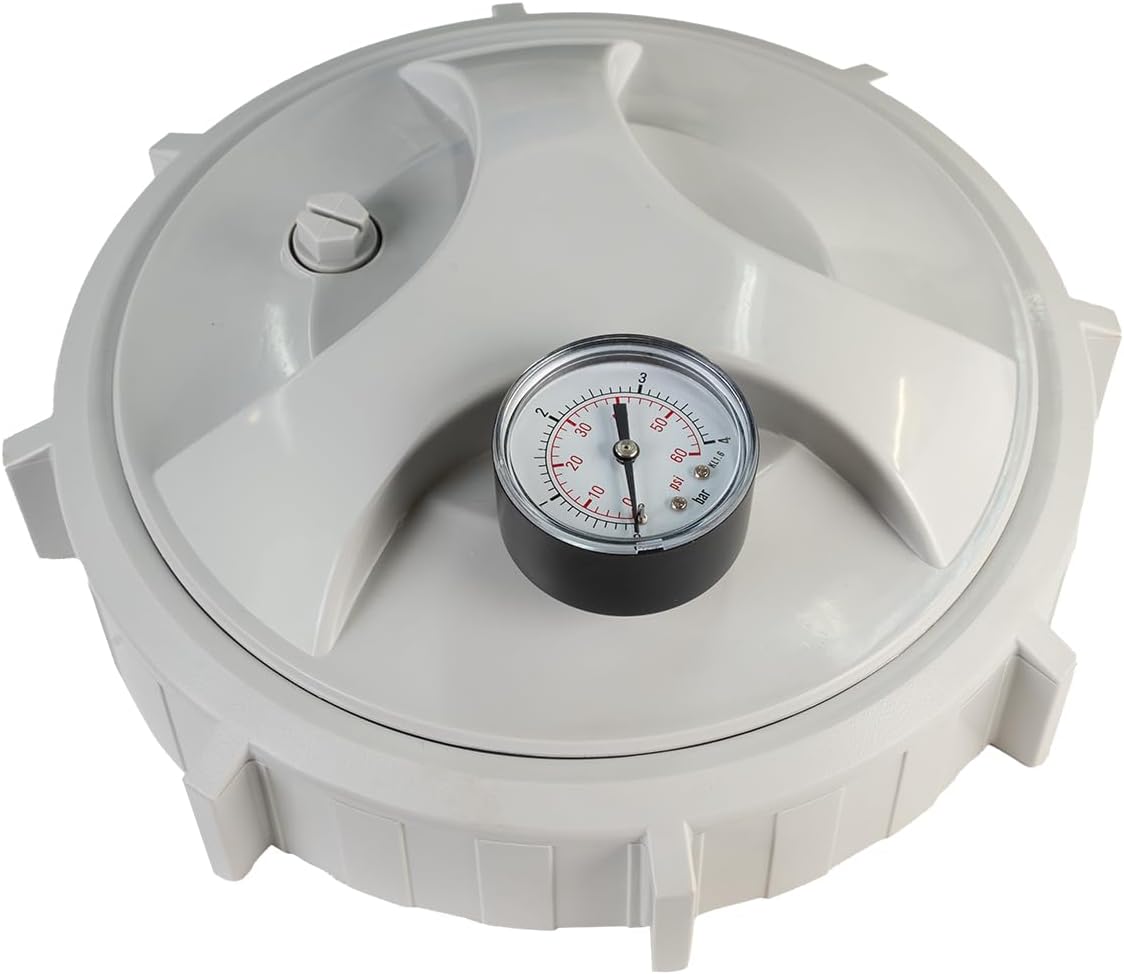
Image 5.1: Close-up view of the pressure gauge, indicating system pressure.
6. Maintenance
Regular maintenance ensures optimal performance and extends the life of your filter system.
6.1 Cleaning the Filter Cartridge
- Turn Off Power: Always disconnect the pump from the power source before performing any maintenance.
- Relieve Pressure: Open the air relief valve on top of the filter housing to release any trapped air and pressure.
- Remove Lid: Unscrew and remove the filter housing lid.
- Remove Cartridge: Carefully lift out the dirty filter cartridge.
- Clean Cartridge: Rinse the cartridge thoroughly with a garden hose to remove debris from between the pleats. For stubborn dirt or oils, a specialized filter cleaner may be used.
- Inspect and Replace: Inspect the cartridge for damage. If damaged or excessively worn, replace it with a new one.
- Reassemble: Place the clean cartridge back into the housing, ensuring it seats properly. Replace the lid and tighten securely. Close the air relief valve.
- Reprime and Restart: Follow the priming steps (Section 4.3) and restart the pump.

Image 6.1: Demonstrating the cleaning process for the filter cartridge.
6.2 Winterization
Before freezing temperatures arrive, prepare your filter system for winter storage:
- Disconnect power to the pump.
- Drain all water from the pump and filter housing. Remove drain plugs if present.
- Remove the filter cartridge, clean it, and store it in a dry place.
- Store the pump and filter housing in a dry, protected area where temperatures will not drop below freezing.
7. Troubleshooting
This section addresses common issues you might encounter with your filter system.
| Problem | Possible Cause | Solution |
|---|---|---|
| Pump does not start or hums | No power; tripped GFCI; motor obstruction | Check power connection; reset GFCI; inspect impeller for debris. |
| Low water flow | Clogged filter cartridge; air leak in suction line; low pool water level; clogged skimmer/pump basket | Clean or replace cartridge; check all connections for leaks; add water to pool; clean skimmer/pump basket. |
| Water not clearing | Dirty filter; insufficient run time; chemical imbalance | Clean/replace cartridge; increase pump run time; test and adjust pool chemistry. |
| Air bubbles in return line | Air leak in suction line; low pool water level | Check all suction side connections for leaks; ensure pool water level is adequate. |
8. Specifications
Key technical specifications for the XtremepowerUS Pool Cartridge Filter System, Model 75231:
- Model Number: 75231
- Pump Horsepower: 0.75 HP
- Voltage: 115 Volts
- Frequency: 60 Hz
- Maximum Flow Rate: 62 Gallons Per Minute (GPM)
- Maximum Head Lift: 39.4 Feet
- Filter Area: 25 sq. ft.
- Recommended Pool Size: Up to 18,000 Gallons
- Port Size: 1.5 inches
- Product Dimensions (L x W x H): 21" x 22.5" x 20.5"
- Item Weight: 43.5 Pounds
- Material: Mixed
- Maximum Water Temperature: 104°F (40°C)
- Maximum Pressure: 50 PSI
9. Warranty & Support
For specific warranty details and customer support, please refer to the documentation included with your purchase or visit the official XtremepowerUS website. Keep your purchase receipt as proof of purchase for any warranty claims.

