
AmeriLite 02-AZ-DR09-PGM-P-G3-A
AmeriLite Switchback LED Projector Headlight Pair Instruction Manual
Model: 02-AZ-DR09-PGM-P-G3-A | Brand: AmeriLite

Image 0.1: AmeriLite Switchback LED Projector Headlight Pair.
1. Introduction
This instruction manual provides essential information for the proper installation, operation, and maintenance of your AmeriLite Switchback LED Projector Headlight Pair. Please read this manual thoroughly before proceeding with installation or use to ensure safety and optimal performance.
This headlight assembly is designed as a direct replacement for specific Dodge Ram models, enhancing visibility and vehicle aesthetics.
1.1. Compatibility
- 2009-2018 Dodge Ram 1500
- 2010-2018 Dodge Ram 2500/3500
- Note: Fits Dual/Quad Models ONLY. Does not fit Ram models equipped with factory projector headlights.
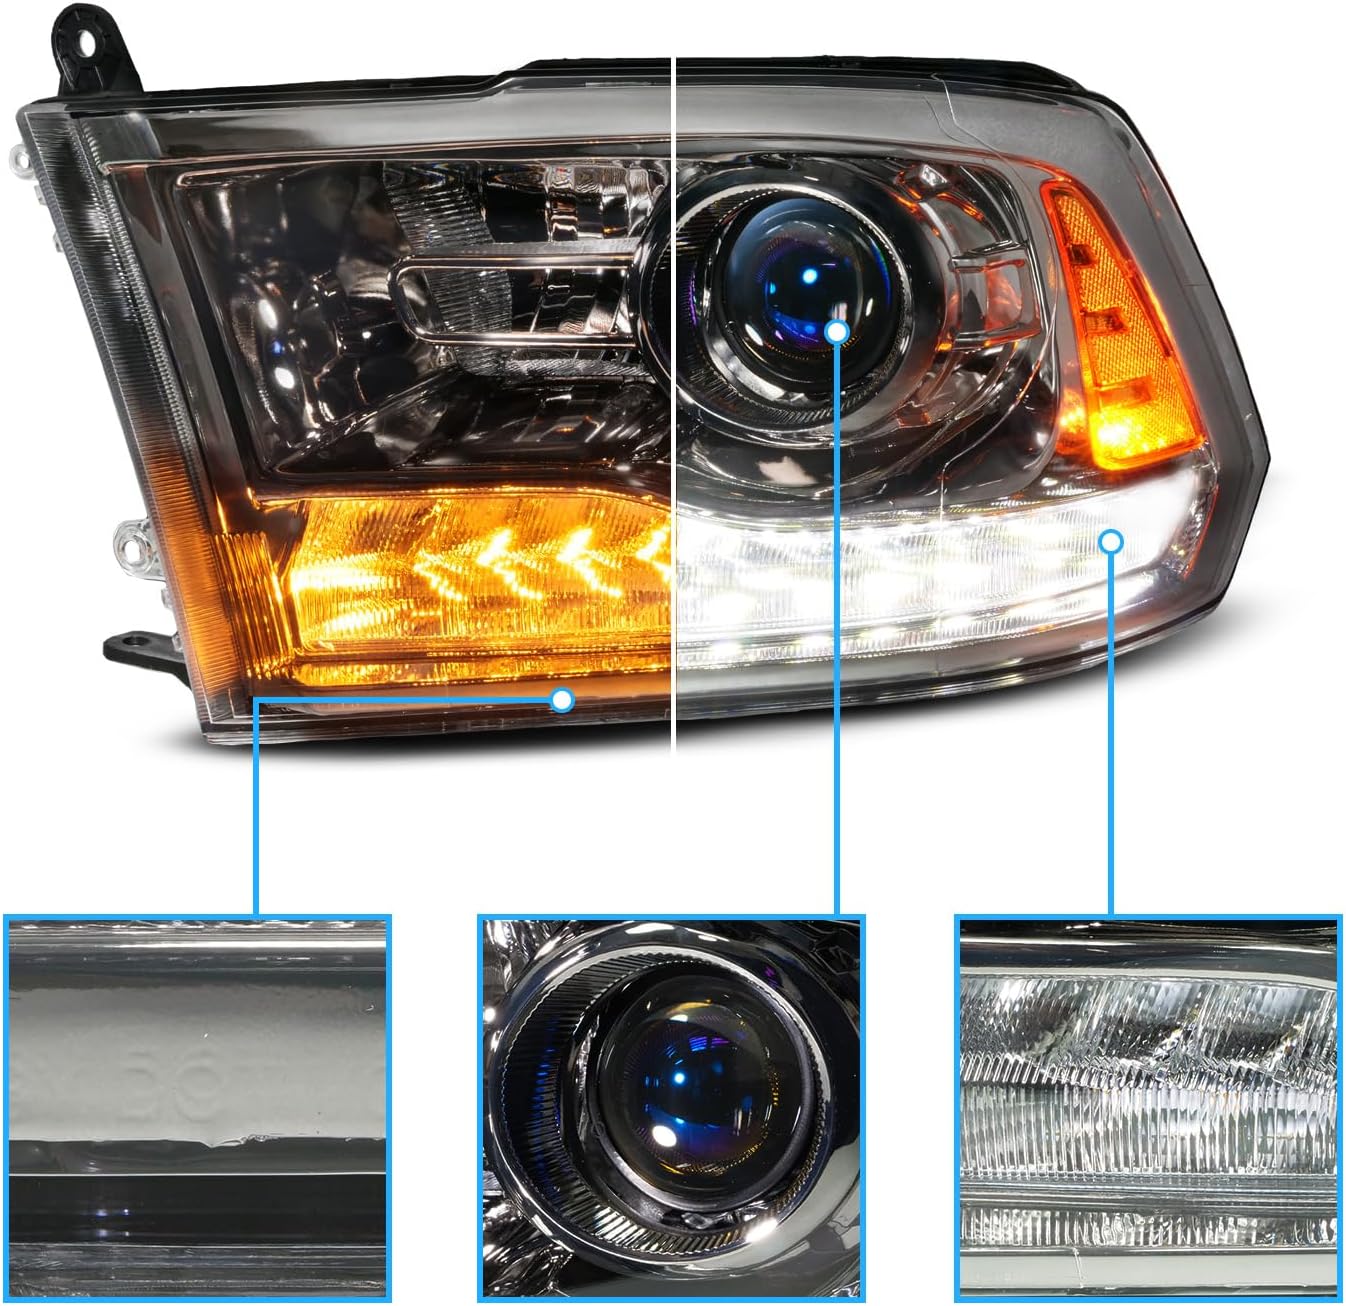
Image 1.1: Visual representation of compatible Dodge Ram truck models.
2. Safety Information
Always prioritize safety during installation and operation. Failure to follow these guidelines may result in injury or damage to the product or vehicle.
- Professional Installation Recommended: Due to the complexity of automotive electrical systems and vehicle disassembly, professional installation is highly recommended.
- Disconnect Battery: Before beginning any electrical work, disconnect the vehicle's negative battery terminal to prevent electrical shock or short circuits.
- Wear Protective Gear: Use appropriate personal protective equipment, such as gloves and eye protection.
- Handle with Care: Headlight assemblies contain delicate components. Handle them carefully to avoid damage.
- DOT & SAE Compliance: These headlights meet or exceed all U.S. and Canadian regulations for safety and performance.
3. Package Contents
Verify that all components are present and undamaged upon opening the package.
- 1x Driver Side Headlight Assembly (Gun-Metal Housing)
- 1x Passenger Side Headlight Assembly (Gun-Metal Housing)
- Pre-installed Low Beam H9 Bulb
- Pre-installed High Beam 9005XS Bulb
- Integrated Switchback LED Parking & Turn Signal Light Bar
- Necessary wiring harnesses/adapters (may vary by vehicle model)

Image 3.1: Overview of the headlight pair and included bulbs/adapters.
4. Installation Guide (Setup)
This section outlines the general steps for installing the AmeriLite Headlight Pair. Professional installation is strongly advised.
4.1. Tools Required (Typical)
- 10mm Socket Wrench
- Flathead Screwdriver
- Trim Removal Tool (optional, for plastic clips)
4.2. Installation Steps
- Prepare Vehicle: Park the vehicle on a level surface, engage the parking brake, and turn off the engine. Disconnect the negative terminal of the vehicle's battery.
- Access Headlights: Depending on your specific Dodge Ram model, you may need to remove the front grille and/or loosen the bumper to access the headlight mounting bolts. Refer to your vehicle's service manual or an online resource for specific removal procedures.
- Remove Old Headlights:
- Locate and remove the mounting bolts securing the factory headlight assembly.
- Carefully pull the headlight assembly forward to detach it from its clips.
- Disconnect all electrical connectors from the bulbs and the main harness.
- Install New Headlights:
- Connect the electrical harnesses from the new AmeriLite headlight assembly to the vehicle's wiring. Ensure all connections are secure.
- Carefully position the new headlight assembly into the vehicle's headlight opening, ensuring all mounting tabs align.
- Secure the headlight assembly with the factory mounting bolts. Do not overtighten.
- Reconnect Battery: Reconnect the negative battery terminal.
- Test Functionality: Turn on the vehicle and test all headlight functions: low beam, high beam, parking lights, and turn signals.
- Adjust Beam Aim: The headlights feature beam adjusters. After installation, it is crucial to properly aim the headlights to ensure optimal visibility and to avoid blinding oncoming traffic. Refer to Image 4.1 for adjuster location. This may require a wall or a professional aiming station.

Image 4.1: Rear view of the headlight assembly highlighting the main connector and beam adjuster.
4.3. Post-Installation Considerations
- Warning Lights: Some vehicles may display a "parking light out" or similar warning message after installing LED components. This typically occurs because the vehicle's computer detects a different electrical load. This may require programming the vehicle's Body Control Module (BCM) with a diagnostic tool (e.g., AlphaOBD) to recognize the LED lights. Consult a qualified technician for assistance if this occurs.
- Sealing: While manufactured to high standards, periodically inspect the headlight seals for any signs of moisture intrusion, especially after heavy rain or car washes.
5. Operation
The AmeriLite Switchback LED Projector Headlight Pair operates in conjunction with your vehicle's existing lighting controls.
- Low Beam: Activated via your vehicle's standard headlight switch. Provides illumination for general driving conditions.
- High Beam: Activated via your vehicle's standard high beam lever/switch. Provides maximum illumination for dark roads when no oncoming traffic is present.
- Parking Lights / Daytime Running Lights (DRL): The integrated LED light bar functions as both parking lights and DRLs.
- Switchback Turn Signals: The LED light bar features a switchback function. When the turn signal is activated, the white DRLs will switch to amber and flash, then return to white when the turn signal is disengaged.

Image 5.1: Switchback LED functionality (white DRL and amber turn signal).

Image 5.2: High-intensity LED illumination comparison.
6. Maintenance
Regular maintenance helps preserve the appearance and functionality of your headlights.
- Cleaning: Clean the headlight lenses regularly with a soft cloth and mild automotive soap or glass cleaner. Avoid abrasive cleaners or harsh chemicals, which can damage the polycarbonate lens material or UV coating.
- Inspection: Periodically inspect the headlight assemblies for any signs of damage, cracks, or moisture accumulation. Ensure all wiring connections remain secure.
- Bulb Replacement: While the LED components are long-lasting, the H9 (low beam) and 9005XS (high beam) bulbs are replaceable. If a bulb fails, replace it with a bulb of the same type and wattage. Refer to Image 4.1 for bulb access.
- UV Protection: The lenses are treated with a UV and abrasive coating. To prolong their lifespan, consider applying a UV protectant specifically designed for automotive plastics annually.
7. Troubleshooting
This section addresses common issues you might encounter.
| Problem | Possible Cause | Solution |
|---|---|---|
| Headlight not illuminating |
|
|
| "Parking Light Out" warning on dashboard |
|
|
| Moisture inside headlight lens |
|
|
| Improper beam aim |
|
|
8. Specifications
| Brand | AmeriLite |
| Model Number | 02-AZ-DR09-PGM-P-G3-A |
| Color | Gun Metal Housing, Clear Lens |
| Lens Material | Polycarbonate |
| Light Source | Projector (Low/High Beam), Switchback LED (DRL/Turn Signal) |
| Bulb Type (Included) | H9 (Low Beam), 9005XS (High Beam) |
| Safety Rating | DOT Compliant, SAE Compliant |
| Compatibility | 2009-2018 Dodge Ram 1500, 2010-2018 Dodge Ram 2500/3500 (Dual/Quad Models ONLY) |
| Item Weight | Approximately 22.4 pounds (pair) |
| Package Dimensions | Approximately 24.46 x 23.39 x 13.72 inches |
9. Warranty and Support
AmeriLite provides a manufacturer's warranty for this product.
- Warranty Period: This product typically comes with a 1-year manufacturer's warranty from the date of purchase. Please retain your proof of purchase for warranty claims.
- Warranty Coverage: The warranty covers defects in materials and workmanship under normal use. It does not cover damage due to improper installation, accidents, misuse, or unauthorized modifications.
- Customer Support: For technical assistance, warranty inquiries, or replacement parts, please contact AmeriLite customer service through their official channels or the retailer where the product was purchased.
Ask a question about this manual
Ask about setup, troubleshooting, compatibility, parts, safety, or missing instructions. Manuals+ will review the question and use this page’s manual context to help answer it.