
1. Introduction
This instruction manual provides important information for the installation, operation, and maintenance of your BOSCH HBF134EB2 oven. Please read this manual thoroughly before using the appliance for the first time to ensure safe and correct operation. Keep this manual in a safe place for future reference.
2. Safety Instructions
Always observe the following safety instructions to prevent accidents and damage to the appliance:
- Electrical Safety: Ensure the oven is correctly earthed and connected to a power supply that matches the specifications on the rating plate. Do not use extension cords or multiple socket adapters.
- Hot Surfaces: The oven and its accessible parts become very hot during use. Exercise caution to avoid touching heating elements. Keep children away.
- Supervision: Never leave the oven unattended during operation, especially when cooking with fat or oil, as these can ignite.
- Cleaning: Always switch off the appliance and allow it to cool before cleaning. Do not use harsh abrasive cleaners or sharp metal scrapers to clean the oven door glass, as they can scratch the surface, which may result in shattering of the glass.
- Repairs: Only authorized service personnel should carry out repairs. Incorrect repairs can lead to considerable danger for the user.
3. Product Overview
Familiarize yourself with the components of your BOSCH HBF134EB2 oven.

Figure 3.1: Front view of the BOSCH HBF134EB2 oven. This image displays the oven's sleek black exterior, featuring two rotary control knobs on either side of a central digital display. The left knob controls cooking functions, while the right knob sets the temperature. The digital display shows the time and other operational indicators.
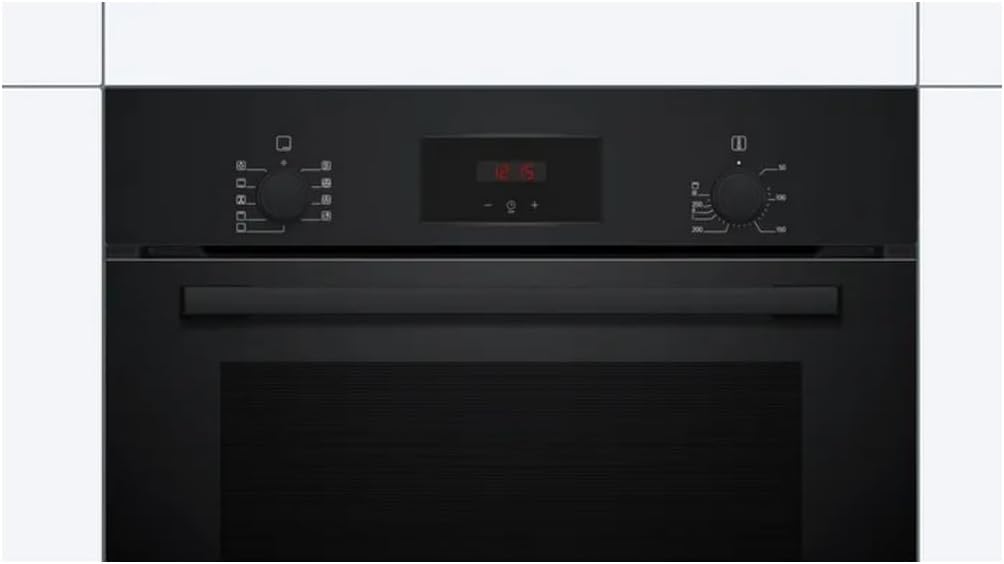
Figure 3.2: The BOSCH HBF134EB2 oven with its door open. This view reveals the spacious interior, equipped with multiple rack positions and two baking trays, demonstrating the oven's capacity and versatility for various cooking needs.

Figure 3.3: A detailed view of the BOSCH HBF134EB2 oven's interior, focusing on the rear wall. The image clearly shows the convection fan, which ensures even heat distribution, and the protective cover over the heating element, highlighting the oven's design for efficient cooking.

Figure 3.4: The energy efficiency label for the BOSCH HBF134EB2 oven. This label indicates an energy class of A, with energy consumption values of 0.98 kWh/cycle for conventional heating and 0.79 kWh/cycle for forced air convection, and a usable volume of 66 liters.
4. Setup and Installation
Proper installation is crucial for the safe and efficient operation of your oven. It should only be carried out by a qualified technician.
4.1 Unpacking and Inspection
- Carefully remove all packaging materials.
- Inspect the oven for any transport damage. Do not connect a damaged appliance. Contact your supplier.
- Remove all accessories and internal packaging from the oven cavity.
4.2 Electrical Connection
- The oven must be connected to the mains supply by a qualified electrician.
- Ensure the voltage and frequency specified on the rating plate match your household supply.
- The appliance must be correctly earthed.
4.3 First Use and Initial Cleaning
- Before first use, wipe the oven interior with a damp cloth and mild detergent.
- Heat the empty oven for approximately one hour at maximum temperature (e.g., 250°C with conventional heat) to burn off any manufacturing residues. Ensure good ventilation during this process.
5. Operating Instructions
This section explains how to use the various functions of your BOSCH HBF134EB2 oven.
5.1 Control Panel
The control panel consists of two rotary knobs and a digital display.
- Left Rotary Knob: Selects the heating function (e.g., Conventional Heat, Hot Air 3D, Grill).
- Right Rotary Knob: Sets the temperature in degrees Celsius (°C).
- Digital Display: Shows the current time, cooking duration, and other settings.
5.2 Setting the Time
- When the oven is first connected or after a power cut, the time display will flash.
- Use the '+' or '-' buttons (usually located near the digital display) to set the current time.
- Confirm the setting by pressing the clock symbol or waiting a few seconds.
5.3 Basic Cooking Functions
- Select Function: Turn the left rotary knob to the desired heating function (e.g., Hot Air 3D for even baking on multiple levels, Conventional Heat for traditional baking, Grill for browning).
- Set Temperature: Turn the right rotary knob to the desired temperature. The oven will begin to heat up.
- Monitor Cooking: The oven light will illuminate when the door is opened. You can also set a timer for cooking duration using the digital display controls.
- Switch Off: Once cooking is complete, turn both rotary knobs to the 'Off' position.
5.4 Using Oven Accessories
Your oven comes with various accessories such as oven racks and baking trays. Ensure they are inserted correctly into the side racks. Refer to the markings on the side racks for appropriate levels for different dishes.
6. Maintenance and Cleaning
Regular cleaning and maintenance will prolong the life of your oven and ensure optimal performance.
6.1 Cleaning the Oven Interior
- Allow the oven to cool completely before cleaning.
- Remove any loose food residues.
- Use a damp cloth and a mild cleaning agent specifically designed for ovens. Avoid abrasive cleaners.
- For stubborn stains, a specialized oven cleaner can be used, following the manufacturer's instructions.
6.2 Cleaning the Oven Exterior
- Wipe the exterior surfaces with a soft, damp cloth and a mild detergent.
- Do not use abrasive cleaners or harsh chemicals, as they can damage the finish.
6.3 Replacing the Oven Light
- Ensure the oven is switched off and completely cool. Disconnect from the power supply.
- Unscrew the glass cover of the oven light.
- Replace the bulb with a new one of the same type (heat-resistant, specified wattage).
- Screw the glass cover back on.
7. Troubleshooting
Here are solutions to common issues you might encounter with your oven.
| Problem | Possible Cause | Solution |
|---|---|---|
| Oven does not heat up. | No power supply; oven settings incorrect. | Check power connection and circuit breaker. Ensure function and temperature knobs are set correctly. |
| Oven light not working. | Bulb is faulty. | Replace the oven light bulb (refer to Section 6.3). |
| Uneven cooking results. | Incorrect temperature/function; food placement. | Ensure correct function (e.g., Hot Air 3D for multiple levels). Use recommended rack positions. Preheat oven fully. |
| Digital display flashing. | Power interruption; time not set. | Set the current time (refer to Section 5.2). |
If the problem persists after attempting these solutions, please contact customer service.
8. Specifications
- Brand: Bosch
- Model: HBF134EB2
- Dimensions (Package): 68 x 67 x 66 cm
- Weight (Package): 36 kg
- Energy Class: A
- Usable Volume: 66 Liters
- Energy Consumption (Conventional): 0.98 kWh/cycle
- Energy Consumption (Forced Air Convection): 0.79 kWh/cycle
9. Warranty and Support
Your BOSCH HBF134EB2 oven comes with a manufacturer's warranty. Please refer to the warranty card provided with your appliance for specific terms and conditions, including the warranty period and coverage details.
For technical assistance, spare parts, or to arrange a service appointment, please contact Bosch customer support. You can find contact information on the official Bosch website or in the documentation included with your appliance.
When contacting support, please have your appliance's model number (HBF134EB2) and serial number ready. The serial number is typically located on the rating plate, which can be found on the inside frame of the oven door.