
1. Introduction
This manual provides detailed instructions for the installation, operation, and maintenance of your MekedeTech Android Car Radio. This unit is specifically designed for Fiat Egea models manufactured between 2015 and 2018, offering a seamless upgrade to your vehicle's infotainment system.
Key features include a 9-inch touch screen, Android 13 OS, Wireless CarPlay and Android Auto compatibility, GPS navigation, WiFi connectivity, and FM radio functionality.

Image 1.1: The MekedeTech Android Car Radio main unit, featuring a large touch screen display with various applications and widgets.
2. Package Contents
Before installation, please verify that all components listed below are present in your package:
- Main Head Unit (Android Car Radio)
- Power Cable + Canbus Box
- RCA Cable (Note: M90S/95S models may not include a cooling fan connector cable)
- Reversing Camera Cable
- USB Cables (Multiple, for various connections)
- Microphone (MIC) (Note: M90S/95S models may not include an external MIC)
- GPS Antenna
- Audio Out Cable
- 4G Antenna (if applicable to your model variant)

Image 2.1: Visual representation of the components included in the product package, such as the main unit, various cables, and antennas.
3. Setup and Installation
The MekedeTech Android Car Radio is designed for direct compatibility with the Fiat Egea 2015-2018, requiring no cutting or modification of the original car wiring. This ensures easy integration with your vehicle's existing systems.
3.1 Pre-Installation Check
- Ensure the vehicle's ignition is off and the battery is disconnected before starting installation.
- Confirm all package contents are present and undamaged.
3.2 General Installation Steps
- Carefully remove the original car radio unit and trim panels. Refer to your vehicle's service manual for specific instructions.
- Connect the provided power cable and Canbus box to the vehicle's wiring harness. Ensure all connections are secure.
- Connect the GPS antenna and route it to a location with a clear view of the sky (e.g., dashboard, A-pillar).
- Connect the WiFi/4G antenna (if applicable) and route it for optimal signal reception.
- Connect the reversing camera cable and other auxiliary cables (RCA, USB, MIC) as needed.
- Carefully mount the new Android Car Radio into the dashboard opening.
- Reconnect the vehicle battery and test the unit's functionality.
3.3 Cooling Fan Setup (If Applicable)
Some models include a cooling fan to manage CPU temperature, especially during prolonged use or in hot climates. Proper setup ensures optimal performance and longevity.
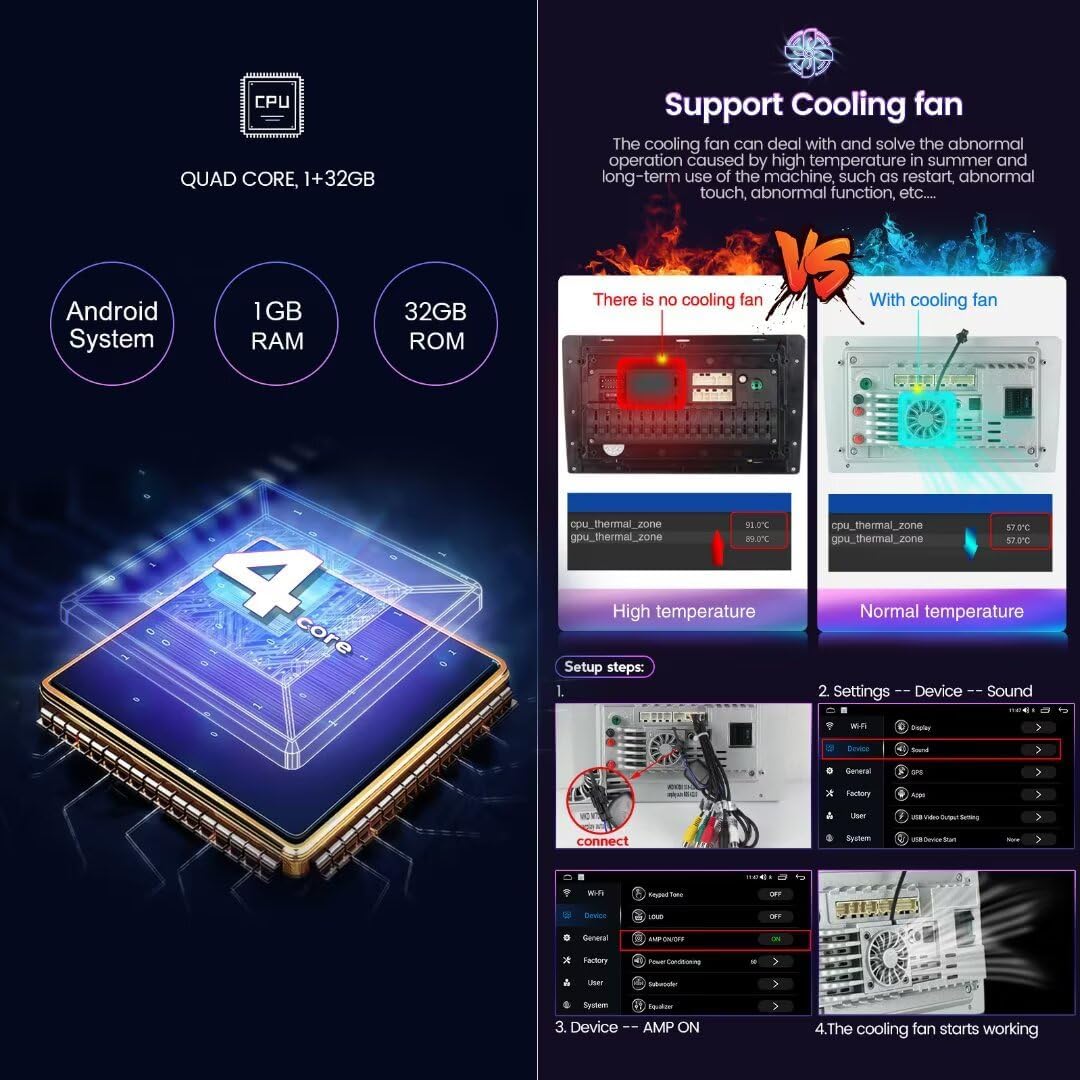
Image 3.1: Illustration of the cooling fan's connection and its effect on CPU temperature, demonstrating a reduction from high to normal temperature with the fan active.
To activate the cooling fan:
- Connect the cooling fan cable to the designated port on the main unit.
- Navigate to Settings > Device > Sound on the unit.
- Under General, ensure AMP ON/OFF is enabled.
- The cooling fan will start automatically when needed.
Note: For complex installations or if you are unsure, professional installation is recommended.

Image 3.2: A visual comparison showing the original car radio setup and the upgraded MekedeTech Android Car Radio installed in the dashboard.
4. Operating Instructions
4.1 Basic Operation
- Power On/Off: Press and hold the power button (usually located on the front panel) to turn the unit on or off. A short press typically mutes/unmutes audio.
- Touch Screen: The 9-inch IPS touch screen responds to standard touch gestures (tap, swipe, pinch-to-zoom).
- Steering Wheel Control: Utilize your vehicle's existing steering wheel controls to manage essential functions like volume, track skipping, and mode selection without taking your hands off the wheel.
4.2 Wireless CarPlay and Android Auto
The unit supports both Wireless CarPlay (for iOS devices) and Wireless Android Auto (for Android devices), allowing seamless integration of your smartphone's features.
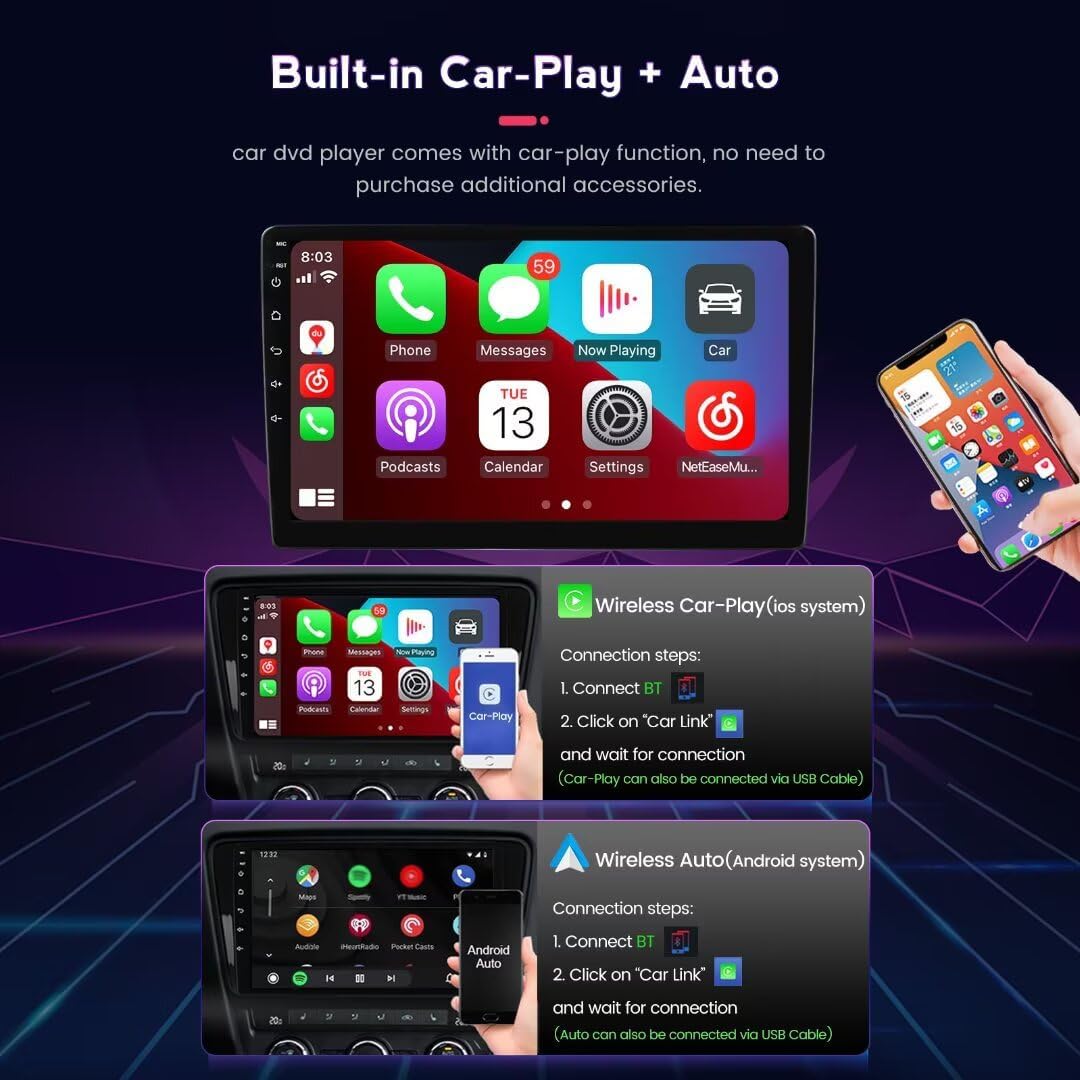
Image 4.1: Visual guide demonstrating the connection process for both Wireless CarPlay (iOS) and Wireless Android Auto (Android) via Bluetooth and the 'Car Link' application.
Connection Steps:
- Ensure Bluetooth is enabled on your smartphone.
- On the car radio, navigate to the 'Car Link' application.
- Pair your smartphone with the car radio via Bluetooth.
- Once paired, the system will automatically initiate CarPlay or Android Auto.
Note: A wired connection via USB cable is also supported for both CarPlay and Android Auto.
4.3 GPS Navigation
The unit features a built-in GPS system with support for offline and online maps. WiFi connectivity enables live traffic updates.
- Supported Maps: The system is compatible with popular navigation applications such as iGO, Navitel, Yandex, and Google Maps.
- Real-time Traffic: Connect to WiFi for up-to-date traffic information.
4.4 FM RDS Radio
Enjoy high-fidelity sound quality with the integrated FM RDS radio. Scan for stations and save your favorites.
4.5 Bluetooth Hands-Free Calling
Connect your smartphone via Bluetooth for hands-free calling. The built-in microphone ensures clear communication.
4.6 Split Screen Display
The split-screen function allows two applications to be displayed simultaneously, enhancing convenience. For example, you can view navigation on one side and control music on the other.

Image 4.2: Demonstrations of the split-screen feature, showing navigation alongside music playback or online video, and the GPS navigation interface with supported map applications.
4.7 WiFi Connectivity
The built-in WiFi module allows you to connect to the internet via a WiFi hotspot, enabling app downloads, online streaming, and real-time updates.
5. Maintenance
To ensure the longevity and optimal performance of your MekedeTech Android Car Radio, follow these maintenance guidelines:
- Screen Cleaning: Use a soft, lint-free cloth slightly dampened with water or a screen cleaner specifically designed for electronics. Avoid harsh chemicals or abrasive materials.
- Software Updates: Periodically check for system updates via the unit's settings menu to ensure you have the latest features and security patches.
- Environmental Conditions: Avoid exposing the unit to extreme temperatures, direct sunlight for prolonged periods, or excessive moisture.
- Cable Connections: Periodically check all cable connections to ensure they are secure and free from damage.
6. Troubleshooting
If you encounter issues with your car radio, refer to the following common troubleshooting steps:
- No Power: Check all power connections and ensure the vehicle's battery is properly connected. Verify the fuse in the power cable.
- No Sound: Check volume settings, ensure cables are properly connected, and verify that the unit is not muted.
- GPS Signal Loss: Ensure the GPS antenna has a clear view of the sky and is securely connected. Move the vehicle to an open area if necessary.
- Bluetooth/CarPlay/Android Auto Connection Issues: Ensure Bluetooth is enabled on both devices. Try unpairing and re-pairing the devices. Restart both the car radio and your smartphone.
- Touch Screen Unresponsive: Perform a soft reset by pressing the reset button (if available) or by turning the vehicle off and on again.
- System Lag/Freezing: Close unnecessary background applications. If the issue persists, a factory reset may be required (note: this will erase all user data).
If these steps do not resolve the issue, please contact customer support.
7. Specifications
| Feature | Specification |
|---|---|
| System | Android 13 OS |
| CPU | 4-Core A53 |
| Memory | 1GB RAM + 32GB ROM |
| Screen Size | 9 inch |
| Display Resolution | 1280*720 IPS Touch Screen |
| Connectivity Technology | Wireless (Bluetooth, WiFi) |
| Special Features | Bluetooth, Touchscreen, Wired Android Auto, Wireless CarPlay, GPS Navigation |
| Map Type | Worldwide |
| Human Interface Input | Buttons, Keyboard, Touchscreen |
| Control Method | Touch |
8. Warranty Information
This MekedeTech Android Car Radio comes with a 1-Year Warranty from the date of purchase. This warranty covers manufacturing defects and malfunctions under normal use. It does not cover damage caused by improper installation, misuse, accidents, or unauthorized modifications.
Please retain your proof of purchase for warranty claims.
9. Support
For technical assistance, warranty claims, or any questions not covered in this manual, please contact MekedeTech customer support through the retailer where the product was purchased or visit the official MekedeTech website for contact information.
