1. Product Overview
The Kalttoy ESP8266 Deauther WiFi Watch is an ESP8266 development board designed to be worn like a smartwatch. It comes pre-installed with the latest ESP8266 Deauther software, enabling users to perform various secure tests on WiFi networks. This device also serves as a versatile development board for creating custom software.
Important Note: This device is a test tool. It is intended for educational and testing purposes on your own devices and networks. It must never be used to cause harm or damage to others' property or networks.
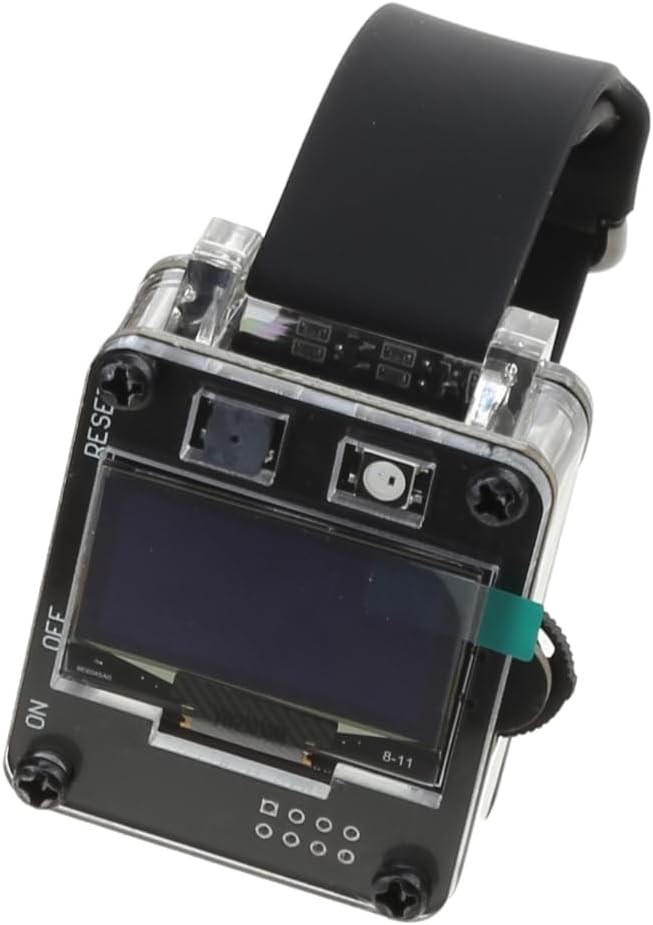
Figure 1: Front view of the Kalttoy ESP8266 Deauther WiFi Watch.
Key Features:
- ESP8266 Development Board: Functions as a standard ESP8266 development platform.
- Wearable Design: Can be worn as a smartwatch for convenience.
- Pre-installed Deauther Software: Ready for WiFi network testing.
- OLED Display: Features a SH1106 1.3" OLED screen for user interaction.
- Integrated Battery: Equipped with an 800 mAh lithium battery for extended operation.
- User Interface: Includes a 3-way momentary slide switch and additional buttons for navigation.
- 2.4 GHz WiFi Support: The ESP8266 module supports 2.4 GHz WiFi networks only.
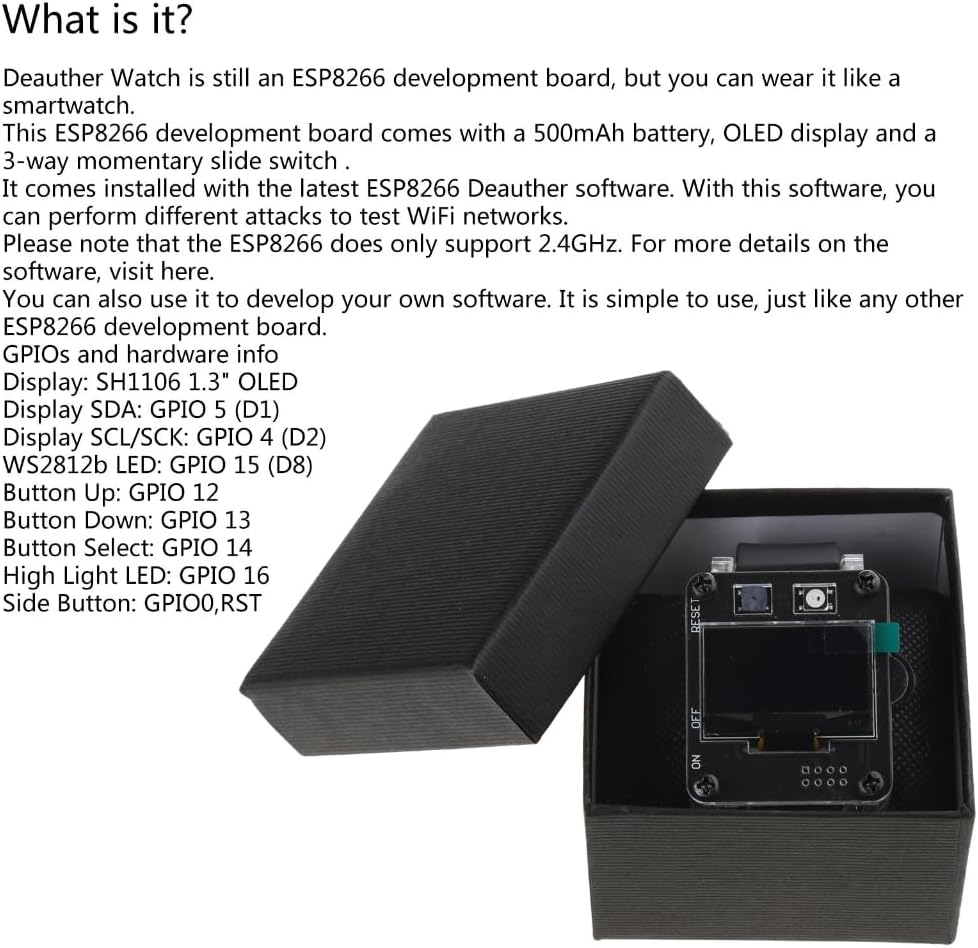
Figure 2: Detailed view of the watch highlighting its features and GPIO pinout.
GPIO and Hardware Information:
- Display: SH1106 1.3" OLED
- Display SDA: GPIO 5 (D1)
- Display SCL/SCK: GPIO 4 (D2)
- WS2812b LED: GPIO 15 (D8)
- Button Up: GPIO 12
- Button Down: GPIO 13
- Button Select: GPIO 14
- High Light LED: GPIO 16
- Side Button: GPIO0, RST
2. Setup
2.1 Initial Charging
Before first use, fully charge the device. The integrated 800 mAh lithium battery provides approximately 8 to 10 hours of operation on a full charge. Connect the device to a standard USB power source using a compatible charging cable (not always included, refer to product packaging). The charging current for V2 models is 0.8A, while V1 models use 0.5A.
2.2 Powering On/Off
Locate the 3-way momentary slide switch on the side of the watch. Slide the switch to the 'ON' position to power on the device. The OLED screen should illuminate. To power off, slide the switch to the 'OFF' position.

Figure 3: Angled view showing the power switch and USB port.
2.3 Software Access and Development
The device comes with the ESP8266 Deauther software pre-installed. For detailed information on the software, including source code and advanced usage, please refer to the official product description or the manufacturer's website. The device can also be used as a standard ESP8266 development board for custom firmware and applications.
3. Operating Instructions
3.1 Basic Navigation
The device features an OLED display and several buttons for interaction:
- Up Button (GPIO 12): Used to scroll up through menus or increase values.
- Down Button (GPIO 13): Used to scroll down through menus or decrease values.
- Select Button (GPIO 14): Used to confirm selections or enter sub-menus.
- Side Button (GPIO0, RST): May function as a reset button or for specific software interactions.
Navigate through the Deauther software menus using these buttons to access various functions and settings.
3.2 Using the Deauther Software
The pre-installed Deauther software allows for various WiFi network testing functionalities. These typically include:
- Scanning: Discovering available 2.4 GHz WiFi networks.
- Deauthentication Attacks: Sending deauthentication frames to disconnect devices from a WiFi network.
- Beacon Flooding: Creating fake WiFi networks.
- Probe Request Flooding: Sending probe requests to specific networks.
For detailed instructions on specific software functions and their parameters, consult the software's documentation, which is typically available on the project's GitHub page or the manufacturer's support resources.
Ethical Use Reminder: Always ensure you have explicit permission before performing any tests on WiFi networks that you do not own or manage. Unauthorized use of this device for network interference is illegal and unethical.
4. Maintenance
4.1 Cleaning
To clean the device, gently wipe the screen and casing with a soft, dry, lint-free cloth. Avoid using abrasive materials, solvents, or harsh chemicals, as these can damage the display or casing. Do not expose the device to excessive moisture.
4.2 Battery Care
To prolong battery life, avoid fully discharging the device frequently. Charge the battery when the charge level is low. If storing the device for an extended period, ensure it is charged to approximately 50% to prevent deep discharge.
4.3 Storage
Store the device in a cool, dry place away from direct sunlight, extreme temperatures, and high humidity. Keep it away from strong magnetic fields and out of reach of children.
5. Troubleshooting
5.1 Device Does Not Power On
- Ensure the battery is sufficiently charged. Connect the device to a power source and allow it to charge for at least 30 minutes before attempting to power it on again.
- Verify the power slide switch is firmly in the 'ON' position.
5.2 Display Issues
- If the display is blank or shows garbled text, try restarting the device.
- Ensure the screen protection (if applicable to your model, V2 has it) is not obstructing the view.
5.3 WiFi Connectivity Problems
- The ESP8266 module only supports 2.4 GHz WiFi networks. Ensure you are attempting to connect to a 2.4 GHz network.
- Verify that the WiFi antenna (if external) is properly connected.
5.4 Device Unresponsive
If the device becomes unresponsive, press the 'RST' (Reset) button, which is typically located near the side button or as part of the side button functionality. This will restart the device without affecting stored data.
6. Specifications
The following table outlines the general specifications and differences between the Deauther Watch V1 and V2 models:

Figure 4: Comparison of Deauther Watch versions.
| Feature | Deauther Watch V1 | Deauther Watch V2 |
|---|---|---|
| Battery Capacity | 500 mAh | 800 mAh |
| Case Material | 3D Printed (YES) | 3D Printed (YES) |
| Screen Protection | No | Yes |
| Battery Indicator | No | Yes |
| Power Switch | Plastic | Metal |
| Charging Current | 0.5A | 0.8A |
| RTC (DS3231) | No | Yes |
| Breakout GPIOs | Yes | Yes |
| Color Options | Black | Black & White |
General Specifications:
- Brand: Kalttoy
- Model Number: 4NB603790_XXC7
- Material: PCB (Printed Circuit Board)
- Connectivity: ESP8266 (2.4 GHz WiFi only)
- Country of Origin: China
7. Warranty and Support
7.1 Warranty Information
Information regarding specific warranty terms for the Kalttoy ESP8266 Deauther WiFi Watch is not available in this manual. Please refer to your purchase documentation or contact the retailer/manufacturer directly for warranty details.
7.2 Spare Parts and Software Updates
Information on the availability of spare parts and guaranteed software updates for this product is currently unavailable. For inquiries, please contact the manufacturer, Kalttoy, or your point of purchase.
7.3 Technical Support
For technical assistance, troubleshooting beyond the scope of this manual, or further information on software development, please reach out to the manufacturer or consult relevant online communities and forums dedicated to ESP8266 development and Deauther projects. The manufacturer's contact information can typically be found on their official website or through your retailer.


